Act-Verify: A Proven Pattern for Building Bulletproof Functional Tests

How can functional tests in automated end-to-end testing verify software meets your user’s expectations? Let’s take a look.
Verifying that your application’s UI meets user expectations through automated end-to-end tests requires more than recording your functional test in the browser by following a predefined test case step by step. It requires switching on a QA logic making sure that what you see during recording is what users get when interacting with your UI, fully in accordance with the application’s expected behavior. I’ll show you how to make the difference.
What Are Functional Tests?
Functional testing is a type of black-box testing which is performed to confirm that the functionality of an application or a system is behaving as expected. In general QA engineers build their functional tests with the only purpose being: to validate the functionality of the software under test. Unfortunately, not all tests we write are good enough to fulfill their true purpose.
In this blog post I will illustrate what it means to build bulletproof functional tests based on practical examples. To demonstrate my idea, I will use Test Studio—a low-code visual testing tool that allows you to create automated end-to-end tests by recording actions in the browser.
When Does Adding Verifications Make Sense and Why?
Before we jump into explaining how to add verifications though, let’s quickly look behind the scenes. As a QA engineer, a vital part of your automation responsibilities is understanding the business layer and making sure that all testing efforts you and your team invest verify certain functionality against a set of business requirements your software needs to fulfil from a user’s perspective. That is also known as end-to-end testing or testing through your users’ eyes.
Common examples of functionality that needs to be verified during automation are the processes of logging in and out, navigating to another page as part of your test case and making sure that page has loaded and all elements are visible, or verifying that the correct product has been added to the shopping cart. Let’s make sense of that by looking closer at one of these examples.
The Login Test Case
Let’s imagine we must automate a sample login page and the test scenario should look like this:
- Navigate to a login page
- Enter username
- Enter password
- Click Login button
Take a look at the following test examples representing the scenario described above.
Example 1:

Example 2:

Do you notice any difference between these tests?
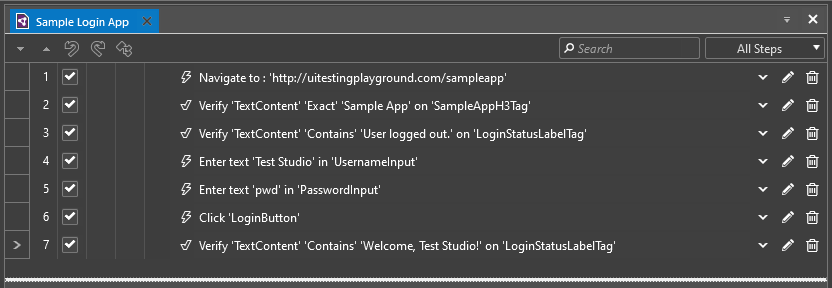
While in Example 1 the test contains only action steps, in Example 2 the test contains action and verification steps. The verification steps in Example 2 play a vital role as they ensure the application has reached a specific state after performing an action step.
While both test examples may pass, only the latter will provide you the confidence that the actual software product matches expected requirements and can ensure that this section of the software product is defect-free. So, if we intend to spend time writing tests, how can we ensure that we write good functional tests?
The Power of Good Functional Tests
We can hijack an idea from a very simple but powerful pattern used in unit testing: the AAA (Arrange-Act-Assert) pattern, which has become almost a standard across the industry.
Editor’s note: Check out this article on doing your first mock, which explains the Arrange-Act-Assert concept.
Similarly, we can use the Act-Verify pattern in our functional tests, which is a great way to structure test cases. As demonstrated in Example 2, each test case should consist of specific test steps that perform certain actions in the application’s UI and should also contain verification steps that ensure the application has reached a specific state after performing the action.
In Test Studio when using the recorder functionality with your actions, you automatically record action steps such as navigating to a page, entering text into an input field, clicking on a button, etc. (refer to Example 1).
However, to build really good functional tests, after performing the required actions you need to perform verifications as well (refer to Example 2). This way we ensure that the application’s functionality we are testing is performing as intended.
Adding Verifications in Test Studio
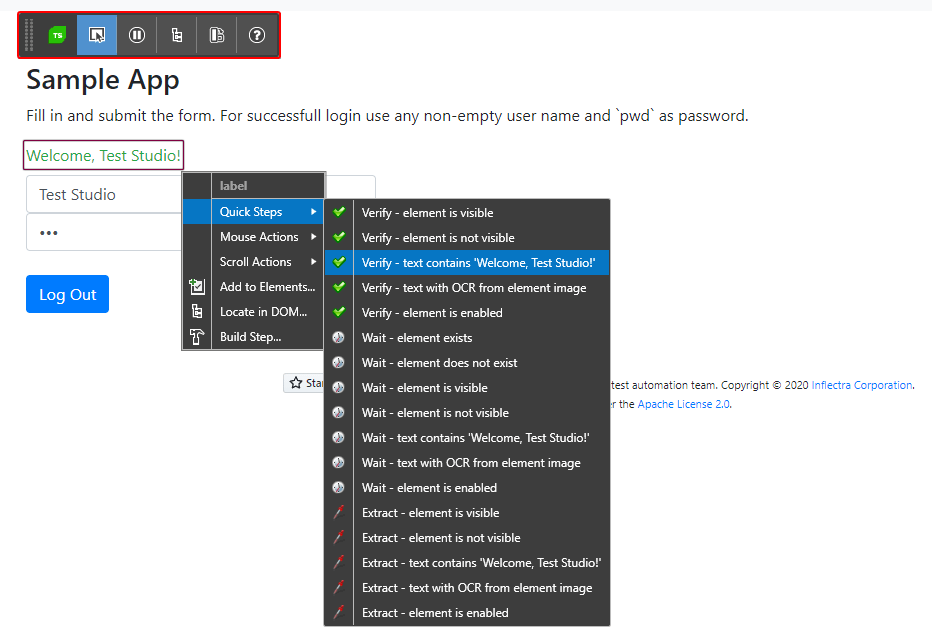
Verifications in Test Studio are not added automatically like action steps while recording, but the process is extremely simple. You can add a quick verification from the context recording menu with the help of the element highlighter like demonstrated below, or build advanced verifications with the Advanced Recording Tools.

Verification Types in Test Studio
The following types are the most-used verifications in Test Studio and can be used to verify the state or the behavior of the web or WPF application elements under test.
- Visible – checks if the element is visible on the web page.
- Exist – checks if the element is present on the web page or DOM tree.
- Content – when adding verification, content is dynamically built against the currently selected element. You can verify element’s InnerText, TextContent, InnerMarkup, etc.
- Attributes – verifies element’s attributes such as element ID, Class, Name or any other custom attribute.
- Image – builds an image verification against specific elements for pixel-by-pixel visual verifications in tests. The image verification feature is based on an element’s visual rendering rather than the properties or attributes of that element.
Make sure to check this blog about understanding validation content element types.
Summary
When writing automated end-to-end tests, it is best practice to add verification steps and validate the application’s behavior in response to actions. This sounds basic, indeed, but it is also fundamental for your testing strategy and how you convert test cases into automated tests.
Adding the right verifications at the right time will also impact the stability—but most importantly the reliability—of your tests. Missing doing so may cause unexpected failures or even worse, falsely passing tests.
Ultimately, knowing where to add verifications and which type of verification you need means that you as a tester are aware of your users’ journey and validate against the business requirements your application’s UI is expected to reflect.

Ivaylo Todorov
Ivaylo is a QA Engineer on the Progress Test Studio team, where he helps build a better and more reliable product. Before starting as a QA Engineer, Ivaylo spent three years as a Technical Support Engineer in Test Studio doing his best to guide customers in their automation endeavours. Ivaylo enjoys skiing, cooking and portrait photography.
