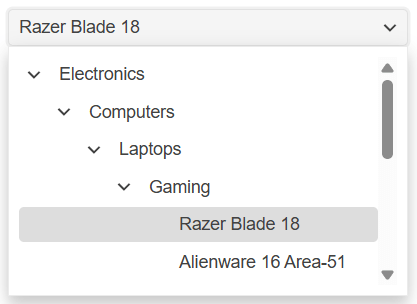
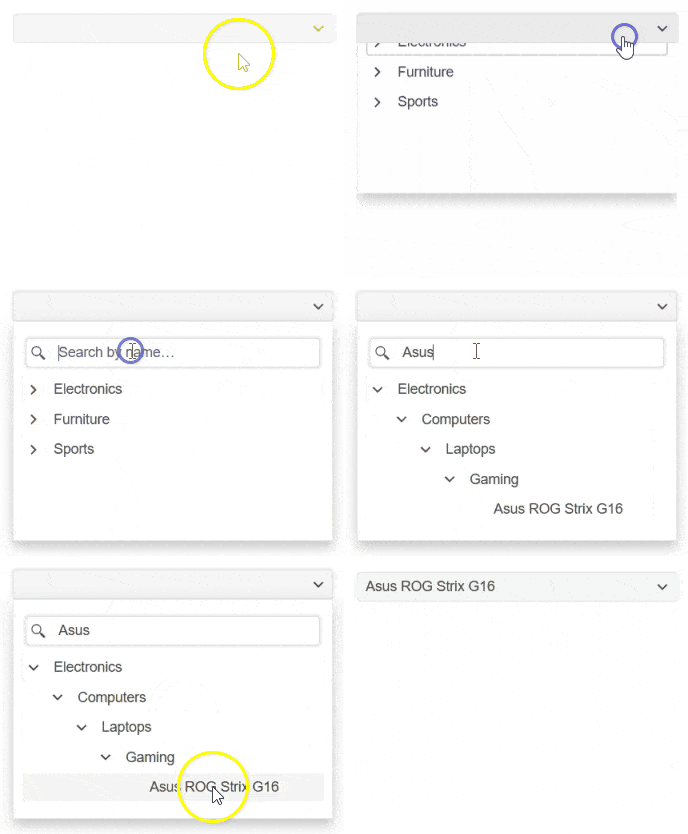
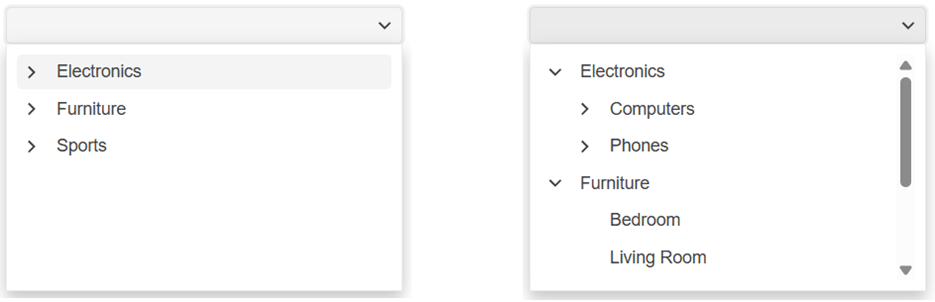
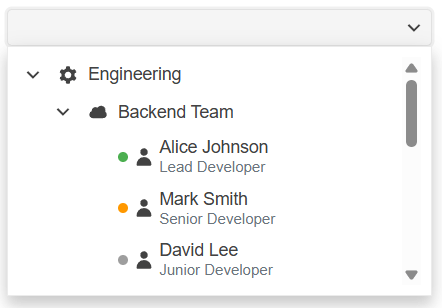
<?xml version="1.0" encoding="UTF-8"?>
<?xml-stylesheet type="text/xsl" media="screen" href="/~files/atom-premium.xsl"?>
                                                                                                                                                                                                                                                                                                                                                                                                                                                                                                                                             
<feed xmlns="http://www.w3.org/2005/Atom" xmlns:feedpress="https://feed.press/xmlns" xmlns:media="http://search.yahoo.com/mrss/" xmlns:podcast="https://podcastindex.org/namespace/1.0">
  <feedpress:locale>en</feedpress:locale>
  <link rel="hub" href="https://feedpress.superfeedr.com/"/>
  <logo>https://static.feedpress.com/logo/telerik-blogs-web-blazor-61850150254c2.jpg</logo>
  <title type="text">Telerik Blogs | Web | Blazor</title>
  <subtitle type="text">The official blog of Progress Telerik - expert articles and tutorials for developers.</subtitle>
  <id>uuid:bb99b1d5-c939-47bf-81f2-0cbf39bfe5ec;id=2805</id>
  <updated>2026-08-24T02:17:02Z</updated>
  <link rel="alternate" href="https://www.telerik.com/"/>
  <link rel="self" type="application/atom+xml" href="https://feeds.telerik.com/blogs/web-blazor"/>
  <entry>
    <id>urn:uuid:d487dffa-56e8-493a-b7b3-47bd62e986a2</id>
    <title type="text">Telerik UI for Blazor vs. Syncfusion Blazor: Which Is Better for Long-Term Application Development?</title>
    <summary type="text">Both Telerik UI for Blazor and Syncfusion Blazor can be used to build complex business applications. See how the two stack up across several evaluation areas.</summary>
    <published>2026-08-18T17:08:35Z</published>
    <updated>2026-08-24T02:17:02Z</updated>
    <author>
      <name>Maya Mateva </name>
    </author>
    <link rel="alternate" href="https://feeds.telerik.com/link/23050/17422356/telerik-ui-blazor-vs-syncfusion-blazor-which-better-long-term-application-development"/>
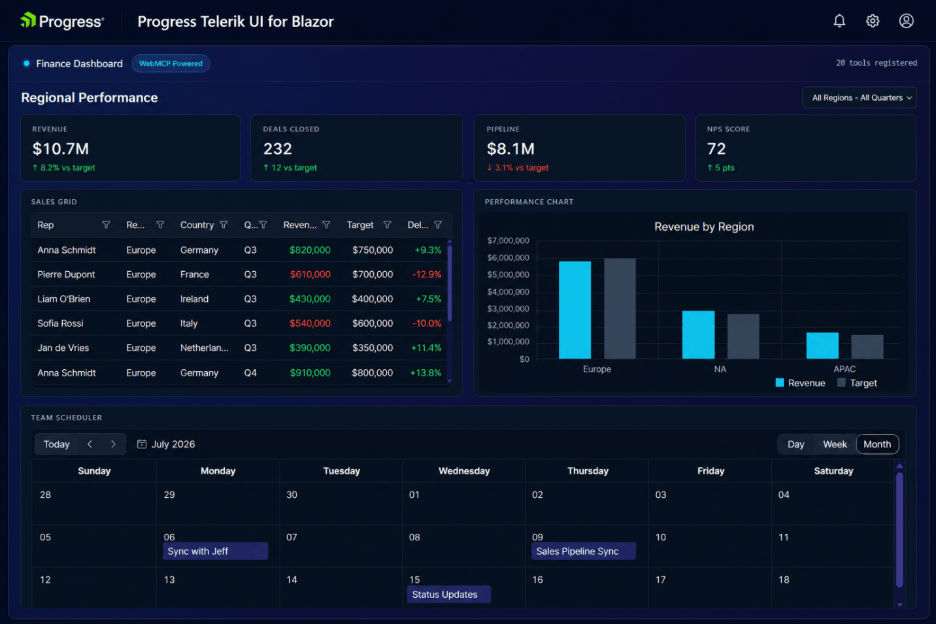
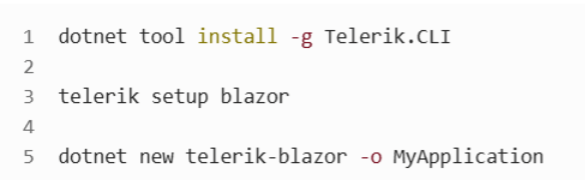
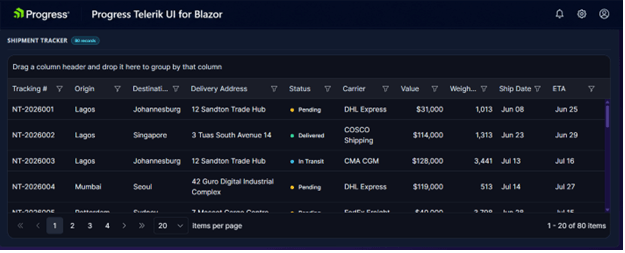
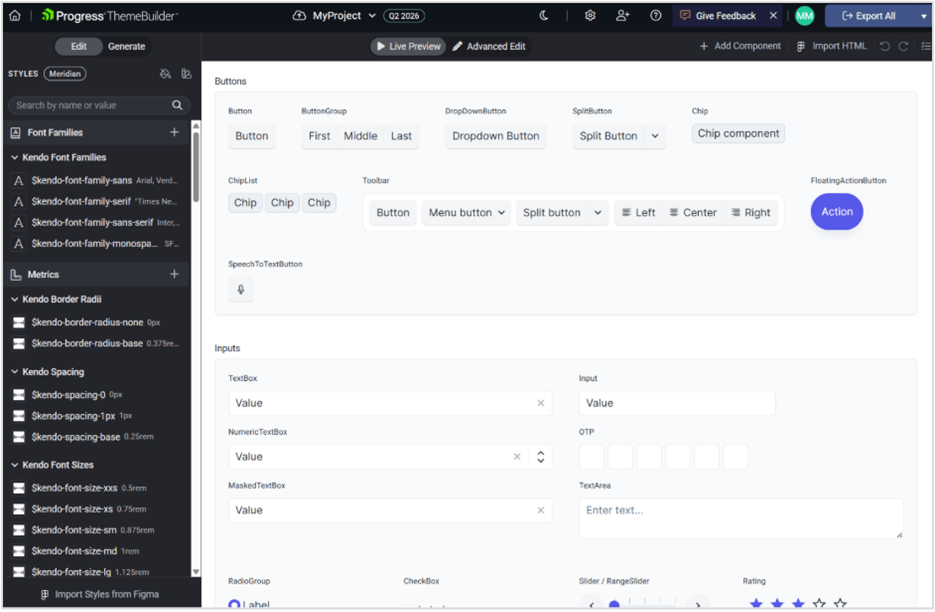
    <content type="text"><![CDATA[<p><span class="featured">Both Telerik UI for Blazor and Syncfusion Blazor can be used to build complex business applications. See how the two stack up across several evaluation areas.</span></p><p>Blazor has become a serious platform for building modern web applications with .NET. As the framework has matured, commercial UI component libraries have become an important part of the Blazor development experience.</p><p>Instead of building every Grid, Chart, Scheduler, Form, Editor, and navigation component from scratch, teams can rely on mature component suites to accelerate development, improve UI quality and reduce long-term maintenance effort. Two of the most common options for Blazor development are <strong>Progress Telerik UI for Blazor</strong> and <strong>Syncfusion Blazor</strong>.</p><p>Both are mature. Both provide large component collections, commercial support, documentation, examples and tooling for .NET developers. Both can be used to build complex business applications.</p><p>The decision is rarely about whether one product is objectively &ldquo;better.&rdquo; A more useful question is: &ldquo;Which library better matches the way your team builds, maintains, upgrades and scales Blazor applications over time?&rdquo;</p><p>At a high level, <strong>Syncfusion Blazor</strong> is attractive for teams that want a very broad component catalog, access to many specialized controls and a Community License for qualifying users. <strong><a target="_blank" href="https://www.telerik.com/blazor-ui">Telerik UI for Blazor</a></strong> is a strong fit for teams that value a cohesive developer experience, predictable APIs, strong theming workflows, product polish, support reputation and long-term maintainability.</p><p>This comparison looks at both products through practical evaluation criteria: onboarding, component coverage, grid capabilities, theming, accessibility, performance, support, AI readiness and long-term project fit.</p><p><img src="https://www.telerik.com/sfimages/default-source/blogs/2026/2026-08/telerik-blazor-dashboard.png?sfvrsn=4c114d9e_2" alt="Blazor Dashboard app" /></p><h2 id="quick-decision-summary">Quick Decision Summary</h2><p>Choose Telerik UI for Blazor if&hellip;</p><ul><li>You are building a long-lived application that will be maintained for several years.</li><li>Multiple developers or product teams will contribute to the same UI codebase.</li><li>You value predictable APIs and standardized implementation patterns.</li><li>You need strong theming, design-token management or designer-developer collaboration.</li><li>You care about upgrade experience, support quality and long-term maintainability.</li><li>You want a component suite that is easy for both developers and AI coding assistants to reason about.</li></ul><h2 id="key-differences-at-a-glance">Key Differences at a Glance</h2><table><style>table,
 th,
    td {
      border: 1px;
      border-color: #bdbdba;
      border-style: dotted;
      border-collapse: collapse;
      margin-right: auto;
      padding: 0in 5.4pt 0in 5.4pt;
      text-align: left;
    }
  </style>
 <thead><tr><th><strong>Evaluation Area</strong></th><th><strong>Telerik UI for Blazor</strong></th><th><strong>Syncfusion Blazor</strong></th></tr></thead><tbody><tr><td>Primary Strength</td><td>Cohesive developer experience, theming, maintainability</td><td>Broad component catalog and ecosystem coverage</td></tr><tr><td>Best Fit</td><td>Long-lived apps, shared UI platforms, design-system driven teams</td><td>Teams prioritizing maximum component availability</td></tr><tr><td>Component Count</td><td>120+ Blazor components</td><td>145+ Blazor components through the Community License page</td></tr><tr><td>Community License</td><td>No equivalent free Community License for qualifying small companies</td><td>Available for qualifying companies and individuals under stated revenue, developer and employee limits</td></tr><tr><td>Theming</td><td>ThemeBuilder with visual customization, CSS/SASS variables, Figma integration, project sharing, version control and user access rights</td><td>Flexible styling and theme customization options</td></tr><tr><td>Accessibility</td><td>Provides a WCAG 2.2 compliance table and Accessibility Conformance Report through VPAT</td><td>Documents WAI-ARIA, WCAG 2.2, Section 508, screen reader, keyboard, color contrast and RTL accessibility support</td></tr><tr><td>Grid</td><td>Strong focus on polished data scenarios, predictable usage patterns and accessibility documentation</td><td>Broad Grid feature set and detailed accessibility documentation</td></tr><tr><td>AI Readiness</td><td>Public documentation references AI/WebMCP-related work in Telerik Blazor docs</td><td>Syncfusion has published Blazor skills and license-related resources for AI-assisted component workflows</td></tr><tr><td>Overall Positioning</td><td>Strong fit when coherence, team productivity and UI governance matter most</td><td>Strong fit when breadth and licensing flexibility matter most</td></tr></tbody></table><br /><h2 id="what-most-teams-eventually-optimize-for">What Most Teams Eventually Optimize For</h2><p>When teams first compare component libraries, they usually start with feature lists.</p><p>That makes sense. Component count, available controls, Grid features, Scheduler options, chart types, templates, exporting and documentation examples are easy to compare.</p><p>But once a Blazor application moves into production, different questions become more important:</p><ul><li>How easy is the application to maintain?</li><li>Can new developers understand the UI code quickly?</li><li>Are component APIs predictable?</li><li>How painful are upgrades?</li><li>Can we apply the same branding across multiple applications?</li><li>Can designers and developers work from the same design system?</li><li>How reliable is support when something breaks?</li><li>Can AI coding assistants generate correct and maintainable UI code?</li></ul><p>This is where the distinction between <strong>breadth</strong> and <strong>cohesion</strong> matters.</p><p>Syncfusion has a strong case when a team wants access to a broad collection of components, related document libraries and specialized controls. Telerik has a very strong case when a team wants a more unified development model, mature theming workflows and a polished component experience across the core UI scenarios that most business applications depend on.</p><p>Neither priority is wrong. The better choice depends on what your team values most.</p><h2 id="time-to-first-value">Time to First Value</h2><p>Feature comparisons are useful, but the first developer experience is usually more practical:</p><ul><li>How do I install the package?</li><li>How do I configure licensing?</li><li>How do I set up NuGet access?</li><li>How do I create the first Blazor project?</li><li>How quickly can I render a real component?</li><li>How many manual steps are required before I can start evaluating the library?</li></ul><p>This is where <strong>time to first value</strong> becomes important.</p><h3 id="time-to-first-value-telerik-ui-for-blazor">Time to First Value: Telerik UI for Blazor</h3><p>Telerik puts a strong emphasis on guided onboarding. The product experience includes getting-started documentation, templates, licensing guidance, CLI-based workflows and integration with Telerik tooling.</p><p>Telerik focuses heavily on onboarding and guided setup, and this includes:</p><ul><li>Structured getting-started documentation</li><li>Starter project guidance</li><li>Project templates and configuration assistance</li><li>Consistent setup patterns across components</li></ul><p>The Telerik CLI can help reduce setup friction by assisting with project creation, package configuration, licensing-related setup, templates and related tooling.</p><p>This matters because early evaluation is not only about installing a NuGet package. It is about reducing the number of small setup decisions that slow teams down before they can assess the actual components.</p><p>The setup becomes as simple as:</p><p><img src="https://www.telerik.com/sfimages/default-source/blogs/2026/2026-08/telerik-cli.png?sfvrsn=d8047b3e_2" width="400" alt="dotnet tool install -g Telerik.CLI  Telerik setup blazor  dotnet new Telerik-blazor -o MyApplication" /></p><p>For larger teams, this kind of guided setup can be useful because new developers do not need to rediscover the same configuration steps independently.</p><h3 id="time-to-first-value-syncfusion-blazor">Time to First Value: Syncfusion Blazor</h3><p>Syncfusion also has a strong onboarding story. Its ecosystem includes product documentation, sample applications and a large collection of examples. The Syncfusion Blazor samples repository describes demos for Blazor Server and Blazor WebAssembly apps, including project files targeting modern .NET versions.</p><p>That breadth of examples can be valuable when a developer is looking for a specific scenario or specialized component behavior.</p><h3 id="time-to-first-value-takeaway">Time-to-First-Value Takeaway</h3><p>For a small proof of concept, both products can get developers started quickly.</p><p>The advantage of Telerik UI is more about guided setup and a cohesive path from installation to production-style usage. Syncfusion&rsquo;s advantage is the large ecosystem of samples.</p><h2 id="component-coverage">Component Coverage</h2><p>Component count is one of the most visible comparison points.</p><p>Syncfusion Blazor is known for broad component coverage. Its Community License page describes access to <strong>145+ Blazor components</strong> for eligible users and organizations. Syncfusion&rsquo;s broader product line also includes UI components, document SDKs and standalone UI SDKs under the Community License description.</p><p>That breadth is a legitimate advantage. Teams that need niche controls, document processing capabilities, PDF-related libraries, Office document support or specialized UI scenarios may find Syncfusion difficult to overlook.</p><p>Telerik UI for Blazor takes a somewhat different approach. It provides a large suite of core Blazor components, but its strongest value proposition is not simply the number of controls. Telerik UI is strongest when the application depends heavily on polished core components such as Grid, Charts, Scheduler, Forms, Inputs, Editors, Layout, Navigation, Upload and theming.</p><p>For many business applications, both libraries cover the essential requirements. The practical difference is often not &ldquo;Does a component exist?&rdquo; but:</p><ul><li>How predictable is it to configure?</li><li>Does it follow familiar patterns from other components in the same suite?</li><li>Does documentation match real development scenarios?</li><li>Is the component easy to theme and maintain?</li><li>Does it fit into a shared UI platform?</li></ul><h3 id="component-coverage-takeaway">Component Coverage Takeaway</h3><p>Syncfusion has the advantage in overall breadth and specialized coverage.</p><p>Telerik has the advantage when teams want a cohesive suite focused on core business application scenarios, polished UI behavior and maintainable implementation patterns.</p><h2 id="the-grid-the-component-that-often-decides-the-evaluation">The Grid: The Component That Often Decides the Evaluation</h2><p>If one component influences UI library decisions more than any other, it is usually the grid.</p><p>Business applications spend a large amount of time displaying, filtering, grouping, sorting, editing, exporting and analyzing data. For many teams, the grid is not just one component. It is the center of the application.</p><p>Both Telerik UI for Blazor and Syncfusion Blazor provide capable Grid components with support for common business scenarios such as:</p><ul><li>Sorting</li><li>Filtering</li><li>Grouping</li><li>Paging</li><li>Virtualization</li><li>Inline editing</li><li>Batch editing</li><li>Templates</li><li>Aggregates</li><li>Exporting</li><li>Hierarchical data</li><li>Large dataset scenarios</li></ul><p>Both vendors can support serious data-heavy applications. In practice, grid performance depends not only on the component itself but also on data access strategy, rendering mode, server communication, virtualization configuration and application architecture.</p><h3 id="telerik-ui-for-blazor-grid">Telerik UI for Blazor Grid</h3><p>The Telerik UI for <a target="_blank" href="https://demos.telerik.com/blazor-ui/grid/overview">Blazor Grid</a> is strongest when teams care about a polished and predictable implementation model.</p><p><img src="https://www.telerik.com/sfimages/default-source/blogs/2026/2026-08/telerik-blazor-grid.png?sfvrsn=3e25ad7e_2" alt="Telerik Blazor grid for shipment tracker" /></p><p>The main advantages are not only feature availability, but how the Grid fits into the broader development experience:</p><ul><li>Predictable configuration patterns</li><li>Strong template support</li><li>Familiar event and data-binding approaches</li><li>Alignment with the rest of the Telerik component suite</li><li>Accessibility-specific documentation</li><li>A mature experience for common business data scenarios</li></ul><p>Telerik Grid accessibility is <strong>WCAG 2.2 AA and Section 508 compliant</strong>, follows WAI-ARIA best practices for keyboard navigation and is tested with popular screen readers. That is a concrete point worth considering for teams building applications with formal accessibility requirements.</p><h3 id="syncfusion-blazor-grid">Syncfusion Blazor Grid</h3><p>The Syncfusion Grid is also highly capable and has a broad feature surface. It is particularly attractive when teams need extensive configuration options or specialized behaviors.</p><p>Syncfusion&rsquo;s Grid supports accessibility standards including ADA, Section 508, WCAG 2.2 and ARIA roles, with details on screen reader support, RTL support, color contrast, mobile device support, keyboard navigation and Axe-core validation.</p><h3 id="grid-takeaway">Grid Takeaway</h3><p>Both Grids are mature and capable.</p><p>Syncfusion&rsquo;s Grid stands out for broad functionality and configurability. The Telerik Grid stands out for a polished developer experience, accessibility documentation and a usage model that tends to fit well into long-lived applications with multiple contributors.</p><p>If your evaluation is based on a specific Grid feature, test that feature in both products. If your evaluation is based on long-term maintainability, onboarding, accessibility and shared implementation patterns, Telerik deserves stronger consideration.</p><h2 id="scheduler-charts-and-dashboards">Scheduler, Charts and Dashboards</h2><p>After the Grid, Scheduler and Charts are often among the most important components in business applications.</p><h3 id="scheduler">Scheduler</h3><p>Both Telerik and Syncfusion support common scheduling scenarios such as:</p><ul><li>Day, week and month views</li><li>Recurring events</li><li>Resource grouping</li><li>Drag-and-drop editing</li><li>Custom templates</li><li>Business calendar scenarios</li></ul><p>Syncfusion is attractive when the team wants broad scenario coverage and many examples.</p><p>Telerik is attractive when the <a target="_blank" href="https://demos.telerik.com/blazor-ui/scheduler/overview">Blazor Scheduler</a> needs to feel like part of the same UI platform as the Grid, Forms, Inputs, Dialogs, Charts and navigation components.</p><h3 id="charts-and-dashboards">Charts and Dashboards</h3><p>Both libraries provide charting capabilities suitable for dashboards, reporting UIs, KPI tracking, analytics screens and business intelligence-style interfaces.</p><p>The distinction is less about whether common chart types exist and more about the surrounding workflow:</p><ul><li>How easily can charts be themed?</li><li>Can they follow the same visual system as the rest of the app?</li><li>Can multiple teams reuse the same design language?</li><li>Can dashboard screens stay visually aligned over time?</li></ul><p>This is where the Telerik theming story becomes especially relevant.</p><h2 id="theming-and-design-system-governance">Theming and Design-System Governance</h2><p>Theming is often underestimated during evaluations.</p><p>At the start of a project, teams usually focus on functionality. Later, especially in long-lived applications, theming becomes a product and architecture concern.</p><p>Questions start to appear:</p><ul><li>Can we align components with our brand?</li><li>Can designers and developers collaborate without translating everything manually?</li><li>Can we reuse themes across multiple applications?</li><li>Can we manage design tokens centrally?</li><li>Can we support light and dark modes?</li><li>Can we avoid one-off CSS overrides that become hard to maintain?</li><li>Can we update the visual language without rewriting large parts of the UI?</li></ul><p>This is one of Progress Telerik UI&rsquo;s clearest differentiators.</p><h3 id="progress-telerik-themebuilder">Progress Telerik ThemeBuilder</h3><p><a href="https://www.telerik.com/themebuilder" target="_blank">Progress Telerik ThemeBuilder</a> is a SaaS tool that enables teams to create custom themes and preview how they affect component appearance. It can generate a CSS file that can be used in a Blazor app instead of a built-in theme.</p><p><img src="https://www.telerik.com/sfimages/default-source/blogs/2026/2026-08/progress-themebuilder-blazor.png?sfvrsn=d5ab735f_2" alt="Progress ThemeBuilder showing button styles" /></p><p>ThemeBuilder also supports capabilities that matter in design-system driven organizations, including:</p><ul><li>Atomic customization</li><li>CSS/SASS variables</li><li>Custom HTML support</li><li>Figma integration</li><li>Theme modes and built-in themes</li><li>Custom fonts and iconography</li><li>Project sharing</li><li>Version control</li><li>Collaboration and user access rights</li></ul><p>This is more than visual customization. It helps teams create a shared styling workflow between design and engineering.</p><p>For organizations with multiple product teams, this can reduce duplicated CSS work, prevent visual drift between applications and make brand updates easier to manage.</p><h3 id="syncfusion-customization">Syncfusion Customization</h3><p>Syncfusion also provides styling and customization options. For many teams, those capabilities will be enough.</p><p>However, if centralized design-system governance is a major requirement, Progress Telerik ThemeBuilder gives it a particularly strong position.</p><h3 id="theming-takeaway">Theming Takeaway</h3><p>Both libraries can be customized.</p><p>Telerik has a clearer advantage when teams need design tokens, Figma-related workflows, centralized branding, visual governance and reusable themes across multiple applications.</p><h2 id="blazor-app-accessibility">Blazor App Accessibility</h2><p>Accessibility should be part of any serious UI library evaluation.</p><p>Teams building applications for public sector, healthcare, finance, education, government or large internal platforms often need to consider:</p><ul><li>WCAG</li><li>Section 508</li><li>Keyboard navigation</li><li>Screen reader support</li><li>WAI-ARIA roles and attributes</li><li>Color contrast</li><li>Accessible interaction alternatives</li><li>Accessibility conformance documentation</li></ul><h3 id="telerik-accessibility">Telerik Accessibility</h3><p><a target="_blank" href="https://www.telerik.com/blazor-ui/documentation/accessibility/compliance#compliance-table">Telerik UI for Blazor provides an accessibility compliance table</a> that lists WCAG 2.2 compliance levels for individual components. Progress Telerik also provides an Accessibility Conformance Report through VPAT.</p><p>For the Grid specifically, Telerik documents WCAG 2.2 AA and Section 508 compliance, WAI-ARIA best practices, keyboard navigation, and screen reader testing.</p><h3 id="syncfusion-accessibility">Syncfusion Accessibility</h3><p>Syncfusion documents accessibility support for Blazor components, including WAI-ARIA, WCAG 2.2, Section 508, keyboard navigation, screen reader support, RTL support and color contrast considerations.</p><p>Syncfusion&rsquo;s DataGrid accessibility documentation also provides a detailed view of supported standards and limitations for complex interactions.</p><h3 id="accessibility-takeaway">Accessibility Takeaway</h3><p>Both vendors take accessibility seriously and provide documentation around standards and component behavior.</p><p>The Telerik component-level compliance table and documented Grid compliance are helpful for teams that need formal accessibility evidence. Syncfusion also provides broad accessibility documentation, including detailed DataGrid accessibility coverage.</p><p>For accessibility-sensitive applications, the best approach is to test the exact components and configurations your application will use.</p><h2 id="support-documentation-and-learning-resources">Support, Documentation and Learning Resources</h2><p>Support quality is hard to capture in a comparison table, but it often becomes critical after adoption.</p><p>During a trial, teams should evaluate:</p><ul><li>How quickly developers find answers in documentation</li><li>Whether examples match real scenarios</li><li>How clear upgrade notes are</li><li>How support handles complex issues</li><li>Whether feedback and bug reports are visible</li><li>Whether the vendor provides practical guidance beyond simple demos</li></ul><h3 id="telerik-ui-for-blazor-support">Telerik UI for Blazor Support</h3><p>Progress Telerik has a long-standing reputation in the ecosystem for polished components, detailed documentation, active forums, feedback channels and strong support. That reputation is one of the reasons Telerik UI is often favored by teams building long-lived applications.</p><p>This should still be validated during evaluation. The best support test is not reading a marketing page. It is submitting realistic trial questions and measuring how useful the answers are.</p><h3 id="syncfusion-blazor-support">Syncfusion Blazor Support</h3><p>Syncfusion also provides commercial support, documentation, samples and a large knowledge base. Its broad ecosystem can be helpful when developers are searching for examples across many controls and scenarios.</p><p>Syncfusion&rsquo;s large sample repository is especially useful when teams want to inspect working examples and compare usage across components.</p><h3 id="support-takeaway">Support Takeaway</h3><p>Both vendors provide serious support and learning resources.</p><p>Telerik UI is often especially attractive for teams that prioritize product polish, support confidence and long-term UI quality. Syncfusion is strong for teams that value broad documentation coverage, many samples and a large ecosystem.</p><h2 id="product-quality-stability-and-upgrade-experience">Product Quality, Stability and Upgrade Experience</h2><p>Product quality is more than whether a component works in a demo.</p><p>For long-lived applications, quality usually means:</p><ul><li>Stable APIs</li><li>Clear documentation</li><li>Predictable behavior</li><li>Accessibility guidance</li><li>Reliable release notes</li><li>Manageable upgrades</li><li>Good support for modern .NET versions</li><li>Transparent handling of bug fixes and breaking changes</li><li>Similar concepts across related components</li></ul><p>This is where the Telerik UI value proposition becomes stronger. Its advantage is not only that the components are polished, but that the suite tends to feel like a coherent product rather than a collection of unrelated controls.</p><p>That can reduce cognitive load for teams. Developers who learn common Telerik concepts in one component often find similar ideas elsewhere in the suite.</p><p>Syncfusion&rsquo;s broader catalog is valuable, but naturally creates a larger surface area to learn, test and govern. That tradeoff may be completely acceptable if the team needs the additional breadth.</p><h3 id="upgrade-experience-takeaway">Upgrade Experience Takeaway</h3><p>For short-lived apps, upgrade experience may not matter much.</p><p>For applications expected to live for several years, upgrade predictability and maintainable implementation patterns become important. Telerik UI is particularly compelling for teams that prioritize those concerns.</p><h2 id="ai-readiness-and-agentic-development">AI Readiness and Agentic Development</h2><p>A few years ago, component library evaluations focused primarily on features, performance and support. Today, many teams are adding another criterion to their evaluation:</p><p><strong>How well does the platform integrate with AI-assisted development workflows?</strong></p><p>The discussion is no longer limited to AI-powered components. Developers increasingly expect AI tools that can help generate interfaces, configure components, validate code, enforce design-system rules and accelerate application development.</p><h3 id="progress-telerik-ai-approach">Progress Telerik AI Approach</h3><p>Progress Telerik has invested in AI-assisted development across several areas of the product ecosystem, combining UI components, AI-powered tooling and agentic workflows into a more complete development experience.</p><p>The foundation of this effort is the <a href="https://www.telerik.com/mcp-servers#ai-coding-assistant" target="_blank">Telerik AI Coding Assistant</a>, which integrates directly into developer workflows through IDE-based experiences, GitHub Copilot extensions, and <a href="https://www.telerik.com/mcp-servers" target="_blank">MCP-based tooling</a>. The assistant can help generate Telerik UI for Blazor code, configure components, scaffold common scenarios, generate sample data and provide implementation guidance using Telerik-specific knowledge rather than generic web examples.</p><p>Beyond code generation, Progress Telerik has introduced an <a href="https://www.telerik.com/mcp-servers#agentic-ui-generator" target="_blank">Agentic UI Generator</a> that uses a collection of specialized assistants working together through an MCP-based architecture. Rather than generating isolated snippets, it can help create complete pages, dashboards, layouts and component configurations while following Telerik component patterns and design-system guidance.</p><p>The platform includes specialized assistants for:</p><ul><li>Page and UI generation</li><li>Component selection and configuration</li><li>Layout creation</li><li>Styling and theming</li><li>Icons and visual assets</li><li>Accessibility guidance</li><li>Validation and quality checks</li><li>Project onboarding and setup workflows</li></ul><p>These capabilities are orchestrated through the Agentic UI Generator, allowing developers to work at a higher level of abstraction when creating Blazor applications.</p><h4 id="telerik-ai-plugins-mcp-and-development-tools">Telerik AI Plugins, MCP and Development Tools</h4><p>One notable aspect of the Telerik AI strategy is the focus on developer tools rather than only AI-enabled components.</p><p>The Telerik MCP-based tooling includes plugin capabilities for:</p><p>![Telerik MCP-based tooling includes UI Generator/Orchestrator, Getting Started Assistant, Component Assistant, Icon Assistant, Layout Assistant, Styling Assistant, Accessibility Assistant, Validator Assistant](/sfimages/default-source/blogs/2026/2026-08/telerik-mcp- plugins)</p><p>This allows AI tools to work with Telerik-specific knowledge instead of relying solely on generic LLM training data, which can help reduce incorrect component usage and configuration errors.</p><p>In addition, Telerik provides AI-enhanced capabilities within its component ecosystem, including AI-powered chat experiences, semantic search scenarios, AI-assisted data operations, AI integrations within Grid and Editor components, WebMCP support, and integration scenarios involving technologies such as <a target="_blank" href="https://demos.telerik.com/blazor-ui/a2ui/ai-a2ui">A2UI</a>, AG-UI and Microsoft Agent Framework.</p><h3 id="syncfusion-ai-position">Syncfusion AI Position</h3><p>Syncfusion is also actively investing in AI-based developer experiences and provides AI-related features, assistants and tooling across its ecosystem. Like Progress Telerik, Syncfusion is exploring AI-assisted development workflows and has published AI-related resources and component skills for developers working with its platform.</p><p>One of Syncfusion&rsquo;s broader advantages remains the size of its overall ecosystem, which includes a large collection of UI components, document processing libraries and developer tools that can participate in AI-assisted workflows.</p><h3 id="ai-readiness-takeaway">AI Readiness Takeaway</h3><p>Which platform has the stronger AI story? Today, both Progress Telerik and Syncfusion are investing in AI.</p><p>The difference is less about whether AI capabilities exist and more about where the investment is focused.</p><p>Syncfusion&rsquo;s strength comes from the breadth of its ecosystem and the large number of controls, libraries, and scenarios available to developers.</p><p>Telerik UI&rsquo;s strength comes from providing an increasingly connected AI development experience that spans:</p><ul><li>AI Coding Assistant</li><li>Agentic UI Generator</li><li>MCP-based development tooling</li><li>Specialized AI assistants</li><li>Validation workflows</li><li>Accessibility guidance</li><li>Design-system alignment</li><li>AI-enhanced components and features</li></ul><p>For teams looking beyond AI-powered controls and toward AI-assisted UI development, Telerik currently offers one of the more comprehensive AI stories available in the Blazor ecosystem. The combination of UI generation, component-aware assistants, validation tooling, theming guidance and MCP integration makes the AI capabilities feel like part of the overall developer workflow rather than a collection of isolated features.</p><aside><hr data-sf-ec-immutable="" /><div class="row"><div class="col-4 u-normal-full u-small-mb0"><h4 class="u-fs20 u-fw5 u-lh125 u-mb0">Progress Telerik Agentic UI Generator vs. Syncfusion Agentic UI Builder</h4></div><div class="col-8"><p class="u-fs16 u-mb0"><a target="_blank" href="https://www.telerik.com/blogs/progress-telerik-agentic-ui-generator-vs-syncfusion-agentic-ui-builder">See how the AI-based UI creation tools</a> from devtools powerhouses Progress and Syncfusion stack up when they go head to head.</p></div></div><hr class="u-mb3" /></aside><h2 id="where-telerik-has-a-clear-advantage">Where Telerik Has a Clear Advantage</h2><p>Telerik is strongest when the team cares less about maximizing the catalog and more about building a maintainable UI platform.</p><p>Telerik is particularly compelling when:</p><ul><li>The application will live for several years.</li><li>Multiple developers or product teams will work in the same codebase.</li><li>The Grid, Forms, Charts, Scheduler and layout components need to feel cohesive.</li><li>Design-system governance matters.</li><li>The team wants strong theming workflows through ThemeBuilder.</li><li>Accessibility evidence is important.</li><li>Support confidence is a major factor.</li><li>AI-assisted development is becoming part of the engineering workflow.</li></ul><p>The clearest Telerik differentiator is ThemeBuilder. Its support for visual customization, variables, Figma integration, theme modes, custom fonts, project sharing, version control and collaboration makes it especially useful for teams that need a structured design-to-development workflow.</p><h2 id="pros-and-cons">Pros and Cons</h2><p><strong>Telerik UI for Blazor</strong></p><table><style>table,
 th,
    td {
      border: 1px;
      border-color: #bdbdba;
      border-style: dotted;
      border-collapse: collapse;
      margin-right: auto;
      padding: 0in 5.4pt 0in 5.4pt;
      text-align: left;
    }
  </style>
 <thead><tr><th><strong>Pros</strong></th><th><strong>Cons</strong></th></tr></thead><tbody><tr><td>Cohesive component suite</td><td>Commercial licensing required</td></tr><tr><td>Strong Grid experience</td><td>Smaller component catalog than Syncfusion (Telerik &ndash; 120+, Syncfusion &ndash; 145+)</td></tr><tr><td>Predictable APIs and implementation patterns</td><td>Fewer niche controls in some specialized areas</td></tr><tr><td>Strong ThemeBuilder and design-system workflow</td><td>Some advanced scenarios may require custom implementation</td></tr><tr><td>Accessibility documentation and compliance resources</td><td>Not the best fit if raw component count is the top priority</td></tr><tr><td>Strong fit for long-lived applications</td><td>&nbsp;</td></tr><tr><td>Good alignment with AI-assisted development trends</td><td>&nbsp;</td></tr><tr><td>Strong support reputation in the .NET ecosystem</td><td>&nbsp;</td></tr></tbody></table><br /><p><strong>Syncfusion Blazor</strong></p><table><style>table,
 th,
    td {
      border: 1px;
      border-color: #bdbdba;
      border-style: dotted;
      border-collapse: collapse;
      margin-right: auto;
      padding: 0in 5.4pt 0in 5.4pt;
      text-align: left;
    }
  </style>
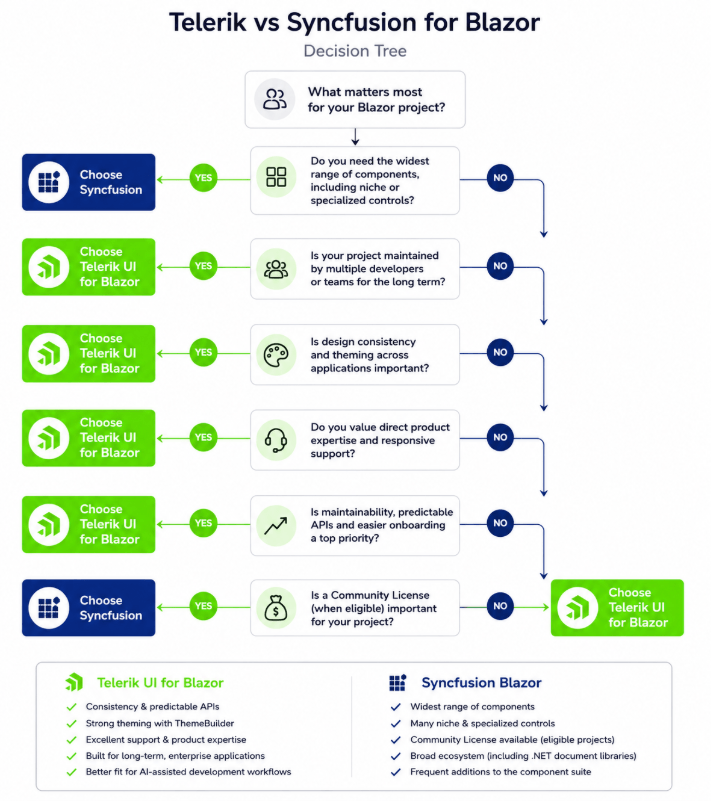
 <thead><tr><th><strong>Pros</strong></th><th><strong>Cons</strong></th></tr></thead><tbody><tr><td>Broad component catalog</td><td>Larger API surface can increase complexity</td></tr><tr><td>Community License for qualifying users</td><td>More governance may be needed to standardize usage</td></tr><tr><td>Document and file-format related ecosystem</td><td>Component experience may vary more across the suite</td></tr><tr><td>Many samples and examples</td><td>Teams should carefully test upgrades and scenario-specific behavior</td></tr><tr><td>Strong specialized-control coverage</td><td>&nbsp;</td></tr></tbody></table><br /><h2 id="decision-framework">Decision Framework</h2><p><img src="https://www.telerik.com/sfimages/default-source/blogs/2026/2026-08/telerik-vs-syncfusion-blazor.png?sfvrsn=ee697bc7_2" alt="Telerik vs Syncfusion for Blazor decision tree" /></p><p><strong>Telerik UI for Blazor is likely the better fit if&hellip;</strong></p><ol><li>The application will be maintained for several years.</li><li>Multiple developers or teams will contribute to the UI.</li><li>You need a shared design system.</li><li>The Grid is central to your application.</li><li>Accessibility documentation is important.</li><li>You want a polished and cohesive development experience.</li><li>Support confidence is part of the buying decision.</li><li>You expect AI-assisted development to become more important.</li><li>You value maintainability more than raw component count.</li></ol><p><strong>Syncfusion Blazor is likely the better fit if&hellip;</strong></p><ol><li>You need the large component catalog.</li><li>You need niche components.</li><li>The Community License applies to you.</li><li>Your team is comfortable managing a larger API surface.</li><li>Your evaluation is primarily driven by breadth and feature availability.</li></ol><h2 id="final-verdict">Final Verdict</h2><p>If your primary goal is maximizing the number of available controls, accessing specialized components, benefiting from a Community License, <strong>Syncfusion Blazor is difficult to overlook</strong>.</p><p>If your priority is building a long-lived Blazor application with a cohesive developer experience, strong theming, accessibility documentation, support confidence, predictable implementation patterns and maintainable UI architecture, <strong>Telerik UI for Blazor offers a very compelling value proposition</strong>.</p><p>The choice comes down to what your team wants to optimize for. Feature breadth matters during evaluation. Maintainability matters in production.</p><p>For teams building applications that need to scale across developers, products, themes, accessibility requirements, and future AI-assisted workflows, <strong>Telerik UI for Blazor stands out as the stronger long-term choice</strong>&mdash;not because Syncfusion is weak, but because Telerik UI for Blazor&rsquo;s strengths align especially well with the needs of structured, design-system driven, maintainable Blazor development.</p><p><a target="_blank" href="https://www.telerik.com/try/ui-for-blazor" class="Btn">Try Telerik UI for Blazor</a></p><img src="https://feeds.telerik.com/link/23050/17422356.gif" height="1" width="1"/>]]></content>
  </entry>
  <entry>
    <id>urn:uuid:68d0b963-eb80-4d92-a001-5ca19733c57f</id>
    <title type="text">Telerik UI for Blazor TaskBoard for Enterprise Workflows</title>
    <summary type="text">See how the Blazor TaskBoard can equip your app with a handy Kanban-style visualized workflow.</summary>
    <published>2026-08-12T20:22:31Z</published>
    <updated>2026-08-24T02:17:02Z</updated>
    <author>
      <name>Dimo Dimov </name>
    </author>
    <link rel="alternate" href="https://feeds.telerik.com/link/23050/17416597/telerik-ui-blazor-taskboard-enterprise-workflows"/>
    <content type="text"><![CDATA[<p><span class="featured">See how the Blazor TaskBoard can equip your app with a handy Kanban-style visualized workflow.</span></p><p>In the modern fast-paced era, teams need more than a simple to-do list. They need structured, visual workflows that reflect real project states, support multiple roles and integrate smoothly into existing processes. The Progress <a target="_blank" href="https://www.telerik.com/blazor-ui/taskboard">Telerik UI for Blazor TaskBoard</a>, also known as a Kanban Board, is purpose-built for exactly that.</p><p>In this post, we will explore the key TaskBoard features and walk through a practical two-role enterprise scenario: an administrator who configures the board and a user who works with the tasks.</p><h2 id="what-is-the-telerik-ui-for-blazor-taskboard">What Is the Telerik UI for Blazor TaskBoard?</h2><p>The <code>TelerikTaskBoard</code> component displays task and progress information as <strong>Cards</strong> organized in <strong>Columns</strong>. The component supports:</p><ul><li>Flexible data binding with convention-based or custom property names</li><li>Drag-and-drop for Cards and Columns</li><li>Built-in and custom toolbar tools</li><li>CRUD operations for Cards and Columns</li><li>A rich event model</li><li>Card priorities with color coding</li><li>Column-level restrictions about the maximum allowed number of Cards</li><li>Customizable templates for Cards and Column headers</li></ul><h3 id="data-binding">Data Binding</h3><p>The TaskBoard recognizes a set of default model property names out of the box, which means you can bind your data without any extra configuration as long as your classes follow the naming convention. For simplicity, the examples in this blog post will follow the default conventions.</p><p>The <code>Status</code> property is the link between Cards and Columns: a Card is rendered inside the Column with a matching <code>Status</code> value. If your domain model uses different property names, you can map them via parameters such as <code>CardStatusField</code>, <code>ColumnStatusField</code>, etc.</p><h4 id="card-model">Card Model</h4><pre class=" language-csharp"><code class="prism  language-csharp"><span class="token keyword">public</span> <span class="token keyword">class</span> <span class="token class-name">TaskBoardCard</span> 
<span class="token punctuation">{</span> 
    <span class="token keyword">public</span> <span class="token keyword">int</span>    Id          <span class="token punctuation">{</span> <span class="token keyword">get</span><span class="token punctuation">;</span> <span class="token keyword">set</span><span class="token punctuation">;</span> <span class="token punctuation">}</span> 
    <span class="token keyword">public</span> <span class="token keyword">int</span>    Index       <span class="token punctuation">{</span> <span class="token keyword">get</span><span class="token punctuation">;</span> <span class="token keyword">set</span><span class="token punctuation">;</span> <span class="token punctuation">}</span> 
    <span class="token keyword">public</span> <span class="token keyword">string</span> Title       <span class="token punctuation">{</span> <span class="token keyword">get</span><span class="token punctuation">;</span> <span class="token keyword">set</span><span class="token punctuation">;</span> <span class="token punctuation">}</span> 
    <span class="token keyword">public</span> <span class="token keyword">string</span> Description <span class="token punctuation">{</span> <span class="token keyword">get</span><span class="token punctuation">;</span> <span class="token keyword">set</span><span class="token punctuation">;</span> <span class="token punctuation">}</span> 
    <span class="token keyword">public</span> <span class="token keyword">string</span> Status      <span class="token punctuation">{</span> <span class="token keyword">get</span><span class="token punctuation">;</span> <span class="token keyword">set</span><span class="token punctuation">;</span> <span class="token punctuation">}</span> 
    <span class="token keyword">public</span> <span class="token keyword">string</span> Priority    <span class="token punctuation">{</span> <span class="token keyword">get</span><span class="token punctuation">;</span> <span class="token keyword">set</span><span class="token punctuation">;</span> <span class="token punctuation">}</span> 
<span class="token punctuation">}</span> 
</code></pre><h4 id="column-model">Column Model</h4><pre class=" language-csharp"><code class="prism  language-csharp"><span class="token keyword">public</span> <span class="token keyword">class</span> <span class="token class-name">TaskBoardColumn</span> 
<span class="token punctuation">{</span> 
    <span class="token keyword">public</span> <span class="token keyword">int</span>                     Index    <span class="token punctuation">{</span> <span class="token keyword">get</span><span class="token punctuation">;</span> <span class="token keyword">set</span><span class="token punctuation">;</span> <span class="token punctuation">}</span> 
    <span class="token keyword">public</span> <span class="token keyword">string</span>                  Status   <span class="token punctuation">{</span> <span class="token keyword">get</span><span class="token punctuation">;</span> <span class="token keyword">set</span><span class="token punctuation">;</span> <span class="token punctuation">}</span> 
    <span class="token keyword">public</span> <span class="token keyword">string</span>                  Title    <span class="token punctuation">{</span> <span class="token keyword">get</span><span class="token punctuation">;</span> <span class="token keyword">set</span><span class="token punctuation">;</span> <span class="token punctuation">}</span> 
    <span class="token keyword">public</span> <span class="token keyword">string</span>                  Width    <span class="token punctuation">{</span> <span class="token keyword">get</span><span class="token punctuation">;</span> <span class="token keyword">set</span><span class="token punctuation">;</span> <span class="token punctuation">}</span> 
    <span class="token keyword">public</span> <span class="token keyword">int</span><span class="token operator">?</span>                    WipLimit <span class="token punctuation">{</span> <span class="token keyword">get</span><span class="token punctuation">;</span> <span class="token keyword">set</span><span class="token punctuation">;</span> <span class="token punctuation">}</span> 
    <span class="token keyword">public</span> <span class="token keyword">bool</span>                    Enabled  <span class="token punctuation">{</span> <span class="token keyword">get</span><span class="token punctuation">;</span> <span class="token keyword">set</span><span class="token punctuation">;</span> <span class="token punctuation">}</span> 
    <span class="token keyword">public</span> TaskBoardColumnButtons<span class="token operator">?</span> Buttons  <span class="token punctuation">{</span> <span class="token keyword">get</span><span class="token punctuation">;</span> <span class="token keyword">set</span><span class="token punctuation">;</span> <span class="token punctuation">}</span> 
<span class="token punctuation">}</span> 
</code></pre><h3 id="drag-and-drop">Drag and Drop</h3><p>Drag-and-drop is the signature UX feature of any Kanban board, and the TaskBoard delivers it with minimal setup.</p><h3 id="dragging-cards">Dragging Cards</h3><p>Card-dragging is enabled by default (<code>CardDraggable="true"</code>). When a user drops a Card into a different column or a different position within the same column, the <code>OnCardMove</code> event fires. Update the Card&rsquo;s <code>Index</code> and <code>Status</code> in the handler:</p><pre class=" language-razor"><code class="prism  language-razor">&lt;TelerikTaskBoard OnCardMove="@OnTaskBoardCardMove" /&gt; 
 
@code { 
    private void OnTaskBoardCardMove(TaskBoardCardMoveEventArgs&lt;TaskBoardCard&gt; args) 
    { 
        args.Item.Index  = args.NewIndex; 
        args.Item.Status = args.NewStatus; 
    } 
} 
</code></pre><h3 id="reordering-columns">Reordering Columns</h3><p>Column reordering is disabled by default (<code>ColumnReorderable="false"</code>). When enabled, the <code>OnColumnReorder</code> event gives you the old and new index so you can update the original data source or cancel the operation:</p><pre class=" language-razor"><code class="prism  language-razor">&lt;TelerikTaskBoard ColumnReorderable="true" 
                  OnColumnReorder="@OnColumnReorder" /&gt; 
 
@code { 
    private void OnColumnReorder(TaskBoardColumnReorderEventArgs&lt;TaskBoardColumn&gt; args) 
    { 
        // Use args.NewIndex to update the original Column data source 
        // or 
        // args.IsCancelled = true; // Revert the reordering 
    } 
} 
</code></pre><h3 id="editing-cards-and-columns">Editing Cards and Columns</h3><p>The TaskBoard supports built-in create, edit and delete operations for both Cards and Columns.</p><h3 id="card-crud-events">Card CRUD Events</h3><p>Each operation requires a corresponding event handler that updates your data collection:</p><pre class=" language-razor"><code class="prism  language-razor">&lt;TelerikTaskBoard CardData="@TaskBoardCards" 
                  OnCardCreate="@OnCreate" 
                  OnCardUpdate="@OnUpdate" 
                  OnCardDelete="@OnDelete" /&gt; 
 
@code { 
    private List&lt;TaskBoardCard&gt; TaskBoardCards { get; set; } = new List&lt;TaskBoardCard&gt;(); 
 
    private void OnCreate(TaskBoardCardCreateEventArgs&lt;TaskBoardCard&gt; args) 
    { 
        args.Item.Id = 12345; 
 
        TaskBoardCards.Add(args.Item); 
    } 
 
    private void OnUpdate(TaskBoardCardUpdateEventArgs&lt;TaskBoardCard&gt; args) 
    { 
        args.OriginalItem.Title       = args.Item.Title; 
        args.OriginalItem.Description = args.Item.Description; 
        args.OriginalItem.Priority    = args.Item.Priority; 
    } 
 
    private void OnDelete(TaskBoardCardDeleteEventArgs&lt;TaskBoardCard&gt; args) 
    { 
        TaskBoardCards.Remove(args.Item); 
    } 
} 
</code></pre><h3 id="column-crud-events">Column CRUD Events</h3><p>Column operations follow the same pattern. When a Column is deleted, the app decides what to do with orphaned Cards&mdash;keep them, delete them or move them to another column:</p><pre class=" language-razor"><code class="prism  language-razor">&lt;TelerikTaskBoard ColumnData="@TaskBoardColumns" 
                  OnColumnCreate="@OnTaskBoardColumnCreate" 
                  OnColumnDelete="@OnTaskBoardColumnDelete" 
                  OnColumnUpdate="@OnTaskBoardColumnUpdate" /&gt; 
 
@code { 
    private List&lt;TaskBoardColumn&gt; TaskBoardColumns { get; set; } = new List&lt;TaskBoardColumn&gt;(); 
 
    private void OnTaskBoardColumnCreate(TaskBoardColumnCreateEventArgs&lt;TaskBoardColumn&gt; args) 
    { 
        args.Item.Status = "new-unique-status"; 
        TaskBoardColumns.Add(args.Item); 
    } 
 
    private void OnTaskBoardColumnDelete(TaskBoardColumnDeleteEventArgs&lt;TaskBoardColumn&gt; args) 
    { 
        TaskBoardColumns.Remove(args.Item); 
    } 
 
    private void OnTaskBoardColumnUpdate(TaskBoardColumnUpdateEventArgs&lt;TaskBoardColumn&gt; args) 
    { 
        args.OriginalItem.Title = args.Item.Title; 
        args.OriginalItem.Status = args.Item.Status; 
        args.OriginalItem.Width = args.Item.Width; 
        args.OriginalItem.WipLimit = args.Item.WipLimit; 
    } 
} 
</code></pre><h3 id="toolbar">ToolBar</h3><p>The <code>TaskBoardToolBar</code> sits above the Columns and provides both built-in and custom tools. With regard to editing, the ToolBar provides a built-in <code>&lt;TaskBoardToolBarAddColumnTool /&gt;</code> component that renders a Button that fires the <code>OnColumnCreate</code> event.</p><pre class=" language-razor"><code class="prism  language-razor">&lt;TelerikTaskBoard&gt; 
    &lt;TaskBoardToolBar&gt; 
        &lt;TaskBoardToolBarAddColumnTool Icon="@SvgIcon.Plus" /&gt; 
    &lt;/TaskBoardToolBar&gt; 
&lt;/TelerikTaskBoard&gt; 
</code></pre><h2 id="two-role-taskboard-use-case">Two-Role TaskBoard Use Case</h2><p>A common pattern separates the board configuration from day-to-day usage. The following samples demonstrate this pattern with two TaskBoard instances that share the same column settings.</p><h3 id="administrator-role-configuring-the-board-columns">Administrator Role: Configuring the Board Columns</h3><p>The administrator starts from an empty <code>TelerikTaskBoard</code> to create and manage the workflow stages (e.g., Backlog, In Progress, Under Review, Done).</p><p>A <code>TelerikGrid</code> with inline editing and row drag-and-drop lets the administrator define the available priority levels and assign a color to each. A <code>TelerikColorPalette</code> editor uses color values from the Telerik CSS theme.</p><pre class=" language-razor"><code class="prism  language-razor">@using System.Text.Json 
 
@inject IJSRuntime JS 
 
&lt;h1&gt;TaskBoard Management&lt;/h1&gt; 
 
&lt;h2&gt;TaskBoard Columns&lt;/h2&gt; 
 
&lt;TelerikTaskBoard CardData="@TaskBoardCards" 
                  ColumnData="@TaskBoardColumns" 
                  ColumnReorderable="true" 
                  Height="300px" 
                  OnColumnCreate="@OnTaskBoardColumnCreate" 
                  OnColumnDelete="@OnTaskBoardColumnDelete" 
                  OnColumnReorder="@OnTaskBoardColumnReorder" 
                  OnColumnUpdate="@OnTaskBoardColumnUpdate" 
                  TColumn="@TaskBoardColumn" 
                  TItem="@TaskBoardCard"&gt; 
    &lt;TaskBoardSettings&gt; 
        &lt;TaskBoardColumnSettings Buttons="@(TaskBoardColumnButtons.EditColumn | TaskBoardColumnButtons.DeleteColumn)" 
                                 Width="300px" /&gt; 
    &lt;/TaskBoardSettings&gt; 
    &lt;TaskBoardToolBar&gt; 
        &lt;TaskBoardToolBarAddColumnTool Icon="@SvgIcon.Plus" /&gt; 
    &lt;/TaskBoardToolBar&gt; 
&lt;/TelerikTaskBoard&gt; 
 
&lt;h2&gt;Task Priorities&lt;/h2&gt; 
 
&lt;TelerikGrid Data="@TaskBoardPriorities" 
             ConfirmDelete="true" 
             EditMode="@GridEditMode.Inline" 
             OnUpdate="@OnGridUpdate" 
             OnCreate="@OnGridCreate" 
             OnDelete="@OnGridDelete" 
             RowDraggable="true" 
             OnRowDrop="@OnGridRowDrop" 
             TItem="@TaskBoardCardPriority"&gt; 
    &lt;GridToolBarTemplate&gt; 
        &lt;GridCommandButton Command="Add"&gt;Add Item&lt;/GridCommandButton&gt; 
    &lt;/GridToolBarTemplate&gt; 
    &lt;GridColumns&gt; 
        &lt;GridColumn Field="@nameof(TaskBoardCardPriority.Text)" /&gt; 
        &lt;GridColumn Field="@nameof(TaskBoardCardPriority.Color)"&gt; 
            &lt;Template&gt; 
                @{ TaskBoardCardPriority priority = (TaskBoardCardPriority)context; } 
                &lt;div class="priority-color"&gt; 
                    &lt;strong style="background-color: @(priority.Color);"&gt;&lt;/strong&gt; 
                    &lt;span&gt;@GetColorKeyword(priority.Color)&lt;/span&gt; 
                &lt;/div&gt; 
            &lt;/Template&gt; 
            &lt;EditorTemplate&gt; 
                @{ TaskBoardCardPriority priority = (TaskBoardCardPriority)context; } 
                &lt;TelerikColorPalette @bind-Value="@priority.Color" 
                                     Colors="@PriorityColors" 
                                     Columns="6" 
                                     Size="@ThemeConstants.ColorPalette.Size.Large" /&gt; 
            &lt;/EditorTemplate&gt; 
        &lt;/GridColumn&gt; 
        &lt;GridCommandColumn Title="Commands"&gt; 
            &lt;GridCommandButton Command="Edit"&gt;Edit&lt;/GridCommandButton&gt; 
            &lt;GridCommandButton Command="Save" ShowInEdit="true"&gt;Save&lt;/GridCommandButton&gt; 
            &lt;GridCommandButton Command="Cancel" ShowInEdit="true"&gt;Cancel&lt;/GridCommandButton&gt; 
            &lt;GridCommandButton Command="Delete"&gt;Delete&lt;/GridCommandButton&gt; 
        &lt;/GridCommandColumn&gt; 
    &lt;/GridColumns&gt; 
&lt;/TelerikGrid&gt; 
 
&lt;TelerikButton OnClick="@OnConfirmTaskBoardClick"&gt;Confirm TaskBoard Configuration&lt;/TelerikButton&gt; 
 
&lt;style&gt; 
    .priority-color { 
        display: flex; 
        align-items: center; 
    } 
 
    .priority-color &gt; strong { 
        display: inline-block; 
        width: 1.2em; 
        height: 1.2em; 
        margin-right: .5em; 
    } 
&lt;/style&gt; 
 
@code { 
    private List&lt;TaskBoardCard&gt; TaskBoardCards { get; set; } = new List&lt;TaskBoardCard&gt;(); 
    private List&lt;TaskBoardColumn&gt; TaskBoardColumns { get; set; } = new List&lt;TaskBoardColumn&gt;(); 
    private List&lt;TaskBoardCardPriority&gt; TaskBoardPriorities { get; set; } = new List&lt;TaskBoardCardPriority&gt;() 
        { 
            new TaskBoardCardPriority() { Text = "Low", Value = "low", Color = "var(--kendo-color-success)" }, 
            new TaskBoardCardPriority() { Text = "Normal", Value = "normal", Color = "var(--kendo-color-info)" }, 
            new TaskBoardCardPriority() { Text = "High", Value = "high", Color = "var(--kendo-color-warning)"}, 
            new TaskBoardCardPriority() { Text = "Critical", Value = "critical", Color = "var(--kendo-color-error)" } 
        }; 
 
    private void OnTaskBoardColumnCreate(TaskBoardColumnCreateEventArgs&lt;TaskBoardColumn&gt; args) 
    { 
            args.Item.Status = $"status-{++LastId}"; 
            TaskBoardColumns.Add(args.Item); 
    } 
 
    private void OnTaskBoardColumnDelete(TaskBoardColumnDeleteEventArgs&lt;TaskBoardColumn&gt; args) 
    { 
        TaskBoardColumns.Remove(args.Item); 
 
        TaskBoardCards.RemoveAll(c =&gt; c.Status == args.Item.Status); 
    } 
 
    private void OnTaskBoardColumnReorder(TaskBoardColumnReorderEventArgs&lt;TaskBoardColumn&gt; args) 
    { 
 
    } 
 
    private void OnTaskBoardColumnUpdate(TaskBoardColumnUpdateEventArgs&lt;TaskBoardColumn&gt; args) 
    { 
        args.OriginalItem.Title = args.Item.Title; 
        args.OriginalItem.Status = args.Item.Status; 
        args.OriginalItem.Width = args.Item.Width; 
        args.OriginalItem.WipLimit = args.Item.WipLimit; 
    } 
 
    private async Task OnConfirmTaskBoardClick() 
    { 
        await JS.InvokeVoidAsync("localStorage.setItem", 
                new object\\\[] { "taskboard-columns", JsonSerializer.Serialize(TaskBoardColumns) }); 
 
        await JS.InvokeVoidAsync("localStorage.setItem", 
                new object\\\[] { "taskboard-priorities", JsonSerializer.Serialize(TaskBoardPriorities) }); 
    } 
 
    private readonly string\\\[] PriorityColors = new string\\\[] 
    { 
        "var(--kendo-color-info)", 
        "var(--kendo-color-primary)", 
        "var(--kendo-color-secondary)", 
        "var(--kendo-color-tertiary)", 
        "var(--kendo-color-inverse)", 
        "var(--kendo-color-success)", 
        "var(--kendo-color-warning)", 
        "var(--kendo-color-error)", 
        "var(--kendo-color-series-b)", 
        "var(--kendo-color-series-c)", 
        "var(--kendo-color-series-d)", 
        "var(--kendo-color-series-f)" 
    }; 
 
    private string GetColorKeyword(string themeColorName) 
    { 
        return themeColorName.Replace("var(--kendo-color-", "").Replace(")", ""); 
    } 
 
    private void OnGridDelete(GridCommandEventArgs args) 
    { 
        TaskBoardCardPriority deletedItem = (TaskBoardCardPriority)args.Items.First(); 
 
        TaskBoardPriorities.Remove(deletedItem); 
    } 
 
    private void OnGridCreate(GridCommandEventArgs args) 
    { 
        TaskBoardCardPriority createdItem = (TaskBoardCardPriority)args.Items.First(); 
 
        TaskBoardPriorities.Insert(0, createdItem); 
    } 
 
    private void OnGridRowDrop(GridRowDropEventArgs&lt;TaskBoardCardPriority&gt; args) 
    { 
        TaskBoardPriorities.Remove(args.Item); 
 
        int destinationItemIndex = TaskBoardPriorities.IndexOf(args.DestinationItem); 
        if (args.DropPosition == GridRowDropPosition.After) 
        { 
            destinationItemIndex++; 
        } 
 
        TaskBoardPriorities.Insert(destinationItemIndex, args.Item); 
    } 
 
    private void OnGridUpdate(GridCommandEventArgs args) 
    { 
        TaskBoardCardPriority updatedItem = (TaskBoardCardPriority)args.Items.First(); 
        int originalItemIndex = TaskBoardPriorities.FindIndex(i =&gt; i.Value == updatedItem.Value); 
 
        if (originalItemIndex != -1) 
        { 
            TaskBoardPriorities\\\[originalItemIndex] = updatedItem; 
        } 
    } 
 
    private int LastId { get; set; } 
 
    public class TaskBoardCard 
    { 
        public string Description { get; set; } = string.Empty; 
        public int Id { get; set; } 
        public int Index { get; set; } 
        public string Priority { get; set; } = string.Empty; 
        public string Status { get; set; } = string.Empty; 
        public string Title { get; set; } = string.Empty; 
    } 
 
    public class TaskBoardColumn 
    { 
        public TaskBoardColumnButtons? Buttons { get; set; } 
        public bool Enabled { get; set; } = true; 
        public int Index { get; set; } 
        public string Status { get; set; } = string.Empty; 
        public string Title { get; set; } = string.Empty; 
        public string Width { get; set; } = string.Empty; 
        public int? WipLimit { get; set; } 
    } 
} 
</code></pre><h3 id="user-role-working-with-tasks">User Role: Working with Tasks</h3><p>The second example demonstrates the user&rsquo;s workspace. It loads the column and priority definitions saved by the administrator and then presents a fully operational <code>TelerikTaskBoard</code> where cards can be created, edited, moved and deleted.</p><p>Notice that the column management buttons are absent, and the user can only manage cards. The <code>TaskBoardSearchBox</code> tool lets them quickly filter cards by title or description. The task priorities automatically color-code the left border of each card.</p><pre class=" language-razor"><code class="prism  language-razor">@using System.Text.Json 
@using Telerik.Blazor.Components.TaskBoard 
 
@inject IJSRuntime JS 
 
&lt;PageTitle&gt;Counter&lt;/PageTitle&gt; 
 
&lt;TelerikTaskBoard CardData="@TaskBoardCards" 
                  ColumnData="@TaskBoardColumns" 
                  ColumnReorderable="true" 
                  Height="600px" 
                  Priorities="@TaskBoardPriorities" 
                  OnCardCreate="@OnTaskBoardCardCreate" 
                  OnCardDelete="@OnTaskBoardCardDelete" 
                  OnCardMove="@OnTaskBoardCardMove" 
                  OnCardUpdate="@OnTaskBoardCardUpdate" 
                  TColumn="@TaskBoardColumn" 
                  TItem="@TaskBoardCard"&gt; 
    &lt;TaskBoardSettings&gt; 
        &lt;TaskBoardColumnSettings Buttons="@(TaskBoardColumnButtons.AddCard)" 
                                 Width="300px" /&gt; 
    &lt;/TaskBoardSettings&gt; 
    &lt;TaskBoardToolBar&gt; 
        &lt;TaskBoardSearchBox /&gt; 
    &lt;/TaskBoardToolBar&gt; 
&lt;/TelerikTaskBoard&gt; 
 
@code { 
    private List&lt;TaskBoardCard&gt; TaskBoardCards { get; set; } = new List&lt;TaskBoardCard&gt;(); 
    private List&lt;TaskBoardColumn&gt; TaskBoardColumns { get; set; } = new List&lt;TaskBoardColumn&gt;(); 
    private List&lt;TaskBoardCardPriority&gt; TaskBoardPriorities { get; set; } = new List&lt;TaskBoardCardPriority&gt;(); 
 
    private void OnTaskBoardCardCreate(TaskBoardCardCreateEventArgs&lt;TaskBoardCard&gt; args) 
    { 
        args.Item.Id = ++LastId; 
 
        // Optionally, add the Card to the bottom of the column 
        //int maxIndexInColumn = TaskBoardCards.Where(c =&gt; c.Status == args.Item.Status).Select(c =&gt; c.Index).DefaultIfEmpty(0).Max(); 
        //args.Item.Index = ++maxIndexInColumn; 
 
        TaskBoardCards.Add(args.Item); 
    } 
 
    private void OnTaskBoardCardDelete(TaskBoardCardDeleteEventArgs&lt;TaskBoardCard&gt; args) 
    { 
        TaskBoardCards.Remove(args.Item); 
    } 
 
    private void OnTaskBoardCardMove(TaskBoardCardMoveEventArgs&lt;TaskBoardCard&gt; args) 
    { 
        args.Item.Index = args.NewIndex; 
        args.Item.Status = args.NewStatus; 
    } 
 
    private void OnTaskBoardCardUpdate(TaskBoardCardUpdateEventArgs&lt;TaskBoardCard&gt; args) 
    { 
        args.OriginalItem.Description = args.Item.Description; 
        args.OriginalItem.Index = args.Item.Index; 
        args.OriginalItem.Priority = args.Item.Priority; 
        args.OriginalItem.Title = args.Item.Title; 
        args.OriginalItem.Status = args.Item.Status; 
    } 
 
    protected override async Task OnAfterRenderAsync(bool firstRender) 
    { 
        if (firstRender) 
        { 
            //TaskBoardColumns = await LocalStorage.GetItem&lt;List&lt;TaskBoardColumn&gt;&gt;("taskboard-columns") ?? new List&lt;TaskBoardColumn&gt;(); 
            //TaskBoardPriorities = await LocalStorage.GetItem&lt;List&lt;TaskBoardCardPriority&gt;&gt;("taskboard-priorities") ?? new List&lt;TaskBoardCardPriority&gt;(); 
 
            string serializedColumns = await JS.InvokeAsync&lt;string&gt;("localStorage.getItem", "taskboard-columns"); 
            TaskBoardColumns = JsonSerializer.Deserialize&lt;List&lt;TaskBoardColumn&gt;&gt;(serializedColumns) ?? new List&lt;TaskBoardColumn&gt;(); 
 
            string serializedPriorities = await JS.InvokeAsync&lt;string&gt;("localStorage.getItem", "taskboard-priorities"); 
            TaskBoardPriorities = JsonSerializer.Deserialize&lt;List&lt;TaskBoardCardPriority&gt;&gt;(serializedPriorities) ?? new List&lt;TaskBoardCardPriority&gt;(); 
 
            StateHasChanged(); 
        } 
    } 
 
    private int LastId { get; set; } 
 
    public class TaskBoardCard 
    { 
        public string Description { get; set; } = string.Empty; 
        public int Id { get; set; } 
        public int Index { get; set; } 
        public string Priority { get; set; } = string.Empty; 
        public string Status { get; set; } = string.Empty; 
        public string Title { get; set; } = string.Empty; 
    } 
 
    public class TaskBoardColumn 
    { 
        public TaskBoardColumnButtons? Buttons { get; set; } 
        public bool Enabled { get; set; } = true; 
        public int Index { get; set; } 
        public string Status { get; set; } = string.Empty; 
        public string Title { get; set; } = string.Empty; 
        public string Width { get; set; } = string.Empty; 
        public int? WipLimit { get; set; } 
 
        public TaskBoardColumn Clone() 
        { 
            return new TaskBoardColumn() 
            { 
                Status = this.Status, 
                Title = this.Title, 
                Width = this.Width, 
                WipLimit = this.WipLimit 
            }; 
        } 
    } 
} 
</code></pre><h2 id="key-takeaways">Key Takeaways</h2><p>The Telerik UI for Blazor TaskBoard fits naturally into enterprise workflows with its data-driven and event-driven architecture. Here are the design principles the examples above demonstrate:</p><ul><li><strong>Separation of concerns</strong> &ndash; Board structure (columns, priorities) lives apart from the task data, enabling role-based access and centralized configuration.</li><li><strong>Convention-based models</strong> &ndash; Default property names (<code>Status</code>, <code>Index</code>, <code>Title</code>, etc.) eliminate boilerplate configuration while still allowing full customization via field-mapping parameters.</li><li><strong>Event-sourced mutations</strong> &ndash; Every user action fires a cancellable event. Your handlers decide what gets persisted and how, making integration with any backend straightforward.</li><li><strong>Progressive disclosure</strong> &ndash; <code>TaskBoardCardSettings</code> and <code>TaskBoardColumnSettings</code> let you show exactly the right buttons to the right roles.</li><li><strong>Theme-aware colors</strong> &ndash; Using CSS theme variables (<code>var(--kendo-color-error)</code>) for priority colors enables visual consistency across Telerik themes with zero extra work.</li></ul><h3 id="resources">Resources</h3><ul><li><a target="_blank" href="https://www.telerik.com/blazor-ui/documentation/components/taskboard/overview">TaskBoard Documentation</a></li><li><a target="_blank" href="https://demos.telerik.com/blazor-ui/taskboard/overview">TaskBoard Live Demos</a></li></ul><h2 id="ready-to-experiment-with-the-taskboard-control">Ready to Experiment with the TaskBoard Control?</h2><p>TaskBoard and 120 other Telerik UI for Blazor components are all available for a free 30-day trial:</p><p><a target="_blank" href="https://www.telerik.com/try/ui-for-blazor" class="Btn">Try Now</a></p><img src="https://feeds.telerik.com/link/23050/17416597.gif" height="1" width="1"/>]]></content>
  </entry>
  <entry>
    <id>urn:uuid:87e533de-18c4-4413-bfa3-86b39bf91ec3</id>
    <title type="text">Simplify Hierarchical Selection in Blazor with the Telerik DropDownTree</title>
    <summary type="text">The Blazor DropDownTree allows you to show hierarchy for data like product searches or organization and department structures down to individual employees, with options for expansion and collapse and breadcrumb displays.</summary>
    <published>2026-08-04T15:48:07Z</published>
    <updated>2026-08-24T02:17:02Z</updated>
    <author>
      <name>Ivan Danchev </name>
    </author>
    <link rel="alternate" href="https://feeds.telerik.com/link/23050/17403334/simplify-hierarchical-selection-blazor-telerik-dropdowntree"/>
    <content type="text"><![CDATA[<p><span class="featured">The Blazor DropDownTree allows you to show hierarchy for data like product searches or organization and department structures down to individual employees, with options for expansion and collapse and breadcrumb displays.</span></p><p>Hierarchical data is everywhere. Product catalogs, organizational structures, file systems, geographical regions and permission models all rely on parent-child relationships to help users understand and navigate information.</p><p>The challenge appears when users need to select something from that hierarchy.</p><p>A traditional dropdown works well for flat lists, but once the number of items grows, users lose important context. A product category called &ldquo;Gaming Laptops&rdquo; means much more when users can see that it belongs under &ldquo;Electronics &rarr; Computers &rarr; Laptops.&rdquo;</p><p>A TreeView solves the navigation problem, but it is not always the right fit inside a form. Keeping a large hierarchy permanently visible can consume valuable screen space.</p><p>This is where the Progress Telerik UI for <a target="_blank" href="https://www.telerik.com/blazor-ui/dropdowntree">Blazor DropDownTree</a> comes in.</p><p>The DropDownTree combines the compact experience of a dropdown with the navigation capabilities of a <a target="_blank" href="https://www.telerik.com/blazor-ui/treeview">TreeView</a>, allowing users to browse, search and select hierarchical data without overwhelming the UI.</p><p>In this article, we will explore how to use the DropDownTree to:</p><ul><li>Display hierarchical data</li><li>Help users quickly find items</li><li>Make working with hierarchical data more intuitive</li><li>Customize the appearance of nodes</li><li>Customize the selected value display</li></ul><h2 id="why-choose-a-dropdowntree">Why Choose a DropDownTree?</h2><p>When working with hierarchical data, choosing the right component can make a significant difference in the user experience.</p><p>A standard dropdown or <a target="_blank" href="https://www.telerik.com/blazor-ui/combobox">ComboBox</a> is ideal for flat data, but it does not provide context about how items relate to each other. A TreeView preserves the hierarchy, but it is always visible and may not fit well inside forms where space is limited.</p><p>The DropDownTree combines the best of both approaches.</p><table><style>table,
 th,
        td {
            border: 1px;
            border-color: #bdbdba;
            border-style: dotted;
            border-collapse: collapse;
            margin-right: auto;
            padding: 0in 5.4pt 0in 5.4pt;
            text-align: left;
        }
    </style>
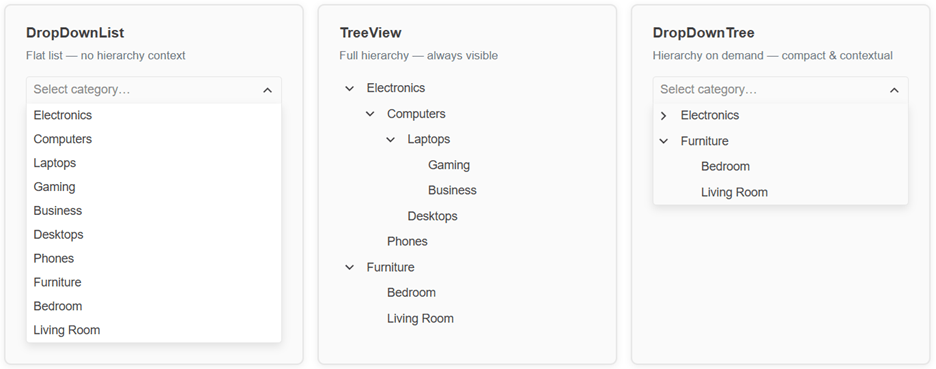
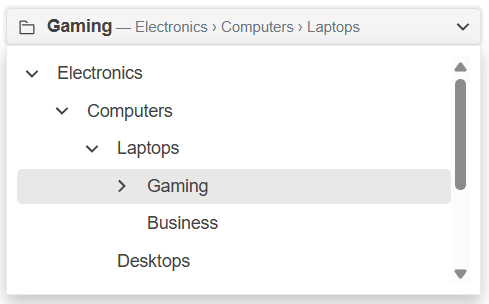
 <thead><tr><th>Component</th><th>Best For</th></tr></thead><tbody><tr><td>DropDownList</td><td>Selecting from a small flat list</td></tr><tr><td>ComboBox</td><td>Searching and selecting from large flat datasets</td></tr><tr><td>TreeView</td><td>Browsing and managing visible hierarchies</td></tr><tr><td>DropDownTree</td><td>Selecting items from hierarchical data in a compact UI</td></tr></tbody></table><br /><p>If your users need to select something from a hierarchy but don&rsquo;t need the hierarchy visible all the time, the DropDownTree is often the right choice.</p><p><img src="https://www.telerik.com/sfimages/default-source/blogs/2026/2026-07/compare-dropdown-treview-dropdowntree.png?sfvrsn=a7309ec7_2" alt="Side-by-side comparison: DropDownList with flat categories, TreeView with expanded categories, DropDownTree combining dropdown + hierarchy" /></p><h2 id="how-can-you-display-hierarchical-data">How Can You Display Hierarchical Data?</h2><p>Let&rsquo;s start with a common scenario: a product catalog.</p><p>Imagine an inventory application with categories like:</p><pre><code>Electronics
&nbsp;&nbsp;Computers
&nbsp;&nbsp;&nbsp;&nbsp;Laptops
&nbsp;&nbsp;&nbsp;&nbsp;&nbsp;&nbsp;Gaming
&nbsp;&nbsp;&nbsp;&nbsp;&nbsp;&nbsp;Business
&nbsp;&nbsp;&nbsp;&nbsp;Phones
Furniture
&nbsp;&nbsp;Bedroom
&nbsp;&nbsp;Living Room
</code></pre><p>Displaying this structure in a flat dropdown would quickly become difficult to use. The DropDownTree allows you to bind directly to hierarchical data, including data that comes from a database through a service.</p><h2 id="the-data-model">The Data Model</h2><p>The component works with a recursive DTO where each node holds its own children:</p><pre class=" language-csharp"><code class="prism  language-csharp"><span class="token keyword">public</span> <span class="token keyword">class</span> <span class="token class-name">HierarchicalTreeItemDto</span>
<span class="token punctuation">{</span>
    <span class="token keyword">public</span> <span class="token keyword">int</span> TreeItemId <span class="token punctuation">{</span> <span class="token keyword">get</span><span class="token punctuation">;</span> <span class="token keyword">set</span><span class="token punctuation">;</span> <span class="token punctuation">}</span>
    <span class="token keyword">public</span> <span class="token keyword">string</span> Text <span class="token punctuation">{</span> <span class="token keyword">get</span><span class="token punctuation">;</span> <span class="token keyword">set</span><span class="token punctuation">;</span> <span class="token punctuation">}</span>
    <span class="token keyword">public</span> <span class="token keyword">bool</span> HasChildren <span class="token operator">=</span><span class="token operator">&gt;</span> Items<span class="token operator">?</span><span class="token punctuation">.</span>Count <span class="token operator">&gt;</span> <span class="token number">0</span><span class="token punctuation">;</span>
    <span class="token keyword">public</span> List<span class="token operator">&lt;</span>HierarchicalTreeItemDto<span class="token operator">&gt;</span> Items <span class="token punctuation">{</span> <span class="token keyword">get</span><span class="token punctuation">;</span> <span class="token keyword">set</span><span class="token punctuation">;</span> <span class="token punctuation">}</span> <span class="token operator">=</span> <span class="token keyword">new</span><span class="token punctuation">(</span><span class="token punctuation">)</span><span class="token punctuation">;</span>
<span class="token punctuation">}</span>
</code></pre><p><code>HasChildren</code> is computed from <code>Items.Count</code>, so it never goes out of sync with the actual data.</p><p><strong>The Component and Binding</strong></p><pre class=" language-csharp"><code class="prism  language-csharp">@inject HierarchicalTreeItemService HierarchicalTreeItemService

<span class="token operator">&lt;</span>TelerikDropDownTree Data<span class="token operator">=</span><span class="token string">"@DropDownTreeData"</span>
                     @bind<span class="token operator">-</span>Value<span class="token operator">=</span><span class="token string">"@DropDownTreeValue"</span>
                     @bind<span class="token operator">-</span>ExpandedItems<span class="token operator">=</span><span class="token string">"@DropDownTreeExpandedItems"</span>
                     ValueField<span class="token operator">=</span><span class="token string">"TreeItemId"</span>
                     Filterable<span class="token operator">=</span><span class="token string">"true"</span>
                     FilterOperator<span class="token operator">=</span><span class="token string">"@StringFilterOperator.Contains"</span>
                     FilterPlaceholder<span class="token operator">=</span><span class="token string">"Search by name"</span><span class="token operator">&gt;</span>

    <span class="token operator">&lt;</span>DropDownTreeBindings<span class="token operator">&gt;</span>
        <span class="token operator">&lt;</span>DropDownTreeBinding TextField<span class="token operator">=</span><span class="token string">"Text"</span> ItemsField<span class="token operator">=</span><span class="token string">"Items"</span> <span class="token operator">/</span><span class="token operator">&gt;</span>
    <span class="token operator">&lt;</span><span class="token operator">/</span>DropDownTreeBindings<span class="token operator">&gt;</span>

<span class="token operator">&lt;</span><span class="token operator">/</span>TelerikDropDownTree<span class="token operator">&gt;</span>

@code <span class="token punctuation">{</span>
    <span class="token keyword">private</span> List<span class="token operator">&lt;</span>HierarchicalTreeItemDto<span class="token operator">&gt;</span> DropDownTreeData <span class="token punctuation">{</span> <span class="token keyword">get</span><span class="token punctuation">;</span> <span class="token keyword">set</span><span class="token punctuation">;</span> <span class="token punctuation">}</span>
    <span class="token keyword">private</span> <span class="token keyword">int</span> DropDownTreeValue <span class="token punctuation">{</span> <span class="token keyword">get</span><span class="token punctuation">;</span> <span class="token keyword">set</span><span class="token punctuation">;</span> <span class="token punctuation">}</span>
    <span class="token keyword">private</span> IEnumerable<span class="token operator">&lt;</span><span class="token keyword">object</span><span class="token operator">&gt;</span> DropDownTreeExpandedItems <span class="token punctuation">{</span> <span class="token keyword">get</span><span class="token punctuation">;</span> <span class="token keyword">set</span><span class="token punctuation">;</span> <span class="token punctuation">}</span> <span class="token operator">=</span> <span class="token keyword">new</span> <span class="token class-name">List</span><span class="token operator">&lt;</span><span class="token keyword">object</span><span class="token operator">&gt;</span><span class="token punctuation">(</span><span class="token punctuation">)</span><span class="token punctuation">;</span>

    <span class="token keyword">protected</span> <span class="token keyword">override</span> <span class="token keyword">void</span> <span class="token function">OnInitialized</span><span class="token punctuation">(</span><span class="token punctuation">)</span>
    <span class="token punctuation">{</span>
        DropDownTreeData <span class="token operator">=</span> HierarchicalTreeItemService<span class="token punctuation">.</span><span class="token function">GetHierarchicalTreeItems</span><span class="token punctuation">(</span><span class="token punctuation">)</span><span class="token punctuation">.</span><span class="token function">ToList</span><span class="token punctuation">(</span><span class="token punctuation">)</span><span class="token punctuation">;</span>
        DropDownTreeExpandedItems <span class="token operator">=</span> DropDownTreeData<span class="token punctuation">.</span><span class="token function">Where</span><span class="token punctuation">(</span>x <span class="token operator">=</span><span class="token operator">&gt;</span> x<span class="token punctuation">.</span>HasChildren<span class="token punctuation">)</span><span class="token punctuation">.</span><span class="token generic-method function">ToList<span class="token punctuation">&lt;</span><span class="token keyword">object</span><span class="token punctuation">&gt;</span></span><span class="token punctuation">(</span><span class="token punctuation">)</span><span class="token punctuation">;</span>
    <span class="token punctuation">}</span>
<span class="token punctuation">}</span>
</code></pre><ul><li><code>Data</code> &ndash; The root-level collection. The component recursively reads <code>ItemsField</code> to build the full tree; it never calls the service itself.</li><li><code>@bind-Value</code> &ndash; Two-way binding for the selected node&rsquo;s key. Updates <code>DropDownTreeValue</code> with the chosen <code>TreeItemId</code>.</li><li><code>@bind-ExpandedItems</code> &ndash; Controls which nodes are open. Prepopulating it with the root nodes that have children means users see the top-level structure the moment they open the dropdown.</li><li><code>DropDownTreeBinding</code> &ndash; Tells the component which property is the display label (<code>TextField</code>) and which holds the children (<code>ItemsField</code>). These match the DTO property names exactly. </li></ul><p><code>GetHierarchicalTreeItems()</code> is where your data-access logic lives. It queries the database and maps the results into the <code>HierarchicalTreeItemDto</code> hierarchy. The component receives a ready-made tree; it has no knowledge of where the data came from.</p><p>An exemplary Product category hierarchy displayed inside the DropDownTree:</p><p><img src="https://www.telerik.com/sfimages/default-source/blogs/2026/2026-07/product-hierarchy-dropdowntree.png?sfvrsn=c40920c8_2" alt="Electronics – Computers – Laptops – Gaming – Razer Blade 18" /></p><blockquote><p><strong> Tip:</strong> If your application already uses hierarchical DTOs, you can often bind them directly without flattening or restructuring your data.</p></blockquote><h2 id="how-can-users-find-items-faster">How Can Users Find Items Faster?</h2><p>Large hierarchies can quickly become difficult to navigate manually. Imagine a catalog containing thousands of products organized across multiple category levels.</p><p>Instead of expanding nodes one by one, users can search directly. Filtering is enabled with a single parameter:</p><pre class=" language-html"><code class="prism  language-html"><span class="token tag"><span class="token tag"><span class="token punctuation">&lt;</span>TelerikDropDownTree</span> <span class="token attr-name">Data</span><span class="token attr-value"><span class="token punctuation">=</span><span class="token punctuation">"</span>@CatalogData<span class="token punctuation">"</span></span>
                     <span class="token attr-name">@bind-Value</span><span class="token attr-value"><span class="token punctuation">=</span><span class="token punctuation">"</span>@SelectedValue<span class="token punctuation">"</span></span>
                     <span class="token attr-name">@bind-ExpandedItems</span><span class="token attr-value"><span class="token punctuation">=</span><span class="token punctuation">"</span>@ExpandedItems<span class="token punctuation">"</span></span>
                     <span class="token attr-name">ValueField</span><span class="token attr-value"><span class="token punctuation">=</span><span class="token punctuation">"</span>@nameof(CategoryItem.Id)<span class="token punctuation">"</span></span>
                     <span class="token attr-name">Filterable</span><span class="token attr-value"><span class="token punctuation">=</span><span class="token punctuation">"</span>true<span class="token punctuation">"</span></span>
                     <span class="token attr-name">FilterOperator</span><span class="token attr-value"><span class="token punctuation">=</span><span class="token punctuation">"</span>@StringFilterOperator.Contains<span class="token punctuation">"</span></span>
                     <span class="token attr-name">FilterPlaceholder</span><span class="token attr-value"><span class="token punctuation">=</span><span class="token punctuation">"</span>Search by name&hellip;<span class="token punctuation">"</span></span><span class="token punctuation">&gt;</span></span>
    <span class="token tag"><span class="token tag"><span class="token punctuation">&lt;</span>DropDownTreeBindings</span><span class="token punctuation">&gt;</span></span>
        <span class="token tag"><span class="token tag"><span class="token punctuation">&lt;</span>DropDownTreeBinding</span> <span class="token attr-name">TextField</span><span class="token attr-value"><span class="token punctuation">=</span><span class="token punctuation">"</span>@nameof(CategoryItem.Name)<span class="token punctuation">"</span></span>
                             <span class="token attr-name">ItemsField</span><span class="token attr-value"><span class="token punctuation">=</span><span class="token punctuation">"</span>@nameof(CategoryItem.Children)<span class="token punctuation">"</span></span> <span class="token punctuation">/&gt;</span></span>
    <span class="token tag"><span class="token tag"><span class="token punctuation">&lt;/</span>DropDownTreeBindings</span><span class="token punctuation">&gt;</span></span>
<span class="token tag"><span class="token tag"><span class="token punctuation">&lt;/</span>TelerikDropDownTree</span><span class="token punctuation">&gt;</span></span>
</code></pre><p>Setting <code>Filterable="true"</code> adds a search box at the top of the popup. <code>FilterOperator</code> controls the matching strategy. <code>Contains</code> is the most user-friendly choice. <code>FilterPlaceholder</code> sets the hint text inside the search field.</p><p>Now users can quickly locate deeply nested items. For example, searching for a specific laptop brand, e.g., &ldquo;Asus,&rdquo; can immediately reveal:</p><pre><code>&nbsp;Electronics
&nbsp;&nbsp;Computers
&nbsp;&nbsp;&nbsp;Laptops
&nbsp;&nbsp;&nbsp;&nbsp;Gaming
&nbsp;&nbsp;&nbsp;&nbsp;&nbsp;Asus ROG Strix G16
</code></pre><p><img src="https://www.telerik.com/sfimages/default-source/blogs/2026/2026-07/search-dropdowntree.gif?sfvrsn=405a4903_2" alt="User types in Asus, and Asus ROG Strix G16 comes up, showing the breadcrumb of categories" /></p><h2 id="how-can-you-make-navigation-more-intuitive">How Can You Make Navigation More Intuitive?</h2><p>Sometimes the best experience is to show users the available structure immediately. Displaying top-level product categories expanded when the popup opens makes it easier to understand what options are available.</p><p>The DropDownTree lets you control which nodes are expanded through <code>@bind-ExpandedItems</code>. You can initialize the expanded set programmatically in <code>OnInitialized</code>:</p><pre class=" language-csharp"><code class="prism  language-csharp"><span class="token keyword">protected</span> <span class="token keyword">override</span> <span class="token keyword">void</span> <span class="token function">OnInitialized</span><span class="token punctuation">(</span><span class="token punctuation">)</span>
<span class="token punctuation">{</span>
    <span class="token comment">// Expand all root-level categories on load</span>
    ExpandedItems <span class="token operator">=</span> CatalogData
        <span class="token punctuation">.</span><span class="token function">Where</span><span class="token punctuation">(</span>item <span class="token operator">=</span><span class="token operator">&gt;</span> item<span class="token punctuation">.</span>Children<span class="token operator">?</span><span class="token punctuation">.</span>Count <span class="token operator">&gt;</span> <span class="token number">0</span><span class="token punctuation">)</span>
        <span class="token punctuation">.</span><span class="token generic-method function">Cast<span class="token punctuation">&lt;</span><span class="token keyword">object</span><span class="token punctuation">&gt;</span></span><span class="token punctuation">(</span><span class="token punctuation">)</span>
        <span class="token punctuation">.</span><span class="token function">ToList</span><span class="token punctuation">(</span><span class="token punctuation">)</span><span class="token punctuation">;</span>
<span class="token punctuation">}</span>
</code></pre><p>You can also include buttons that let users expand or collapse all nodes at once:</p><pre class=" language-html"><code class="prism  language-html"><span class="token tag"><span class="token tag"><span class="token punctuation">&lt;</span>TelerikButton</span> <span class="token attr-name">OnClick</span><span class="token attr-value"><span class="token punctuation">=</span><span class="token punctuation">"</span>@ExpandRoots<span class="token punctuation">"</span></span> <span class="token attr-name">ThemeColor</span><span class="token attr-value"><span class="token punctuation">=</span><span class="token punctuation">"</span>@ThemeConstants.Button.ThemeColor.Primary<span class="token punctuation">"</span></span><span class="token punctuation">&gt;</span></span>
    Expand Root Categories
<span class="token tag"><span class="token tag"><span class="token punctuation">&lt;/</span>TelerikButton</span><span class="token punctuation">&gt;</span></span>
<span class="token tag"><span class="token tag"><span class="token punctuation">&lt;</span>TelerikButton</span> <span class="token attr-name">OnClick</span><span class="token attr-value"><span class="token punctuation">=</span><span class="token punctuation">"</span>@CollapseAll<span class="token punctuation">"</span></span><span class="token punctuation">&gt;</span></span>
    Collapse All
<span class="token tag"><span class="token tag"><span class="token punctuation">&lt;/</span>TelerikButton</span><span class="token punctuation">&gt;</span></span>
private void ExpandRoots()
{
    ExpandedItems = CatalogData
        .Where(item =&gt; item.Children?.Count &gt; 0)
        .Cast<span class="token tag"><span class="token tag"><span class="token punctuation">&lt;</span>object</span><span class="token punctuation">&gt;</span></span>()
        .ToList();
}

private void CollapseAll()
{
    ExpandedItems = new List<span class="token tag"><span class="token tag"><span class="token punctuation">&lt;</span>object</span><span class="token punctuation">&gt;</span></span>();
}
</code></pre><p>This gives users immediate context while keeping the dropdown compact.</p><p>All nodes collapsed vs. expanded root nodes:</p><p><img src="https://www.telerik.com/sfimages/default-source/blogs/2026/2026-07/dropdowntree-nodes-collapsed-expanded.png?sfvrsn=f3fdf335_2" alt="In the lefthand version, we see Electronics, Furniture, Sports. All indicating they are collapsed and have an accordion dropdown available. On the right, Electronics is expanded to reveal Computers and Phones, both of which have the arrow indicating they have children. Furniture shows Bedroom and Living Room, which are the final categories in that hierarchy." /></p><h2 id="how-can-you-make-hierarchies-easier-to-scan">How Can You Make Hierarchies Easier to Scan?</h2><p>Hierarchical data often contains different types of items. A department may contain employees. A folder may contain documents. A product category may contain products.</p><p>Displaying everything as plain text makes the hierarchy harder to understand.</p><p>The DropDownTree supports <code>ItemTemplate</code> inside <code>DropDownTreeBinding</code>, allowing you to fully customize how each node renders. The template receives the data item as context.</p><p>Start with an enriched data model that carries everything the template needs:</p><pre class=" language-csharp"><code class="prism  language-csharp"><span class="token keyword">public</span> <span class="token keyword">class</span> <span class="token class-name">OrgNode</span>
<span class="token punctuation">{</span>
    <span class="token keyword">public</span> <span class="token keyword">int</span> Id <span class="token punctuation">{</span> <span class="token keyword">get</span><span class="token punctuation">;</span> <span class="token keyword">set</span><span class="token punctuation">;</span> <span class="token punctuation">}</span>
    <span class="token keyword">public</span> <span class="token keyword">string</span> Name <span class="token punctuation">{</span> <span class="token keyword">get</span><span class="token punctuation">;</span> <span class="token keyword">set</span><span class="token punctuation">;</span> <span class="token punctuation">}</span> <span class="token operator">=</span> <span class="token keyword">string</span><span class="token punctuation">.</span>Empty<span class="token punctuation">;</span>
    <span class="token keyword">public</span> <span class="token keyword">string</span> Role <span class="token punctuation">{</span> <span class="token keyword">get</span><span class="token punctuation">;</span> <span class="token keyword">set</span><span class="token punctuation">;</span> <span class="token punctuation">}</span> <span class="token operator">=</span> <span class="token keyword">string</span><span class="token punctuation">.</span>Empty<span class="token punctuation">;</span>
    <span class="token keyword">public</span> EmployeeStatus Status <span class="token punctuation">{</span> <span class="token keyword">get</span><span class="token punctuation">;</span> <span class="token keyword">set</span><span class="token punctuation">;</span> <span class="token punctuation">}</span> <span class="token operator">=</span> EmployeeStatus<span class="token punctuation">.</span>Available<span class="token punctuation">;</span>
    <span class="token keyword">public</span> ISvgIcon<span class="token operator">?</span> Icon <span class="token punctuation">{</span> <span class="token keyword">get</span><span class="token punctuation">;</span> <span class="token keyword">set</span><span class="token punctuation">;</span> <span class="token punctuation">}</span>
    <span class="token keyword">public</span> List<span class="token operator">&lt;</span>OrgNode<span class="token operator">&gt;</span><span class="token operator">?</span> Children <span class="token punctuation">{</span> <span class="token keyword">get</span><span class="token punctuation">;</span> <span class="token keyword">set</span><span class="token punctuation">;</span> <span class="token punctuation">}</span>
<span class="token punctuation">}</span>

<span class="token keyword">public</span> <span class="token keyword">enum</span> EmployeeStatus <span class="token punctuation">{</span> Available<span class="token punctuation">,</span> Busy<span class="token punctuation">,</span> Away <span class="token punctuation">}</span>
</code></pre><p>Each department gets a contextual icon&mdash;a gear for Engineering, a dollar sign for Finance and so on. Each employee carries a job title and an availability status.</p><p>Wire up the template:</p><pre class=" language-html"><code class="prism  language-html"><span class="token tag"><span class="token tag"><span class="token punctuation">&lt;</span>TelerikDropDownTree</span> <span class="token attr-name">Data</span><span class="token attr-value"><span class="token punctuation">=</span><span class="token punctuation">"</span>@OrgData<span class="token punctuation">"</span></span>
                     <span class="token attr-name">@bind-Value</span><span class="token attr-value"><span class="token punctuation">=</span><span class="token punctuation">"</span>@SelectedValue<span class="token punctuation">"</span></span>
                     <span class="token attr-name">@bind-ExpandedItems</span><span class="token attr-value"><span class="token punctuation">=</span><span class="token punctuation">"</span>@ExpandedItems<span class="token punctuation">"</span></span>
                     <span class="token attr-name">ValueField</span><span class="token attr-value"><span class="token punctuation">=</span><span class="token punctuation">"</span>@nameof(OrgNode.Id)<span class="token punctuation">"</span></span>
                     <span class="token attr-name">Width</span><span class="token attr-value"><span class="token punctuation">=</span><span class="token punctuation">"</span>340px<span class="token punctuation">"</span></span><span class="token punctuation">&gt;</span></span>

    <span class="token tag"><span class="token tag"><span class="token punctuation">&lt;</span>DropDownTreeBindings</span><span class="token punctuation">&gt;</span></span>
        <span class="token tag"><span class="token tag"><span class="token punctuation">&lt;</span>DropDownTreeBinding</span> <span class="token attr-name">TextField</span><span class="token attr-value"><span class="token punctuation">=</span><span class="token punctuation">"</span>@nameof(OrgNode.Name)<span class="token punctuation">"</span></span>
                             <span class="token attr-name">ItemsField</span><span class="token attr-value"><span class="token punctuation">=</span><span class="token punctuation">"</span>@nameof(OrgNode.Children)<span class="token punctuation">"</span></span><span class="token punctuation">&gt;</span></span>
            <span class="token tag"><span class="token tag"><span class="token punctuation">&lt;</span>ItemTemplate</span><span class="token punctuation">&gt;</span></span>
                @{
                    var node = (OrgNode)context;
                    var isLeaf = !(node.Children?.Count &gt; 0);
                }
                @if (!isLeaf)
                {
                    <span class="token comment">&lt;!-- Department node: contextual icon + name --&gt;</span>
                    <span class="token tag"><span class="token tag"><span class="token punctuation">&lt;</span>TelerikSvgIcon</span> <span class="token attr-name">Icon</span><span class="token attr-value"><span class="token punctuation">=</span><span class="token punctuation">"</span>@node.Icon<span class="token punctuation">"</span></span> <span class="token punctuation">/&gt;</span></span>
                    <span class="token tag"><span class="token tag"><span class="token punctuation">&lt;</span>span</span><span class="token punctuation">&gt;</span></span><span class="token entity" title=" ">&amp;nbsp;</span>@node.Name<span class="token tag"><span class="token tag"><span class="token punctuation">&lt;/</span>span</span><span class="token punctuation">&gt;</span></span>
                }
                else
                {
                    <span class="token comment">&lt;!-- Employee node: status dot + person icon + name and role --&gt;</span>
                    <span class="token tag"><span class="token tag"><span class="token punctuation">&lt;</span>span</span> <span class="token attr-name">class</span><span class="token attr-value"><span class="token punctuation">=</span><span class="token punctuation">"</span>node-status node-status--@node.Status.ToString().ToLower()<span class="token punctuation">"</span></span><span class="token punctuation">&gt;</span></span><span class="token tag"><span class="token tag"><span class="token punctuation">&lt;/</span>span</span><span class="token punctuation">&gt;</span></span>
                    <span class="token tag"><span class="token tag"><span class="token punctuation">&lt;</span>TelerikSvgIcon</span> <span class="token attr-name">Icon</span><span class="token attr-value"><span class="token punctuation">=</span><span class="token punctuation">"</span>@SvgIcon.User<span class="token punctuation">"</span></span> <span class="token punctuation">/&gt;</span></span>
                    <span class="token tag"><span class="token tag"><span class="token punctuation">&lt;</span>span</span> <span class="token attr-name">class</span><span class="token attr-value"><span class="token punctuation">=</span><span class="token punctuation">"</span>node-employee<span class="token punctuation">"</span></span><span class="token punctuation">&gt;</span></span>
                        <span class="token tag"><span class="token tag"><span class="token punctuation">&lt;</span>span</span> <span class="token attr-name">class</span><span class="token attr-value"><span class="token punctuation">=</span><span class="token punctuation">"</span>node-employee-name<span class="token punctuation">"</span></span><span class="token punctuation">&gt;</span></span>@node.Name<span class="token tag"><span class="token tag"><span class="token punctuation">&lt;/</span>span</span><span class="token punctuation">&gt;</span></span>
                        <span class="token tag"><span class="token tag"><span class="token punctuation">&lt;</span>span</span> <span class="token attr-name">class</span><span class="token attr-value"><span class="token punctuation">=</span><span class="token punctuation">"</span>node-employee-role<span class="token punctuation">"</span></span><span class="token punctuation">&gt;</span></span>@node.Role<span class="token tag"><span class="token tag"><span class="token punctuation">&lt;/</span>span</span><span class="token punctuation">&gt;</span></span>
                    <span class="token tag"><span class="token tag"><span class="token punctuation">&lt;/</span>span</span><span class="token punctuation">&gt;</span></span>
                }
            <span class="token tag"><span class="token tag"><span class="token punctuation">&lt;/</span>ItemTemplate</span><span class="token punctuation">&gt;</span></span>
        <span class="token tag"><span class="token tag"><span class="token punctuation">&lt;/</span>DropDownTreeBinding</span><span class="token punctuation">&gt;</span></span>
    <span class="token tag"><span class="token tag"><span class="token punctuation">&lt;/</span>DropDownTreeBindings</span><span class="token punctuation">&gt;</span></span>

<span class="token tag"><span class="token tag"><span class="token punctuation">&lt;/</span>TelerikDropDownTree</span><span class="token punctuation">&gt;</span></span>
</code></pre><p>A few CSS rules complete the effect:</p><pre class=" language-css"><code class="prism  language-css"><span class="token selector"><span class="token class">.node-status</span> </span><span class="token punctuation">{</span>
    <span class="token property">display</span><span class="token punctuation">:</span> inline-block<span class="token punctuation">;</span>
    <span class="token property">width</span><span class="token punctuation">:</span> <span class="token number">8</span>px<span class="token punctuation">;</span>
    <span class="token property">height</span><span class="token punctuation">:</span> <span class="token number">8</span>px<span class="token punctuation">;</span>
    <span class="token property">border-radius</span><span class="token punctuation">:</span> <span class="token number">50%</span><span class="token punctuation">;</span>
    <span class="token property">margin-right</span><span class="token punctuation">:</span> <span class="token number">5</span>px<span class="token punctuation">;</span>
<span class="token punctuation">}</span>

<span class="token selector"><span class="token class">.node-status--available</span> </span><span class="token punctuation">{</span> <span class="token property">background</span><span class="token punctuation">:</span> <span class="token hexcode">#4caf50</span><span class="token punctuation">;</span> <span class="token punctuation">}</span>
<span class="token selector"><span class="token class">.node-status--busy</span>      </span><span class="token punctuation">{</span> <span class="token property">background</span><span class="token punctuation">:</span> <span class="token hexcode">#ff9800</span><span class="token punctuation">;</span> <span class="token punctuation">}</span>
<span class="token selector"><span class="token class">.node-status--away</span>      </span><span class="token punctuation">{</span> <span class="token property">background</span><span class="token punctuation">:</span> <span class="token hexcode">#9e9e9e</span><span class="token punctuation">;</span> <span class="token punctuation">}</span>

<span class="token selector"><span class="token class">.node-employee</span> </span><span class="token punctuation">{</span>
    <span class="token property">display</span><span class="token punctuation">:</span> inline-flex<span class="token punctuation">;</span>
    <span class="token property">flex-direction</span><span class="token punctuation">:</span> column<span class="token punctuation">;</span>
    <span class="token property">line-height</span><span class="token punctuation">:</span> <span class="token number">1.2</span><span class="token punctuation">;</span>
    <span class="token property">vertical-align</span><span class="token punctuation">:</span> middle<span class="token punctuation">;</span>
<span class="token punctuation">}</span>

<span class="token selector"><span class="token class">.node-employee-name</span> </span><span class="token punctuation">{</span> <span class="token property">font-size</span><span class="token punctuation">:</span> <span class="token number">0.875</span>rem<span class="token punctuation">;</span> <span class="token punctuation">}</span>
<span class="token selector"><span class="token class">.node-employee-role</span> </span><span class="token punctuation">{</span> <span class="token property">font-size</span><span class="token punctuation">:</span> <span class="token number">0.75</span>rem<span class="token punctuation">;</span> <span class="token property">color</span><span class="token punctuation">:</span> <span class="token hexcode">#6c757d</span><span class="token punctuation">;</span> <span class="token punctuation">}</span>
</code></pre><p>The result: department nodes render with their domain icon, while employees show a colored availability dot, their name and their role&mdash;all inside the same compact dropdown:</p><p><img src="https://www.telerik.com/sfimages/default-source/blogs/2026/2026-07/dropdowntree-department-employees.png?sfvrsn=132fa79d_2" alt="Engineering – Backend Team shows employee names, a colored availability dot and their role" /></p><h2 id="how-can-you-customize-the-selected-value-display">How Can You Customize the Selected Value Display?</h2><p>By default the DropDownTree shows the selected item&rsquo;s text in the input. With <code>ValueTemplate</code> you can replace that with any markup you like.</p><p>A useful pattern is showing the selected item together with its breadcrumb path, giving users instant context about where the selection sits in the hierarchy:</p><pre class=" language-html"><code class="prism  language-html"><span class="token tag"><span class="token tag"><span class="token punctuation">&lt;</span>TelerikDropDownTree</span> <span class="token attr-name">Data</span><span class="token attr-value"><span class="token punctuation">=</span><span class="token punctuation">"</span>@CatalogData<span class="token punctuation">"</span></span>
                     <span class="token attr-name">@bind-Value</span><span class="token attr-value"><span class="token punctuation">=</span><span class="token punctuation">"</span>@SelectedValue<span class="token punctuation">"</span></span>
                     <span class="token attr-name">@bind-ExpandedItems</span><span class="token attr-value"><span class="token punctuation">=</span><span class="token punctuation">"</span>@ExpandedItems<span class="token punctuation">"</span></span>
                     <span class="token attr-name">ValueField</span><span class="token attr-value"><span class="token punctuation">=</span><span class="token punctuation">"</span>@nameof(CategoryItem.Id)<span class="token punctuation">"</span></span>
                     <span class="token attr-name">Width</span><span class="token attr-value"><span class="token punctuation">=</span><span class="token punctuation">"</span>380px<span class="token punctuation">"</span></span><span class="token punctuation">&gt;</span></span>

    <span class="token tag"><span class="token tag"><span class="token punctuation">&lt;</span>DropDownTreeBindings</span><span class="token punctuation">&gt;</span></span>
        <span class="token tag"><span class="token tag"><span class="token punctuation">&lt;</span>DropDownTreeBinding</span> <span class="token attr-name">TextField</span><span class="token attr-value"><span class="token punctuation">=</span><span class="token punctuation">"</span>@nameof(CategoryItem.Name)<span class="token punctuation">"</span></span>
                             <span class="token attr-name">ItemsField</span><span class="token attr-value"><span class="token punctuation">=</span><span class="token punctuation">"</span>@nameof(CategoryItem.Children)<span class="token punctuation">"</span></span> <span class="token punctuation">/&gt;</span></span>
    <span class="token tag"><span class="token tag"><span class="token punctuation">&lt;/</span>DropDownTreeBindings</span><span class="token punctuation">&gt;</span></span>

    <span class="token tag"><span class="token tag"><span class="token punctuation">&lt;</span>ValueTemplate</span><span class="token punctuation">&gt;</span></span>
        @{
            // context is the selected data item
            var item = context as CategoryItem;
            var breadcrumb = item != null ? GetBreadcrumb(item.Id) : string.Empty;
            var isCategory = item?.Children?.Count &gt; 0;
        }
        <span class="token tag"><span class="token tag"><span class="token punctuation">&lt;</span>span</span> <span class="token attr-name">title</span><span class="token attr-value"><span class="token punctuation">=</span><span class="token punctuation">"</span>@breadcrumb<span class="token punctuation">"</span></span><span class="token punctuation">&gt;</span></span>
            <span class="token tag"><span class="token tag"><span class="token punctuation">&lt;</span>TelerikSvgIcon</span> <span class="token attr-name">Icon</span><span class="token attr-value"><span class="token punctuation">=</span><span class="token punctuation">"</span>@(isCategory ? SvgIcon.Folder : SvgIcon.Star)<span class="token punctuation">"</span></span> <span class="token punctuation">/&gt;</span></span>
            <span class="token entity" title=" ">&amp;nbsp;</span><span class="token tag"><span class="token tag"><span class="token punctuation">&lt;</span>strong</span><span class="token punctuation">&gt;</span></span>@item?.Name<span class="token tag"><span class="token tag"><span class="token punctuation">&lt;/</span>strong</span><span class="token punctuation">&gt;</span></span>
            @if (!string.IsNullOrEmpty(breadcrumb))
            {
                <span class="token tag"><span class="token tag"><span class="token punctuation">&lt;</span>span</span><span class="token style-attr language-css"><span class="token attr-name"> <span class="token attr-name">style</span></span><span class="token punctuation">="</span><span class="token attr-value"><span class="token property">font-size</span><span class="token punctuation">:</span><span class="token number">0.85</span>em<span class="token punctuation">;</span> <span class="token property">color</span><span class="token punctuation">:</span><span class="token hexcode">#6c757d</span><span class="token punctuation">;</span></span><span class="token punctuation">"</span></span><span class="token punctuation">&gt;</span></span>
                    <span class="token entity" title=" ">&amp;nbsp;</span>&mdash; @breadcrumb
                <span class="token tag"><span class="token tag"><span class="token punctuation">&lt;/</span>span</span><span class="token punctuation">&gt;</span></span>
            }
        <span class="token tag"><span class="token tag"><span class="token punctuation">&lt;/</span>span</span><span class="token punctuation">&gt;</span></span>
    <span class="token tag"><span class="token tag"><span class="token punctuation">&lt;/</span>ValueTemplate</span><span class="token punctuation">&gt;</span></span>

<span class="token tag"><span class="token tag"><span class="token punctuation">&lt;/</span>TelerikDropDownTree</span><span class="token punctuation">&gt;</span></span>
</code></pre><p>The <code>GetBreadcrumb</code> helper walks the tree and builds the ancestor path:</p><pre class=" language-csharp"><code class="prism  language-csharp"><span class="token keyword">private</span> <span class="token keyword">string</span> <span class="token function">GetBreadcrumb</span><span class="token punctuation">(</span><span class="token keyword">int</span> id<span class="token punctuation">)</span>
<span class="token punctuation">{</span>
    <span class="token keyword">var</span> path <span class="token operator">=</span> <span class="token keyword">new</span> <span class="token class-name">List</span><span class="token operator">&lt;</span><span class="token keyword">string</span><span class="token operator">&gt;</span><span class="token punctuation">(</span><span class="token punctuation">)</span><span class="token punctuation">;</span>
    <span class="token function">BuildPath</span><span class="token punctuation">(</span>CatalogData<span class="token punctuation">,</span> id<span class="token punctuation">,</span> path<span class="token punctuation">)</span><span class="token punctuation">;</span>
    <span class="token keyword">if</span> <span class="token punctuation">(</span>path<span class="token punctuation">.</span>Count <span class="token operator">&gt;</span> <span class="token number">1</span><span class="token punctuation">)</span> path<span class="token punctuation">.</span><span class="token function">RemoveAt</span><span class="token punctuation">(</span>path<span class="token punctuation">.</span>Count <span class="token operator">-</span> <span class="token number">1</span><span class="token punctuation">)</span><span class="token punctuation">;</span> <span class="token comment">// remove leaf, keep ancestors</span>
    <span class="token keyword">return</span> <span class="token keyword">string</span><span class="token punctuation">.</span><span class="token function">Join</span><span class="token punctuation">(</span><span class="token string">" &rsaquo; "</span><span class="token punctuation">,</span> path<span class="token punctuation">)</span><span class="token punctuation">;</span>
<span class="token punctuation">}</span>

<span class="token keyword">private</span> <span class="token keyword">bool</span> <span class="token function">BuildPath</span><span class="token punctuation">(</span>List<span class="token operator">&lt;</span>CategoryItem<span class="token operator">&gt;</span> nodes<span class="token punctuation">,</span> <span class="token keyword">int</span> id<span class="token punctuation">,</span> List<span class="token operator">&lt;</span><span class="token keyword">string</span><span class="token operator">&gt;</span> path<span class="token punctuation">)</span>
<span class="token punctuation">{</span>
    <span class="token keyword">foreach</span> <span class="token punctuation">(</span><span class="token keyword">var</span> node <span class="token keyword">in</span> nodes<span class="token punctuation">)</span>
    <span class="token punctuation">{</span>
        path<span class="token punctuation">.</span><span class="token function">Add</span><span class="token punctuation">(</span>node<span class="token punctuation">.</span>Name<span class="token punctuation">)</span><span class="token punctuation">;</span>
        <span class="token keyword">if</span> <span class="token punctuation">(</span>node<span class="token punctuation">.</span>Id <span class="token operator">==</span> id<span class="token punctuation">)</span> <span class="token keyword">return</span> <span class="token keyword">true</span><span class="token punctuation">;</span>
        <span class="token keyword">if</span> <span class="token punctuation">(</span>node<span class="token punctuation">.</span>Children <span class="token operator">!=</span> <span class="token keyword">null</span> <span class="token operator">&amp;&amp;</span> <span class="token function">BuildPath</span><span class="token punctuation">(</span>node<span class="token punctuation">.</span>Children<span class="token punctuation">,</span> id<span class="token punctuation">,</span> path<span class="token punctuation">)</span><span class="token punctuation">)</span> <span class="token keyword">return</span> <span class="token keyword">true</span><span class="token punctuation">;</span>
        path<span class="token punctuation">.</span><span class="token function">RemoveAt</span><span class="token punctuation">(</span>path<span class="token punctuation">.</span>Count <span class="token operator">-</span> <span class="token number">1</span><span class="token punctuation">)</span><span class="token punctuation">;</span>
    <span class="token punctuation">}</span>
    <span class="token keyword">return</span> <span class="token keyword">false</span><span class="token punctuation">;</span>
<span class="token punctuation">}</span>
</code></pre><p>Selecting &ldquo;Gaming&rdquo; now shows <strong>Gaming &mdash; Electronics &rsaquo; Computers &rsaquo; Laptops</strong> in the input, making the choice self-explanatory without any extra UI:</p><p><img src="https://www.telerik.com/sfimages/default-source/blogs/2026/2026-07/dropdowntree-breadcrumb.png?sfvrsn=156a29f7_2" alt="Gaming - Electronics - Computers – Laptops breadcrumb" /></p><h2>When Should You Use a DropDownTree?</h2><p>The DropDownTree is useful whenever users need to select items from nested data.</p><p>Common scenarios include:</p><ul><li><strong>Product catalogs</strong> &ndash; Browse categories and subcategories while preserving their relationships.</li><li><strong>Organization structures</strong> &ndash; Select employees, teams or departments.</li><li><strong>Document management</strong> &ndash; Choose folders and files from nested structures.</li><li><strong>Geographic selection</strong> &ndash; Navigate countries, regions, cities and locations.</li><li><strong>Permission management</strong> &ndash; Assign roles or resources organized into security hierarchies.</li><li><strong>Content management</strong> &ndash; Select pages, sections or navigation items.</li></ul><p>Whenever hierarchy provides useful context, the DropDownTree helps users make better selections.</p><h2 id="try-the-telerik-ui-for-blazor-dropdowntree-today">Try the Telerik UI for Blazor DropDownTree Today</h2><p>The DropDownTree brings a long-requested hierarchical selection experience to Telerik UI for Blazor applications.</p><p>With built-in filtering, flexible data binding, templates, adaptive rendering, and accessibility support, it provides everything needed to create intuitive hierarchical selection workflows.</p><p>Explore these resources to learn more:</p><ul><li><a target="_blank" href="https://blazorrepl.telerik.com/cAkVwKlf24PvTBlp46">REPL Examples</a> &ndash; Experiment with the code directly in your browser</li><li><a target="_blank" href="https://demos.telerik.com/blazor-ui/dropdowntree/overview">Live Demos</a> &ndash; See the component in action</li><li><a target="_blank" href="https://docs.telerik.com/blazor-ui/components/dropdowntree/overview">Documentation</a> &ndash; Explore configuration options and API</li></ul><p>Whether you are building an inventory system, HR portal, document manager or administrative application, the Telerik UI for Blazor DropDownTree can help users find and select hierarchical data quickly and naturally.</p><p><a target="_blank" href="https://www.telerik.com/try/ui-for-blazor" class="Btn">Try Now</a></p><img src="https://feeds.telerik.com/link/23050/17403334.gif" height="1" width="1"/>]]></content>
  </entry>
  <entry>
    <id>urn:uuid:452287a5-3c9b-45ea-8390-165db6f09df3</id>
    <title type="text">Using AI to Build a Blazor App 4: Architect and Build the First Feature</title>
    <summary type="text">How do you get AI to iteratively work on your feature without losing track of its progress? Give it a way to track its progress!</summary>
    <published>2026-07-28T14:29:39Z</published>
    <updated>2026-08-24T02:17:02Z</updated>
    <author>
      <name>Jon Hilton </name>
    </author>
    <link rel="alternate" href="https://feeds.telerik.com/link/23050/17390073/using-ai-build-blazor-app-4-architect-build-first-feature"/>
    <content type="text"><![CDATA[<p><span class="featured">How do you get AI to iteratively work on your feature without losing track of its progress? Give it a way to track its progress!</span></p><p>Now, at this point we&rsquo;re clear on scope and UI/UX, and we have a first thin slice (tracer bullet) to build.</p><p>But this first feature is where all those little niggly decisions show up. We&rsquo;re using Blazor, but which version, render mode, CSS framework?</p><p>First we need to get clear on those:</p><blockquote><p>We want to build 0001-open-existing-astro-draft-and-save-edits.md. Let&rsquo;s start by planning this - grill me on every key technical choice needed to get this built, include your recommended answer for each question, ask me one thing at a time until you have enough to proceed with the build of this tracer bullet.</p></blockquote><p>Time for some more back and forth with the GPT 5.5.</p><p><img src="https://www.telerik.com/sfimages/default-source/blogs/2026/2026-06/codex-appsettings.png?sfvrsn=8bf86d7d_2" title="Codex proposes where the Astro repo path should live and explains its reasoning. One question, one recommendation, one decision logged before any code gets written." alt="Codex prompt suggesting a repo-local appsettings.Local.json for the Astro repository path, with the user replying " /></p><p>Including some key decisions around making sure we don&rsquo;t lose changes:</p><p><img src="https://www.telerik.com/sfimages/default-source/blogs/2026/2026-06/codex-concurrency.png?sfvrsn=42053a96_2" title="A small but important call: use the file timestamp at load time and refuse to overwrite if it has changed since. The kind of detail worth nailing down before the build, not after a lost draft." alt="Codex recommendation for an optimistic concurrency check using LastWriteTimeUtc to prevent overwriting drafts changed on disk" /></p><p>Notice how we&rsquo;re now firmly into implementation details.</p><p>Every step before this was about the requirement, the overall business goal we&rsquo;re reaching for, the headline feature(s) that help us meet those goals. Now we&rsquo;re getting into the core details about how we implement this (where do we store data, what do we store, how do we handle concurrency).</p><p>Again, this is not a linear process. Technical limitations here could mean the original feature is compromised and needs to be rethought.</p><p>Ultimately you&mdash;the human developer&mdash;are the key to unlocking this feature. When you decide you&rsquo;ve got enough detail, the problem scope is clear and the key implementation decisions have been made, you can instruct AI to start building.</p><h2 id="smaller-slices">Smaller Slices</h2><p>AI works best when you give it less to think about in one go. In this case, our tracer bullet is arguably quite large still (there are a few moving parts and it arguably does more than one thing).</p><p>This is entirely subjective, but I decided to have it break the work down into slightly smaller steps.</p><blockquote><p>I want to create tasks for this, rather than just go ahead. Given the context of the tracer bullet, and the technical decisions, let&rsquo;s create one or more tasks. Propose how we can slice this work up, then get my approval before writing the individual tasks. They key is to keep each individual task so it delivers a vertical slice through the app, and value that could be shipped.</p><p>Ensure we use the visual prototype we created, and match that for this implementation</p></blockquote><p>This resulted in a few separate tasks:</p><ul><li>0002 Boot Local Blazor Workspace With Validated Config</li><li>0003 Discover And Open Existing Astro Draft</li><li>0004 Save Draft Body Back To Astro File</li><li>0005 Restore Last Active Draft</li><li>0006 Protect Against External File Changes</li></ul><p>Here&rsquo;s part of 002:</p><pre class=" language-markdown"><code class="prism  language-markdown"><span class="token title important"><span class="token punctuation">#</span> Task 0002: Boot Local Blazor Workspace With Validated Config</span>

<span class="token title important"><span class="token punctuation">##</span> Goal</span>

Create the first runnable Article Workspace app shell as a .NET 10 Blazor Web App and validate that it can be configured to point at the Astro repository.

This is the first vertical slice of <span class="token url">[Task 0001](0001-open-existing-astro-draft-and-save-edits.md)</span>. It should not read or edit article files yet; it should prove the app can launch and clearly report whether the local workspace is configured.

<span class="token title important"><span class="token punctuation">##</span> User Story</span>

As the writer, I want to open Article Workspace and know whether it is connected to my Astro repository, so I can fix setup problems before the app reads or writes content.

<span class="token title important"><span class="token punctuation">##</span> Technical Decisions</span>
...

<span class="token title important"><span class="token punctuation">##</span> Scope</span>
...

<span class="token title important"><span class="token punctuation">##</span> Visual Reference</span>
Use <span class="token code keyword" spellcheck="false">`prototypes/article-workspace/index.html`</span> as the visual reference for layout, spacing, typography, colors, and overall product feel.

This slice should adapt the prototype to a narrow setup/connected-workspace screen. It should not look like the default Blazor template.

<span class="token title important"><span class="token punctuation">##</span> Acceptance Criteria</span>
...

<span class="token title important"><span class="token punctuation">##</span> Non-Goals</span>
...

<span class="token title important"><span class="token punctuation">##</span> Implementation Notes</span>
...
</code></pre><h2 id="you-can-still-do-things-manually">You Can Still Do Things Manually</h2><p>This may come as a surprise, but sometimes it&rsquo;s still better to do things yourself!</p><p>Every time I create a new Blazor project with AI, it seems to overreach and/or get itself into a muddle trying to set the project up, configure Tailwind CSS, etc.</p><p>So I opted to spin up the new project myself and check it all worked first. Then I added my <a target="_blank" href="https://github.com/Practical-ASP-NET/Tailwind.Extensions.AspNetCore">Tailwind NuGet package</a>, which I tend to use for integrating Tailwind with Blazor.</p><p>I did get AI to help with parts of this (like then migrating from Bootstrap to Tailwind), but it&rsquo;s worth noting that sometimes it&rsquo;s still quicker to do things yourself (rather than burn AI tokens looping around to get their in eight steps when you can do it in one or two).</p><p>With the new project set up, AI was able to work through the first task (now confusingly numbered 0002).</p><blockquote><p>let&rsquo;s implement the next available task</p></blockquote><p>With this, we ended up with a simple screen that showed the app was configured (if we remove the config, it shows a warning and instructions to configure the paths to Astro, etc.).</p><p><img src="https://www.telerik.com/sfimages/default-source/blogs/2026/2026-06/setup-connected.png?sfvrsn=96026761_2" title="The output of task 0002: a setup screen that confirms the app can find the Astro repo, or tells you clearly when it cannot. No drafts yet, just proof the wiring holds." alt="Article Workspace setup screen showing a Connected status pill and a resolved workspace table with Astro repository, content directory, and supported extensions" /></p><p>Now at this point, I was tempted to just open up a new session (important, for keeping that context down) and tell it to start Task 2. But there&rsquo;s an issue with that approach.</p><h2 id="keep-tabs-on-your-progress">Keep Tabs on Your Progress</h2><p>If I just say &ldquo;implement the next feature,&rdquo; the LLM has to trawl through the code and the tasks list (which it won&rsquo;t know about, so has to look for), see what&rsquo;s already been built and figure out which task to handle next.</p><p>This is an expensive way to figure something out that we already know. We already know we just did feature 0002 and just need to tell the LLM where we got to and how to take the next step.</p><p>Knowing we&rsquo;re going to be doing this a lot, I asked the LLM to create a skill for implementing tasks that also keeps a lightweight progress log that new LLM chats can reference when they come to pick up new tasks.</p><blockquote><p>let&rsquo;s create a skill to implement each task. It should ensure we write a simple progress log so the next session knows (roughly) what&rsquo;s been done, and potential next tasks to pick up. So the flow will be to check progress, identify next task to work on, then set to work on that task until its acceptance criteria are met</p></blockquote><p>This resulted in a task-runner Codex skill.</p><p>With that in place, I opened up a new chat and asked it to implement the next feature.</p><blockquote><p>I&rsquo;ll use the task-runner skill to find the local backlog, identify the next pending task, and carry it through implementation and verification.</p><p>I found a Blazor solution with a numbered task backlog and an existing progress log. I&rsquo;m reading the task state and the next task&rsquo;s criteria before touching code.</p><p>Task 0003 is next. Its slice is read-only: scan configured Astro content, parse draft frontmatter, list drafts, and load the selected body without modifying source files.</p><p>The existing UI is still the setup screen from 0002, and the code has no draft discovery layer yet. I&rsquo;m going to add a small read-only workspace service, then adapt the home page into the prototype-style sidebar plus editor once config is valid.</p></blockquote><p>From here, I kept going, starting new chats for each task, and Codex kept using the new skill to execute that task (and update the progress log).</p><p>Here&rsquo;s part of the running progress log.</p><pre class=" language-markdown"><code class="prism  language-markdown"><span class="token title important"><span class="token punctuation">#</span> Progress</span>

<span class="token title important"><span class="token punctuation">##</span> Status</span>

| Task | State | Notes |
| --- | --- | --- |
| 0001 | Done | Umbrella tracer bullet is covered by tasks 0002 through 0006: configure, discover, edit, preview, save, restore last active draft, startup reload, and stale-save protection. |
| 0002 | Done | Local Blazor setup screen validates Astro repository config and shows connected/blocking states. |
| 0003 | Done | Discovers configured Astro draft files and opens the selected body read-only. |
| 0004 | Done | Saves the selected draft body back to disk, tracks dirty state, supports save shortcut, and renders sanitized Markdown preview. |
| 0005 | Done | Persists the last selected draft in Astro repo metadata and restores it on startup with fallback handling. |
| 0006 | Done | Blocks stale saves when the selected draft changed on disk and exposes reload before saving. |

<span class="token title important"><span class="token punctuation">##</span> Task Session Convention</span>

<span class="token list punctuation">-</span> Before working on a task, check whether the app is already listening on <span class="token code keyword" spellcheck="false">`http://localhost:5012/`</span>.
<span class="token list punctuation">-</span> If it is not running, start it from <span class="token code keyword" spellcheck="false">`src/DevWriter/DevWriter`</span> with <span class="token code keyword" spellcheck="false">`dotnet watch run --urls http://localhost:5012`</span>.
<span class="token list punctuation">-</span> Keep a single app instance running during task work; if another process is already listening on <span class="token code keyword" spellcheck="false">`5012`</span>, reuse it rather than starting a second instance.
<span class="token list punctuation">-</span> If the watched app crashes during a task, restart the same <span class="token code keyword" spellcheck="false">`dotnet watch`</span> command and continue verification in the browser.

<span class="token title important"><span class="token punctuation">##</span> Latest Session</span>

<span class="token list punctuation">-</span> Date: 2026-05-07
<span class="token list punctuation">-</span> Task: 0001 - Open Existing Astro Draft And Save Edits
<span class="token list punctuation">-</span> Result: Done
<span class="token list punctuation">-</span> Changed:
  <span class="token list punctuation">-</span> Marked the umbrella tracer bullet complete after checking its acceptance criteria against completed slices 0002 through 0006.
<span class="token list punctuation">-</span> Verified:
  <span class="token list punctuation">-</span> Reviewed <span class="token code keyword" spellcheck="false">`tasks/0001-open-existing-astro-draft-and-save-edits.md`</span> against the implemented code paths and previous verification from tasks 0002 through 0006.
  <span class="token list punctuation">-</span> Confirmed the app has no commit, push, publish, or newsletter code paths in the tracer bullet implementation.
<span class="token list punctuation">-</span> Notes:
  - <span class="token code keyword" spellcheck="false">`0001`</span> is an umbrella task; no code changes were needed for this check.
  <span class="token list punctuation">-</span> Remaining work should be captured as new backlog slices rather than keeping <span class="token code keyword" spellcheck="false">`0001`</span> open.
</code></pre><h2 id="did-ai-get-everything-right-not-exactly">Did AI Get Everything Right? Not Exactly</h2><p>LLMs rarely get everything &ldquo;right.&rdquo;</p><p>For most of the work, it did a good job. But occasionally the UI was a bit &ldquo;off&rdquo; (part of the screen overlapping another part, superfluous elements that didn&rsquo;t really do anything).</p><p>Overall, it created a functional (and visually faithful to the prototype) app that satisfied everything we&rsquo;d agreed for the initial feature.</p><p>There was just one step left to do. GPT had put all the markup and UI logic for this feature in one file. I don&rsquo;t mind this as a first step, but would always opt to then break that down into smaller components (each with their own data, parameters, logic).</p><p>You can see from this code, we&rsquo;ve a few different concerns muddled up in one component.</p><p><img src="https://www.telerik.com/sfimages/default-source/blogs/2026/2026-06/home-razor-bloat.png?sfvrsn=e57943af_2" title="All of this lived in a single Home component. Workspace state, draft list, editor body, save status, JS interop references, the lot. A clear signal it was time to start pulling things apart." alt="Home.razor code listing with around fifteen private fields including workspace, drafts, selectedDraft, editorBody, savedBody, isSaving, and isDirty" /></p><p>Time to get the LLM to clean up its mess with a quick refactor.</p><blockquote><p>The home component in this project is now doing too much. Can we refactor it, specifically looking for seams, so we can identify potential components to extract - suggest refactorings as you go and I will approve or course correct</p></blockquote><p>It proposed several refactoring steps, all of which looked reasonable to me.</p><p><img src="https://www.telerik.com/sfimages/default-source/blogs/2026/2026-06/codex-refactor-plan.png?sfvrsn=648bb320_2" title="Codex proposing the seams: four extractions, starting with DraftSidebar because it has the cleanest boundary. Reviewed step by step rather than approved in one go." alt="Codex refactor plan proposing four extractions from Home.razor: WorkspaceShell, WorkspaceSetupPanel, DraftSidebar, and DraftEditor" /></p><p>We stepped through those (and one or two more that I identified after this was done) and, with that, we had our V1 of a functional app for easily managing and capturing blog/newsletter ideas via an Astro blog.</p><p><img src="https://www.telerik.com/sfimages/default-source/blogs/2026/2026-06/app-v1-running.png?sfvrsn=e612d7e4_2" title="The V1 in use, with a real draft list pulled from the Astro repo. Also the moment it surfaced a pile of half-finished posts the author had quietly forgotten about." alt="Finished Article Workspace app showing a sidebar list of drafts and the selected draft " /></p><p>Fun fact, it also surfaced a number of draft blog posts I apparently never finished.</p><h2 id="in-summary">In Summary</h2><p>Software design is a messy, iterative affair where you often go round in circles, moving from the fuzzy to the concrete.</p><p>AI can help you with this. It works best when you keep things relatively fluid (grill me on requirements, now let&rsquo;s prototype that part of the UI, perhaps we need a technical spike for this part).</p><p>Once you reach a shared understanding of what you&rsquo;re building (and ideally why), it&rsquo;s time to slice that work up. LLMs work best with small amounts of context, so these slices want to reflect that, but still deliver value. The litmus test is: what&rsquo;s small enough to build quickly, which is technically shippable (doesn&rsquo;t mean you have to ship it, but you could).</p><p>If you find yourself doing something more than once, get the LLM to turn it into a skill (as we did here, with the task-runner skill).</p><p>Finally, where possible, leave some breadcrumbs so the LLM doesn&rsquo;t have to start over each time (ADRs, progress log). It saves tokens, and context, and means you can pick up where you left off for every new chat session.</p><p>That app that surfaced a pile of forgotten draft posts? It&rsquo;s already doing its job. Now over to me to commit to that weekly cadence. (There&rsquo;s some things AI can&rsquo;t do, like provide the willpower to build good habits!)</p><aside><hr data-sf-ec-immutable="" /><div class="row"><div class="col-4 u-normal-full u-small-mb0"><h4 class="u-fs20 u-fw5 u-lh125 u-mb0">Telerik UI for Blazor Meets A2UI: The Next Step Toward Dynamic UI Generation</h4></div><div class="col-8"><p class="u-fs16 u-mb0"><a target="_blank" href="https://www.telerik.com/blogs/telerik-ui-blazor-meets-a2ui-next-step-toward-dynamic-ui-generation">Learn how A2UI enables AI systems</a> to generate interactive, dynamically generated Blazor interfaces and how Progress Telerik UI for Blazor will help.</p></div></div></aside><img src="https://feeds.telerik.com/link/23050/17390073.gif" height="1" width="1"/>]]></content>
  </entry>
  <entry>
    <id>urn:uuid:936b3062-3a6c-4a85-b007-2ee454b097b5</id>
    <title type="text">Blazor Basics: Handling Loading, Empty and Error States in Blazor</title>
    <summary type="text">Learn two ways to properly handle the four loading states: loading, error, success and empty in Blazor web applications.</summary>
    <published>2026-07-24T15:57:03Z</published>
    <updated>2026-08-24T02:17:02Z</updated>
    <author>
      <name>Claudio Bernasconi </name>
    </author>
    <link rel="alternate" href="https://feeds.telerik.com/link/23050/17386661/blazor-basics-handling-loading-empty-error-states-blazor"/>
    <content type="text"><![CDATA[<p><span class="featured">Learn two ways to properly handle the four loading states: loading, error, success and empty in Blazor web applications.</span></p><p>In modern web development, page rendering speed is crucial. We render pages as quickly as possible and asynchronously load data from the server. Once the data arrives on the client, we update the web application and integrate the data into the existing page.</p><p>Therefore, modern data-driven applications are rarely in a stable state. Data might still be loading from the server, the request might fail or the server might return an empty data set.</p><p>Handling different application states is essential for creating responsive and user-friendly web applications.</p><p>In this article, we will learn how to professionally handle <strong>success</strong>, <strong>loading</strong>, <strong>empty</strong> and <strong>error</strong> states in Blazor web applications.</p><p>You can <a target="_blank" href="https://github.com/claudiobernasconi/BlazorHandlingUIStates">access the code used in this example on GitHub.</a></p><h2 id="basic-loading-state-handling">Basic Loading State Handling</h2><p>When creating a Blazor Web App based on the .NET 10 project template, you&rsquo;ll see code like this in the generated Weather page.</p><pre class=" language-csharp"><code class="prism  language-csharp">@<span class="token keyword">foreach</span> <span class="token punctuation">(</span><span class="token keyword">var</span> forecast <span class="token keyword">in</span> forecasts<span class="token punctuation">)</span>
<span class="token punctuation">{</span>
    <span class="token operator">&lt;</span>tr<span class="token operator">&gt;</span>
        <span class="token operator">&lt;</span>td<span class="token operator">&gt;</span>@forecast<span class="token punctuation">.</span>Date<span class="token punctuation">.</span><span class="token function">ToShortDateString</span><span class="token punctuation">(</span><span class="token punctuation">)</span><span class="token operator">&lt;</span><span class="token operator">/</span>td<span class="token operator">&gt;</span>
        <span class="token operator">&lt;</span>td<span class="token operator">&gt;</span>@forecast<span class="token punctuation">.</span>TemperatureC<span class="token operator">&lt;</span><span class="token operator">/</span>td<span class="token operator">&gt;</span>
        <span class="token operator">&lt;</span>td<span class="token operator">&gt;</span>@forecast<span class="token punctuation">.</span>TemperatureF<span class="token operator">&lt;</span><span class="token operator">/</span>td<span class="token operator">&gt;</span>
        <span class="token operator">&lt;</span>td<span class="token operator">&gt;</span>@forecast<span class="token punctuation">.</span>Summary<span class="token operator">&lt;</span><span class="token operator">/</span>td<span class="token operator">&gt;</span>
    <span class="token operator">&lt;</span><span class="token operator">/</span>tr<span class="token operator">&gt;</span>
<span class="token punctuation">}</span>
</code></pre><p>There is a <code>forecasts</code> field in the <code>@code</code> section of the component of type <code>WeatherForecast[]?</code>.</p><p>In the <code>OnInitializedAsync</code> lifecycle method, the <code>forecasts</code> field gets populated with the Weather data.</p><p><strong>But what about the initial page render when the <code>forecasts</code> field is null?</strong></p><p>If we use the <code>foreach</code> iteration statement on a <code>null</code> value, we&rsquo;ll get a <code>NullReferenceException</code> during runtime. To prevent that from happening, the default project template wraps the above code in an <code>if-else</code> statement:</p><pre class=" language-csharp"><code class="prism  language-csharp">@<span class="token keyword">if</span> <span class="token punctuation">(</span>forecasts <span class="token operator">==</span> <span class="token keyword">null</span><span class="token punctuation">)</span>
<span class="token punctuation">{</span>
    <span class="token operator">&lt;</span>p<span class="token operator">&gt;</span><span class="token operator">&lt;</span>em<span class="token operator">&gt;</span>Loading<span class="token punctuation">.</span><span class="token punctuation">.</span><span class="token punctuation">.</span><span class="token operator">&lt;</span><span class="token operator">/</span>em<span class="token operator">&gt;</span><span class="token operator">&lt;</span><span class="token operator">/</span>p<span class="token operator">&gt;</span>
<span class="token punctuation">}</span>
<span class="token keyword">else</span> 
<span class="token punctuation">{</span>
  <span class="token comment">// additional code omitted for simplicity</span>
  @<span class="token keyword">foreach</span> <span class="token punctuation">(</span><span class="token keyword">var</span> forecast <span class="token keyword">in</span> forecasts<span class="token punctuation">)</span>
  <span class="token punctuation">{</span>
      <span class="token operator">&lt;</span>tr<span class="token operator">&gt;</span>
          <span class="token operator">&lt;</span>td<span class="token operator">&gt;</span>@forecast<span class="token punctuation">.</span>Date<span class="token punctuation">.</span><span class="token function">ToShortDateString</span><span class="token punctuation">(</span><span class="token punctuation">)</span><span class="token operator">&lt;</span><span class="token operator">/</span>td<span class="token operator">&gt;</span>
          <span class="token operator">&lt;</span>td<span class="token operator">&gt;</span>@forecast<span class="token punctuation">.</span>TemperatureC<span class="token operator">&lt;</span><span class="token operator">/</span>td<span class="token operator">&gt;</span>
          <span class="token operator">&lt;</span>td<span class="token operator">&gt;</span>@forecast<span class="token punctuation">.</span>TemperatureF<span class="token operator">&lt;</span><span class="token operator">/</span>td<span class="token operator">&gt;</span>
          <span class="token operator">&lt;</span>td<span class="token operator">&gt;</span>@forecast<span class="token punctuation">.</span>Summary<span class="token operator">&lt;</span><span class="token operator">/</span>td<span class="token operator">&gt;</span>
      <span class="token operator">&lt;</span><span class="token operator">/</span>tr<span class="token operator">&gt;</span>
  <span class="token punctuation">}</span>
<span class="token punctuation">}</span>
</code></pre><p>As long as the value of the <code>forecasts</code> field is <code>null</code>, the <strong>Loading&hellip;</strong> text is shown on the page. When the <code>forecasts</code> field is populated during page initialization, the page rerenders and the <code>else</code> block is executed, which contains a <code>foreach</code>statement that iterates over each element of the <code>forecasts</code> array.</p><p><strong>While this basic setup works, it has some flaws.</strong></p><ol><li>First of all, it&rsquo;s cumbersome to wrap the whole page code inside a large <code>if-else</code> block.</li><li>Next, the <strong>Loading&hellip;</strong> text is a lot smaller than the actual data rendering. That leads to vertical content shift during page load. Assume a button is below the forecast items. The user might want to click the button at the same time the list appears, moving the button away from their cursor.</li><li>This basic implementation also doesn&rsquo;t handle the error case. Let&rsquo;s say the data doesn&rsquo;t load from the server for various reasons; the <strong>Loading&hellip;</strong> text will forever be visible. It&rsquo;s not possible to distinguish between the <code>null</code> value from the page initialization and the <code>null</code> value from a failed data loading attempt.</li></ol><p>The goal of this article is to show you how to do a better job handling the empty, loading and error states of Blazor components.</p><h2 id="handling-empty-result-sets">Handling Empty Result Sets</h2><p>Sometimes the HTTP requests to the server succeeds but returns no items.</p><p>In the previous example, we would show an empty list, since the <code>foreach</code> statement will not be executed because the returned list does not contain any items.</p><p>A better solution is to explicitly communicate the empty result set to the user. The following code properly differentiates the loading from the empty result set state.</p><pre class=" language-csharp"><code class="prism  language-csharp">@<span class="token keyword">if</span> <span class="token punctuation">(</span>forecasts <span class="token operator">==</span> <span class="token keyword">null</span><span class="token punctuation">)</span>
<span class="token punctuation">{</span>
    <span class="token operator">&lt;</span>p<span class="token operator">&gt;</span><span class="token operator">&lt;</span>em<span class="token operator">&gt;</span>Loading<span class="token punctuation">.</span><span class="token punctuation">.</span><span class="token punctuation">.</span><span class="token operator">&lt;</span><span class="token operator">/</span>em<span class="token operator">&gt;</span><span class="token operator">&lt;</span><span class="token operator">/</span>p<span class="token operator">&gt;</span>
<span class="token punctuation">}</span>
<span class="token keyword">else</span> <span class="token keyword">if</span> <span class="token punctuation">(</span><span class="token operator">!</span>forecasts<span class="token punctuation">.</span><span class="token function">Any</span><span class="token punctuation">(</span><span class="token punctuation">)</span><span class="token punctuation">)</span>
<span class="token punctuation">{</span>
    <span class="token operator">&lt;</span>p<span class="token operator">&gt;</span>No weather information available<span class="token punctuation">.</span><span class="token operator">&lt;</span><span class="token operator">/</span>p<span class="token operator">&gt;</span>
<span class="token punctuation">}</span>
<span class="token keyword">else</span> 
<span class="token punctuation">{</span>
  <span class="token comment">// additional code omitted for simplicity</span>
  @<span class="token keyword">foreach</span> <span class="token punctuation">(</span><span class="token keyword">var</span> forecast <span class="token keyword">in</span> forecasts<span class="token punctuation">)</span>
  <span class="token punctuation">{</span>
      <span class="token operator">&lt;</span>tr<span class="token operator">&gt;</span>
          <span class="token operator">&lt;</span>td<span class="token operator">&gt;</span>@forecast<span class="token punctuation">.</span>Date<span class="token punctuation">.</span><span class="token function">ToShortDateString</span><span class="token punctuation">(</span><span class="token punctuation">)</span><span class="token operator">&lt;</span><span class="token operator">/</span>td<span class="token operator">&gt;</span>
          <span class="token operator">&lt;</span>td<span class="token operator">&gt;</span>@forecast<span class="token punctuation">.</span>TemperatureC<span class="token operator">&lt;</span><span class="token operator">/</span>td<span class="token operator">&gt;</span>
          <span class="token operator">&lt;</span>td<span class="token operator">&gt;</span>@forecast<span class="token punctuation">.</span>TemperatureF<span class="token operator">&lt;</span><span class="token operator">/</span>td<span class="token operator">&gt;</span>
          <span class="token operator">&lt;</span>td<span class="token operator">&gt;</span>@forecast<span class="token punctuation">.</span>Summary<span class="token operator">&lt;</span><span class="token operator">/</span>td<span class="token operator">&gt;</span>
      <span class="token operator">&lt;</span><span class="token operator">/</span>tr<span class="token operator">&gt;</span>
  <span class="token punctuation">}</span>
<span class="token punctuation">}</span>
</code></pre><p>This solution clearly communicates the three different UI states: Loading, empty result set and weather information available.</p><h2 id="handling-errors-during-data-loading">Handling Errors During Data Loading</h2><p>Another often-overlooked case is when an HTTP request to the server fails.</p><p>With the previous implementation, the <code>forecasts</code> field will remain <code>null</code> or set to an empty list (depending on the implementation). Both options are wrong.</p><p>It&rsquo;s best practice to show an error to the user to let them know that something didn&rsquo;t work properly. Otherwise, they might think that the request returned an empty result set (meaning, no weather data is available).</p><p>Consider the following data loading implementation in the <code>OnInitializedAsync</code> lifecycle method:</p><pre class=" language-csharp"><code class="prism  language-csharp"><span class="token keyword">private</span> List<span class="token operator">&lt;</span>WeatherForecast<span class="token operator">&gt;</span><span class="token operator">?</span> forecasts<span class="token punctuation">;</span>
<span class="token keyword">private</span> <span class="token keyword">string</span><span class="token operator">?</span> errorMessage<span class="token punctuation">;</span>

<span class="token keyword">protected</span> <span class="token keyword">override</span> <span class="token keyword">async</span> Task <span class="token function">OnInitializedAsync</span><span class="token punctuation">(</span><span class="token punctuation">)</span>
<span class="token punctuation">{</span>
    <span class="token keyword">try</span>
    <span class="token punctuation">{</span>
        forecasts <span class="token operator">=</span> <span class="token keyword">await</span> weatherService<span class="token punctuation">.</span><span class="token function">GetWeatherDataAsync</span><span class="token punctuation">(</span><span class="token punctuation">)</span><span class="token punctuation">;</span>
    <span class="token punctuation">}</span>
    <span class="token keyword">catch</span> <span class="token punctuation">(</span><span class="token class-name">Exception</span> ex<span class="token punctuation">)</span>
    <span class="token punctuation">{</span>
        errorMessage <span class="token operator">=</span> ex<span class="token punctuation">.</span>Message<span class="token punctuation">;</span>
    <span class="token punctuation">}</span>
<span class="token punctuation">}</span>
</code></pre><p>We use a <code>try-catch</code> statement to catch exceptions and store the exception message in the <code>errorMessage</code> field.</p><p><strong>Hint:</strong> It&rsquo;s best practice to catch and properly handle different exception types. If we cannot recover from a specific exception type, it doesn&rsquo;t make sense to catch it.</p><p>In the component template, we can now show the error message to the user:</p><pre class=" language-csharp"><code class="prism  language-csharp">@<span class="token keyword">if</span> <span class="token punctuation">(</span>errorMessage <span class="token operator">!=</span> <span class="token keyword">null</span><span class="token punctuation">)</span> 
<span class="token punctuation">{</span>
    <span class="token operator">&lt;</span>p <span class="token keyword">class</span><span class="token operator">=</span><span class="token string">"text-danger"</span><span class="token operator">&gt;</span>Error<span class="token punctuation">:</span> @errorMessage<span class="token operator">&lt;</span><span class="token operator">/</span>p<span class="token operator">&gt;</span>
<span class="token punctuation">}</span>
<span class="token keyword">else</span> <span class="token keyword">if</span> <span class="token punctuation">(</span>forecasts <span class="token operator">==</span> <span class="token keyword">null</span><span class="token punctuation">)</span>
<span class="token punctuation">{</span>
    <span class="token operator">&lt;</span>p<span class="token operator">&gt;</span><span class="token operator">&lt;</span>em<span class="token operator">&gt;</span>Loading<span class="token punctuation">.</span><span class="token punctuation">.</span><span class="token punctuation">.</span><span class="token operator">&lt;</span><span class="token operator">/</span>em<span class="token operator">&gt;</span><span class="token operator">&lt;</span><span class="token operator">/</span>p<span class="token operator">&gt;</span>
<span class="token punctuation">}</span>
<span class="token keyword">else</span> <span class="token keyword">if</span> <span class="token punctuation">(</span><span class="token operator">!</span>forecasts<span class="token punctuation">.</span><span class="token function">Any</span><span class="token punctuation">(</span><span class="token punctuation">)</span><span class="token punctuation">)</span>
<span class="token punctuation">{</span>
    <span class="token operator">&lt;</span>p<span class="token operator">&gt;</span>No weather information available<span class="token punctuation">.</span><span class="token operator">&lt;</span><span class="token operator">/</span>p<span class="token operator">&gt;</span>
<span class="token punctuation">}</span>
<span class="token keyword">else</span> 
<span class="token punctuation">{</span>
  <span class="token comment">// additional code omitted for simplicity</span>
  @<span class="token keyword">foreach</span> <span class="token punctuation">(</span><span class="token keyword">var</span> forecast <span class="token keyword">in</span> forecasts<span class="token punctuation">)</span>
  <span class="token punctuation">{</span>
      <span class="token operator">&lt;</span>tr<span class="token operator">&gt;</span>
          <span class="token operator">&lt;</span>td<span class="token operator">&gt;</span>@forecast<span class="token punctuation">.</span>Date<span class="token punctuation">.</span><span class="token function">ToShortDateString</span><span class="token punctuation">(</span><span class="token punctuation">)</span><span class="token operator">&lt;</span><span class="token operator">/</span>td<span class="token operator">&gt;</span>
          <span class="token operator">&lt;</span>td<span class="token operator">&gt;</span>@forecast<span class="token punctuation">.</span>TemperatureC<span class="token operator">&lt;</span><span class="token operator">/</span>td<span class="token operator">&gt;</span>
          <span class="token operator">&lt;</span>td<span class="token operator">&gt;</span>@forecast<span class="token punctuation">.</span>TemperatureF<span class="token operator">&lt;</span><span class="token operator">/</span>td<span class="token operator">&gt;</span>
          <span class="token operator">&lt;</span>td<span class="token operator">&gt;</span>@forecast<span class="token punctuation">.</span>Summary<span class="token operator">&lt;</span><span class="token operator">/</span>td<span class="token operator">&gt;</span>
      <span class="token operator">&lt;</span><span class="token operator">/</span>tr<span class="token operator">&gt;</span>
  <span class="token punctuation">}</span>
<span class="token punctuation">}</span>
</code></pre><p>We first handle the error case before considering the <strong>error</strong>, <strong>loading</strong>, <strong>empty</strong> and <strong>success</strong> states, using an extended <code>if-else</code> statement with four cases.</p><h2 id="a-cleaner-state-handling-pattern-with-explicit-state">A Cleaner State Handling Pattern with Explicit State</h2><p>Let&rsquo;s look at a <strong>more scalable</strong> and <strong>less cumbersome</strong> approach to handling different loading states using an explicit state <code>enum</code>.</p><p>First, we implement a <code>LoadingStates</code> <strong>enum</strong> with four states: <strong>Loading</strong>, <strong>Success</strong>, <strong>Empty</strong> and <strong>Error</strong>:</p><pre class=" language-csharp"><code class="prism  language-csharp"><span class="token keyword">public</span> <span class="token keyword">enum</span> LoadingStates
<span class="token punctuation">{</span>
    Loading<span class="token punctuation">,</span>
    Success<span class="token punctuation">,</span>
    Empty<span class="token punctuation">,</span>
    Error
<span class="token punctuation">}</span>
</code></pre><p>Next, we add a <code>LoadingState</code> component:</p><pre class=" language-csharp"><code class="prism  language-csharp">@<span class="token keyword">if</span> <span class="token punctuation">(</span>State <span class="token operator">==</span> LoadingStates<span class="token punctuation">.</span>Loading<span class="token punctuation">)</span>
<span class="token punctuation">{</span>
    @Loading
<span class="token punctuation">}</span>
<span class="token keyword">else</span> <span class="token keyword">if</span> <span class="token punctuation">(</span>State <span class="token operator">==</span> LoadingStates<span class="token punctuation">.</span>Success<span class="token punctuation">)</span>
<span class="token punctuation">{</span>
    @Success
<span class="token punctuation">}</span>
<span class="token keyword">else</span> <span class="token keyword">if</span> <span class="token punctuation">(</span>State <span class="token operator">==</span> LoadingStates<span class="token punctuation">.</span>Empty<span class="token punctuation">)</span>
<span class="token punctuation">{</span>
    @Empty
<span class="token punctuation">}</span>
<span class="token keyword">else</span> <span class="token keyword">if</span> <span class="token punctuation">(</span>State <span class="token operator">==</span> LoadingStates<span class="token punctuation">.</span>Error<span class="token punctuation">)</span>
<span class="token punctuation">{</span>
    @Error
<span class="token punctuation">}</span>

@code <span class="token punctuation">{</span>
    <span class="token punctuation">[</span>Parameter<span class="token punctuation">,</span> EditorRequired<span class="token punctuation">]</span>
    <span class="token keyword">public</span> LoadingStates State <span class="token punctuation">{</span> <span class="token keyword">get</span><span class="token punctuation">;</span> <span class="token keyword">set</span><span class="token punctuation">;</span> <span class="token punctuation">}</span>

    <span class="token punctuation">[</span>Parameter<span class="token punctuation">]</span>
    <span class="token keyword">public</span> RenderFragment<span class="token operator">?</span> Loading <span class="token punctuation">{</span> <span class="token keyword">get</span><span class="token punctuation">;</span> <span class="token keyword">set</span><span class="token punctuation">;</span> <span class="token punctuation">}</span>

    <span class="token punctuation">[</span>Parameter<span class="token punctuation">]</span>
    <span class="token keyword">public</span> RenderFragment<span class="token operator">?</span> Success <span class="token punctuation">{</span> <span class="token keyword">get</span><span class="token punctuation">;</span> <span class="token keyword">set</span><span class="token punctuation">;</span> <span class="token punctuation">}</span>

    <span class="token punctuation">[</span>Parameter<span class="token punctuation">]</span>
    <span class="token keyword">public</span> RenderFragment<span class="token operator">?</span> Empty <span class="token punctuation">{</span> <span class="token keyword">get</span><span class="token punctuation">;</span> <span class="token keyword">set</span><span class="token punctuation">;</span> <span class="token punctuation">}</span>

    <span class="token punctuation">[</span>Parameter<span class="token punctuation">]</span>
    <span class="token keyword">public</span> RenderFragment<span class="token operator">?</span> Error <span class="token punctuation">{</span> <span class="token keyword">get</span><span class="token punctuation">;</span> <span class="token keyword">set</span><span class="token punctuation">;</span> <span class="token punctuation">}</span>
<span class="token punctuation">}</span>
</code></pre><p>We have a required <code>State</code> parameter of type <code>LoadingStates</code>, which will receive the current state of the parent component.</p><p>The <code>Loading</code>, <code>Success</code>, <code>Empty</code> and <code>Error</code> properties provide an optional parameter of type <code>RenderFragment</code>. Those properties are then used depending on the state of the parent component.</p><blockquote><p><strong>Hint:</strong> You can learn more about <a target="_blank" href="https://www.telerik.com/blogs/blazor-basics-templating-components-renderfragments">templating Blazor components with RenderFragements</a>.</p></blockquote><p>Next, we use the <code>LoadingState</code> component inside the <code>Weather</code> component:</p><pre class=" language-html"><code class="prism  language-html"><span class="token tag"><span class="token tag"><span class="token punctuation">&lt;</span>LoadingState</span> <span class="token attr-name">State</span><span class="token attr-value"><span class="token punctuation">=</span><span class="token punctuation">"</span>@_loadingState<span class="token punctuation">"</span></span><span class="token punctuation">&gt;</span></span>
    <span class="token tag"><span class="token tag"><span class="token punctuation">&lt;</span>Loading</span><span class="token punctuation">&gt;</span></span>
        <span class="token tag"><span class="token tag"><span class="token punctuation">&lt;</span>p</span><span class="token punctuation">&gt;</span></span><span class="token tag"><span class="token tag"><span class="token punctuation">&lt;</span>em</span><span class="token punctuation">&gt;</span></span>Loading...<span class="token tag"><span class="token tag"><span class="token punctuation">&lt;/</span>em</span><span class="token punctuation">&gt;</span></span><span class="token tag"><span class="token tag"><span class="token punctuation">&lt;/</span>p</span><span class="token punctuation">&gt;</span></span>
    <span class="token tag"><span class="token tag"><span class="token punctuation">&lt;/</span>Loading</span><span class="token punctuation">&gt;</span></span>
    <span class="token tag"><span class="token tag"><span class="token punctuation">&lt;</span>Empty</span><span class="token punctuation">&gt;</span></span>
        <span class="token tag"><span class="token tag"><span class="token punctuation">&lt;</span>p</span><span class="token punctuation">&gt;</span></span>No weather information available.<span class="token tag"><span class="token tag"><span class="token punctuation">&lt;/</span>p</span><span class="token punctuation">&gt;</span></span>
    <span class="token tag"><span class="token tag"><span class="token punctuation">&lt;/</span>Empty</span><span class="token punctuation">&gt;</span></span>
    <span class="token tag"><span class="token tag"><span class="token punctuation">&lt;</span>Success</span><span class="token punctuation">&gt;</span></span>
        <span class="token tag"><span class="token tag"><span class="token punctuation">&lt;</span>table</span> <span class="token attr-name">class</span><span class="token attr-value"><span class="token punctuation">=</span><span class="token punctuation">"</span>table<span class="token punctuation">"</span></span><span class="token punctuation">&gt;</span></span>
            <span class="token tag"><span class="token tag"><span class="token punctuation">&lt;</span>thead</span><span class="token punctuation">&gt;</span></span>
                <span class="token tag"><span class="token tag"><span class="token punctuation">&lt;</span>tr</span><span class="token punctuation">&gt;</span></span>
                    <span class="token tag"><span class="token tag"><span class="token punctuation">&lt;</span>th</span><span class="token punctuation">&gt;</span></span>Date<span class="token tag"><span class="token tag"><span class="token punctuation">&lt;/</span>th</span><span class="token punctuation">&gt;</span></span>
                    <span class="token tag"><span class="token tag"><span class="token punctuation">&lt;</span>th</span> <span class="token attr-name">aria-label</span><span class="token attr-value"><span class="token punctuation">=</span><span class="token punctuation">"</span>Temperature in Celsius<span class="token punctuation">"</span></span><span class="token punctuation">&gt;</span></span>Temp. (C)<span class="token tag"><span class="token tag"><span class="token punctuation">&lt;/</span>th</span><span class="token punctuation">&gt;</span></span>
                    <span class="token tag"><span class="token tag"><span class="token punctuation">&lt;</span>th</span> <span class="token attr-name">aria-label</span><span class="token attr-value"><span class="token punctuation">=</span><span class="token punctuation">"</span>Temperature in Fahrenheit<span class="token punctuation">"</span></span><span class="token punctuation">&gt;</span></span>Temp. (F)<span class="token tag"><span class="token tag"><span class="token punctuation">&lt;/</span>th</span><span class="token punctuation">&gt;</span></span>
                    <span class="token tag"><span class="token tag"><span class="token punctuation">&lt;</span>th</span><span class="token punctuation">&gt;</span></span>Summary<span class="token tag"><span class="token tag"><span class="token punctuation">&lt;/</span>th</span><span class="token punctuation">&gt;</span></span>
                <span class="token tag"><span class="token tag"><span class="token punctuation">&lt;/</span>tr</span><span class="token punctuation">&gt;</span></span>
            <span class="token tag"><span class="token tag"><span class="token punctuation">&lt;/</span>thead</span><span class="token punctuation">&gt;</span></span>
            <span class="token tag"><span class="token tag"><span class="token punctuation">&lt;</span>tbody</span><span class="token punctuation">&gt;</span></span>
                @foreach (var forecast in forecasts)
                {
                    <span class="token tag"><span class="token tag"><span class="token punctuation">&lt;</span>tr</span><span class="token punctuation">&gt;</span></span>
                        <span class="token tag"><span class="token tag"><span class="token punctuation">&lt;</span>td</span><span class="token punctuation">&gt;</span></span>@forecast.Date.ToShortDateString()<span class="token tag"><span class="token tag"><span class="token punctuation">&lt;/</span>td</span><span class="token punctuation">&gt;</span></span>
                        <span class="token tag"><span class="token tag"><span class="token punctuation">&lt;</span>td</span><span class="token punctuation">&gt;</span></span>@forecast.TemperatureC<span class="token tag"><span class="token tag"><span class="token punctuation">&lt;/</span>td</span><span class="token punctuation">&gt;</span></span>
                        <span class="token tag"><span class="token tag"><span class="token punctuation">&lt;</span>td</span><span class="token punctuation">&gt;</span></span>@forecast.TemperatureF<span class="token tag"><span class="token tag"><span class="token punctuation">&lt;/</span>td</span><span class="token punctuation">&gt;</span></span>
                        <span class="token tag"><span class="token tag"><span class="token punctuation">&lt;</span>td</span><span class="token punctuation">&gt;</span></span>@forecast.Summary<span class="token tag"><span class="token tag"><span class="token punctuation">&lt;/</span>td</span><span class="token punctuation">&gt;</span></span>
                    <span class="token tag"><span class="token tag"><span class="token punctuation">&lt;/</span>tr</span><span class="token punctuation">&gt;</span></span>
                }
            <span class="token tag"><span class="token tag"><span class="token punctuation">&lt;/</span>tbody</span><span class="token punctuation">&gt;</span></span>
        <span class="token tag"><span class="token tag"><span class="token punctuation">&lt;/</span>table</span><span class="token punctuation">&gt;</span></span>
    <span class="token tag"><span class="token tag"><span class="token punctuation">&lt;/</span>Success</span><span class="token punctuation">&gt;</span></span>
    <span class="token tag"><span class="token tag"><span class="token punctuation">&lt;</span>Error</span><span class="token punctuation">&gt;</span></span>
        <span class="token tag"><span class="token tag"><span class="token punctuation">&lt;</span>p</span> <span class="token attr-name">class</span><span class="token attr-value"><span class="token punctuation">=</span><span class="token punctuation">"</span>text-danger<span class="token punctuation">"</span></span><span class="token punctuation">&gt;</span></span>Error: @errorMessage<span class="token tag"><span class="token tag"><span class="token punctuation">&lt;/</span>p</span><span class="token punctuation">&gt;</span></span>
    <span class="token tag"><span class="token tag"><span class="token punctuation">&lt;/</span>Error</span><span class="token punctuation">&gt;</span></span>
<span class="token tag"><span class="token tag"><span class="token punctuation">&lt;/</span>LoadingState</span><span class="token punctuation">&gt;</span></span>
</code></pre><p>Instead of the <code>if-else</code> statement, we use the <code>LoadingState</code> component and provide the loading state of the <code>Weather</code> component as its <code>State</code> parameter.</p><p>We can now provide HTML definitions for each of the four loading states. For example, we move the table rendering the weather information into the <code>Success</code> child element.</p><p>The code section looks like this:</p><pre class=" language-csharp"><code class="prism  language-csharp">@code <span class="token punctuation">{</span>
    <span class="token keyword">private</span> IEnumerable<span class="token operator">&lt;</span>WeatherForecast<span class="token operator">&gt;</span> forecasts <span class="token operator">=</span> <span class="token punctuation">[</span><span class="token punctuation">]</span><span class="token punctuation">;</span>
    <span class="token keyword">private</span> LoadingStates _loadingState <span class="token operator">=</span> LoadingStates<span class="token punctuation">.</span>Loading<span class="token punctuation">;</span>
    <span class="token keyword">private</span> <span class="token keyword">string</span><span class="token operator">?</span> errorMessage<span class="token punctuation">;</span>

    <span class="token keyword">protected</span> <span class="token keyword">override</span> <span class="token keyword">async</span> Task <span class="token function">OnInitializedAsync</span><span class="token punctuation">(</span><span class="token punctuation">)</span>
    <span class="token punctuation">{</span>
        _loadingState <span class="token operator">=</span> LoadingStates<span class="token punctuation">.</span>Loading<span class="token punctuation">;</span>

        <span class="token keyword">try</span>
        <span class="token punctuation">{</span>
            forecasts <span class="token operator">=</span> <span class="token keyword">await</span> WeatherService<span class="token punctuation">.</span><span class="token function">GetWeatherDataAsync</span><span class="token punctuation">(</span><span class="token punctuation">)</span><span class="token punctuation">;</span>
            _loadingState <span class="token operator">=</span> forecasts<span class="token punctuation">.</span><span class="token function">Any</span><span class="token punctuation">(</span><span class="token punctuation">)</span> <span class="token operator">?</span> 
                LoadingStates<span class="token punctuation">.</span>Success <span class="token punctuation">:</span> 
                LoadingStates<span class="token punctuation">.</span>Empty<span class="token punctuation">;</span>
        <span class="token punctuation">}</span>
        <span class="token keyword">catch</span> <span class="token punctuation">(</span><span class="token class-name">Exception</span> ex<span class="token punctuation">)</span>
        <span class="token punctuation">{</span>
            errorMessage <span class="token operator">=</span> ex<span class="token punctuation">.</span>Message<span class="token punctuation">;</span>
            _loadingState <span class="token operator">=</span> LoadingStates<span class="token punctuation">.</span>Error<span class="token punctuation">;</span>
        <span class="token punctuation">}</span>
    <span class="token punctuation">}</span>
<span class="token punctuation">}</span>
</code></pre><p>In addition to the <code>forecasts</code> field, we have a <code>_loadingState</code> field and an <code>errorMessage</code> field.</p><p>In the <code>OnInitializedAsync</code> method, we first set the loading state to <strong>Loading</strong>. This allows the Blazor application to communicate that it&rsquo;s loading data by rendering the Loading state fragment defined in the component template.</p><p>Next, we use a <code>try-catch</code> statement to handle unexpected exceptions. In the <code>try</code> clause, we use the <code>WeatherService</code> to fetch the data from the server and set the <code>_loadingState</code> field to <strong>Success</strong> or <strong>Empty</strong> depending on the data received.</p><p>In case of an exception, we set the error message to the <code>errorMessage</code> field in the <code>catch</code> block and set the <code>_loadingState</code> field to <strong>Error</strong>.</p><blockquote><p><strong>Hint:</strong> You can test the error state by voluntarily throwing an exception inside the <code>WeatherService</code> implementation.</p></blockquote><h2 id="improved-developer-experience">Improved Developer Experience</h2><p><strong>Optional:</strong> You could implement default behavior inside the <code>LoadingState</code> component for the loading and error cases.</p><p>That way, you maintain consistency throughout the application and can override the default implementation in specific cases. And you shorten the component template for most components, such as the <code>Weather</code> component in this example.</p><pre class=" language-csharp"><code class="prism  language-csharp">@<span class="token keyword">if</span> <span class="token punctuation">(</span>State <span class="token operator">==</span> LoadingStateEnum<span class="token punctuation">.</span>Loading<span class="token punctuation">)</span>
<span class="token punctuation">{</span>
    @Loading <span class="token operator">?</span><span class="token operator">?</span> <span class="token operator">&lt;</span>p<span class="token operator">&gt;</span>Loading<span class="token punctuation">.</span><span class="token punctuation">.</span><span class="token punctuation">.</span><span class="token operator">&lt;</span><span class="token operator">/</span>p<span class="token operator">&gt;</span>
<span class="token punctuation">}</span>
</code></pre><p>In the <code>LoadingState</code> component, we use the <code>??</code> operator to render the provided render fragment or the default template.</p><p>You could do the same for the <strong>Error</strong> state or maybe even the <strong>Empty</strong> state.</p><h2 id="conclusion">Conclusion</h2><p>In data-driven applications, handling states such as <strong>loading</strong>, <strong>error</strong>, <strong>empty</strong> and <strong>success</strong> is crucial for providing a modern user experience.</p><p>The default project template doesn&rsquo;t provide a solution to handle all of them. It focuses on the happy path while neglecting other cases.</p><p>In this article, we learned two ways to properly handle the four loading states. The second approach, using a dedicated <code>LoadingState</code> component, is more reusable and clearly differentiates between all the states.</p><p>If you want to learn more about Blazor development, watch my <a target="_blank" href="https://www.youtube.com/playlist?list=PLwISgxnkpZGL_LhTQCWwp-WCzupv7lcp0">free Blazor Crash Course</a> on YouTube. And stay tuned to the Telerik blog for more <a target="_blank" href="https://www.telerik.com/blogs/tag/blazor-basics">Blazor Basics</a>.</p><aside><hr data-sf-ec-immutable="" /><div class="row"><div class="col-4 u-normal-full u-small-mb0"><h4 class="u-fs20 u-fw5 u-lh125 u-mb0">Telerik UI for Blazor Meets A2UI: The Next Step Toward Dynamic UI Generation</h4></div><div class="col-8"><p class="u-fs16 u-mb0"><a target="_blank" href="https://www.telerik.com/blogs/telerik-ui-blazor-meets-a2ui-next-step-toward-dynamic-ui-generation">Learn how A2UI enables AI systems</a> to generate interactive, dynamically generated Blazor interfaces and how Progress Telerik UI for Blazor will help.</p></div></div></aside><img src="https://feeds.telerik.com/link/23050/17386661.gif" height="1" width="1"/>]]></content>
  </entry>
  <entry>
    <id>urn:uuid:e2419957-b248-4ca0-bb06-3fe57d475fe7</id>
    <title type="text">Using AI to Build a Blazor App 3: Prototypes and Tracer Bullets</title>
    <summary type="text">How do you figure out how your app idea should feel to use? Or which part to build first? Turns out we can draw inspiration from some classic texts on software development.</summary>
    <published>2026-07-20T21:41:53Z</published>
    <updated>2026-08-24T02:17:02Z</updated>
    <author>
      <name>Jon Hilton </name>
    </author>
    <link rel="alternate" href="https://feeds.telerik.com/link/23050/17383638/using-ai-build-blazor-app-3-prototypes-tracer-bullets"/>
    <content type="text"><![CDATA[<p><span class="featured">How do you figure out how your app idea should feel to use? Or which part to build first? Turns out we can draw inspiration from some classic texts on software development.</span></p><p>In <a href="https://www.telerik.com/blogs/using-ai-build-blazor-app-1-start-problem" target="_blank">Parts 1</a> and <a href="https://www.telerik.com/blogs/using-ai-build-blazor-app-2-define-requirement" target="_blank">2</a>, we used AI to help us get clear about what we&rsquo;re building and why. We scoped it down and were explicit about what&rsquo;s not in scope. This left us with some decisions made and a starting point for the next step.</p><p>But what is that step? Well that depends slightly on what you&rsquo;re trying to do.</p><p>In Part 1, we identified that software design is messy. Reaching a shared understanding about what you&rsquo;re building (shared with other humans or AI) is a challenge. What we definitely don&rsquo;t want to do is give AI a giant spec and tell it to &ldquo;go build it.&rdquo; There are too many unknowns and opportunities for AI to drift from what we really wanted in the first place.</p><p>So how do we break this down into smaller steps and stay agile so we can react to reality when it hits us in the face and demands we change direction?</p><p>It turns out there are answers to be found in the classic software development texts. <em>The Pragmatic Programmer</em> (a book you absolutely should read, especially if you&rsquo;re using AI for coding) talks about tracer bullets and prototypes. They are two different tools for slightly different purposes.</p><h2 id="tracer-bullets">Tracer Bullets</h2><p>A tracer bullet is a bullet that&rsquo;s loaded at intervals alongside regular bullets and leaves a trace when fired. The idea is it helps you locate the target (if you see the tracer bullets hitting a target, so are the other bullets).</p><p>In coding terms, we can use this to build something that gives you early feedback that you&rsquo;re aiming at the right target.</p><p>In a project like this, a useful tracer bullet might be a minimal feature that exercises the entire stack (UI to backend to persistent storage). Or maybe that first stage of setting up the web project, running it and checking it loads in the browser.</p><p>The key with the tracer bullet is that it&rsquo;s production code, built vertically, to verify your basic premise holds up.</p><h2 id="prototypes">Prototypes</h2><p>Prototypes are different. They&rsquo;re useful for testing out UI designs or spiking technical choices that you haven&rsquo;t used before. You can use them for everything from generating multiple versions of a screen (UI only, no backend) to settle on a design/UX, to spiking out how Claude&rsquo;s Agent SDK could work to give your app AI capabilities.</p><p>The big difference between prototypes and tracer bullets is that prototypes are throwaway. Once you&rsquo;ve used them to clarify an aspect of your project, you chuck them in the bin. Tracer bullets, on the other hand, are small vertical slices of your app that you then keep and build on over time.</p><h2 id="so-which-is-it-to-be">So Which Is It to Be?</h2><p>In this case, I wanted to think through the UI and UX for this new app. Specifically to figure out the ergonomics of everything we decided was in scope (in Part 2).</p><blockquote><p>Now I want to prototype this. To be clear, this prototype is for deciding on the rough shape of the UI for this feature. I would like to see a rough mockup (not over-designed) of how this article workspace could look. This is prototype code which will be thrown away, so does not need to be functional beyond showing me potential UI/UX</p></blockquote><p>Again, we&rsquo;re starting with a prompt to see how Codex (GPT 5.5) handles this. From that prompt, it created a basic V1, which was surprisingly functional but had a few issues.</p><p><img src="https://www.telerik.com/sfimages/default-source/blogs/2026/2026-06/prototype-v1.png?sfvrsn=13147592_2" title="The first prototype is functional but trying to do too much on one screen. The Quick Capture corner and the squeezed newsletter panel were the obvious targets for the next iteration." alt="First Article Workspace prototype with cramped Quick Capture, sidebar nav, editor and a sidelined newsletter panel" /></p><p>The issues here include:</p><ul><li>The &ldquo;Quick Capture&rdquo; is too small to be useful (top-left).</li><li>The newsletter showing on the right (or underneath on smaller screens) feels a bit sidelined over there (again, too small).</li><li>Overall, this is trying to do much on one screen.</li></ul><p>But the markdown editor works, as does the left-hand nav, and I liked the idea of the publish checks (which we had surfaced in earlier conversations with the AI).</p><p>So, over a few messages, we iterated this prototype:</p><blockquote><p>Capture an idea that is way too small to be useful. I think I&rsquo;d be tempted to have that as a button, and a modal in this case (not always a fan of a modal, but seems OK here)</p></blockquote><p>It then built a new modal for capturing an idea, but it added more fields. This is a trap with LLMs trying to be helpful (drifting from the brief), so I brought it back.</p><blockquote><p>we&rsquo;ve drifted from the brief there, we agreed to simply capture a rough idea/title and also optionally why it matters. So the idea should be a text area (rough idea) too and we don&rsquo;t need additional fields</p></blockquote><p>After a few more back-and-forths, we arrived at a better version, but I wanted to check we&rsquo;d met the requirements listed in the most recent ADR (created in the last step).</p><blockquote><p>if you review the ADR, what does this screen not meet (in terms of the requirements we landed on)</p></blockquote><p>After a couple more iterations we landed here:</p><p><img src="https://www.telerik.com/sfimages/default-source/blogs/2026/2026-06/prototype-v2.png?sfvrsn=e8f5976_2" title="A few iterations later: idea capture moved into a modal, Article and Newsletter share one editor with tabs, and Publish Checks sit alongside. The mockup stage is where the real UX decisions actually got made." alt="Revised Article Workspace prototype with Article and Newsletter tabs sharing the editor pane and Publish Checks on the right" /></p><p>Key features that came out of this process:</p><ul><li>&ldquo;Capture idea&rdquo; button (opens modal)</li><li>Shared &ldquo;editor pane&rdquo; for both Article and Newsletter (with tabs)</li><li>Consistent UI/UX across both tabs (with publish checks on right)</li><li>Same markdown editor used on both tabs</li><li>AI functionality on the newsletter tab (to generate hook and subject line ideas)</li></ul><p>The key thing that jumped out for me here was the realization that, although the ADR captured the details of what we were aiming for, it was only during this &ldquo;mockup&rdquo; stage that some key design decisions were made. It&rsquo;s another example of using AI to help you, the human, think.</p><p>Because this is throwaway code, it&rsquo;s cheap to iterate, throw ideas around and think through the ergonomics of this feature. This is not 1:1 production code, but it helped us arrive at some key UI/UX decisions, and we can always use this as a reference point when we come to build the real thing. It will be up to us how closely we want the AI to stick to this &ldquo;design.&rdquo;</p><h2 id="now-for-the-tracer-bullet">Now for the Tracer Bullet</h2><p>With that UI sorted, the next step is to make this something that runs in the browser, and as quickly as possible. A perfect case for tracer bullets!</p><blockquote><p>using the prototype we settled on, please identify candidates for our first tracer bullet and present them to me. This should be a tracer bullet as in the Pragmatic Programmer, something we can build that&rsquo;s real, and will be the basis of our app</p></blockquote><p>At this point, GPT gave me a few options:</p><ul><li>Capture Idea To Real Draft</li><li>Article Plus Companion Newsletter Draft</li><li>Publish Draft To Blog</li><li>Open Existing Draft and Save Edits</li></ul><p>As this new UI will need to work with MDX files in my Astro blog as the source of truth, I figured &ldquo;Open Existing Draft and Save Edits&rdquo; was a good first step (proves the architecture and immediately gives me a new editor for existing content).</p><p>GPT suggested this acceptance test:</p><blockquote><p>Given an existing Astro MDX draft, I can open the app, edit the article body in a comfortable editor, save it, close the app, reopen it, and see the same edited draft loaded from the real Astro source file.</p></blockquote><p>At this stage, we need something to build from (which is a little more detailed than that acceptance test).</p><blockquote><p>Ok great let&rsquo;s capture that. I feel like we should create a task/ticket/issue for this.</p></blockquote><p>With that GPT created a task md file. Here&rsquo;s part of it:</p><p><img src="https://www.telerik.com/sfimages/default-source/blogs/2026/2026-06/task-0001.png?sfvrsn=c454ca1b_2" title="Part of the task file GPT wrote for the first tracer bullet. Just enough context for the next session to act on, without burying it in detail." alt="Markdown task file titled Task 0001 Open Existing Astro Draft And Save Edits showing Goal, User Story, and Scope sections" /></p><p>This is all about context. We want to give AI enough context to do the work, but not so much it has to start guessing and interpreting mountains of detail to find the parts it needs.</p><p>This is a good first step. Next time, we&rsquo;ll <a href="https://www.telerik.com/blogs/using-ai-build-blazor-app-4-architect-build-first-feature" target="_blank">build that tracer bullet</a> for real.</p><aside><hr data-sf-ec-immutable="" /><div class="row"><div class="col-4 u-normal-full u-small-mb0"><h4 class="u-fs20 u-fw5 u-lh125 u-mb0">Telerik UI for Blazor Meets A2UI: The Next Step Toward Dynamic UI Generation</h4></div><div class="col-8"><p class="u-fs16 u-mb0"><a target="_blank" href="https://www.telerik.com/blogs/telerik-ui-blazor-meets-a2ui-next-step-toward-dynamic-ui-generation">Learn how A2UI enables AI systems</a> to generate interactive, dynamically generated Blazor interfaces and how Progress Telerik UI for Blazor will help.</p></div></div></aside><img src="https://feeds.telerik.com/link/23050/17383638.gif" height="1" width="1"/>]]></content>
  </entry>
  <entry>
    <id>urn:uuid:cdf15d91-3853-4df5-9081-f0766ab544bc</id>
    <title type="text">Using AI to Build a Blazor App 2: Define the Requirement</title>
    <summary type="text">Knowing roughly what you’re aiming for is one thing, but sooner or later you need to get clear on the specifics. What’s the feature you’re actually aiming for?</summary>
    <published>2026-07-14T14:23:05Z</published>
    <updated>2026-08-24T02:17:02Z</updated>
    <author>
      <name>Jon Hilton </name>
    </author>
    <link rel="alternate" href="https://feeds.telerik.com/link/23050/17380120/using-ai-build-blazor-app-2-define-requirement"/>
    <content type="text"><![CDATA[<p><span class="featured">Knowing roughly what you&rsquo;re aiming for is one thing, but sooner or later you need to get clear on the specifics. What&rsquo;s the feature you&rsquo;re actually aiming for?</span></p><blockquote><p>AI will build whatever you ask it to, so you&rsquo;d better ask for the right thing.</p></blockquote><p>Last time, we saw how to <a href="https://www.telerik.com/blogs/using-ai-build-blazor-app-1-start-problem" target="_blank">use AI to dig into a problem and define the rough shape</a> of a viable solution. By the end of that session, we&rsquo;d decided to keep things simple: a markdown editor that works directly with MDX files, a way to draft the corresponding newsletter emails and a publishing workflow to make the article live on the web.</p><p>We&rsquo;d avoided heavy technical discussions, UI design or carving out specific features, and ended up with a number of decision records (markdown) which captured the decisions we made along the way. Now we needed to get more specific and figure out which feature to build first.</p><p>Here&rsquo;s the prompt I tried this time (using GPT 5.5).</p><blockquote><p>We previously worked through an ideation process for this new project and captured key decisions as ADRs on disk. Please now work with me to carve out the headline feature we want to build first, that we think has the best chance of delivering the value we carved out in phase 1. We know what we&rsquo;re trying to build and why, now we want to make this concrete by figuring out what this core feature is. Do not get into specific implementation details here. The goal is to shape the feature (mapping to the decisions we&rsquo;ve already made).</p><p>Ask me questions, one at a time, to flesh this out enough that we can later define our first behavioural tests, which will then drive implementation.</p><p>For each question, include your recommended answer.</p></blockquote><p>By no means is this a perfect prompt, but the key thing I wanted was for GPT to focus on the headline feature&mdash;the thing we can build that will deliver the greatest value (to address the problem we identified in Part 1).</p><p>To avoid getting into the technical weeds at this stage, the instructions are to stay firmly in &ldquo;what can the user do, and what does it achieve&rdquo; territory. Just as with Part 1, this flushed out some crucial details.</p><p>For example, GPT asked how I wanted the flow between writing an article and then drafting its related newsletter to work.</p><p>I realized I didn&rsquo;t want this to be a linear process (write article, prepare newsletter) but more of an editing surface where I could jump between the two.</p><blockquote><p>I&rsquo;d say the prepare newsletter can happen any time, I might potentially work on the article, then mid-writing realise I&rsquo;ve got the hook for the newsletter and decide to jump over there to draft that (or at least capture it). So it&rsquo;s not linear</p></blockquote><p>To which GPT responded:</p><blockquote><p>That&rsquo;s a useful constraint: the headline feature is not a linear wizard. It&rsquo;s an <strong>article workspace with a linked newsletter draft available at any time</strong>, plus a deliberate publish action when the blog post is ready.</p><p><strong>Recommended shape:</strong> every article has a companion newsletter area that can be opened whenever inspiration hits. It can hold rough notes, hooks, or a near-final email. Publishing the blog post later gives that newsletter draft the final URL it needs.</p></blockquote><p>We dug into details around how any AI assistance might work with the newsletter editor. I don&rsquo;t like the idea of AI writing content for me, but would be happy to use AI for hook and subject line suggestions.</p><blockquote><p>Next question: <strong>how should the app present those hook/subject suggestions so they help without taking over?</strong></p></blockquote><p>I answered:</p><blockquote><p>I think maybe options for the user to generate hooks, generate subjects etc. then a way to take one and use it (or get new ones if they&rsquo;re no good)</p></blockquote><p>GPT:</p><blockquote><p>That gives the assistance a clean role: <strong>explicitly requested idea generation for newsletter framing</strong>, with user-controlled insertion.</p></blockquote><p>We covered a lot of ground in this chat, including:</p><ul><li>When you mark a finished article as ready to publish, should the feature generate the newsletter draft automatically?</li><li>When you begin the publish article action, what guardrails should the app check before it lets you proceed?</li><li>When the blog post is published, what should happen to the newsletter draft automatically?</li><li>What is the main user-facing promise of this headline feature in one sentence?</li></ul><h2 id="ai-recommended-answers">AI Recommended Answers</h2><p>In the prompt, I&rsquo;d asked the LLM to include its recommended answer when asking questions.</p><p>This seems &ldquo;off&rdquo; at first (surely that&rsquo;s your job, as the human!), but it turns out to be quite helpful.</p><p>There is a danger that you&rsquo;ll just start accepting what the AI suggests because it&rsquo;s the easiest option, so it&rsquo;s worth thinking carefully about what you really think before blindly accepting its recommendations. But in many cases the AI gets it right, or close enough that you can tweak it and move on.</p><p><img src="https://www.telerik.com/sfimages/default-source/blogs/2026/2026-06/gpt-happy-path.png?sfvrsn=5cffb767_2" title="GPT not only asks the question, it offers a recommended answer. Useful as a starting point you can push back on, rather than a blank canvas." alt="GPT response recommending the headline-feature happy path from idea capture through Astro publish" /></p><p>One of the biggest challenges with defining scope is being clear what <strong>not</strong> to build.</p><p>On this occasion, GPT caught this, finishing with this question:</p><blockquote><p>Before we stop, one final shaping question: <strong>what would be explicitly out of scope for the first version of Article Workspace?</strong></p><ul><li>Social posts.</li><li>Newsletter sending/scheduling.</li><li>Full AI article generation.</li><li>Complex idea inbox or content pipeline states.</li><li>Analytics beyond simple publishing visibility.</li><li>Multi-user/productized workflows.</li><li>Deep DevScribe/Bento integration.</li><li>Rigid streak mechanics.</li><li>Implementation-specific Git UI details beyond a deliberate publish action.</li></ul></blockquote><p>It&rsquo;s tempting to think that, with AI, we could include some of these and let it go at them. But we still care about code quality and building features that work, and the best way to do that with LLMs is to be specific and reduce how many things we ask it to do at a time.</p><p>So I agreed with all of these being out of scope and we settled on this shape for the headline feature.</p><pre class=" language-markdown"><code class="prism  language-markdown"><span class="token title important"><span class="token punctuation">#</span> Headline Feature: Article Workspace</span>

Article Workspace lets you capture an idea, develop it into a Markdown article, prepare a companion newsletter draft, publish the blog post to Astro, and keep the email follow-up visible so the audience receives useful value and the weekly publishing rhythm builds trust over time.

<span class="token title important"><span class="token punctuation">##</span> Core Happy Path</span>

You open the app, capture a useful idea with why it matters, immediately get a draft article workspace, write the Markdown article, optionally draft newsletter hooks, subject, and body alongside it, confirm publish readiness, publish the blog post to Astro by marking it not draft and committing/pushing, then see the final URL available to finish the linked newsletter draft for separate sending.

<span class="token title important"><span class="token punctuation">##</span> Key Boundaries</span>

<span class="token list punctuation">-</span> Idea capture is the earliest form of a draft, not a separate workflow.
<span class="token list punctuation">-</span> Capture requires the idea plus why it matters / what is at stake / angle.
<span class="token list punctuation">-</span> The &ldquo;why it matters&rdquo; note stays visible near the editor, not inside the published article by default.
<span class="token list punctuation">-</span> Newsletter writing can happen at any time, not only after the article is finished.
<span class="token list punctuation">-</span> AI assistance is limited to optional hooks and subject-line suggestions.
<span class="token list punctuation">-</span> Blog publishing and newsletter sending remain separate deliberate actions.
<span class="token list punctuation">-</span> Blog success means the article is in Astro source, marked not draft, committed, and pushed.
<span class="token list punctuation">-</span> Newsletter success means subject/body are ready, reviewed, and have access to the final article URL unless sending the full article verbatim.

<span class="token title important"><span class="token punctuation">##</span> Out of Scope For First Version</span>

Social posts, newsletter sending/scheduling, full AI article generation, complex idea inbox or pipeline states, broad analytics, multi-user workflows, deep DevScribe/Bento integration, rigid streak mechanics, and implementation-specific Git UI detail beyond a deliberate publish action.
</code></pre><p>One last step, I asked GPT to capture this and it chose to record a new ADR.</p><p>It could be that ADRs aren&rsquo;t the right tool here (using them for everything feels like we might be over-simplifying how we capture requirement details), but in the interest of pragmatism I chose to accept it and move on to the next stage.</p><h2 id="measure-twice-cut-once">Measure Twice, Cut Once?</h2><p>Let&rsquo;s address the elephant in the room. When you work through a process like this (with or without AI), it can feel like a lot of effort up front. The temptation is to bypass this stage. Wouldn&rsquo;t it be quicker to simply throw a prompt at Codex and hope it sorts it out for us?!</p><p>In short, not really.</p><p>With the prompt-and-pray approach, you might feel like you&rsquo;re going faster, but this thinking, scoping and being clear about what you&rsquo;re building is going to happen somewhere.</p><p>The danger of jumping straight to prompt is you&rsquo;ll end up with something that doesn&rsquo;t solve the problem. Or you&rsquo;ll spend much, much longer iterating to the solution because the thinking is happening as new code is written.</p><p>LLMs work best with smaller amounts of information in their context window (fewer tokens). If you can break the work down ahead of time, you can keep your context minimal for each small step.</p><p>If you start with wide-open scope, you&rsquo;ll find yourself throwing more and more features at the problem (because building stuff is fun!). But the real goal here is to take the smallest step, in order to get feedback (from real users).</p><p>I&rsquo;ve found this up-front thinking work pays dividends down the road.</p><p>But rather than take my word for it, give it a go for yourself. Get that impulsive part of your brain to take a back seat for an hour or so while you work with AI to get clear about what you&rsquo;re building.</p><p>Then, when you&rsquo;re ready, move on to the next step: figuring out what to build first and what that should actually look like. We&rsquo;ll get into that in <a href="https://www.telerik.com/blogs/using-ai-build-blazor-app-3-prototypes-tracer-bullets" target="_blank">Part 3</a>.</p><p>We&rsquo;ll also discover how some old techniques, borrowed from a classic software development playbook, make AI work better too.</p><aside><hr data-sf-ec-immutable="" /><div class="row"><div class="col-4 u-normal-full u-small-mb0"><h4 class="u-fs20 u-fw5 u-lh125 u-mb0">Telerik UI for Blazor Meets A2UI: The Next Step Toward Dynamic UI Generation</h4></div><div class="col-8"><p class="u-fs16 u-mb0"><a target="_blank" href="https://www.telerik.com/blogs/telerik-ui-blazor-meets-a2ui-next-step-toward-dynamic-ui-generation">Learn how A2UI enables AI systems</a> to generate interactive, dynamically generated Blazor interfaces and how Progress Telerik UI for Blazor will help.</p></div></div></aside><img src="https://feeds.telerik.com/link/23050/17380120.gif" height="1" width="1"/>]]></content>
  </entry>
  <entry>
    <id>urn:uuid:8720cf41-2dac-4533-a2fe-cf1af00e248f</id>
    <title type="text">Using AI to Build a Blazor App 1: Start With the Problem</title>
    <summary type="text">Many AI-assisted projects fail before a line of code is written because the idea was never properly defined. Here’s how to use an LLM to interrogate your own thinking until a vague premise becomes something you can actually build.</summary>
    <published>2026-07-07T15:04:02Z</published>
    <updated>2026-08-24T02:17:02Z</updated>
    <author>
      <name>Jon Hilton </name>
    </author>
    <link rel="alternate" href="https://feeds.telerik.com/link/23050/17374443/using-ai-build-blazor-app-1-start-problem"/>
    <content type="text"><![CDATA[<p><span class="featured">Many AI-assisted projects fail before a line of code is written because the idea was never properly defined. Here&rsquo;s how to use an LLM to interrogate your own thinking until a vague premise becomes something you can actually build.</span></p><p>How do you go from idea to working software? That&rsquo;s the challenge we face as software developers.</p><p>While AI <strong>feels</strong> like it&rsquo;s changed everything, it hasn&rsquo;t changed that fundamental problem.</p><p>It&rsquo;s not a question of how quickly AI can write code (answer: very quickly), but rather how soon can we find out if our assumptions are correct and if we&rsquo;re building the right thing to move the needle.</p><p>Do we even know what needle we&rsquo;re trying to move in the first place?</p><p>In this short series, we&rsquo;ll explore how we can use AI to build the right things, to solve the most urgent problems, without shipping substandard code.</p><ul><li>We&rsquo;ll start with a vague premise and see if AI can help us sharpen our understanding of what we&rsquo;re building (and why).</li><li>Then we&rsquo;ll move on to working with AI to carve out the headline feature we want to build first.</li><li>We&rsquo;ll remove ambiguity (and reach a shared understanding of what we&rsquo;re building) using prototypes and tracer bullets.</li><li>Then we&rsquo;ll establish the architecture of what we&rsquo;re building (including key technology choices), break the work down into smaller steps and build it.</li></ul><p>First, we need to get clear about what we&rsquo;re building.</p><h2 id="a-journey-of-a-thousand-miles-begins-with-a-single-step">A Journey of a Thousand Miles Begins with a Single Step</h2><p>If you&rsquo;ve been experimenting with AI, you already know the big AI trap. The temptation to just throw a vague prompt its way, cross your fingers and hope it magically builds the perfect web application (while you sleep).</p><p>In reality it&rsquo;s not that simple.</p><p>AI will happily run off and build whatever you ask it to, which is problematic if you ask it to build the wrong thing, start with fuzzy requirements or give it too much to do in one step.</p><p>So, the first task is the same as it&rsquo;s always been: get clear about the problem you&rsquo;re solving.</p><p>In this case, I started with a simple problem to solve. I have a goal of writing at least one article a week for my personal blog and also an email to my newsletter audience (based on the same blog post). In reality, that cadence is rarely once a week, and often drifts to once a month or, in the worst case, once &ldquo;every now and then.&rdquo;</p><p>So starting with that problem, I gave this prompt to GPT 5.5 (via the Codex GUI):</p><blockquote><p>I want to build a new web application using .NET 10 and Blazor. Please grill me on the idea, what it&rsquo;s for, key technology choices, and help me scope out a reasonable first version so we can get user feedback as soon as possible</p></blockquote><p>This did <strong>not</strong> go well.</p><p>GPT 5.5 responded with a giant wall of text and lots of questions. It started diving into implementation details about Blazor (which render mode to use, etc.) and essentially skipped the part where it finds out what I&rsquo;m trying to build before focusing on those implementation details.</p><p>I started over, and tried different variations of the same prompt.</p><p>First I got it to ask me one question at a time, which worked better, but I realized it was still jumping to technical details. I wanted to keep it focused on problems and ideal outcomes, not technical matters or even defining the feature details at this stage.</p><p>After a few iterations we arrived at this:</p><blockquote><p>I want to build a new web application using .NET 10 and Blazor.</p><p>Please grill me on the idea.</p><p>Ask me one question at a time, and include your brief recommendation for each question.</p><p>Dig into each answer until that thread is clear, then move on to the next question.</p><p>For notable decisions (anything fundamental, or where the reasoning for which can&rsquo;t be deduced from implementation), capture that decision as an ADR in a decisions folder.</p><p>Help me explore the problem space, and the core outcomes we want this application to achieve.</p><p>Do not scope features at this point, that will come next.</p></blockquote><p>This worked better.</p><p>Over the course of a 45-minute back-and-forth, we fleshed out the problem I was trying to solve, and the rough shape of any potential solution. I won&rsquo;t include the entire conversation here, but here are some highlights.</p><p>It asked:</p><blockquote><p>Where do ideas currently appear first: while at your computer, on your phone, in notes, in code/projects, from conversations, or somewhere else?</p></blockquote><p>The answer I gave included this phrase: &ldquo;Could be anywhere really.&rdquo;</p><p>GPT 5.5 wasn&rsquo;t having that.</p><blockquote><p>This one isn&rsquo;t quite a decision yet, because &ldquo;could be anywhere&rdquo; can lead to a lot of product surface.</p><p>Follow-up question:</p><p>For the first version, is it acceptable if mobile capture is only a lightweight inbox, with real writing/editing still expected to happen at a keyboard?</p></blockquote><p>In my experience, AI shines with this kind of process, digging into answers you give it and getting clear so you can make concrete decisions, not just hand-wavey &ldquo;ideas.&rdquo;</p><p>Some more questions it posed:</p><blockquote><p>What would make this application feel like a calm writing system rather than another obligation to maintain?</p></blockquote><blockquote><p>What is the smallest publishing rhythm that would still feel successful: exactly one post/email every week, or a sustainable average with occasional skips and catch-ups?</p></blockquote><blockquote><p>What would make you stop using this app, even if it technically worked?</p></blockquote><p>Notice how GPT 5.5 stayed on task here, exploring the problem and not getting into feature design, or technical choices.</p><p>Eventually we arrived at this summary:</p><blockquote><p>The core shape is now clear: a local-first, single-user Blazor/.NET app that helps you maintain a weekly blog-plus-newsletter rhythm, with the Astro repo as source of truth, a calm Markdown writing experience, lightweight AI assistance, and explicit publishing/Git steps.</p></blockquote><p>The main technical decision made was the one I started with (that we&rsquo;d be using Blazor to build it) and some high level thoughts around source of truth, and the existing systems (like my blog).</p><p>We also ended up with a number of architecture decision records (ADRs) captured in markdown documents. ADRs are typically used to capture technical decisions, but were also useful here for capturing the decisions we arrived at around the problem and solution itself.</p><p>Here&rsquo;s one example:</p><pre class=" language-markdown"><code class="prism  language-markdown"><span class="token title important"><span class="token punctuation">#</span> ADR 0028: Slug Generation</span>
Status
Accepted

<span class="token title important"><span class="token punctuation">##</span> Context</span>
Blog posts need a final URL slug. The slug should usually be short, readable, and aligned with the article's content or main takeaway.

Manual override is sometimes needed.

<span class="token title important"><span class="token punctuation">##</span> Decision</span>
The application should generate slugs automatically from the article title or main takeaway, while allowing the user to override them.

Slugs should be treated as stable after publication unless deliberately changed.

<span class="token title important"><span class="token punctuation">##</span> Consequences</span>
Slug generation should optimize for short, meaningful URLs rather than blindly mirroring the full title.
The user must retain control over the final slug.
Published slug changes should be treated as deliberate edits, not incidental metadata updates.
</code></pre><p>Whenever I work through an AI interview like this, I find I emerge with a much clearer picture of what I&rsquo;m building (and why). The LLM&rsquo;s questions force me to think and often surface angles I hadn&rsquo;t previously considered. In some cases I&rsquo;ve gone on to realize building a feature is actually unnecessary (a change to existing habits or processes would achieve the same result).</p><p>In this case, though, we&rsquo;re on the right track and have a clearly scoped brief for an editor to capture ideas and author content.</p><h2 id="make-it-work-for-you">Make It Work for You</h2><p>When you try to use AI to build something like this, you might feel like there should be some simple streamlined process you can work through. A clean process where you feed a feature idea in, AI gives you perfect code out and you ride off into the sunset.</p><p>Alas, software design is anything but streamlined, and no AI tool is going to take the chaos of defining and refining an idea and handle it in a nice straight line.</p><p>In this case, getting AI to grill you about the idea is one part of the design process, but there are others, which we&rsquo;ll come to shortly. We started high-level here because this was an embryonic idea and a greenfield application. But if you already had an app and were adding a feature, you might skip this step and jump straight into designing a specific feature/requirement.</p><h2 id="iterate-your-prompts">Iterate Your Prompts</h2><p>But what about the prompt itself? Did I happen upon some perfect, fully formed prompt that made AI work perfectly? In short, no!</p><p>Prompts rarely arrive fully formed. In this case, I started with a vague prompt, then refined and tested it until I found one that worked better for my needs. This is a key difference I&rsquo;ve noticed between people who get good results from an LLM and those who feel frustrated.</p><p>It&rsquo;s useful to learn how to write effective prompts, or &ldquo;meta prompts&rdquo; (where you get AI to write the prompt for you), and run rapid iterations so you can get something that works for you. Here it took around five minutes to get to a prompt that worked well for this exercise.</p><p>You can also turn to examples published online (Matt Pocock&rsquo;s skills are a clear standout), but it&rsquo;s useful to learn how to create your own skills/prompts, based on your own unique workflow and preferences.</p><p>With that said, we&rsquo;ve carved out our idea: a simple &ldquo;surface&rdquo; for capturing ideas and turning those into articles (with the source of truth being an MDX in an Astro blog).</p><p>Now to define the headline features. That&rsquo;s next, in <a href="https://www.telerik.com/blogs/using-ai-build-blazor-app-2-define-requirement" target="_blank">Part 2</a>.</p><aside><hr data-sf-ec-immutable="" /><div class="row"><div class="col-4 u-normal-full u-small-mb0"><h4 class="u-fs20 u-fw5 u-lh125 u-mb0">AI Can&rsquo;t Solve It All: What Frontend Devs Still Hate Working On</h4></div><div class="col-8"><p class="u-fs16 u-mb0">What still causes the most friction when building modern web applications? <a target="_blank" href="https://www.telerik.com/blogs/ai-cant-solve-all-what-120-frontend-developers-say-they-still-hate-working">120+ developers at JSNation and React Summit weigh in.</a></p></div></div></aside><img src="https://feeds.telerik.com/link/23050/17374443.gif" height="1" width="1"/>]]></content>
  </entry>
  <entry>
    <id>urn:uuid:25764796-2937-4908-aea5-7d0a72c05de6</id>
    <title type="text">Choosing the Right Telerik UI for Blazor Chart</title>
    <summary type="text">Which type of chart is best for your data set? Explore the different types of Blazor charts and get a guide of which to use in certain use cases.</summary>
    <published>2026-06-30T16:57:43Z</published>
    <updated>2026-08-24T02:17:02Z</updated>
    <author>
      <name>Héctor Pérez </name>
    </author>
    <link rel="alternate" href="https://feeds.telerik.com/link/23050/17370447/choosing-right-telerik-ui-blazor-chart"/>
    <content type="text"><![CDATA[<p><span class="featured">Which type of chart is best for your data set? Explore the different types of Blazor charts and get a guide of which to use in certain use cases.</span></p><p>In data-driven applications, it is common to want to display information dynamically and visually. However, there are times when we have doubts about which type of chart to use in our applications.</p><p>Choosing the wrong type of chart can cause users to become confused or even distort the information by displaying it incompletely or with a layout that doesn&rsquo;t make much sense.</p><p>That is why this article is a roundup of the types of charts available in the Progress Telerik <a target="_blank" href="https://www.telerik.com/blazor-ui">UI suite for Blazor</a> and when to use each. Let&rsquo;s get to it!</p><h2 id="chart-types-in-telerik-ui-for-blazor">Chart Types in Telerik UI for Blazor</h2><p>Let&rsquo;s analyze the different types of <a target="_blank" href="https://www.telerik.com/blazor-ui/documentation/components/chart/overview">charts available in Telerik UI for Blazor</a>, as well as when to use them.</p><h3 id="column-chart">Column Chart</h3><p>The first type of chart, column, is perhaps the simplest. With this chart we can display vertical bars in which the height represents the value of each category. It&rsquo;s a quite versatile chart type, which is why it&rsquo;s very common to see it in applications and elsewhere. The chart looks like the following:</p><p><img src="https://www.telerik.com/sfimages/default-source/blogs/2026/2026-06/simple-column-chart.png?sfvrsn=2ad90540_2" alt="Simple column chart" /></p><p>This type of chart is useful when we want to compare values across categories, show rankings or classifications, and visualize data where order does matter.</p><h3 id="bar-chart">Bar Chart</h3><p>The bar chart is the equivalent of the column chart but in a horizontal format. In the Telerik component <code>ChartSeriesType.Bar</code> is used and the category axis is on the vertical axis instead of horizontal:</p><p><img src="https://www.telerik.com/sfimages/default-source/blogs/2026/2026-06/simple-bar-chart.png?sfvrsn=2e966c33_2" alt="Simple bar chart showing categories and values." /></p><p>This chart can be used when category names are long and you need more space to display them, when you want to show a horizontal comparison between values, and when you want to emphasize the difference in values between categories.</p><h3 id="line-chart">Line Chart</h3><p>The line chart displays a graph with connected points, which makes this chart ideal for showing trends over time. In the Telerik component it supports normal, step and smooth lines:</p><p><img src="https://www.telerik.com/sfimages/default-source/blogs/2026/2026-06/simple-line-chart.png?sfvrsn=4c604b1_2" alt="Simple line chart showing an upward trend" /></p><p>This chart is suitable when we want to visualize temporal trends, compare different evolutions within the same period and when continuity between data points is relevant.</p><h3 id="area-chart">Area Chart</h3><p>This type of chart is similar to the line chart, with the difference that the space beneath the lines is filled with a semi-transparent color. This gives greater emphasis to the volume or magnitude of the data. In the Telerik component we can control the opacity using the <code>Opacity</code> property.</p><p><img src="https://www.telerik.com/sfimages/default-source/blogs/2026/2026-06/area-chart-simple.png?sfvrsn=5e3dca17_2" alt="Simple area chart showing rising values over time" /></p><p>You can use this chart when you want to emphasize the volume of the data, their trend or when you want to show how different series overlap.</p><h3 id="pie-chart">Pie Chart</h3><p>The pie chart displays a circle divided into proportional slices for each value specified in the category. It only supports a single series, which makes it an ideal chart for showing the composition of a whole:</p><p><img src="https://www.telerik.com/sfimages/default-source/blogs/2026/2026-06/simple-pie-chart.png?sfvrsn=56a76ea0_2" alt="Simple pie chart showing proportional data distribution" /></p><p>Some examples of when to use this type of chart are when you want to show a percentage distribution of data, while being mindful of the maximum number of slices so as not to overcrowd the chart. Likewise, when you want users to quickly understand portions of a whole and when you require the values to add up to 100%.</p><h3 id="donut-chart">Donut Chart</h3><p>This type of chart is similar to a pie chart but with a hole in the center. This hole can be used to display a highlighted data point or, as the Progress Telerik team has done, allow multiple series to be shown:</p><p><img src="https://www.telerik.com/sfimages/default-source/blogs/2026/2026-06/donut-chart-simple.png?sfvrsn=89334033_2" alt="Simple donut chart with four colored segments" /></p><p>This chart is recommended for showing, in addition to the pie-chart scenarios, hierarchical relationships between data sets.</p><h3 id="scatter-chart">Scatter Chart</h3><p>The scatter chart displays a series of points defined by the <strong>x</strong> and <strong>y</strong> axes, with these being numeric data:</p><p><img src="https://www.telerik.com/sfimages/default-source/blogs/2026/2026-06/scatter-plot-basic.png?sfvrsn=f64a9932_2" alt="Scatter plot showing correlated data points" /></p><p>This type of chart is ideal when you want to show a correlation between two numeric variables, such as the relationship between users connected in an application and a website&rsquo;s load time. It is also useful for identifying patterns, clusters, scientific data, among others.</p><h3 id="bubble-chart">Bubble Chart</h3><p>This chart is similar to the scatter chart in how it works, but adds a third dimension, which is the size of the bubble:</p><p><img src="https://www.telerik.com/sfimages/default-source/blogs/2026/2026-06/simple-bubble-chart.png?sfvrsn=34686cbe_2" alt="Simple bubble chart showing values by size" /></p><p>The third dimension is useful for comparing entities with multiple metrics simultaneously.</p><h3 id="scatter-line-chart">Scatter Line Chart</h3><p>The scatter line chart is similar to the scatter chart, except that in this case the points are connected by lines:</p><p><img src="https://www.telerik.com/sfimages/default-source/blogs/2026/2026-06/scatter-line-plot.png?sfvrsn=86d3bc9b_2" alt="Scatter plot with connecting line showing data relationship" /></p><p>This chart is convenient to use when you want to show the relationship between two variables while maintaining continuity in the data or trend.</p><h3 id="candlestick-chart">Candlestick Chart</h3><p>This candlestick-style chart is widely used in the financial sector, as it allows showing four values for a period: open, close, high and low. If we are talking about stocks in the securities market, the body of the candle represents the price from open to close, while the wicks, which are the thin lines above and below, show the period&rsquo;s high and low:</p><p><img src="https://www.telerik.com/sfimages/default-source/blogs/2026/2026-06/candlestick-chart.png?sfvrsn=a9d98305_2" alt="Candlestick chart showing market price movements" /></p><p>This chart is suitable for showing financial movements or when you want to identify trading patterns.</p><h3 id="ohlc-chart-open-high-low-close">OHLC Chart (Open-High-Low-Close)</h3><p>This chart shows the same four values as the candlestick chart, but instead of using candle bodies, it uses horizontal marks. In this chart the horizontal values represent the open and close, while the lower and upper extremes show the maximum and minimum:</p><p><img src="https://www.telerik.com/sfimages/default-source/blogs/2026/2026-06/ohlc-candlestick-chart.png?sfvrsn=3fafa6ef_2" alt="Candlestick OHLC chart" /></p><p>The use cases for this chart are the same as for the candlestick chart, but when you want a cleaner visualization. It is also ideal when you want to show many time periods, in which a candlestick chart would overlap the values.</p><h3 id="heatmap-chart">Heatmap Chart</h3><p>The heatmap displays a grid where color intensity represents the magnitude of a value across two dimensions:</p><p><img src="https://www.telerik.com/sfimages/default-source/blogs/2026/2026-06/heatmap-chart-color-grid.png?sfvrsn=2f853608_2" alt="Heatmap showing color-coded intensity across a grid" /></p><p>If you are a software developer, you will surely recognize the image above, since GitHub shows a similar chart to display the commits you have made on an account. This demonstrates that the chart is ideal for showing an activity density in two dimensions and when you want to show behavior patterns across intersecting categories.</p><h3 id="radar-line-chart">Radar Line Chart</h3><p>This chart starts from a common center from which several axes radiate. Each axis represents a specific value, which are then connected to form a closed shape:</p><p><img src="https://www.telerik.com/sfimages/default-source/blogs/2026/2026-06/radar-line-chart.png?sfvrsn=2ef60c49_2" alt="Radar line chart comparing multiple variables" /></p><p>It is very useful when you want to make profile comparisons, such as variables between LLM models or when you want to make before/after comparisons.</p><h3 id="radar-area-chart">Radar Area Chart</h3><p>This radar area chart is similar to the radar line chart, with the difference that the space of the formed shape is filled with a color:</p><p><img src="https://www.telerik.com/sfimages/default-source/blogs/2026/2026-06/radar-area-chart-filled.png?sfvrsn=364cf4ed_2" alt="Filled radar area chart showing multivariate data" /></p><p>This chart works well to understand how different profiles overlap on the chart quickly.</p><h3 id="radar-column-chart">Radar Column Chart</h3><p>The radar column chart follows the same principle as the radar line and radar area charts, with the difference that it shows diagonal bars extending from the center:</p><p><img src="https://www.telerik.com/sfimages/default-source/blogs/2026/2026-06/radar-column-chart.png?sfvrsn=5607c18f_2" alt="Radar column chart for comparison" /></p><p>By showing bars instead of connecting points, this chart is excellent for comparing individual values across categories and when an overlap in the radar area could make reading values difficult.</p><h3 id="range-area-chart">Range Area Chart</h3><p>The range area chart shows an area defined between two continuous lines defining the range between a minimum and a maximum value, similar to the area chart but not starting from zero:</p><p><img src="https://www.telerik.com/sfimages/default-source/blogs/2026/2026-06/range-area-chart.png?sfvrsn=1a0018c5_2" alt="Range area chart showing high and low values." /></p><p>By displaying ranges, it is ideal in scenarios such as temperature ranges, error margins and when you need to emphasize a difference between continuous sequences of values.</p><h3 id="range-bar-chart">Range Bar Chart</h3><p>This chart lets you display ranges of values over a period of time using horizontal bars, whose position and length vary according to a from value and a to value:</p><p><img src="https://www.telerik.com/sfimages/default-source/blogs/2026/2026-06/range-bar-chart.png?sfvrsn=d0c7eb72_2" alt="Horizontal range bar chart showing start and end values" /></p><p>This chart can help you show time ranges or durations, or compare ranges between categories or groups.</p><h3 id="range-column-chart">Range Column Chart</h3><p>It is the vertical version of the range bar chart. In this chart vertical bars are displayed, which vary according to the from and to values:</p><p><img src="https://www.telerik.com/sfimages/default-source/blogs/2026/2026-06/range-column-chart.png?sfvrsn=13016741_2" alt="Range column chart showing min and max values" /></p><p>This chart could be useful to show ranges of scores between periods or when you need to emphasize both the minimum and the maximum of each category.</p><h3 id="waterfall-chart">Waterfall Chart</h3><p>This chart is based on a series of bars that show a cumulative value of sequential positive and negative values. Each bar starts where the previous one ended, which allows you to see the value&rsquo;s behavior after a period. In the Telerik component it is also possible to display columns with total or partial values:</p><p><img src="https://www.telerik.com/sfimages/default-source/blogs/2026/2026-06/waterfall-chart-simple.png?sfvrsn=5b498a9d_2" alt="Waterfall chart showing sequential positive and negative values" /></p><p>Use cases for this chart include when you need to analyze cash flow over months, for budget and profitability analysis, among others.</p><h3 id="sankey-chart">Sankey Chart</h3><p>This Telerik component <code>TelerikSankey</code> displays a set of entities and links to represent the flow between them. In addition, the thickness of each link shows the value, allowing users to easily see the entity-to-value flow:</p><p><img src="https://www.telerik.com/sfimages/default-source/blogs/2026/2026-06/sankey-diagram-flows.png?sfvrsn=be7afe80_2" alt="Sankey diagram showing flows between categories" /></p><p>Because of its flexibility, the Sankey chart is ideal for analyzing traffic distributions, breaking down budgets or redistributing resources.</p><h3 id="stock-chart">Stock Chart</h3><p>To use a stock chart, you should use the <code>TelerikStockChart</code> component, which is part of the Telerik UI for Blazor suite. This component is specifically designed for financial time series data. It supports types we&rsquo;ve already covered such as candlestick and OHLC, with the difference that it includes a navigator to select a specific time period:</p><p><img src="https://www.telerik.com/sfimages/default-source/blogs/2026/2026-06/stock-market-line-chart.gif?sfvrsn=33fc642e_2" alt="Stock chart showing stock market price movements" /></p><p>This component is useful when you need to navigate time periods in financial data or to create trading dashboards or investment analysis.</p><h3 id="trendline-chart">Trendline Chart</h3><p>The last chart type we&rsquo;ll analyze is the trendline type. This chart isn&rsquo;t really a chart type where you define its own data; rather, it takes the data from an existing chart to reveal the trend of the data. The component supports several trend types: linear, average, exponential, logarithmic, among others:</p><p><img src="https://www.telerik.com/sfimages/default-source/blogs/2026/2026-06/trendline-chart-simple.png?sfvrsn=68161b2c_2" alt="Simple trendline chart showing upward data trend" /></p><p>Some use cases for this chart type include revealing the overall direction of the data, smoothing fluctuations, performing forecasts, as well as conducting statistical analyses and validating patterns over time.</p><h3 id="decision-tree-for-selecting-the-best-chart">Decision Tree for Selecting the Best Chart</h3><p>After having analyzed the different types of charts that we can find in the Telerik UI for Blazor suite, I want to leave you a decision list that can help you select the best chart for your use case:</p><p><strong>Comparison &amp; Trends</strong><br />- If there is time or continuity -&gt; Use a line, area or scatter line chart<br />- If there are simple categories -&gt; Use a column or bar chart<br />- If there are long category names -&gt; Use a bar chart<br />- If you want to show underlying trends -&gt; Add a trendline</p><p><strong>Composition (Parts of a Whole)</strong><br />- For a single series -&gt; Use a pie or donut chart<br />- For multiple series -&gt; Use a donut chart<br />- For flows between domains -&gt; Use a Sankey diagram</p><p><strong>Relationships &amp; Distribution</strong><br />- With 2 variables -&gt; Use a scatter plot<br />- With 3 variables -&gt; Use a bubble chart<br />- For 2D density -&gt; Use a heatmap<br />- For multidimensional profiles -&gt; Use a radar chart (area, column or line)</p><p><strong>Ranges &amp; Cumulative Changes</strong><br />- To show the effect of changes -&gt; Use a waterfall chart<br />- For continuous ranges -&gt; Use a range area chart<br />- For time durations -&gt; Use a range bar chart<br />- For vertical ranges -&gt; Use a range column chart</p><p><strong>Specialized Data</strong><br />- For financial/price movement -&gt; Use a candlestick or stock chart</p><p>This list should help you make a better decision about when to use each type of chart.</p><h2 id="conclusion">Conclusion</h2><p>Throughout this article, we have taken a tour of the different types of charts that we can find in the Telerik suite for Blazor. This was aimed at understanding the structure of each one, how it looks and which are the best scenarios for their use. After this information, it&rsquo;s your turn to present your users&rsquo; data in different ways, always keeping in mind that their interpretation should be as simple as possible.</p><p>Ready to experiment with all these chart types? Telerik UI for Blazor comes with a free 30-day trial:</p><p><a href="https://www.telerik.com/try/ui-for-blazor" target="_blank" class="Btn">Try Now</a></p><img src="https://feeds.telerik.com/link/23050/17370447.gif" height="1" width="1"/>]]></content>
  </entry>
  <entry>
    <id>urn:uuid:f453a1a3-be23-4d75-bf04-ef6ba83b2753</id>
    <title type="text">Blazor Basics: Implementing a Loading Indicator for Asynchronous Components</title>
    <summary type="text">Learn how to properly implement a custom loading indicator and why professional UI libraries can provide the best user experience.</summary>
    <published>2026-06-24T19:22:32Z</published>
    <updated>2026-08-24T02:17:02Z</updated>
    <author>
      <name>Claudio Bernasconi </name>
    </author>
    <link rel="alternate" href="https://feeds.telerik.com/link/23050/17366682/blazor-basics-implementing-loading-indicator-asynchronous-components"/>
    <content type="text"><![CDATA[<p><span class="featured">Learn how to properly implement a custom loading indicator and why professional UI libraries can provide the best user experience.</span></p><p>In modern web development, we often asynchronously load data from the server. Blazor is no different. To let the user know that data is being loaded and the app is working, we should show a busy or loading indicator during such operations.</p><p>In this article, we will implement a basic loading indicator in Blazor using CSS and also explore more advanced solutions.</p><p>You can <a target="_blank" href="https://github.com/claudiobernasconi/BlazorLoadingIndicator">access the code used in this example on GitHub</a>.</p><h2 id="the-blazor-project-template-approach">The Blazor Project Template Approach</h2><p>Let&rsquo;s start simple by looking at the loading indicator used in the default Blazor project template.</p><pre class=" language-html"><code class="prism  language-html">@if (forecasts == null)
{
    <span class="token tag"><span class="token tag"><span class="token punctuation">&lt;</span>p</span><span class="token punctuation">&gt;</span></span><span class="token tag"><span class="token tag"><span class="token punctuation">&lt;</span>em</span><span class="token punctuation">&gt;</span></span>Loading...<span class="token tag"><span class="token tag"><span class="token punctuation">&lt;/</span>em</span><span class="token punctuation">&gt;</span></span><span class="token tag"><span class="token tag"><span class="token punctuation">&lt;/</span>p</span><span class="token punctuation">&gt;</span></span>
}
else
{
    <span class="token tag"><span class="token tag"><span class="token punctuation">&lt;</span>table</span> <span class="token attr-name">class</span><span class="token attr-value"><span class="token punctuation">=</span><span class="token punctuation">"</span>table<span class="token punctuation">"</span></span><span class="token punctuation">&gt;</span></span>
    <span class="token comment">&lt;!-- code omitted --&gt;</span>
    <span class="token tag"><span class="token tag"><span class="token punctuation">&lt;/</span>table</span><span class="token punctuation">&gt;</span></span>
}
</code></pre><p>This very basic approach uses an <code>if-else</code> statement to determine the component state and a simple paragraph HTML element to render a <em>&ldquo;Loading&hellip;&rdquo;</em> text.</p><p>There are a few flaws with this overly simplistic solution:</p><ol><li><p>Static text does not provide a modern user experience. In a world where attention spans are short and user experience is important, we should use a <strong>spinner animation</strong> or another element that conveys the <strong>feeling of progress</strong>.</p></li><li><p>Static text does not act as a <strong>placeholder</strong> with the <strong>correct size</strong>. In the example above from the Weather page of the default Blazor project template, the <em>Loading</em> text has a much lower height compared to the fully rendered table containing the weather information.</p></li><li><p>A code snippet like the <em>Loading</em> text above is not reusable. It doesn&rsquo;t include a CSS class to make it look consistent across pages, nor is it reusable. Copying the same snippet across multiple pages will yield different user experiences if one of the developers decides to alter its design in the future.</p></li></ol><h2 id="a-basic-reusable-loading-indicator-component">A Basic Reusable Loading Indicator Component</h2><p>Let&rsquo;s build a basic <strong>reusable</strong> <code>LoadingIndicator</code> component. First of all, we want to internalize the loading state.</p><p>This helps us get rid of the <code>if-else</code> statement in each page component. We want the code in the page component to look like this:</p><pre class=" language-html"><code class="prism  language-html"><span class="token tag"><span class="token tag"><span class="token punctuation">&lt;</span>LoadingIndicator</span> <span class="token attr-name">IsLoading</span><span class="token attr-value"><span class="token punctuation">=</span><span class="token punctuation">"</span>@(forecasts == null)<span class="token punctuation">"</span></span><span class="token punctuation">&gt;</span></span>
    <span class="token tag"><span class="token tag"><span class="token punctuation">&lt;</span>table</span><span class="token punctuation">&gt;</span></span>
    <span class="token comment">&lt;!-- code omitted --&gt;</span>
<span class="token tag"><span class="token tag"><span class="token punctuation">&lt;/</span>LoadingIndicator</span><span class="token punctuation">&gt;</span></span>
</code></pre><p>Let&rsquo;s start with the component template:</p><pre class=" language-csharp"><code class="prism  language-csharp">@<span class="token keyword">if</span> <span class="token punctuation">(</span>IsLoading<span class="token punctuation">)</span>
<span class="token punctuation">{</span>
    <span class="token operator">&lt;</span>div <span class="token keyword">class</span><span class="token operator">=</span><span class="token string">"loading-indicator"</span> Style<span class="token operator">=</span><span class="token string">"@($"</span>height<span class="token punctuation">:</span> <span class="token punctuation">{</span>Height<span class="token punctuation">}</span>px<span class="token string">")"</span><span class="token operator">&gt;</span>
        <span class="token operator">&lt;</span>div <span class="token keyword">class</span><span class="token operator">=</span><span class="token string">"circular-progress"</span> <span class="token operator">/</span><span class="token operator">&gt;</span>
        <span class="token operator">&lt;</span>div <span class="token keyword">class</span><span class="token operator">=</span><span class="token string">"progress-text"</span><span class="token operator">&gt;</span>Loading<span class="token punctuation">.</span><span class="token punctuation">.</span><span class="token punctuation">.</span><span class="token operator">&lt;</span><span class="token operator">/</span>div<span class="token operator">&gt;</span>
    <span class="token operator">&lt;</span><span class="token operator">/</span>div<span class="token operator">&gt;</span>
<span class="token punctuation">}</span>
<span class="token keyword">else</span>
<span class="token punctuation">{</span>
    @ChildContent
<span class="token punctuation">}</span>
</code></pre><p>We internalized the <code>if-else</code> statement handling the loading state. During loading, we display a loading indicator, which consists of three <code>div</code>s.</p><p>We show the child content (in the example above, an HTML table) when the loading state is <code>false</code>.</p><p>Now let&rsquo;s look at the code section:</p><pre class=" language-csharp"><code class="prism  language-csharp">@code <span class="token punctuation">{</span>
    <span class="token punctuation">[</span>Parameter<span class="token punctuation">]</span>
    <span class="token keyword">public</span> required <span class="token keyword">int</span> Height <span class="token punctuation">{</span> <span class="token keyword">get</span><span class="token punctuation">;</span> <span class="token keyword">set</span><span class="token punctuation">;</span> <span class="token punctuation">}</span> <span class="token operator">=</span> <span class="token number">96</span><span class="token punctuation">;</span>

    <span class="token punctuation">[</span>Parameter<span class="token punctuation">,</span> EditorRequired<span class="token punctuation">]</span>
    <span class="token keyword">public</span> required <span class="token keyword">bool</span> IsLoading <span class="token punctuation">{</span> <span class="token keyword">get</span><span class="token punctuation">;</span> <span class="token keyword">set</span><span class="token punctuation">;</span> <span class="token punctuation">}</span>

    <span class="token punctuation">[</span>Parameter<span class="token punctuation">,</span> EditorRequired<span class="token punctuation">]</span>
    <span class="token keyword">public</span> RenderFragment<span class="token operator">?</span> ChildContent <span class="token punctuation">{</span> <span class="token keyword">get</span><span class="token punctuation">;</span> <span class="token keyword">set</span><span class="token punctuation">;</span> <span class="token punctuation">}</span>
<span class="token punctuation">}</span>
</code></pre><p>Here, we have three component parameters. Let&rsquo;s go through them one by one.</p><p>The <code>Height</code> parameter is optional (notice the absence of the <code>EditorRequired</code> attribute). By default, the height of our loading indicator is <strong>96 pixels</strong>. However, we can provide a custom value to this property for each instance on a page component.</p><p>The <code>IsLoading</code> parameter decides whether the loading indicator or its children are rendered.</p><p>The <code>ChildContent</code> parameter of type <code>RenderFragement</code> allows us to wrap the content of the page into the <code>LoadingIndicator</code> for a good developer experience.</p><p>Now that we have the component template and its behavior, we need the <strong>CSS styling</strong>:</p><pre class=" language-css"><code class="prism  language-css"><span class="token selector"><span class="token class">.loading-indicator</span> </span><span class="token punctuation">{</span>
    <span class="token property">display</span><span class="token punctuation">:</span> flex<span class="token punctuation">;</span>
    <span class="token property">flex-direction</span><span class="token punctuation">:</span> column<span class="token punctuation">;</span>
    <span class="token property">align-items</span><span class="token punctuation">:</span> center<span class="token punctuation">;</span>
    <span class="token property">justify-content</span><span class="token punctuation">:</span> center<span class="token punctuation">;</span>
    <span class="token property">width</span><span class="token punctuation">:</span> <span class="token number">100%</span><span class="token punctuation">;</span>
    <span class="token property">gap</span><span class="token punctuation">:</span> <span class="token number">8</span>px<span class="token punctuation">;</span>
<span class="token punctuation">}</span>

<span class="token selector"><span class="token class">.circular-progress</span> </span><span class="token punctuation">{</span>
    <span class="token property">width</span><span class="token punctuation">:</span> <span class="token number">32</span>px<span class="token punctuation">;</span>
    <span class="token property">height</span><span class="token punctuation">:</span> <span class="token number">32</span>px<span class="token punctuation">;</span>
    <span class="token property">border</span><span class="token punctuation">:</span> <span class="token number">3</span>px solid <span class="token function">rgba</span><span class="token punctuation">(</span><span class="token number">0</span>, <span class="token number">0</span>, <span class="token number">0</span>, <span class="token number">0.1</span><span class="token punctuation">)</span><span class="token punctuation">;</span>
    <span class="token property">border-top</span><span class="token punctuation">:</span> <span class="token number">3</span>px solid <span class="token hexcode">#3b82f6</span><span class="token punctuation">;</span>
    <span class="token property">border-radius</span><span class="token punctuation">:</span> <span class="token number">50%</span><span class="token punctuation">;</span>
    <span class="token property">animation</span><span class="token punctuation">:</span> spin <span class="token number">0.8</span>s linear infinite<span class="token punctuation">;</span>
<span class="token punctuation">}</span>

<span class="token selector"><span class="token class">.progress-text</span> </span><span class="token punctuation">{</span>
    <span class="token property">font-size</span><span class="token punctuation">:</span> <span class="token number">1</span>rem<span class="token punctuation">;</span>
<span class="token punctuation">}</span>

<span class="token comment">/* Spinner animation */</span>
<span class="token atrule"><span class="token rule">@keyframes</span> spin</span> <span class="token punctuation">{</span>
    <span class="token selector">0% </span><span class="token punctuation">{</span>
        <span class="token property">transform</span><span class="token punctuation">:</span> <span class="token function">rotate</span><span class="token punctuation">(</span><span class="token number">0</span>deg<span class="token punctuation">)</span><span class="token punctuation">;</span>
    <span class="token punctuation">}</span>

    <span class="token selector">100% </span><span class="token punctuation">{</span>
        <span class="token property">transform</span><span class="token punctuation">:</span> <span class="token function">rotate</span><span class="token punctuation">(</span><span class="token number">360</span>deg<span class="token punctuation">)</span><span class="token punctuation">;</span>
    <span class="token punctuation">}</span>
<span class="token punctuation">}</span>
</code></pre><p>CSS, unfortunately, most of the time requires <strong>a lot of code</strong> to implement rather simple things.</p><p>For example, here, we have the <code>loading-indicator</code> class, which contains a <code>flex</code> layout and its layout properties. It basically takes up the entire available width and places its children one below the other.</p><p>Next, we have the <code>circular-progress</code> class, which defines the circle&rsquo;s layout. It&rsquo;s the base of our animation.</p><p>The <code>progress-text</code> class is simple for now and only sets the <code>font-size</code>.</p><p>Last but not least, we have an <strong>animation</strong> definition using <code>keyframes</code>. We use the named animation in the <code>circular-progress</code> class&rsquo;s animation property.</p><p>Let&rsquo;s see how it works in action.</p><p><img src="https://www.telerik.com/sfimages/default-source/blogs/2026/2026-06/loading-indicator.png?sfvrsn=f76d683b_2" title="Loading Indicator Component in a Blazor App" alt="The default Blazor web app project template with a custom loading indicator on the Weather page." /></p><p>I set the delay in the <code>Weather</code> page component to <strong>2 seconds</strong> so that I can see the full loading animation for testing.</p><pre class=" language-csharp"><code class="prism  language-csharp"><span class="token comment">// Simulate asynchronous loading to demonstrate a loading indicator</span>
<span class="token keyword">await</span> Task<span class="token punctuation">.</span><span class="token function">Delay</span><span class="token punctuation">(</span><span class="token number">2000</span><span class="token punctuation">)</span><span class="token punctuation">;</span>
</code></pre><p>As soon as the data is loaded from the screen, the <code>IsLoading</code> property of the <code>LoadingIndicator</code> component will return <code>false</code>. Therefore, instead of the circular progress animation, we will see the pages&rsquo; content.</p><p><img src="https://www.telerik.com/sfimages/default-source/blogs/2026/2026-06/rendered-page-content.png?sfvrsn=b7f42a10_2" title="Weather page with weather information" alt="The default Blazor web app project template with the Weather page and rendered weather information." /></p><p><strong>Hint:</strong> One of the advantages of component-oriented web frameworks such as Blazor is that we can reuse this <code>LoadingIndicator</code> component and therefore hide the large CSS definition and the component behavior behind this <code>LoadingIndicator</code> component.</p><h2 id="professional-integrated-solutions">Professional Integrated Solutions</h2><p>While we definitely provided a more useful component and a better user experience with our reusable <code>LoadingIndicator</code> component, there is still room for improvement.</p><p>As application developers, we want to <strong>provide the best solutions for business problems</strong> while providing the <strong>best possible user experience</strong>.</p><p>We should focus on <strong>delivering value</strong> to our business rather than wasting time implementing generic components. Standing on the shoulders of giants is the right call.</p><p>There are professional user interface libraries, such as <a href="https://www.telerik.com/blazor-ui" target="_blank">Progress Telerik UI for Blazor</a>. Developers of those libraries invest much more time into building those reusable components than we are able to spend in our projects.</p><p>Component libraries like Telerik UI for Blazor integrate sophisticated <a target="_blank" href="https://www.telerik.com/blazor-ui/documentation/common-features/loading-sign">loading indicators and loading state handling</a> into higher-level components, such as AutoComplete fields, Grid layouts and ListViews, and more advanced components like TreeList and TreeView.</p><h2 id="conclusion">Conclusion</h2><p>Handling the <strong>loading state</strong> and providing a <strong>good user experience</strong> during <strong>asynchronous data fetching operations</strong> is crucial in modern web development.</p><p>The default Blazor web application project template provides a simple solution that lacks in multiple regards.</p><p>We implement a custom <code>LoadingIndicator</code> component, which improves the solution from the default project template by extracting logic and behavior into a <strong>reusable component</strong>. Using its <code>Height</code> property, we can make the loading indicator take the same space as the rendered elements, thus preventing layout shifts. It&rsquo;s a step in the right direction.</p><p>However, if possible, I usually prefer using one of the brilliant, existing solutions over my handmade approach. For example, the <a target="_blank" href="https://www.telerik.com/blazor-ui/documentation/common-features/loading-sign">Loader and LoaderContainer components</a> provide a great developer and user experience for building modern Blazor web applications.</p><hr /><blockquote><p>Telerik UI for Blazor comes with a free 30-day trial, so you can explore these plus 120 other components for yourself.</p><br /><p><a target="_blank" href="https://www.telerik.com/try/ui-for-blazor" class="Btn">Try Now</a></p></blockquote><img src="https://feeds.telerik.com/link/23050/17366682.gif" height="1" width="1"/>]]></content>
  </entry>
  <entry>
    <id>urn:uuid:49c497b3-3ecf-4392-b05b-8f6a9712b329</id>
    <title type="text">Telerik UI for Blazor Meets A2UI: The Next Step Toward Dynamic UI Generation</title>
    <summary type="text">Learn how A2UI enables AI systems to generate interactive, dynamically generated Blazor interfaces and how Progress Telerik UI for Blazor will help.</summary>
    <published>2026-06-15T13:30:53Z</published>
    <updated>2026-08-24T02:17:02Z</updated>
    <author>
      <name>Maya Mateva </name>
    </author>
    <link rel="alternate" href="https://feeds.telerik.com/link/23050/17361459/telerik-ui-blazor-meets-a2ui-next-step-toward-dynamic-ui-generation"/>
    <content type="text"><![CDATA[<p><span class="featured">Learn how A2UI enables AI systems to generate interactive, dynamically generated Blazor interfaces and how Progress Telerik UI for Blazor will help.</span></p><p>Imagine this: instead of clicking through a travel app&mdash;picking dates, applying filters, scrolling results, opening tabs to compare&mdash;you type one sentence:</p><p><em>&ldquo;I want to get a flight from London to New York. Give me a plan as a dashboard with important data about the flight.&rdquo;</em></p><p><img src="https://www.telerik.com/sfimages/default-source/blogs/2026/2026-06/blazor-a2ui-flight-dashboard.gif?sfvrsn=9f6fca6_2" alt="Telerik UI for Blazor A2UI produced a flight assistant dashboard that asks origin, destination, departure and return dates, then shows flight overviews, airport information, travel tips, flight prices in a bar chart, flight price data in table by month" /></p><p>What comes back is more than a paragraph explaining the basics. It&rsquo;s a whole interface with a structured results grid showing airline, price, duration and departure time. It&rsquo;s a comparison view so you can weigh your options, all assembled on the spot. No predefined screen needed. Just intent and a UI that responds to it.</p><p>That is the experience shift A2UI creates. And it is coming to <a href="https://www.telerik.com/blazor-ui">Progress Telerik UI for Blazor</a>.</p><p>Don&rsquo;t miss the live demo! <a href="https://www.telerik.com/campaigns/telerik-and-kendo-ui-2026-q2-release-webinar">Register for the Telerik and Kendo UI 2026 Q2 release webinar on June 16</a> to see A2UI transforming intent into interactive Blazor UI in real time.</p><h2 id="what-is-a2ui">What Is A2UI?</h2><p><a href="https://a2ui.org/specification/v0.8-a2ui/">A2UI (Agent-to-User Interface)</a> is an open protocol introduced by Google that defines a standard way for AI agents to communicate their intent to generate a user interface. Think of it as a universal UI language that agents can speak to any client application.</p><p>Rather than describing insights, AI describes interfaces. The application then renders those interfaces using its own UI framework, styling and interaction model.</p><p>In this model:</p><ul><li><strong>AI facilitates the UI composition layer.</strong> It reasons over context and emits a structured definition&mdash;a declarative JSON format describing which components to render and what data to populate them with.</li><li><strong>The application remains the source of truth for rendering and behavior.</strong> The client maintains a catalog of pre-approved components.</li><li><strong>The user experiences fully interactive interfaces generated from intent.</strong> Not static mockups. Not screenshots. Real components with real data.</li></ul><p>A2UI effectively shifts AI from being a narrator to being a <strong>composer of user experiences</strong>.</p><h2 id="a2ui-in-telerik-ui-for-blazor">A2UI in Telerik UI for Blazor</h2><p>Within Telerik UI for <a href="https://demos.telerik.com/blazor-ui/a2ui/ai-a2ui" target="_blank">Blazor, A2UI</a> introduces an additional layer on top of the existing component ecosystem. Components are no longer only developer-defined. They become composable primitives available for AI-driven interface construction.</p><p><img src="https://www.telerik.com/sfimages/default-source/blogs/2026/2026-06/a2ui-progression.png?sfvrsn=986c7d88_2" alt="Backend, transport like AGUI, A2UI instead of text-only response – dynamically generated UI, Progress components, application" /></p><p>In effect, the library becomes a <strong>structured palette for dynamic interface generation</strong>. <strong>Your design system stays intact.</strong> <strong>Your business logic does not move.</strong></p><h2 id="why-a2ui-makes-sense-agents-think-in-text-users-work-in-interfaces">Why A2UI Makes Sense: Agents Think in Text; Users Work in Interfaces</h2><p>AI is rapidly reshaping how software is built and consumed. Over the past year, we have seen an acceleration of copilots, agents and large language models capable of reasoning over data, executing workflows and assisting users in ways that were previously out of reach.</p><p>Yet, one fundamental limitation remains.</p><p><img src="https://www.telerik.com/sfimages/default-source/blogs/2026/2026-06/agents-text-users-interfaces.png?sfvrsn=ba8582d0_2" alt="Agents think in text. Users work in interfaces" /></p><p>AI is exceptionally good at producing text. But applications are not built around text. They are built around interfaces.</p><p>People perceive and interact more easily through visuals&mdash;dashboards, forms, grids, charts, filters, and workflows they can interact with directly. They want to see, explore and act. This is why A2UI has so much potential.</p><p>Modern enterprise applications have long assumed that UI is static. Developers define screens. Users adapt to them. AI, when introduced, typically sits alongside the application as a conversational layer rather than becoming part of the interface itself.</p><p>A2UI introduces the possibility to change that. When AI systems generate structured UI definitions that adapt to context and data, rather than just a block of text, we aren&rsquo;t just enabling what the <em>system says</em>, but what the <em>user sees</em>.</p><p>A single request like &ldquo;analyze my sales performance this quarter&rdquo; can translate into multiple valid experiences depending on who is asking and why&mdash;an executive KPI dashboard, a detailed filterable data grid, a chart-centric exploratory view or a hybrid analytical workspace. The underlying data is the same, but the intent is different. And AI is uniquely positioned to interpret it.</p><h2 id="a2ui-in-practice">A2UI in Practice</h2><p>Use cases for A2UI implementation are as myriad as you can imagine.</p><p>Let&rsquo;s go back to the example of booking a flight. Instead of tedious stepping through pages, one by one, filling and selecting values, you can type: <em>&ldquo;I want to fill a form for booking a flight from London to New York.&rdquo;</em></p><p><img src="https://www.telerik.com/sfimages/default-source/blogs/2026/2026-06/a2ui-flight-form.png?sfvrsn=6dcce9c5_2" alt="In prompt box, I want to fill a form for booking a flight from London to New York. Then fields for origin, destination, departure date and time, passenger name" /></p><p>The AI interprets that intent and <strong>emits</strong> a UI definition&mdash;a JSON description of a data form (pre-filled with data where possible and using the right components), a results grid (columns: airline, price, departure, duration, stops) and a comparison chart with the top options.</p><p>The Blazor renderer receives that definition and displays the interface using real Telerik UI for Blazor components. The Grid, the Form, the Charts&mdash;all themed and all enabling you to interpret and visualize data as naturally as possible.</p><p>Different users expressing the same intent might receive different representations depending on context, preferences or available data. Maybe one person gets a chart-first view and another gets a table. That is dynamic UI generation in practice.</p><h3 id="a-step-further-building-on-an-emerging-ai-ecosystem">A Step Further: Building on an Emerging AI Ecosystem</h3><p>The flight-booking scenario reflects a much broader shift happening across the AI ecosystem. Applications are moving from static interactions toward dynamic, personalized, agent-driven experiences where intent, reasoning and UI composition are tightly connected.</p><p>This is where the A2UI approach becomes part of a larger architecture rather than a standalone concept.</p><p>In the current implementation, the demo builds on complementary layers that are increasingly relevant in modern AI systems:</p><ul><li><strong>AI interprets user intent</strong>, translating natural language into structured goals and constraints.</li><li>The <a href="https://learn.microsoft.com/en-us/agent-framework/overview/"><strong>Microsoft Agent Framework</strong></a> <strong>orchestrates reasoning and execution</strong>, coordinating tools, workflows and multi-step decision-making across systems.</li><li><a href="https://docs.ag-ui.com/introduction"><strong>AG-UI</strong></a> <strong>provides the interaction contract for agent-driven interfaces</strong>, so UI intent and structure are expressed in a consistent, agent- and renderer-agnostic way.</li><li><strong>The A2UI layer for Telerik components for Blazor defines the structure of the user experience</strong>, describing how the outcome of that reasoning should be expressed as a dynamic, interactive UI rather than plain text.</li><li><strong>Telerik UI for Blazor renders the final experience</strong>, materializing that structure using enterprise-grade components such as grids, forms and charts with full theming, interactivity and performance.</li></ul><p>Together, these components enable AI systems to move beyond conversational output and participate directly in application workflows. Instead of producing text responses, agents can reason over data and shape the user experience itself.</p><h2 id="telerik-a2ui-renderer-for-blazor—availability-preview">Telerik A2UI Renderer for Blazor&mdash;Availability: Preview</h2><p>A2UI is still an emerging concept and ecosystem. Standards, protocols, component contracts and implementation patterns are actively evolving as the industry explores what dynamic UI generation should look like in production applications.</p><p>We are approaching A2UI with the same mindset. The feature is still experimental. As the implementation is evolving, feedback is actively shaping its direction.</p><p>During this phase, we are actively observing real-world usage patterns, gathering feedback from early adopters and refining how intent translates into UI structure. Specifically, we are exploring where AI-generated UI delivers real value and how much control users need to retain over generated interfaces.</p><p>The <a href="https://a2ui.org/specification/v0.8-a2ui/">A2UI specification</a> itself is at v0.8 stable, and the ecosystem around it&mdash;transport layers like AG-UI, Agent Frameworks from Microsoft (hint: we are exploring those too) and others and renderers for different frameworks&mdash;is all moving quickly. This is the right moment to explore the pattern, give us feedback and understand how the renderer model fits your architecture. And get to the next level of creating great UI and UX experience.</p><p>The current A2UI Preview for Telerik UI for Blazor focuses on a constrained but high-impact set of building blocks:</p><ul><li><strong>Input components</strong> &ndash; text fields, date pickers, numeric inputs, dropdowns</li><li><strong>Data Grid</strong> &ndash; data exploration, visualization and comparison</li><li><strong>Charts</strong> &ndash; visual representations that adapt to what the data warrants</li></ul><p>These are intentionally chosen because they represent the backbone of most business applications. This Preview is <strong>opinionated by design</strong>. Rather than attempting to support every UI pattern, it focuses on exploring how intent can reliably map to structured, usable interfaces. <a href="https://demos.telerik.com/blazor-ui/a2ui/ai-a2ui" target="_blank">Go straight to the demo</a>, click and prompt around on an easy-to-follow use case and get in touch with feedback.</p><p>If your organization is exploring AI-powered applications in 2026, this is the ideal time to start a pilot. Use our <a href="https://www.telerik.com/account/support-center/contact-us">Support system</a> to tell us more about your use case or drop us a line in our <a href="https://feedback.telerik.com/blazor">Blazor Feedback Portal</a> or in the <a href="https://www.telerik.com/forums/blazor">Telerik Forums</a>.</p><p>The goal isn&rsquo;t to replace your existing application. The goal is to explore how AI can augment it through interfaces that adapt to the user, the context and the task at hand.</p><h2 id="webmcp-vs.-a2ui-what’s-the-difference">WebMCP vs. A2UI: What&rsquo;s the Difference?</h2><p>If you&rsquo;ve been following our recent AI initiatives, you may have also seen our <a href="https://www.telerik.com/blazor-ui/documentation/ai/web-mcp/overview">Preview support for WebMCP</a>, which enables AI agents to interact with applications through standardized tools and capabilities.</p><p>While both WebMCP and A2UI are part of the broader movement toward AI-native applications, they address different parts of the big picture.</p><p>You can think of them as complementary layers: WebMCP focuses on how <strong>AI agents interact with applications</strong>. A2UI focuses on how <strong>applications interact with users</strong> through AI-generated experiences.</p><p>Together, they create a powerful foundation for AI-native applications and are an extension of our commitment to great UI and UX.</p><p>With WebMCP, an AI agent can discover available actions, execute workflows, retrieve data and interact with business functionality exposed by an application.</p><p>With A2UI, that same agent can dynamically generate forms, grids, charts, dashboards and other user experiences that help users understand, validate and act on the results.</p><p>An AI agent can use WebMCP to retrieve information, execute actions and understand business capabilities, while A2UI can transform those results into dynamic user experiences built with Telerik UI for Blazor components.</p><p>To learn more about our WebMCP Preview support, check out our blog post: <a href="https://www.telerik.com/blogs/telerik-and-kendo-meet-webmcp">Telerik and Kendo UI Meet WebMCP</a>.</p><p>The current capabilities represent only the beginning. The beauty of dynamic UI generation is that the number of possible use cases is virtually unlimited. AI maps context and intent, while Telerik UI for Blazor provides the components that bring those experiences to life.</p><hr /><p>Want to shape how A2UI support for Telerik UI for Blazor develops? Share your thoughts on the <a href="https://feedback.telerik.com/blazor">Blazor Feedback Portal</a> or in the <a href="https://www.telerik.com/forums/blazor">Telerik forums</a>. We are reading everything.</p><p>And don&rsquo;t forget to <a href="https://www.telerik.com/campaigns/telerik-and-kendo-ui-2026-q2-release-webinar">join the webinar</a> for a live demo of A2UI.</p><img src="https://feeds.telerik.com/link/23050/17361459.gif" height="1" width="1"/>]]></content>
  </entry>
  <entry>
    <id>urn:uuid:fc4f18d8-9f5a-4741-bfdd-7844b4bdd7e0</id>
    <title type="text">Exploring the SLNX Solution File Format</title>
    <summary type="text">SLNX files are here! In this post, we'll talk about what this format is, why it exists, what it gets right and where you might get tripped up.</summary>
    <published>2026-06-11T19:09:21Z</published>
    <updated>2026-08-24T02:17:02Z</updated>
    <author>
      <name>Dave Brock </name>
    </author>
    <link rel="alternate" href="https://feeds.telerik.com/link/23050/17359642/exploring-slnx-solution-file-format"/>
    <content type="text"><![CDATA[<p><span class="featured">SLNX files are here! In this post, we'll talk about what this format is, why it exists, what it gets right and where you might get tripped up.</span></p><p>If you&rsquo;ve worked with .NET for any length of time, you&rsquo;ve made peace with the <code>.sln</code> file. Not because it&rsquo;s good (it isn&rsquo;t) but because it&rsquo;s the format we have. It&rsquo;s verbose, GUID-laden and a reliable source of merge conflicts on Friday afternoons. It&rsquo;s the format we tolerate, not the one we&rsquo;d choose.</p><p>The good news is there&rsquo;s a new format in town. The <code>.slnx</code> format is Microsoft&rsquo;s XML-based replacement for the venerable <code>.sln</code> file, and it has been steadily gaining first-class support across Visual Studio, the .NET CLI, MSBuild and Rider over the last year. As of <a target="_blank" href="https://devblogs.microsoft.com/dotnet/introducing-slnx-support-dotnet-cli/">.NET 9.0.200</a> and <a target="_blank" href="https://devblogs.microsoft.com/visualstudio/new-simpler-solution-file-format/">Visual Studio 17.13+</a>, you can use it for real projects without crossing your fingers. And <a target="_blank" href="https://learn.microsoft.com/en-us/dotnet/core/compatibility/sdk/10.0/dotnet-new-sln-slnx-default">as of .NET 10</a>, <code>dotnet new sln</code> defaults to <code>.slnx</code>.</p><p>In this post, let&rsquo;s talk about what <code>.slnx</code> is, why it exists, what it gets right and where you might get tripped up.</p><h2 id="a-quick-sln-retrospective">A Quick SLN Retrospective</h2><p>To appreciate why we&rsquo;re getting a new format, let&rsquo;s remember what we&rsquo;ve been working with. Here&rsquo;s a typical fragment of an <code>.sln</code> file.</p><pre><code>Microsoft Visual Studio Solution File, Format Version 12.00
# Visual Studio Version 17
VisualStudioVersion = 17.10.34804.81
MinimumVisualStudioVersion = 10.0.40219.1
Project("{FAE04EC0-301F-11D3-BF4B-00C04F79EFBC}") = "MyApi", "MyApi\MyApi.csproj", "{F95781B3-A973-4D19-9585-974DA143E6A1}"
EndProject
Project("{2150E333-8FDC-42A3-9474-1A3956D46DE8}") = "Solution Items", "Solution Items", "{8FC526EA-218B-4615-8410-4E1850611F38}"
ProjectSection(SolutionItems) = preProject
Directory.Build.props = Directory.Build.props
EndProjectSection
EndProject
Global
GlobalSection(SolutionConfigurationPlatforms) = preSolution
Debug|Any CPU = Debug|Any CPU
Release|Any CPU = Release|Any CPU
EndGlobalSection
GlobalSection(ProjectConfigurationPlatforms) = postSolution
{F95781B3-A973-4D19-9585-974DA143E6A1}.Debug|Any CPU.ActiveCfg = Debug|Any CPU
{F95781B3-A973-4D19-9585-974DA143E6A1}.Debug|Any CPU.Build.0 = Debug|Any CPU
{F95781B3-A973-4D19-9585-974DA143E6A1}.Release|Any CPU.ActiveCfg = Release|Any CPU
{F95781B3-A973-4D19-9585-974DA143E6A1}.Release|Any CPU.Build.0 = Release|Any CPU
EndGlobalSection
EndGlobal
</code></pre><p>Oof. The SLN format is a custom Microsoft format that has some weird quirks. Every project gets a GUID. Solution folders are themselves projects with their own GUIDs. Configuration combinations even get cross-multiplied so a four-project solution with two configurations and two platforms produces <em>16 lines</em> of nearly identical setup.</p><p>The pain points are well known to us all. If even two developers add a project at the same time, both edit <code>GlobalSection(ProjectConfigurationPlatforms)</code>, and Git throws its hands up.</p><p>GUIDs, bless their hearts, are not for human eyes. It&rsquo;s a nightmare trying to figure out which project owns which configuration block. And outside of Visual Studio, generating or modifying <code>.sln</code> files reliably often requires <a target="_blank" href="https://microsoft.github.io/slngen/">a tool like <code>slngen</code></a> because no one wants to write the parser themselves.</p><aside><hr data-sf-ec-immutable="" /><div class="row"><div class="col-4 u-normal-full u-small-mb0"><h4 class="u-fs20 u-fw5 u-lh125 u-mb0">Visual Studio 2026, 6 Months Later</h4></div><div class="col-8"><p class="u-fs16 u-mb0">See what&rsquo;s really behind the <a target="_blank" href="https://www.telerik.com/blogs/visual-studio-2026-6-months-later">Visual Studio 2026 updates</a> and improvements, such as performance, GitHub Copilot, Hot Reload and more.
.</p></div></div><hr class="u-mb3" /></aside><p>This is what the <code>.slnx</code> tries to fix.</p><h2 id="looking-inside-the-.slnx">Looking Inside the .slnx</h2><p>Here&rsquo;s the same project, but expressed as <code>.slnx</code>.</p><pre class=" language-xml"><code class="prism  language-xml"><span class="token tag"><span class="token tag"><span class="token punctuation">&lt;</span>Solution</span><span class="token punctuation">&gt;</span></span>
  <span class="token tag"><span class="token tag"><span class="token punctuation">&lt;</span>Folder</span> <span class="token attr-name">Name</span><span class="token attr-value"><span class="token punctuation">=</span><span class="token punctuation">"</span>/Solution Items/<span class="token punctuation">"</span></span><span class="token punctuation">&gt;</span></span>
    <span class="token tag"><span class="token tag"><span class="token punctuation">&lt;</span>File</span> <span class="token attr-name">Path</span><span class="token attr-value"><span class="token punctuation">=</span><span class="token punctuation">"</span>Directory.Build.props<span class="token punctuation">"</span></span> <span class="token punctuation">/&gt;</span></span>
  <span class="token tag"><span class="token tag"><span class="token punctuation">&lt;/</span>Folder</span><span class="token punctuation">&gt;</span></span>
  <span class="token tag"><span class="token tag"><span class="token punctuation">&lt;</span>Project</span> <span class="token attr-name">Path</span><span class="token attr-value"><span class="token punctuation">=</span><span class="token punctuation">"</span>MyApi/MyApi.csproj<span class="token punctuation">"</span></span> <span class="token punctuation">/&gt;</span></span>
<span class="token tag"><span class="token tag"><span class="token punctuation">&lt;/</span>Solution</span><span class="token punctuation">&gt;</span></span>
</code></pre><p>Notice how we have no GUIDs, no cross-multiplied configuration table and no <code>EndGlobalSection</code> markers. Even a developer who is foreign to the <code>.slnx</code> format can read it and immediately understand it.</p><p>Expanding a little, here&rsquo;s an example from a layered solution.</p><pre class=" language-xml"><code class="prism  language-xml"><span class="token tag"><span class="token tag"><span class="token punctuation">&lt;</span>Solution</span><span class="token punctuation">&gt;</span></span>
  <span class="token tag"><span class="token tag"><span class="token punctuation">&lt;</span>Folder</span> <span class="token attr-name">Name</span><span class="token attr-value"><span class="token punctuation">=</span><span class="token punctuation">"</span>/Solution Items/<span class="token punctuation">"</span></span><span class="token punctuation">&gt;</span></span>
    <span class="token tag"><span class="token tag"><span class="token punctuation">&lt;</span>File</span> <span class="token attr-name">Path</span><span class="token attr-value"><span class="token punctuation">=</span><span class="token punctuation">"</span>.editorconfig<span class="token punctuation">"</span></span> <span class="token punctuation">/&gt;</span></span>
    <span class="token tag"><span class="token tag"><span class="token punctuation">&lt;</span>File</span> <span class="token attr-name">Path</span><span class="token attr-value"><span class="token punctuation">=</span><span class="token punctuation">"</span>Directory.Build.props<span class="token punctuation">"</span></span> <span class="token punctuation">/&gt;</span></span>
    <span class="token tag"><span class="token tag"><span class="token punctuation">&lt;</span>File</span> <span class="token attr-name">Path</span><span class="token attr-value"><span class="token punctuation">=</span><span class="token punctuation">"</span>Directory.Packages.props<span class="token punctuation">"</span></span> <span class="token punctuation">/&gt;</span></span>
  <span class="token tag"><span class="token tag"><span class="token punctuation">&lt;/</span>Folder</span><span class="token punctuation">&gt;</span></span>
  <span class="token tag"><span class="token tag"><span class="token punctuation">&lt;</span>Folder</span> <span class="token attr-name">Name</span><span class="token attr-value"><span class="token punctuation">=</span><span class="token punctuation">"</span>/src/<span class="token punctuation">"</span></span><span class="token punctuation">&gt;</span></span>
    <span class="token tag"><span class="token tag"><span class="token punctuation">&lt;</span>Project</span> <span class="token attr-name">Path</span><span class="token attr-value"><span class="token punctuation">=</span><span class="token punctuation">"</span>src/Application/Application.csproj<span class="token punctuation">"</span></span> <span class="token punctuation">/&gt;</span></span>
    <span class="token tag"><span class="token tag"><span class="token punctuation">&lt;</span>Project</span> <span class="token attr-name">Path</span><span class="token attr-value"><span class="token punctuation">=</span><span class="token punctuation">"</span>src/Domain/Domain.csproj<span class="token punctuation">"</span></span> <span class="token punctuation">/&gt;</span></span>
    <span class="token tag"><span class="token tag"><span class="token punctuation">&lt;</span>Project</span> <span class="token attr-name">Path</span><span class="token attr-value"><span class="token punctuation">=</span><span class="token punctuation">"</span>src/Infrastructure/Infrastructure.csproj<span class="token punctuation">"</span></span> <span class="token punctuation">/&gt;</span></span>
    <span class="token tag"><span class="token tag"><span class="token punctuation">&lt;</span>Project</span> <span class="token attr-name">Path</span><span class="token attr-value"><span class="token punctuation">=</span><span class="token punctuation">"</span>src/Web.Api/Web.Api.csproj<span class="token punctuation">"</span></span> <span class="token punctuation">/&gt;</span></span>
  <span class="token tag"><span class="token tag"><span class="token punctuation">&lt;/</span>Folder</span><span class="token punctuation">&gt;</span></span>
  <span class="token tag"><span class="token tag"><span class="token punctuation">&lt;</span>Folder</span> <span class="token attr-name">Name</span><span class="token attr-value"><span class="token punctuation">=</span><span class="token punctuation">"</span>/tests/<span class="token punctuation">"</span></span><span class="token punctuation">&gt;</span></span>
    <span class="token tag"><span class="token tag"><span class="token punctuation">&lt;</span>Project</span> <span class="token attr-name">Path</span><span class="token attr-value"><span class="token punctuation">=</span><span class="token punctuation">"</span>tests/UnitTests/UnitTests.csproj<span class="token punctuation">"</span></span> <span class="token punctuation">/&gt;</span></span>
    <span class="token tag"><span class="token tag"><span class="token punctuation">&lt;</span>Project</span> <span class="token attr-name">Path</span><span class="token attr-value"><span class="token punctuation">=</span><span class="token punctuation">"</span>tests/IntegrationTests/IntegrationTests.csproj<span class="token punctuation">"</span></span> <span class="token punctuation">/&gt;</span></span>
  <span class="token tag"><span class="token tag"><span class="token punctuation">&lt;/</span>Folder</span><span class="token punctuation">&gt;</span></span>
<span class="token tag"><span class="token tag"><span class="token punctuation">&lt;/</span>Solution</span><span class="token punctuation">&gt;</span></span>
</code></pre><p>If you compare this to the equivalent <code>.sln</code>, you&rsquo;re looking at maybe a third of the lines, with none of the GUID overhead. If you need to override configurations for a specific project (like, say your test project shouldn&rsquo;t build in Release mode) you can express that with a <code>Configurations</code> element on the project. In reality, most projects won&rsquo;t need it at all. If you do, you can review examples in <a target="_blank" href="https://github.com/microsoft/vs-solutionpersistence"><code>microsoft/vs-solutionpersistence</code></a> and its <a target="_blank" href="https://github.com/microsoft/vs-solutionpersistence/wiki/Samples">samples wiki</a>.</p><p>If the <code>.slnx</code> looks similar to a <code>.csproj</code>, that&rsquo;s intentional. Microsoft&rsquo;s reasoning is that XML is already the format the rest of MSBuild speaks, the team already had a parser for it, and features like comments and attributes are first-class citizens. A JSON or YAML format might have been trendier, but it would have forced the team to invent semantics for things <code>.csproj</code> already has solved problems for.</p><h2 id="migrating-existing-projects">Migrating Existing Projects</h2><p>Existing projects are a different conversation. Here&rsquo;s what you get by migrating, and how to do it cleanly.</p><ul><li><strong>Merge conflicts are more manageable.</strong> Because there are no GUIDs that change every time you touch a project, the diffs you see in PRs are meaningful. If you add a project, you see one line added. Move a project to a different folder, and you see the path change. Nobody has to play GUID detective.</li><li><strong>You can reasonably edit by hand.</strong> You&rsquo;ll never want to hand-edit a <code>.sln</code> unless it&rsquo;s an emergency. With <code>.slnx</code>, opening it in your editor of choice is perfectly reasonable. I&rsquo;ve fixed broken solution layouts in a text editor faster than Visual Studio would have let me click through the dialogs.</li><li><strong>Tooling has standardized what a solution is.</strong> Microsoft has open-sourced the parser as the <a target="_blank" href="https://www.nuget.org/packages/Microsoft.VisualStudio.SolutionPersistence/">Microsoft.VisualStudio.SolutionPersistence NuGet package</a>. This means MSBuild, the .NET CLI and third-party tools are all reading the same file the same way.</li></ul><p>Based on the official <code>dotnet sln</code> reference, the <a target="_blank" href="https://learn.microsoft.com/en-us/dotnet/core/tools/dotnet-sln">actual conversion is one command</a>.</p><pre><code>dotnet sln migrate
</code></pre><p>If you run this in a directory with an <code>.sln</code> file, you&rsquo;ll get an <code>.slnx</code> file beside it. From Visual Studio, you can also use <strong>File -&gt; Save Solution As&hellip;</strong> and pick <strong>XML Solution File (.slnx)</strong> from the dropdown. Rider supports a similar flow.</p><p>You don&rsquo;t want to keep both files in the repository. The <code>dotnet sln</code> commands don&rsquo;t reliably pick the right one when you have both, and it&rsquo;s easy for the two to get out of sync as people add or remove projects. Pick when to cut over, delete the old file and move on. While there is <a target="_blank" href="https://github.com/edvilme/dotnet-sln-sync">a community tool</a> called <code>dotnet-sln-sync</code> that helps, that should only be used temporarily and not long term.</p><p>As you convert over, here&rsquo;s a quick checklist to avoid any headaches:</p><ul><li><strong>Verify your <code>global.json</code> allows the right SDK.</strong> You need at least .NET 9.0.200 for full CLI support. If your <code>global.json</code> pins to something older, the migrate command won&rsquo;t work.</li><li><strong>Check your CI build agents.</strong> If you&rsquo;re on self-hosted Azure DevOps agents, for example, confirm they&rsquo;re running an SDK new enough to handle <code>.slnx</code>.</li><li><strong>Audit your pipelines.</strong> Anywhere you have references directly to <code>.sln</code>, update the path. Wildcard references like <code>**/*.sln</code> will miss the new file. If you are using templates where you have a mix of <code>.sln</code> and <code>.slnx</code>, a pattern like <code>**/*.sln*</code> will be useful.</li><li><strong>Look out for dependent tools.</strong> Tools like <code>slngen</code> don&rsquo;t yet support <code>.slnx</code> at the time of this post (you can <a target="_blank" href="https://github.com/microsoft/slngen/issues/643">track the issue here</a>). If you&rsquo;re reliant on a tool outside of the Microsoft umbrella, check before you migrate.</li></ul><h2 id="some-rough-edges">Some Rough Edges</h2><p>The <code>.slnx</code> format is no longer &ldquo;preview&rdquo; in any practical sense, but the ecosystem around it is still catching up.</p><ul><li><strong>Visual Studio file association.</strong> Double-clicking a <code>.slnx</code> file doesn&rsquo;t open Visual Studio by default. You can fix this with a file association or just open it from inside the IDE.</li><li><strong>C# Dev Kit in VS Code.</strong> It works, but you may need to set <a target="_blank" href="https://devblogs.microsoft.com/dotnet/introducing-slnx-support-dotnet-cli/"><code>dotnet.defaultSolution</code></a> to the path of your <code>.slnx</code> if it isn&rsquo;t auto-detected.</li><li><strong>Globbing.</strong> You can&rsquo;t write <code>&lt;Project Path="src/**/*.csproj" /&gt;</code> and have it discover projects automatically. The team&rsquo;s reasoning, captured in the <a target="_blank" href="https://github.com/microsoft/vs-solutionpersistence/issues/61">globbing feature request</a>, is that globbing slows down solution loading on large repos because Visual Studio has to scan the file system before it can render anything. That makes sense, <em>but</em> I think plenty of us would happily trade a slower cold load for never having to add another project entry by hand.</li><li><strong>Third-party tools.</strong> Anything that parses <code>.sln</code> directly needs to update. Hopefully the open-source parser library accelerates that, but you&rsquo;ll find holdouts.</li></ul><p>None of these are dealbreakers for new projects. For older codebases with a lot of tooling baked in, it&rsquo;s worth doing a small pilot before flipping the whole repo.</p><h2 id="wrapping-up">Wrapping Up</h2><p>The <code>.slnx</code> format isn&rsquo;t a revolutionary feature. It doesn&rsquo;t change how you write code, it doesn&rsquo;t add new build capabilities, and it doesn&rsquo;t speed up your application. It is, however, one of those quality-of-life upgrades that quietly results in fewer merge conflicts, less time staring at GUIDs, less friction in your CI pipelines once they&rsquo;re set up.</p><p>If you&rsquo;re starting a new .NET solution, just use <code>.slnx</code> from day one. And with .NET 10, you&rsquo;ll get it without lifting a finger. If you&rsquo;re maintaining an existing <code>.sln</code> file, plan a migration when you have a slow week, audit your tooling and cut over cleanly. The format isn&rsquo;t going anywhere, and getting ahead of the transition is easier than waiting for some downstream tool to force your hand.</p><p>Thanks for reading, and happy coding!</p><h2 id="further-reading">Further Reading</h2><ul><li><a target="_blank" href="https://devblogs.microsoft.com/visualstudio/new-simpler-solution-file-format/">New, simpler solution file format</a></li><li><a target="_blank" href="https://devblogs.microsoft.com/dotnet/introducing-slnx-support-dotnet-cli/">Introducing support for SLNX in the .NET CLI</a></li><li><a target="_blank" href="https://github.com/microsoft/vs-solutionpersistence"><code>microsoft/vs-solutionpersistence</code></a></li><li><a target="_blank" href="https://learn.microsoft.com/en-us/dotnet/core/tools/dotnet-sln"><code>dotnet sln</code> command reference</a></li><li><a target="_blank" href="https://learn.microsoft.com/en-us/dotnet/core/compatibility/sdk/10.0/dotnet-new-sln-slnx-default">.NET 10 breaking change: <code>dotnet new sln</code> defaults to SLNX</a></li></ul><img src="https://feeds.telerik.com/link/23050/17359642.gif" height="1" width="1"/>]]></content>
  </entry>
  <entry>
    <id>urn:uuid:f5808969-92f6-4e38-b801-f36a47627abf</id>
    <title type="text">Visual Studio 2026, 6 Months Later</title>
    <summary type="text">Throughout this post, we’ll discuss Visual Studio updates and improvements, such as performance, GitHub Copilot, Hot Reload and more.</summary>
    <published>2026-06-04T21:42:24Z</published>
    <updated>2026-08-24T02:17:02Z</updated>
    <author>
      <name>Dave Brock </name>
    </author>
    <link rel="alternate" href="https://feeds.telerik.com/link/23050/17354316/visual-studio-2026-6-months-later"/>
    <content type="text"><![CDATA[<p><span class="featured">Throughout this post, we&rsquo;ll discuss Visual Studio updates and improvements, such as performance, GitHub Copilot, Hot Reload and more.</span></p><p>I remember exactly where I was when <a target="_blank" href="https://devblogs.microsoft.com/visualstudio/visual-studio-2026-is-here-faster-smarter-and-a-hit-with-early-adopters/">Visual Studio 2026 dropped</a> back in November: at my desk, watching the Microsoft launch event with one eye and refactoring an <code>IDataReader</code> implementation with the other.</p><p>The keynote was typical Microsoft. There was a lot of &ldquo;reimagining how developers work.&rdquo; There was, of course, a slide with the word &ldquo;intelligent&rdquo; on it at least eight times. And the word &ldquo;Copilot&rdquo; appeared on screen so many times I started to wonder if Microsoft&rsquo;s marketing team had been replaced by an infinite loop that just prints <code>Copilot</code> forever.</p><p>Then I installed the thing.</p><p>The first week with VS 2026 was the most disoriented I&rsquo;ve felt in a Visual Studio release since <a target="_blank" href="https://devblogs.microsoft.com/visualstudio/a-design-with-all-caps/">the menu bar went all-caps in 2012</a> and I spent a month reading angry forum threads about it.</p><p>In 2026, I was tripped up by the just-slightly different Solution Explorer, the Copilot panel that lives where my Test Explorer used to live, the general Copilot onslaught and the interesting design choices. I felt like everything on my desk had been moved slightly to the left.</p><p>That was temporary. As with most new technology, eventually things felt normal again. I was finding workflows that genuinely beat my old ones and I stopped noticing the cosmetic changes. So here&rsquo;s where I am six months later &hellip; same machine, same kind of solution I work in every day, just a different IDE around it.</p><p><img src="https://www.telerik.com/sfimages/default-source/blogs/2026/2026-06/vs2026-overview.png?sfvrsn=4ef376fb_2" alt="" /><br /><span style="font-size:14px;">We meet again, old friend. At least the menu bar isn't in caps.</span></p><p>Six months in, I feel comfortable. Six months is long enough to live with the rough edges, and find what&rsquo;s genuinely useful. So I&rsquo;m here to share them with you.</p><p>As an aside: to keep my sanity intact, I&rsquo;m going to use the word &ldquo;Copilot&rdquo; only when I absolutely have to. Microsoft has decided that every feature in Visual Studio is now Copilot-something &hellip; Copilot Chat, Copilot Edits, Copilot Agent, Copilot Workspaces, GitHub Copilot, Copilot for Azure, Copilot for Pull Requests and so on. So when I say &ldquo;the agent&rdquo; or &ldquo;the AI thing in the sidebar,&rdquo; you&rsquo;ll know what I mean.</p><h2 id="the-performance-story-is-real">The Performance Story Is Real</h2><p>I&rsquo;ll lead with this, mostly because it was the thing I was most skeptical about. Every Visual Studio release for the past decade has touted &ldquo;X% faster solution load!&rdquo; and, to me, every Visual Studio release for the last decade has felt (roughly) the same speed once you test it with your beefy codebase.</p><p>VS 2026 is genuinely faster. Not &ldquo;marketing-faster&rdquo; &hellip; actually faster. The <a target="_blank" href="https://devblogs.microsoft.com/visualstudio/visual-studio-2022/">64-bit-everywhere story that started with VS 2022</a> has matured into something that handles large solutions without the periodic &ldquo;please hold&rdquo; pauses we&rsquo;re all familiar with. In Microsoft&rsquo;s VS2026 launch post, they say they <a target="_blank" href="https://devblogs.microsoft.com/visualstudio/visual-studio-2026-is-here-faster-smarter-and-a-hit-with-early-adopters/">cut hangs by over 50%</a>.</p><p>The IntelliSense responsiveness is the part I notice most. Typing a <code>.</code> after an object now produces suggestions roughly when I expect them to appear. A low bar? Definitely, but previous versions frequently limboed under it.</p><h2 id="agent-mode-is-useful-when-you-pick-the-right-job">Agent Mode Is Useful, When You Pick the Right Job</h2><p>GitHub Copilot&rsquo;s <a target="_blank" href="https://learn.microsoft.com/en-us/visualstudio/ide/copilot-agent-mode?view=visualstudio">agent mode in Visual Studio 2026</a>&mdash;or, as Microsoft prefers, <em>GitHub Copilot Agent Mode powered by Copilot in Visual Studio with Copilot</em>&mdash;has improved tremendously since Visual Studio 2022. Six months in, I think it&rsquo;s genuinely useful, but for a specific set of tasks.</p><p>In my experience, it works well with scoped, well-defined refactors. If I want to ask: <em>Hey Copilot, add a new health check for this Cosmos container and follow the pattern in my existing health checks.</em> (Yes, I sometimes talk to Copilot like a home assistant.) Or: <em>Take my new controller and add the same logging pattern as the others in this project.</em> And, after discovering some methods in a codebase with 11 nested if statements: <em>Convert this <code>for</code> loop to a LINQ expression but keep it readable.</em> It&rsquo;s effective enough that I&rsquo;ve stopped writing this kind of code by hand.</p><p>In my experience, things get harder when the agent needs to understand why something exists. The agent will happily refactor a piece of code that only exists because of, say, a weird third-party integration constraint from 2018, and the resulting code will be cleaner, more maintainable &hellip; and broken in production. Did I actually break something in production? Not this time. But I would have.</p><p>To be fair to the agent, this is exactly where it needs context. It doesn&rsquo;t read minds (although it sure does try). Here&rsquo;s a pattern I&rsquo;ve leaned on.</p><pre class=" language-csharp"><code class="prism  language-csharp"><span class="token comment">// AGENT NOTES:</span>
<span class="token comment">// - This service must remain synchronous; the upstream caller cannot</span>
<span class="token comment">//   be made async without a contract change.</span>
<span class="token comment">// - The string "PRIME" is required by the third-party integration. </span>
<span class="token comment">//   I don't like it but they won't change it. Do not "improve" it </span>
<span class="token comment">//   to PersonType.Prime.ToString().</span>
<span class="token comment">// - Cancellation tokens must be forwarded; do NOT pass `default`.</span>
</code></pre><p>When the agent has clear context like this, it really delivers. Below is the agent producing two new health check files plus a registration update in <code>Program.cs</code>, all from one prompt asking it to mirror an existing pattern. The result is a careful refactoring with the right substitutions swapped in. That&rsquo;s exactly the kind of work I&rsquo;m happy to hand off.</p><p><img src="https://www.telerik.com/sfimages/default-source/blogs/2026/2026-06/gh-copilot-agent.png?sfvrsn=a2b5eefe_2" alt="" /><br /><span style="font-size:14px;">The agent panel and one of the two generated files. Three files changed, zero hand-written by me. (My team is thankful for the latter.)</span></p><p>This sounds like babysitting, and it is. Welcome to AI-driven development, my friends. The 10 seconds of setup saves me from a 10-minute cleanup later. When the prep is solid, the result is solid.</p><p>For more information on <a target="_blank" href="https://learn.microsoft.com/en-us/visualstudio/ide/copilot-chat-context?view=visualstudio#use-custom-instructions">custom instructions, check out the Microsoft documentation</a>.</p><h2 id="test-explorer-isnt-frustrating">Test Explorer Isn&rsquo;t Frustrating</h2><p>In my experience, the Test Explorer seems to be much improved in Visual Studio 2026. If I had to sum it up in previous versions, I&rsquo;d say &ldquo;it&rsquo;s fine&rdquo; &hellip; after all, do we ever get jazzed about tests? In previous releases, I kept saying &ldquo;it&rsquo;s fine&rdquo; until I had a few thousand tests, at which point it started getting opinionated about which tests to run.</p><p>The new version is faster, the filtering predictably works, and it doesn&rsquo;t lose track of which tests are running when you switch branches mid-execution. Try it yourself. Run your full test suite and watch the Test Explorer not embarrass itself. It&rsquo;s a small joy.</p><p><img src="https://www.telerik.com/sfimages/default-source/blogs/2026/2026-06/test-explorer.png?sfvrsn=222a8ba_2" alt="" /><br /><span style="font-size:14px;">One of those things you don't notice until it stops getting in your way.</span></p><h2 id="better-git-integration">Better Git Integration</h2><p>Visual Studio&rsquo;s Git tooling has historically been one of the IDE&rsquo;s more underwhelming features. Until recently, my workflow was:</p><ol><li>Make code changes in Visual Studio.</li><li>Run Git commands in my terminal (or a third-party tool like GitHub Desktop)</li><li>Ignore the IDE&rsquo;s Git panel entirely.</li></ol><p>With VS 2026, I&rsquo;m finally doing real Git work inside the tool. The new staging interface is better. The conflict resolution UI is also better than it used to be. The &ldquo;please show me an actual diff and not a vague summary&rdquo; feature is good.</p><p>Now, it&rsquo;s no GitKraken and it doesn&rsquo;t try to be. But it&rsquo;s good enough that I no longer switch over to a terminal for routine operations, and that works for me.</p><p><img src="https://www.telerik.com/sfimages/default-source/blogs/2026/2026-06/git-conflict.png?sfvrsn=62f8884a_2" alt="" /><br /><span style="font-size:14px;">Three-way merge view, in the IDE I'm already in. Rejoice!</span></p><h2 id="hot-reload-that-reloads-more-often">Hot Reload That Reloads More Often</h2><p>Hot Reload has been one of those features that worked on Friday afternoons if I said &ldquo;please work&rdquo; (especially for ASP.NET Core). Any other time, I&rsquo;d change a method body, save, watch the IDE think very hard about it, and then get: <em>&ldquo;Hot Reload was unable to apply your changes. Restart the application?&rdquo;</em></p><p>The &ldquo;hot&rdquo; in &ldquo;Hot Reload&rdquo; was <a target="_blank" href="https://www.reddit.com/r/dotnet/comments/1my662s/will_microsoft_ever_fix_hot_reload_in_net/">stretching the truth</a> at times (with the understanding that getting it right <a target="_blank" href="https://www.reddit.com/r/dotnet/comments/1my662s/comment/naac88s/?utm_source=share&amp;utm_medium=web3x&amp;utm_name=web3xcss&amp;utm_term=1&amp;utm_content=share_button">isn&rsquo;t as simple in .NET</a> as it is for languages like JavaScript).</p><p>With VS 2026, I now reach for it instinctively instead of cynically. Method-body edits in controllers, services and Razor pages just apply. You change a string in a controller, hit Save and see the change. You know, the way it was supposed to work in 2021. The way it kind of worked in 2023. The way it now actually works in 2026.</p><p>When Hot Reload can&rsquo;t apply a change (because the change requires a metadata update or you&rsquo;ve added a field or whatever the actual reason is), the IDE now tells me clearly why instead of vaguely throwing up its hands. That alone goes a long way. I know whether to keep iterating or to just restart the host.</p><h3 id="debugger-improvements-especially-with-async-traces">Debugger Improvements (Especially with Async Traces)</h3><p>Have you ever stared at an async stack trace and felt your soul leave your body? Just me?</p><p>Historically, when an exception bubbled up from somewhere deep in an <code>async</code>/<code>await</code> chain, the stack trace was a wall of <code>MoveNext</code> calls and state machine internals. It was tremendously useful if you wanted to learn about the C# compiler, but not great if you wanted to know which of your methods actually threw.</p><p>Things are looking better in Visual Studio 2026. The debugger now stitches together async call chains into something that reads like the call graph you actually wrote. The <code>MoveNext</code> noise is collapsed by default. The original calling method is shown as the parent frame and not buried six levels down. When an exception is thrown inside a <code>Task.WhenAll</code>, you can see which task threw without reverse-engineering the parallel structure.</p><p><img src="https://www.telerik.com/sfimages/default-source/blogs/2026/2026-06/debugger.png?sfvrsn=53980e30_2" alt="" /><br /><span style="font-size:14px;">An async exception, with the actual call chain visible. No <code>MoveNext</code> translation required.</span></p><p>On top of that, conditional breakpoints feel faster to evaluate, and the tracepoints (where you can log a message without breaking) is a one-click affair instead of a buried right-click option.</p><p>Small wins. But debugging is the thing I do every day, and small wins on the thing you do every day add up fast.</p><h2 id="the-verdict">The Verdict</h2><p>Look, the Copilot stuff is genuinely impressive. The agent demos at the keynote were the kind of thing that makes you want to fire up the installer immediately. And after six months, I&rsquo;ll admit that I use it every day.</p><p>But Visual Studio 2026 is a genuine step forward for the boring reasons. The performance is real. The Test Explorer doesn&rsquo;t stress me out. The debugger provides stack traces a human can read. The agent mode handles the kind of work I&rsquo;d previously do by hand. Those are the wins that show up in my daily work, not the ones that show up in keynote demos.</p><p>If you&rsquo;re on Visual Studio 2022 and wondering whether to upgrade: yes. Ignore the marketing, and let the unglamorous improvements do their job. Six months later, you won&rsquo;t be excited about Visual Studio 2026 &hellip; and that&rsquo;s exactly the point. You&rsquo;ll just be working faster.</p><aside><hr data-sf-ec-immutable="" /><div class="row"><div class="col-4 u-normal-full u-small-mb0"><h4 class="u-fs20 u-fw5 u-lh125 u-mb0">Extension Properties: C# 14&rsquo;s Game-Changing Feature for Cleaner Code</h4></div><div class="col-8"><p class="u-fs16 u-mb0">This post introduces <a target="_blank" href="https://www.telerik.com/blogs/extension-properties-csharp-14-game-changing-feature-cleaner-code">extension properties</a>, a new feature of C# 14 that allows you to use properties in your extension methods.</p></div></div></aside><img src="https://feeds.telerik.com/link/23050/17354316.gif" height="1" width="1"/>]]></content>
  </entry>
  <entry>
    <id>urn:uuid:54ada40d-ff98-496d-94ae-1dbc6613c6e0</id>
    <title type="text">Advanced Form Validation in Blazor 10</title>
    <summary type="text">These new validation features available in Blazor as of .NET 10 help manage forms with nested objects and lists, plus perform complex and cross-field validations.</summary>
    <published>2026-06-03T13:34:16Z</published>
    <updated>2026-08-24T02:17:02Z</updated>
    <author>
      <name>Héctor Pérez </name>
    </author>
    <link rel="alternate" href="https://feeds.telerik.com/link/23050/17353268/advanced-form-validation-blazor-10"/>
    <content type="text"><![CDATA[<p><span class="featured">These new validation features available in Blazor as of .NET 10 help manage forms with nested objects and lists, plus perform complex and cross-field validations.</span></p><p>Form validation is essential when working with data in Blazor applications. Before .NET 10, if you wanted to perform validation of nested objects, you had to take a series of additional steps that could add complexity to your projects. In this article, we will examine the improvements and new features in .NET 10 to solve this problem through a practical exercise. Let&rsquo;s go!</p><h2 id="understanding-the-problem-of-nested-validations-before-.net-10">Understanding the Problem of Nested Validations Before .NET 10</h2><p>To see the problem when working with nested objects and their validation, let&rsquo;s create a sample Blazor project. For this demonstration, I am working with a project using the <strong>Blazor Web App</strong> template configured with <strong>Interactive Server</strong> rendering <strong>globally</strong>.</p><p>Immediately after creating the project, perform the <a target="_blank" href="https://www.telerik.com/blazor-ui/documentation/getting-started/web-app">installation and configuration steps for the Progress Telerik UI for Blazor controls</a>, as we will use them to quickly build modern interfaces.</p><h3 id="creating-models-in-the-application">Creating Models in the Application</h3><p>Suppose we are building an attendee registration application for a technical event. As a first step, I have defined a class <code>EventRegistration</code> with the following structure:</p><pre class=" language-csharp"><code class="prism  language-csharp"><span class="token keyword">public</span> <span class="token keyword">class</span> <span class="token class-name">EventRegistration</span>
<span class="token punctuation">{</span>
    <span class="token keyword">public</span> Attendee Attendee <span class="token punctuation">{</span> <span class="token keyword">get</span><span class="token punctuation">;</span> <span class="token keyword">set</span><span class="token punctuation">;</span> <span class="token punctuation">}</span> <span class="token operator">=</span> <span class="token keyword">new</span><span class="token punctuation">(</span><span class="token punctuation">)</span><span class="token punctuation">;</span>
    <span class="token keyword">public</span> BillingAddress BillingAddress <span class="token punctuation">{</span> <span class="token keyword">get</span><span class="token punctuation">;</span> <span class="token keyword">set</span><span class="token punctuation">;</span> <span class="token punctuation">}</span> <span class="token operator">=</span> <span class="token keyword">new</span><span class="token punctuation">(</span><span class="token punctuation">)</span><span class="token punctuation">;</span>
    <span class="token keyword">public</span> List<span class="token operator">&lt;</span>SessionSelection<span class="token operator">&gt;</span> Sessions <span class="token punctuation">{</span> <span class="token keyword">get</span><span class="token punctuation">;</span> <span class="token keyword">set</span><span class="token punctuation">;</span> <span class="token punctuation">}</span> <span class="token operator">=</span> <span class="token punctuation">[</span><span class="token punctuation">]</span><span class="token punctuation">;</span>

    <span class="token punctuation">[</span><span class="token function">Range</span><span class="token punctuation">(</span><span class="token keyword">typeof</span><span class="token punctuation">(</span><span class="token keyword">bool</span><span class="token punctuation">)</span><span class="token punctuation">,</span> <span class="token string">"true"</span><span class="token punctuation">,</span> <span class="token string">"true"</span><span class="token punctuation">,</span> ErrorMessage <span class="token operator">=</span> <span class="token string">"You must accept the terms and conditions."</span><span class="token punctuation">)</span><span class="token punctuation">]</span>
    <span class="token keyword">public</span> <span class="token keyword">bool</span> AcceptTerms <span class="token punctuation">{</span> <span class="token keyword">get</span><span class="token punctuation">;</span> <span class="token keyword">set</span><span class="token punctuation">;</span> <span class="token punctuation">}</span>
<span class="token punctuation">}</span>
</code></pre><p>The model above has some nested objects, both single objects such as <code>Attendee</code> and a list of type <code>SessionSelection</code>. Likewise, there is a validation on the property <code>AcceptTerms</code> of type <code>Range</code>, which verifies that the value is <code>true</code>.</p><p>The model of a <code>Attendee</code> looks as follows:</p><pre class=" language-csharp"><code class="prism  language-csharp"><span class="token keyword">public</span> <span class="token keyword">class</span> <span class="token class-name">Attendee</span>
<span class="token punctuation">{</span>
    <span class="token punctuation">[</span><span class="token function">Required</span><span class="token punctuation">(</span>ErrorMessage <span class="token operator">=</span> <span class="token string">"Full name is required."</span><span class="token punctuation">)</span><span class="token punctuation">]</span>
    <span class="token punctuation">[</span><span class="token function">StringLength</span><span class="token punctuation">(</span><span class="token number">100</span><span class="token punctuation">,</span> ErrorMessage <span class="token operator">=</span> <span class="token string">"Name cannot exceed 100 characters."</span><span class="token punctuation">)</span><span class="token punctuation">]</span>
    <span class="token keyword">public</span> <span class="token keyword">string</span><span class="token operator">?</span> FullName <span class="token punctuation">{</span> <span class="token keyword">get</span><span class="token punctuation">;</span> <span class="token keyword">set</span><span class="token punctuation">;</span> <span class="token punctuation">}</span>

    <span class="token punctuation">[</span><span class="token function">Required</span><span class="token punctuation">(</span>ErrorMessage <span class="token operator">=</span> <span class="token string">"Email is required."</span><span class="token punctuation">)</span><span class="token punctuation">]</span>
    <span class="token punctuation">[</span><span class="token function">EmailAddress</span><span class="token punctuation">(</span>ErrorMessage <span class="token operator">=</span> <span class="token string">"Invalid email format."</span><span class="token punctuation">)</span><span class="token punctuation">]</span>
    <span class="token keyword">public</span> <span class="token keyword">string</span><span class="token operator">?</span> Email <span class="token punctuation">{</span> <span class="token keyword">get</span><span class="token punctuation">;</span> <span class="token keyword">set</span><span class="token punctuation">;</span> <span class="token punctuation">}</span>

    <span class="token punctuation">[</span><span class="token function">Required</span><span class="token punctuation">(</span>ErrorMessage <span class="token operator">=</span> <span class="token string">"Phone number is required."</span><span class="token punctuation">)</span><span class="token punctuation">]</span>
    <span class="token punctuation">[</span><span class="token function">Phone</span><span class="token punctuation">(</span>ErrorMessage <span class="token operator">=</span> <span class="token string">"Invalid phone number format."</span><span class="token punctuation">)</span><span class="token punctuation">]</span>
    <span class="token keyword">public</span> <span class="token keyword">string</span><span class="token operator">?</span> Phone <span class="token punctuation">{</span> <span class="token keyword">get</span><span class="token punctuation">;</span> <span class="token keyword">set</span><span class="token punctuation">;</span> <span class="token punctuation">}</span>

    <span class="token punctuation">[</span><span class="token function">Required</span><span class="token punctuation">(</span>ErrorMessage <span class="token operator">=</span> <span class="token string">"Company name is required."</span><span class="token punctuation">)</span><span class="token punctuation">]</span>
    <span class="token keyword">public</span> <span class="token keyword">string</span><span class="token operator">?</span> Company <span class="token punctuation">{</span> <span class="token keyword">get</span><span class="token punctuation">;</span> <span class="token keyword">set</span><span class="token punctuation">;</span> <span class="token punctuation">}</span>

    <span class="token punctuation">[</span><span class="token function">Required</span><span class="token punctuation">(</span>ErrorMessage <span class="token operator">=</span> <span class="token string">"Job title is required."</span><span class="token punctuation">)</span><span class="token punctuation">]</span>
    <span class="token keyword">public</span> <span class="token keyword">string</span><span class="token operator">?</span> JobTitle <span class="token punctuation">{</span> <span class="token keyword">get</span><span class="token punctuation">;</span> <span class="token keyword">set</span><span class="token punctuation">;</span> <span class="token punctuation">}</span>
<span class="token punctuation">}</span>
</code></pre><p>The <code>Attendee</code> model has more validation annotations per property, which allow validating each attendee&rsquo;s information. The project also includes the <code>BillingAddress</code> model to store address information, also featuring validation attributes:</p><pre class=" language-csharp"><code class="prism  language-csharp"><span class="token keyword">public</span> <span class="token keyword">class</span> <span class="token class-name">BillingAddress</span>
<span class="token punctuation">{</span>
    <span class="token punctuation">[</span><span class="token function">Required</span><span class="token punctuation">(</span>ErrorMessage <span class="token operator">=</span> <span class="token string">"Street address is required."</span><span class="token punctuation">)</span><span class="token punctuation">]</span>
    <span class="token keyword">public</span> <span class="token keyword">string</span><span class="token operator">?</span> Street <span class="token punctuation">{</span> <span class="token keyword">get</span><span class="token punctuation">;</span> <span class="token keyword">set</span><span class="token punctuation">;</span> <span class="token punctuation">}</span>

    <span class="token punctuation">[</span><span class="token function">Required</span><span class="token punctuation">(</span>ErrorMessage <span class="token operator">=</span> <span class="token string">"City is required."</span><span class="token punctuation">)</span><span class="token punctuation">]</span>
    <span class="token keyword">public</span> <span class="token keyword">string</span><span class="token operator">?</span> City <span class="token punctuation">{</span> <span class="token keyword">get</span><span class="token punctuation">;</span> <span class="token keyword">set</span><span class="token punctuation">;</span> <span class="token punctuation">}</span>

    <span class="token punctuation">[</span><span class="token function">Required</span><span class="token punctuation">(</span>ErrorMessage <span class="token operator">=</span> <span class="token string">"State/Province is required."</span><span class="token punctuation">)</span><span class="token punctuation">]</span>
    <span class="token keyword">public</span> <span class="token keyword">string</span><span class="token operator">?</span> State <span class="token punctuation">{</span> <span class="token keyword">get</span><span class="token punctuation">;</span> <span class="token keyword">set</span><span class="token punctuation">;</span> <span class="token punctuation">}</span>

    <span class="token punctuation">[</span><span class="token function">Required</span><span class="token punctuation">(</span>ErrorMessage <span class="token operator">=</span> <span class="token string">"Postal code is required."</span><span class="token punctuation">)</span><span class="token punctuation">]</span>
    <span class="token keyword">public</span> <span class="token keyword">string</span><span class="token operator">?</span> PostalCode <span class="token punctuation">{</span> <span class="token keyword">get</span><span class="token punctuation">;</span> <span class="token keyword">set</span><span class="token punctuation">;</span> <span class="token punctuation">}</span>

    <span class="token punctuation">[</span><span class="token function">Required</span><span class="token punctuation">(</span>ErrorMessage <span class="token operator">=</span> <span class="token string">"Country is required."</span><span class="token punctuation">)</span><span class="token punctuation">]</span>
    <span class="token keyword">public</span> <span class="token keyword">string</span><span class="token operator">?</span> Country <span class="token punctuation">{</span> <span class="token keyword">get</span><span class="token punctuation">;</span> <span class="token keyword">set</span><span class="token punctuation">;</span> <span class="token punctuation">}</span>
<span class="token punctuation">}</span>
</code></pre><p>Finally, the <code>SessionSelection</code> model defines the structure of each session selected by an attendee:</p><pre class=" language-csharp"><code class="prism  language-csharp"><span class="token keyword">public</span> <span class="token keyword">class</span> <span class="token class-name">SessionSelection</span>
<span class="token punctuation">{</span>
    <span class="token punctuation">[</span><span class="token function">Required</span><span class="token punctuation">(</span>ErrorMessage <span class="token operator">=</span> <span class="token string">"Session name is required."</span><span class="token punctuation">)</span><span class="token punctuation">]</span>
    <span class="token keyword">public</span> <span class="token keyword">string</span><span class="token operator">?</span> SessionName <span class="token punctuation">{</span> <span class="token keyword">get</span><span class="token punctuation">;</span> <span class="token keyword">set</span><span class="token punctuation">;</span> <span class="token punctuation">}</span>

    <span class="token punctuation">[</span><span class="token function">Required</span><span class="token punctuation">(</span>ErrorMessage <span class="token operator">=</span> <span class="token string">"Preference level is required."</span><span class="token punctuation">)</span><span class="token punctuation">]</span>
    <span class="token keyword">public</span> <span class="token keyword">string</span><span class="token operator">?</span> Preference <span class="token punctuation">{</span> <span class="token keyword">get</span><span class="token punctuation">;</span> <span class="token keyword">set</span><span class="token punctuation">;</span> <span class="token punctuation">}</span>
<span class="token punctuation">}</span>
</code></pre><p>The complexity among the previous models will allow us to test the new validation features included in .NET 10.</p><h3 id="initializing-project-data-using-a-session-catalog-service">Initializing Project Data Using a Session Catalog Service</h3><p>To display mock data in the application, let&rsquo;s create a <code>SessionCatalog</code> service, where we&rsquo;ll define a list of sessions:</p><pre class=" language-csharp"><code class="prism  language-csharp"><span class="token keyword">public</span> <span class="token keyword">class</span> <span class="token class-name">SessionCatalog</span>
<span class="token punctuation">{</span>
    <span class="token keyword">public</span> List<span class="token operator">&lt;</span><span class="token keyword">string</span><span class="token operator">&gt;</span> <span class="token function">GetAvailableSessions</span><span class="token punctuation">(</span><span class="token punctuation">)</span> <span class="token operator">=</span><span class="token operator">&gt;</span>
    <span class="token punctuation">[</span>
        <span class="token string">"Keynote: The Future of .NET"</span><span class="token punctuation">,</span>
        <span class="token string">"Workshop: Blazor Advanced Patterns"</span><span class="token punctuation">,</span>
        <span class="token string">"Talk: SignalR Real-Time Communication"</span><span class="token punctuation">,</span>
        <span class="token string">"Workshop: Minimal APIs Deep Dive"</span><span class="token punctuation">,</span>
        <span class="token string">"Talk: Cloud-Native .NET Applications"</span><span class="token punctuation">,</span>
        <span class="token string">"Workshop: AI Integration with .NET"</span>
    <span class="token punctuation">]</span><span class="token punctuation">;</span>

    <span class="token keyword">public</span> List<span class="token operator">&lt;</span><span class="token keyword">string</span><span class="token operator">&gt;</span> <span class="token function">GetPreferenceLevels</span><span class="token punctuation">(</span><span class="token punctuation">)</span> <span class="token operator">=</span><span class="token operator">&gt;</span>
    <span class="token punctuation">[</span>
        <span class="token string">"High"</span><span class="token punctuation">,</span>
        <span class="token string">"Medium"</span><span class="token punctuation">,</span>
        <span class="token string">"Low"</span>
    <span class="token punctuation">]</span><span class="token punctuation">;</span>
<span class="token punctuation">}</span>
</code></pre><p>We will register this service in <code>Program.cs</code> as follows:</p><pre class=" language-csharp"><code class="prism  language-csharp"><span class="token keyword">var</span> builder <span class="token operator">=</span> WebApplication<span class="token punctuation">.</span><span class="token function">CreateBuilder</span><span class="token punctuation">(</span>args<span class="token punctuation">)</span><span class="token punctuation">;</span>
<span class="token punctuation">.</span><span class="token punctuation">.</span><span class="token punctuation">.</span>
builder<span class="token punctuation">.</span>Services<span class="token punctuation">.</span><span class="token generic-method function">AddSingleton<span class="token punctuation">&lt;</span>SessionCatalog<span class="token punctuation">&gt;</span></span><span class="token punctuation">(</span><span class="token punctuation">)</span><span class="token punctuation">;</span>

<span class="token keyword">var</span> app <span class="token operator">=</span> builder<span class="token punctuation">.</span><span class="token function">Build</span><span class="token punctuation">(</span><span class="token punctuation">)</span><span class="token punctuation">;</span>
</code></pre><h3 id="creating-the-graphical-interface">Creating the Graphical Interface</h3><p>To perform various checks, let&rsquo;s create a graphical interface using the <code>TelerikForm</code> component. This will enable generating and customizing model-based forms and with many configuration parameters, making it a powerful and useful component for our example. The resulting code looks like this:</p><pre class=" language-xml"><code class="prism  language-xml">@page "/registration"
@rendermode InteractiveServer
@using FormValidationNET10.Models
@using FormValidationNET10.Services
@inject SessionCatalog SessionCatalog

<span class="token tag"><span class="token tag"><span class="token punctuation">&lt;</span>PageTitle</span><span class="token punctuation">&gt;</span></span>Event Registration<span class="token tag"><span class="token tag"><span class="token punctuation">&lt;/</span>PageTitle</span><span class="token punctuation">&gt;</span></span>

<span class="token tag"><span class="token tag"><span class="token punctuation">&lt;</span>h1</span> <span class="token attr-name">class</span><span class="token attr-value"><span class="token punctuation">=</span><span class="token punctuation">"</span>mb-4<span class="token punctuation">"</span></span><span class="token punctuation">&gt;</span></span>Event Registration<span class="token tag"><span class="token tag"><span class="token punctuation">&lt;/</span>h1</span><span class="token punctuation">&gt;</span></span>

<span class="token tag"><span class="token tag"><span class="token punctuation">&lt;</span>TelerikForm</span> <span class="token attr-name">EditContext</span><span class="token attr-value"><span class="token punctuation">=</span><span class="token punctuation">"</span>editContext<span class="token punctuation">"</span></span>
             <span class="token attr-name">OnValidSubmit</span><span class="token attr-value"><span class="token punctuation">=</span><span class="token punctuation">"</span>HandleValidSubmit<span class="token punctuation">"</span></span><span class="token punctuation">&gt;</span></span>
    <span class="token tag"><span class="token tag"><span class="token punctuation">&lt;</span>FormValidation</span><span class="token punctuation">&gt;</span></span>
        <span class="token tag"><span class="token tag"><span class="token punctuation">&lt;</span>DataAnnotationsValidator</span> <span class="token punctuation">/&gt;</span></span>
        <span class="token tag"><span class="token tag"><span class="token punctuation">&lt;</span>TelerikValidationSummary</span> <span class="token punctuation">/&gt;</span></span>
    <span class="token tag"><span class="token tag"><span class="token punctuation">&lt;/</span>FormValidation</span><span class="token punctuation">&gt;</span></span>
    <span class="token tag"><span class="token tag"><span class="token punctuation">&lt;</span>FormItems</span><span class="token punctuation">&gt;</span></span>
        <span class="token tag"><span class="token tag"><span class="token punctuation">&lt;</span>FormItem</span> <span class="token attr-name">Field</span><span class="token attr-value"><span class="token punctuation">=</span><span class="token punctuation">"</span>Attendee.FullName<span class="token punctuation">"</span></span> <span class="token attr-name">LabelText</span><span class="token attr-value"><span class="token punctuation">=</span><span class="token punctuation">"</span>Full Name<span class="token punctuation">"</span></span> <span class="token punctuation">/&gt;</span></span>
        <span class="token tag"><span class="token tag"><span class="token punctuation">&lt;</span>FormItem</span> <span class="token attr-name">Field</span><span class="token attr-value"><span class="token punctuation">=</span><span class="token punctuation">"</span>Attendee.Email<span class="token punctuation">"</span></span> <span class="token attr-name">LabelText</span><span class="token attr-value"><span class="token punctuation">=</span><span class="token punctuation">"</span>Email<span class="token punctuation">"</span></span> <span class="token punctuation">/&gt;</span></span>
        <span class="token tag"><span class="token tag"><span class="token punctuation">&lt;</span>FormItem</span> <span class="token attr-name">Field</span><span class="token attr-value"><span class="token punctuation">=</span><span class="token punctuation">"</span>Attendee.Phone<span class="token punctuation">"</span></span> <span class="token attr-name">LabelText</span><span class="token attr-value"><span class="token punctuation">=</span><span class="token punctuation">"</span>Phone<span class="token punctuation">"</span></span> <span class="token punctuation">/&gt;</span></span>
        <span class="token tag"><span class="token tag"><span class="token punctuation">&lt;</span>FormItem</span> <span class="token attr-name">Field</span><span class="token attr-value"><span class="token punctuation">=</span><span class="token punctuation">"</span>Attendee.Company<span class="token punctuation">"</span></span> <span class="token attr-name">LabelText</span><span class="token attr-value"><span class="token punctuation">=</span><span class="token punctuation">"</span>Company<span class="token punctuation">"</span></span> <span class="token punctuation">/&gt;</span></span>
        <span class="token tag"><span class="token tag"><span class="token punctuation">&lt;</span>FormItem</span> <span class="token attr-name">Field</span><span class="token attr-value"><span class="token punctuation">=</span><span class="token punctuation">"</span>Attendee.JobTitle<span class="token punctuation">"</span></span> <span class="token attr-name">LabelText</span><span class="token attr-value"><span class="token punctuation">=</span><span class="token punctuation">"</span>Job Title<span class="token punctuation">"</span></span> <span class="token punctuation">/&gt;</span></span>
        <span class="token tag"><span class="token tag"><span class="token punctuation">&lt;</span>FormItem</span> <span class="token attr-name">Field</span><span class="token attr-value"><span class="token punctuation">=</span><span class="token punctuation">"</span>BillingAddress.Street<span class="token punctuation">"</span></span> <span class="token attr-name">LabelText</span><span class="token attr-value"><span class="token punctuation">=</span><span class="token punctuation">"</span>Street<span class="token punctuation">"</span></span> <span class="token punctuation">/&gt;</span></span>
        <span class="token tag"><span class="token tag"><span class="token punctuation">&lt;</span>FormItem</span> <span class="token attr-name">Field</span><span class="token attr-value"><span class="token punctuation">=</span><span class="token punctuation">"</span>BillingAddress.City<span class="token punctuation">"</span></span> <span class="token attr-name">LabelText</span><span class="token attr-value"><span class="token punctuation">=</span><span class="token punctuation">"</span>City<span class="token punctuation">"</span></span> <span class="token punctuation">/&gt;</span></span>
        <span class="token tag"><span class="token tag"><span class="token punctuation">&lt;</span>FormItem</span> <span class="token attr-name">Field</span><span class="token attr-value"><span class="token punctuation">=</span><span class="token punctuation">"</span>BillingAddress.State<span class="token punctuation">"</span></span> <span class="token attr-name">LabelText</span><span class="token attr-value"><span class="token punctuation">=</span><span class="token punctuation">"</span>State / Province<span class="token punctuation">"</span></span> <span class="token punctuation">/&gt;</span></span>
        <span class="token tag"><span class="token tag"><span class="token punctuation">&lt;</span>FormItem</span> <span class="token attr-name">Field</span><span class="token attr-value"><span class="token punctuation">=</span><span class="token punctuation">"</span>BillingAddress.PostalCode<span class="token punctuation">"</span></span> <span class="token attr-name">LabelText</span><span class="token attr-value"><span class="token punctuation">=</span><span class="token punctuation">"</span>Postal Code<span class="token punctuation">"</span></span> <span class="token punctuation">/&gt;</span></span>
        <span class="token tag"><span class="token tag"><span class="token punctuation">&lt;</span>FormItem</span> <span class="token attr-name">Field</span><span class="token attr-value"><span class="token punctuation">=</span><span class="token punctuation">"</span>BillingAddress.Country<span class="token punctuation">"</span></span><span class="token punctuation">&gt;</span></span>
            <span class="token tag"><span class="token tag"><span class="token punctuation">&lt;</span>Template</span><span class="token punctuation">&gt;</span></span>
                <span class="token tag"><span class="token tag"><span class="token punctuation">&lt;</span>label</span> <span class="token attr-name">for</span><span class="token attr-value"><span class="token punctuation">=</span><span class="token punctuation">"</span>country-editor<span class="token punctuation">"</span></span> <span class="token attr-name">class</span><span class="token attr-value"><span class="token punctuation">=</span><span class="token punctuation">"</span>k-label k-form-label<span class="token punctuation">"</span></span><span class="token punctuation">&gt;</span></span>Country<span class="token tag"><span class="token tag"><span class="token punctuation">&lt;/</span>label</span><span class="token punctuation">&gt;</span></span>
                <span class="token tag"><span class="token tag"><span class="token punctuation">&lt;</span>div</span> <span class="token attr-name">class</span><span class="token attr-value"><span class="token punctuation">=</span><span class="token punctuation">"</span>k-form-field-wrap<span class="token punctuation">"</span></span><span class="token punctuation">&gt;</span></span>
                    <span class="token tag"><span class="token tag"><span class="token punctuation">&lt;</span>TelerikDropDownList</span> <span class="token attr-name">@bind-Value</span><span class="token attr-value"><span class="token punctuation">=</span><span class="token punctuation">"</span>registration.BillingAddress.Country<span class="token punctuation">"</span></span>
                                         <span class="token attr-name">Data</span><span class="token attr-value"><span class="token punctuation">=</span><span class="token punctuation">"</span>@countries<span class="token punctuation">"</span></span>
                                         <span class="token attr-name">DefaultText</span><span class="token attr-value"><span class="token punctuation">=</span><span class="token punctuation">"</span>Select a country...<span class="token punctuation">"</span></span>
                                         <span class="token attr-name">Id</span><span class="token attr-value"><span class="token punctuation">=</span><span class="token punctuation">"</span>country-editor<span class="token punctuation">"</span></span> <span class="token punctuation">/&gt;</span></span>
                    <span class="token tag"><span class="token tag"><span class="token punctuation">&lt;</span>TelerikValidationMessage</span> <span class="token attr-name">For</span><span class="token attr-value"><span class="token punctuation">=</span><span class="token punctuation">"</span>@(() =&gt; registration.BillingAddress.Country)<span class="token punctuation">"</span></span> <span class="token punctuation">/&gt;</span></span>
                <span class="token tag"><span class="token tag"><span class="token punctuation">&lt;/</span>div</span><span class="token punctuation">&gt;</span></span>
            <span class="token tag"><span class="token tag"><span class="token punctuation">&lt;/</span>Template</span><span class="token punctuation">&gt;</span></span>
        <span class="token tag"><span class="token tag"><span class="token punctuation">&lt;/</span>FormItem</span><span class="token punctuation">&gt;</span></span>
        <span class="token tag"><span class="token tag"><span class="token punctuation">&lt;</span>FormItem</span> <span class="token attr-name">Field</span><span class="token attr-value"><span class="token punctuation">=</span><span class="token punctuation">"</span>AcceptTerms<span class="token punctuation">"</span></span><span class="token punctuation">&gt;</span></span>
            <span class="token tag"><span class="token tag"><span class="token punctuation">&lt;</span>Template</span><span class="token punctuation">&gt;</span></span>
                <span class="token tag"><span class="token tag"><span class="token punctuation">&lt;</span>div</span> <span class="token attr-name">class</span><span class="token attr-value"><span class="token punctuation">=</span><span class="token punctuation">"</span>k-form-field-wrap<span class="token punctuation">"</span></span><span class="token punctuation">&gt;</span></span>
                    <span class="token tag"><span class="token tag"><span class="token punctuation">&lt;</span>TelerikCheckBox</span> <span class="token attr-name">@bind-Value</span><span class="token attr-value"><span class="token punctuation">=</span><span class="token punctuation">"</span>registration.AcceptTerms<span class="token punctuation">"</span></span> <span class="token attr-name">Id</span><span class="token attr-value"><span class="token punctuation">=</span><span class="token punctuation">"</span>acceptTerms<span class="token punctuation">"</span></span> <span class="token punctuation">/&gt;</span></span>
                    <span class="token tag"><span class="token tag"><span class="token punctuation">&lt;</span>label</span> <span class="token attr-name">for</span><span class="token attr-value"><span class="token punctuation">=</span><span class="token punctuation">"</span>acceptTerms<span class="token punctuation">"</span></span> <span class="token attr-name">class</span><span class="token attr-value"><span class="token punctuation">=</span><span class="token punctuation">"</span>ms-2<span class="token punctuation">"</span></span><span class="token punctuation">&gt;</span></span>I accept the terms and conditions<span class="token tag"><span class="token tag"><span class="token punctuation">&lt;/</span>label</span><span class="token punctuation">&gt;</span></span>
                    <span class="token tag"><span class="token tag"><span class="token punctuation">&lt;</span>div</span><span class="token punctuation">&gt;</span></span>
                        <span class="token tag"><span class="token tag"><span class="token punctuation">&lt;</span>TelerikValidationMessage</span> <span class="token attr-name">For</span><span class="token attr-value"><span class="token punctuation">=</span><span class="token punctuation">"</span>@(() =&gt; registration.AcceptTerms)<span class="token punctuation">"</span></span> <span class="token punctuation">/&gt;</span></span>
                    <span class="token tag"><span class="token tag"><span class="token punctuation">&lt;/</span>div</span><span class="token punctuation">&gt;</span></span>
                <span class="token tag"><span class="token tag"><span class="token punctuation">&lt;/</span>div</span><span class="token punctuation">&gt;</span></span>
            <span class="token tag"><span class="token tag"><span class="token punctuation">&lt;/</span>Template</span><span class="token punctuation">&gt;</span></span>
        <span class="token tag"><span class="token tag"><span class="token punctuation">&lt;/</span>FormItem</span><span class="token punctuation">&gt;</span></span>
    <span class="token tag"><span class="token tag"><span class="token punctuation">&lt;/</span>FormItems</span><span class="token punctuation">&gt;</span></span>
    <span class="token tag"><span class="token tag"><span class="token punctuation">&lt;</span>FormItemsTemplate</span> <span class="token attr-name">Context</span><span class="token attr-value"><span class="token punctuation">=</span><span class="token punctuation">"</span>formContext<span class="token punctuation">"</span></span><span class="token punctuation">&gt;</span></span>
        @{
            var items = formContext.Items.OfType<span class="token tag"><span class="token tag"><span class="token punctuation">&lt;</span>IFormItem</span><span class="token punctuation">&gt;</span></span>().ToList();
        }

        <span class="token tag"><span class="token tag"><span class="token punctuation">&lt;</span>div</span> <span class="token attr-name">class</span><span class="token attr-value"><span class="token punctuation">=</span><span class="token punctuation">"</span>card shadow-sm mb-4<span class="token punctuation">"</span></span><span class="token punctuation">&gt;</span></span>
            <span class="token tag"><span class="token tag"><span class="token punctuation">&lt;</span>div</span> <span class="token attr-name">class</span><span class="token attr-value"><span class="token punctuation">=</span><span class="token punctuation">"</span>card-header bg-primary text-white<span class="token punctuation">"</span></span><span class="token punctuation">&gt;</span></span>
                <span class="token tag"><span class="token tag"><span class="token punctuation">&lt;</span>h5</span> <span class="token attr-name">class</span><span class="token attr-value"><span class="token punctuation">=</span><span class="token punctuation">"</span>mb-0<span class="token punctuation">"</span></span><span class="token punctuation">&gt;</span></span>Attendee Information<span class="token tag"><span class="token tag"><span class="token punctuation">&lt;/</span>h5</span><span class="token punctuation">&gt;</span></span>
            <span class="token tag"><span class="token tag"><span class="token punctuation">&lt;/</span>div</span><span class="token punctuation">&gt;</span></span>
            <span class="token tag"><span class="token tag"><span class="token punctuation">&lt;</span>div</span> <span class="token attr-name">class</span><span class="token attr-value"><span class="token punctuation">=</span><span class="token punctuation">"</span>card-body<span class="token punctuation">"</span></span><span class="token punctuation">&gt;</span></span>
                <span class="token tag"><span class="token tag"><span class="token punctuation">&lt;</span>div</span> <span class="token attr-name">class</span><span class="token attr-value"><span class="token punctuation">=</span><span class="token punctuation">"</span>row g-3<span class="token punctuation">"</span></span><span class="token punctuation">&gt;</span></span>
                    <span class="token tag"><span class="token tag"><span class="token punctuation">&lt;</span>div</span> <span class="token attr-name">class</span><span class="token attr-value"><span class="token punctuation">=</span><span class="token punctuation">"</span>col-md-6<span class="token punctuation">"</span></span><span class="token punctuation">&gt;</span></span>
                        &lt;TelerikFormItemRenderer Item="@(items.First(x =&gt; x.Field == "Attendee.FullName"))" /&gt;
                    <span class="token tag"><span class="token tag"><span class="token punctuation">&lt;/</span>div</span><span class="token punctuation">&gt;</span></span>
                    <span class="token tag"><span class="token tag"><span class="token punctuation">&lt;</span>div</span> <span class="token attr-name">class</span><span class="token attr-value"><span class="token punctuation">=</span><span class="token punctuation">"</span>col-md-6<span class="token punctuation">"</span></span><span class="token punctuation">&gt;</span></span>
                        &lt;TelerikFormItemRenderer Item="@(items.First(x =&gt; x.Field == "Attendee.Email"))" /&gt;
                    <span class="token tag"><span class="token tag"><span class="token punctuation">&lt;/</span>div</span><span class="token punctuation">&gt;</span></span>
                    <span class="token tag"><span class="token tag"><span class="token punctuation">&lt;</span>div</span> <span class="token attr-name">class</span><span class="token attr-value"><span class="token punctuation">=</span><span class="token punctuation">"</span>col-md-4<span class="token punctuation">"</span></span><span class="token punctuation">&gt;</span></span>
                        &lt;TelerikFormItemRenderer Item="@(items.First(x =&gt; x.Field == "Attendee.Phone"))" /&gt;
                    <span class="token tag"><span class="token tag"><span class="token punctuation">&lt;/</span>div</span><span class="token punctuation">&gt;</span></span>
                    <span class="token tag"><span class="token tag"><span class="token punctuation">&lt;</span>div</span> <span class="token attr-name">class</span><span class="token attr-value"><span class="token punctuation">=</span><span class="token punctuation">"</span>col-md-4<span class="token punctuation">"</span></span><span class="token punctuation">&gt;</span></span>
                        &lt;TelerikFormItemRenderer Item="@(items.First(x =&gt; x.Field == "Attendee.Company"))" /&gt;
                    <span class="token tag"><span class="token tag"><span class="token punctuation">&lt;/</span>div</span><span class="token punctuation">&gt;</span></span>
                    <span class="token tag"><span class="token tag"><span class="token punctuation">&lt;</span>div</span> <span class="token attr-name">class</span><span class="token attr-value"><span class="token punctuation">=</span><span class="token punctuation">"</span>col-md-4<span class="token punctuation">"</span></span><span class="token punctuation">&gt;</span></span>
                        &lt;TelerikFormItemRenderer Item="@(items.First(x =&gt; x.Field == "Attendee.JobTitle"))" /&gt;
                    <span class="token tag"><span class="token tag"><span class="token punctuation">&lt;/</span>div</span><span class="token punctuation">&gt;</span></span>
                <span class="token tag"><span class="token tag"><span class="token punctuation">&lt;/</span>div</span><span class="token punctuation">&gt;</span></span>
            <span class="token tag"><span class="token tag"><span class="token punctuation">&lt;/</span>div</span><span class="token punctuation">&gt;</span></span>
        <span class="token tag"><span class="token tag"><span class="token punctuation">&lt;/</span>div</span><span class="token punctuation">&gt;</span></span>

        <span class="token tag"><span class="token tag"><span class="token punctuation">&lt;</span>div</span> <span class="token attr-name">class</span><span class="token attr-value"><span class="token punctuation">=</span><span class="token punctuation">"</span>card shadow-sm mb-4<span class="token punctuation">"</span></span><span class="token punctuation">&gt;</span></span>
            <span class="token tag"><span class="token tag"><span class="token punctuation">&lt;</span>div</span> <span class="token attr-name">class</span><span class="token attr-value"><span class="token punctuation">=</span><span class="token punctuation">"</span>card-header bg-primary text-white<span class="token punctuation">"</span></span><span class="token punctuation">&gt;</span></span>
                <span class="token tag"><span class="token tag"><span class="token punctuation">&lt;</span>h5</span> <span class="token attr-name">class</span><span class="token attr-value"><span class="token punctuation">=</span><span class="token punctuation">"</span>mb-0<span class="token punctuation">"</span></span><span class="token punctuation">&gt;</span></span>Billing Address<span class="token tag"><span class="token tag"><span class="token punctuation">&lt;/</span>h5</span><span class="token punctuation">&gt;</span></span>
            <span class="token tag"><span class="token tag"><span class="token punctuation">&lt;/</span>div</span><span class="token punctuation">&gt;</span></span>
            <span class="token tag"><span class="token tag"><span class="token punctuation">&lt;</span>div</span> <span class="token attr-name">class</span><span class="token attr-value"><span class="token punctuation">=</span><span class="token punctuation">"</span>card-body<span class="token punctuation">"</span></span><span class="token punctuation">&gt;</span></span>
                <span class="token tag"><span class="token tag"><span class="token punctuation">&lt;</span>div</span> <span class="token attr-name">class</span><span class="token attr-value"><span class="token punctuation">=</span><span class="token punctuation">"</span>row g-3<span class="token punctuation">"</span></span><span class="token punctuation">&gt;</span></span>
                    <span class="token tag"><span class="token tag"><span class="token punctuation">&lt;</span>div</span> <span class="token attr-name">class</span><span class="token attr-value"><span class="token punctuation">=</span><span class="token punctuation">"</span>col-12<span class="token punctuation">"</span></span><span class="token punctuation">&gt;</span></span>
                        &lt;TelerikFormItemRenderer Item="@(items.First(x =&gt; x.Field == "BillingAddress.Street"))" /&gt;
                    <span class="token tag"><span class="token tag"><span class="token punctuation">&lt;/</span>div</span><span class="token punctuation">&gt;</span></span>
                    <span class="token tag"><span class="token tag"><span class="token punctuation">&lt;</span>div</span> <span class="token attr-name">class</span><span class="token attr-value"><span class="token punctuation">=</span><span class="token punctuation">"</span>col-md-4<span class="token punctuation">"</span></span><span class="token punctuation">&gt;</span></span>
                        &lt;TelerikFormItemRenderer Item="@(items.First(x =&gt; x.Field == "BillingAddress.City"))" /&gt;
                    <span class="token tag"><span class="token tag"><span class="token punctuation">&lt;/</span>div</span><span class="token punctuation">&gt;</span></span>
                    <span class="token tag"><span class="token tag"><span class="token punctuation">&lt;</span>div</span> <span class="token attr-name">class</span><span class="token attr-value"><span class="token punctuation">=</span><span class="token punctuation">"</span>col-md-4<span class="token punctuation">"</span></span><span class="token punctuation">&gt;</span></span>
                        &lt;TelerikFormItemRenderer Item="@(items.First(x =&gt; x.Field == "BillingAddress.State"))" /&gt;
                    <span class="token tag"><span class="token tag"><span class="token punctuation">&lt;/</span>div</span><span class="token punctuation">&gt;</span></span>
                    <span class="token tag"><span class="token tag"><span class="token punctuation">&lt;</span>div</span> <span class="token attr-name">class</span><span class="token attr-value"><span class="token punctuation">=</span><span class="token punctuation">"</span>col-md-4<span class="token punctuation">"</span></span><span class="token punctuation">&gt;</span></span>
                        &lt;TelerikFormItemRenderer Item="@(items.First(x =&gt; x.Field == "BillingAddress.PostalCode"))" /&gt;
                    <span class="token tag"><span class="token tag"><span class="token punctuation">&lt;/</span>div</span><span class="token punctuation">&gt;</span></span>
                    <span class="token tag"><span class="token tag"><span class="token punctuation">&lt;</span>div</span> <span class="token attr-name">class</span><span class="token attr-value"><span class="token punctuation">=</span><span class="token punctuation">"</span>col-md-12<span class="token punctuation">"</span></span><span class="token punctuation">&gt;</span></span>
                        &lt;TelerikFormItemRenderer Item="@(items.First(x =&gt; x.Field == "BillingAddress.Country"))" /&gt;
                    <span class="token tag"><span class="token tag"><span class="token punctuation">&lt;/</span>div</span><span class="token punctuation">&gt;</span></span>
                <span class="token tag"><span class="token tag"><span class="token punctuation">&lt;/</span>div</span><span class="token punctuation">&gt;</span></span>
            <span class="token tag"><span class="token tag"><span class="token punctuation">&lt;/</span>div</span><span class="token punctuation">&gt;</span></span>
        <span class="token tag"><span class="token tag"><span class="token punctuation">&lt;/</span>div</span><span class="token punctuation">&gt;</span></span>

        <span class="token tag"><span class="token tag"><span class="token punctuation">&lt;</span>div</span> <span class="token attr-name">class</span><span class="token attr-value"><span class="token punctuation">=</span><span class="token punctuation">"</span>card shadow-sm mb-4<span class="token punctuation">"</span></span><span class="token punctuation">&gt;</span></span>
            <span class="token tag"><span class="token tag"><span class="token punctuation">&lt;</span>div</span> <span class="token attr-name">class</span><span class="token attr-value"><span class="token punctuation">=</span><span class="token punctuation">"</span>card-header bg-primary text-white d-flex justify-content-between align-items-center<span class="token punctuation">"</span></span><span class="token punctuation">&gt;</span></span>
                <span class="token tag"><span class="token tag"><span class="token punctuation">&lt;</span>h5</span> <span class="token attr-name">class</span><span class="token attr-value"><span class="token punctuation">=</span><span class="token punctuation">"</span>mb-0<span class="token punctuation">"</span></span><span class="token punctuation">&gt;</span></span>Session Selection<span class="token tag"><span class="token tag"><span class="token punctuation">&lt;/</span>h5</span><span class="token punctuation">&gt;</span></span>
                <span class="token tag"><span class="token tag"><span class="token punctuation">&lt;</span>TelerikButton</span> <span class="token attr-name">OnClick</span><span class="token attr-value"><span class="token punctuation">=</span><span class="token punctuation">"</span>@AddSession<span class="token punctuation">"</span></span>
                               <span class="token attr-name">ThemeColor</span><span class="token attr-value"><span class="token punctuation">=</span><span class="token punctuation">"</span>@ThemeConstants.Button.ThemeColor.Light<span class="token punctuation">"</span></span>
                               <span class="token attr-name">ButtonType</span><span class="token attr-value"><span class="token punctuation">=</span><span class="token punctuation">"</span>@ButtonType.Button<span class="token punctuation">"</span></span><span class="token punctuation">&gt;</span></span>
                    + Add Session
                <span class="token tag"><span class="token tag"><span class="token punctuation">&lt;/</span>TelerikButton</span><span class="token punctuation">&gt;</span></span>
            <span class="token tag"><span class="token tag"><span class="token punctuation">&lt;/</span>div</span><span class="token punctuation">&gt;</span></span>
            <span class="token tag"><span class="token tag"><span class="token punctuation">&lt;</span>div</span> <span class="token attr-name">class</span><span class="token attr-value"><span class="token punctuation">=</span><span class="token punctuation">"</span>card-body<span class="token punctuation">"</span></span><span class="token punctuation">&gt;</span></span>
                @if (registration.Sessions.Count == 0)
                {
                    <span class="token tag"><span class="token tag"><span class="token punctuation">&lt;</span>div</span> <span class="token attr-name">class</span><span class="token attr-value"><span class="token punctuation">=</span><span class="token punctuation">"</span>alert alert-info mb-0<span class="token punctuation">"</span></span><span class="token punctuation">&gt;</span></span>
                        No sessions added yet. Click "Add Session" to select the sessions you'd like to attend.
                    <span class="token tag"><span class="token tag"><span class="token punctuation">&lt;/</span>div</span><span class="token punctuation">&gt;</span></span>
                }
                else
                {
                    @for (int i = 0; i &lt; registration.Sessions.Count; i++)
                    {
                        var index = i;
                        <span class="token tag"><span class="token tag"><span class="token punctuation">&lt;</span>div</span> <span class="token attr-name">class</span><span class="token attr-value"><span class="token punctuation">=</span><span class="token punctuation">"</span>row g-3 mb-3 align-items-end<span class="token punctuation">"</span></span><span class="token punctuation">&gt;</span></span>
                            <span class="token tag"><span class="token tag"><span class="token punctuation">&lt;</span>div</span> <span class="token attr-name">class</span><span class="token attr-value"><span class="token punctuation">=</span><span class="token punctuation">"</span>col-md-5<span class="token punctuation">"</span></span><span class="token punctuation">&gt;</span></span>
                                <span class="token tag"><span class="token tag"><span class="token punctuation">&lt;</span>label</span> <span class="token attr-name">class</span><span class="token attr-value"><span class="token punctuation">=</span><span class="token punctuation">"</span>k-label k-form-label<span class="token punctuation">"</span></span><span class="token punctuation">&gt;</span></span>Session<span class="token tag"><span class="token tag"><span class="token punctuation">&lt;/</span>label</span><span class="token punctuation">&gt;</span></span>
                                <span class="token tag"><span class="token tag"><span class="token punctuation">&lt;</span>TelerikDropDownList</span> <span class="token attr-name">@bind-Value</span><span class="token attr-value"><span class="token punctuation">=</span><span class="token punctuation">"</span>registration.Sessions[index].SessionName<span class="token punctuation">"</span></span>
                                                     <span class="token attr-name">Data</span><span class="token attr-value"><span class="token punctuation">=</span><span class="token punctuation">"</span>@availableSessions<span class="token punctuation">"</span></span>
                                                     <span class="token attr-name">DefaultText</span><span class="token attr-value"><span class="token punctuation">=</span><span class="token punctuation">"</span>Select a session...<span class="token punctuation">"</span></span> <span class="token punctuation">/&gt;</span></span>
                                <span class="token tag"><span class="token tag"><span class="token punctuation">&lt;</span>TelerikValidationMessage</span> <span class="token attr-name">For</span><span class="token attr-value"><span class="token punctuation">=</span><span class="token punctuation">"</span>@(() =&gt; registration.Sessions[index].SessionName)<span class="token punctuation">"</span></span> <span class="token punctuation">/&gt;</span></span>
                            <span class="token tag"><span class="token tag"><span class="token punctuation">&lt;/</span>div</span><span class="token punctuation">&gt;</span></span>
                            <span class="token tag"><span class="token tag"><span class="token punctuation">&lt;</span>div</span> <span class="token attr-name">class</span><span class="token attr-value"><span class="token punctuation">=</span><span class="token punctuation">"</span>col-md-4<span class="token punctuation">"</span></span><span class="token punctuation">&gt;</span></span>
                                <span class="token tag"><span class="token tag"><span class="token punctuation">&lt;</span>label</span> <span class="token attr-name">class</span><span class="token attr-value"><span class="token punctuation">=</span><span class="token punctuation">"</span>k-label k-form-label<span class="token punctuation">"</span></span><span class="token punctuation">&gt;</span></span>Preference<span class="token tag"><span class="token tag"><span class="token punctuation">&lt;/</span>label</span><span class="token punctuation">&gt;</span></span>
                                <span class="token tag"><span class="token tag"><span class="token punctuation">&lt;</span>TelerikDropDownList</span> <span class="token attr-name">@bind-Value</span><span class="token attr-value"><span class="token punctuation">=</span><span class="token punctuation">"</span>registration.Sessions[index].Preference<span class="token punctuation">"</span></span>
                                                     <span class="token attr-name">Data</span><span class="token attr-value"><span class="token punctuation">=</span><span class="token punctuation">"</span>@preferenceLevels<span class="token punctuation">"</span></span>
                                                     <span class="token attr-name">DefaultText</span><span class="token attr-value"><span class="token punctuation">=</span><span class="token punctuation">"</span>Select preference...<span class="token punctuation">"</span></span> <span class="token punctuation">/&gt;</span></span>
                                <span class="token tag"><span class="token tag"><span class="token punctuation">&lt;</span>TelerikValidationMessage</span> <span class="token attr-name">For</span><span class="token attr-value"><span class="token punctuation">=</span><span class="token punctuation">"</span>@(() =&gt; registration.Sessions[index].Preference)<span class="token punctuation">"</span></span> <span class="token punctuation">/&gt;</span></span>
                            <span class="token tag"><span class="token tag"><span class="token punctuation">&lt;/</span>div</span><span class="token punctuation">&gt;</span></span>
                            <span class="token tag"><span class="token tag"><span class="token punctuation">&lt;</span>div</span> <span class="token attr-name">class</span><span class="token attr-value"><span class="token punctuation">=</span><span class="token punctuation">"</span>col-md-3<span class="token punctuation">"</span></span><span class="token punctuation">&gt;</span></span>
                                <span class="token tag"><span class="token tag"><span class="token punctuation">&lt;</span>TelerikButton</span> <span class="token attr-name">OnClick</span><span class="token attr-value"><span class="token punctuation">=</span><span class="token punctuation">"</span>@(() =&gt; RemoveSession(index))<span class="token punctuation">"</span></span>
                                               <span class="token attr-name">ThemeColor</span><span class="token attr-value"><span class="token punctuation">=</span><span class="token punctuation">"</span>@ThemeConstants.Button.ThemeColor.Error<span class="token punctuation">"</span></span>
                                               <span class="token attr-name">ButtonType</span><span class="token attr-value"><span class="token punctuation">=</span><span class="token punctuation">"</span>@ButtonType.Button<span class="token punctuation">"</span></span><span class="token punctuation">&gt;</span></span>
                                    Remove
                                <span class="token tag"><span class="token tag"><span class="token punctuation">&lt;/</span>TelerikButton</span><span class="token punctuation">&gt;</span></span>
                            <span class="token tag"><span class="token tag"><span class="token punctuation">&lt;/</span>div</span><span class="token punctuation">&gt;</span></span>
                        <span class="token tag"><span class="token tag"><span class="token punctuation">&lt;/</span>div</span><span class="token punctuation">&gt;</span></span>
                    }
                }
                <span class="token tag"><span class="token tag"><span class="token punctuation">&lt;</span>TelerikValidationMessage</span> <span class="token attr-name">For</span><span class="token attr-value"><span class="token punctuation">=</span><span class="token punctuation">"</span>@(() =&gt; registration.Sessions)<span class="token punctuation">"</span></span> <span class="token punctuation">/&gt;</span></span>
            <span class="token tag"><span class="token tag"><span class="token punctuation">&lt;/</span>div</span><span class="token punctuation">&gt;</span></span>
        <span class="token tag"><span class="token tag"><span class="token punctuation">&lt;/</span>div</span><span class="token punctuation">&gt;</span></span>

        <span class="token tag"><span class="token tag"><span class="token punctuation">&lt;</span>div</span> <span class="token attr-name">class</span><span class="token attr-value"><span class="token punctuation">=</span><span class="token punctuation">"</span>card shadow-sm mb-4<span class="token punctuation">"</span></span><span class="token punctuation">&gt;</span></span>
            <span class="token tag"><span class="token tag"><span class="token punctuation">&lt;</span>div</span> <span class="token attr-name">class</span><span class="token attr-value"><span class="token punctuation">=</span><span class="token punctuation">"</span>card-body<span class="token punctuation">"</span></span><span class="token punctuation">&gt;</span></span>
                &lt;TelerikFormItemRenderer Item="@(items.First(x =&gt; x.Field == "AcceptTerms"))" /&gt;
            <span class="token tag"><span class="token tag"><span class="token punctuation">&lt;/</span>div</span><span class="token punctuation">&gt;</span></span>
        <span class="token tag"><span class="token tag"><span class="token punctuation">&lt;/</span>div</span><span class="token punctuation">&gt;</span></span>
    <span class="token tag"><span class="token tag"><span class="token punctuation">&lt;/</span>FormItemsTemplate</span><span class="token punctuation">&gt;</span></span>
    <span class="token tag"><span class="token tag"><span class="token punctuation">&lt;</span>FormButtons</span><span class="token punctuation">&gt;</span></span>
        <span class="token tag"><span class="token tag"><span class="token punctuation">&lt;</span>TelerikButton</span> <span class="token attr-name">ButtonType</span><span class="token attr-value"><span class="token punctuation">=</span><span class="token punctuation">"</span>@ButtonType.Submit<span class="token punctuation">"</span></span>
                       <span class="token attr-name">ThemeColor</span><span class="token attr-value"><span class="token punctuation">=</span><span class="token punctuation">"</span>@ThemeConstants.Button.ThemeColor.Primary<span class="token punctuation">"</span></span><span class="token punctuation">&gt;</span></span>
            Submit Registration
        <span class="token tag"><span class="token tag"><span class="token punctuation">&lt;/</span>TelerikButton</span><span class="token punctuation">&gt;</span></span>
    <span class="token tag"><span class="token tag"><span class="token punctuation">&lt;/</span>FormButtons</span><span class="token punctuation">&gt;</span></span>
<span class="token tag"><span class="token tag"><span class="token punctuation">&lt;/</span>TelerikForm</span><span class="token punctuation">&gt;</span></span>

@if (isSubmitted)
{
    <span class="token tag"><span class="token tag"><span class="token punctuation">&lt;</span>div</span> <span class="token attr-name">class</span><span class="token attr-value"><span class="token punctuation">=</span><span class="token punctuation">"</span>alert alert-success mt-4<span class="token punctuation">"</span></span><span class="token punctuation">&gt;</span></span>
        <span class="token tag"><span class="token tag"><span class="token punctuation">&lt;</span>h5</span><span class="token punctuation">&gt;</span></span>Registration Successful!<span class="token tag"><span class="token tag"><span class="token punctuation">&lt;/</span>h5</span><span class="token punctuation">&gt;</span></span>
        <span class="token tag"><span class="token tag"><span class="token punctuation">&lt;</span>p</span><span class="token punctuation">&gt;</span></span>Thank you, <span class="token tag"><span class="token tag"><span class="token punctuation">&lt;</span>strong</span><span class="token punctuation">&gt;</span></span>@registration.Attendee.FullName<span class="token tag"><span class="token tag"><span class="token punctuation">&lt;/</span>strong</span><span class="token punctuation">&gt;</span></span>! Your registration for @registration.Sessions.Count session(s) has been submitted.<span class="token tag"><span class="token tag"><span class="token punctuation">&lt;/</span>p</span><span class="token punctuation">&gt;</span></span>
    <span class="token tag"><span class="token tag"><span class="token punctuation">&lt;/</span>div</span><span class="token punctuation">&gt;</span></span>
}

@code {
    private EventRegistration registration = new();
    private EditContext editContext = default!;
    private List<span class="token tag"><span class="token tag"><span class="token punctuation">&lt;</span>string</span><span class="token punctuation">&gt;</span></span> availableSessions = [];
    private List<span class="token tag"><span class="token tag"><span class="token punctuation">&lt;</span>string</span><span class="token punctuation">&gt;</span></span> preferenceLevels = [];
    private List<span class="token tag"><span class="token tag"><span class="token punctuation">&lt;</span>string</span><span class="token punctuation">&gt;</span></span> countries = ["United States", "Canada", "Mexico", "United Kingdom", "Germany", "France", "Spain"];
    private bool isSubmitted;

    protected override void OnInitialized()
    {
        editContext = new EditContext(registration);
        
        availableSessions = SessionCatalog.GetAvailableSessions();
        preferenceLevels = SessionCatalog.GetPreferenceLevels();
    }

    private void AddSession()
    {
        registration.Sessions.Add(new SessionSelection());
    }

    private void RemoveSession(int index)
    {
        registration.Sessions.RemoveAt(index);
    }

    private void HandleValidSubmit(EditContext context)
    {
        isSubmitted = true;
    }
}
</code></pre><h3 id="validating-data-before-.net-10">Validating Data Before .NET 10</h3><p>Once we have all the pieces of the project, let&rsquo;s run it. Let&rsquo;s do a test by trying to submit the empty form:</p><p><img src="https://www.telerik.com/sfimages/default-source/blogs/2026/2026-05/form-post-nested-objects-binding-before-net10.gif?sfvrsn=8b4e6fd5_2" alt="Form post showing nested object binding failures before .NET 10" /></p><p>In the previous image, you can see that when submitting the form the only error shown is the one indicating that the terms and conditions have not been accepted. However, although all models implement validations, no others are shown.</p><p>The reason behind this is that <code>DataAnnotationsValidator</code> in Blazor does not perform validation on nested objects or collections. This has been a known limitation in Blazor since its beginnings, which was addressed using custom recursive validators. Let&rsquo;s see how .NET 10 helps us solve this problem.</p><h2 id="validating-data-thanks-to-the-new-features-in-.net-10">Validating Data Thanks to the New Features in .NET 10</h2><p>To perform validation of nested objects and collections, the first step you must take is to add in <code>Program.cs</code> a call to the method <code>AddValidation()</code>:</p><pre class=" language-csharp"><code class="prism  language-csharp"><span class="token keyword">var</span> builder <span class="token operator">=</span> WebApplication<span class="token punctuation">.</span><span class="token function">CreateBuilder</span><span class="token punctuation">(</span>args<span class="token punctuation">)</span><span class="token punctuation">;</span>
<span class="token punctuation">.</span><span class="token punctuation">.</span><span class="token punctuation">.</span>
builder<span class="token punctuation">.</span>Services<span class="token punctuation">.</span><span class="token function">AddValidation</span><span class="token punctuation">(</span><span class="token punctuation">)</span><span class="token punctuation">;</span>

<span class="token keyword">var</span> app <span class="token operator">=</span> builder<span class="token punctuation">.</span><span class="token function">Build</span><span class="token punctuation">(</span><span class="token punctuation">)</span><span class="token punctuation">;</span>
</code></pre><p>The method <code>AddValidation()</code> registers the services required for the validation system to work.</p><p>The next step is to open the main model that contains the hierarchy of submodels and add the attribute <code>[ValidatableType]</code> to the class. In our example, the class is <code>EventRegistration</code>, which will look as follows after the modification:</p><pre class=" language-csharp"><code class="prism  language-csharp"><span class="token punctuation">[</span>ValidatableType<span class="token punctuation">]</span>
<span class="token keyword">public</span> <span class="token keyword">class</span> <span class="token class-name">EventRegistration</span>
<span class="token punctuation">{</span>
   <span class="token punctuation">.</span><span class="token punctuation">.</span><span class="token punctuation">.</span>
<span class="token punctuation">}</span>
</code></pre><p>The attribute <code>[ValidatableType]</code> tells the .NET source generator to generate validation logic for the class. Behind the scenes the following steps will be performed:</p><ol><li>All properties of the decorated class are inspected.</li><li>Nested objects are detected and the necessary code to recursively validate their validation annotations is generated.</li><li>Collections are detected and code is generated to iterate through each element, validating their validation annotations.</li></ol><p>After applying the previous changes, you will see that now, when submitting the form with empty fields, all errors are displayed correctly:</p><p><img src="https://www.telerik.com/sfimages/default-source/blogs/2026/2026-05/form-validating-nested-objects-net10.gif?sfvrsn=60d57217_2" alt="Web form displaying nested object fields with validation" /></p><p>With these changes, we have correctly enabled full validation of nested objects and collections.</p><h3 id="implementing-cross-field-validation-using-ivalidatableobject">Implementing Cross-field Validation Using IValidatableObject</h3><p>So far we have been able to apply validation rules at the level of individual properties. However, it is common in complex applications to have rules that involve multiple properties or complex business logic. For these cases, .NET provides the interface <code>IValidatableObject</code>, which in version 10 integrates seamlessly with <code>[ValidatableType]</code>.</p><p>Let&rsquo;s perform a check of this type assuming this pair of business rules:</p><ul><li>The user must select at least one session.</li><li>Duplicate sessions are not allowed.</li></ul><p>The rules depend on the state of the collection <code>Sessions</code> as a whole. To make it work correctly, let&rsquo;s modify the class <code>EventRegistration</code> by adding the interface:</p><pre class=" language-csharp"><code class="prism  language-csharp"><span class="token punctuation">[</span>ValidatableType<span class="token punctuation">]</span>
<span class="token keyword">public</span> <span class="token keyword">class</span> <span class="token class-name">EventRegistration</span> <span class="token punctuation">:</span> IValidatableObject
<span class="token punctuation">{</span>
    <span class="token punctuation">.</span><span class="token punctuation">.</span><span class="token punctuation">.</span>

    <span class="token keyword">public</span> IEnumerable<span class="token operator">&lt;</span>ValidationResult<span class="token operator">&gt;</span> <span class="token function">Validate</span><span class="token punctuation">(</span>ValidationContext validationContext<span class="token punctuation">)</span>
    <span class="token punctuation">{</span>
    <span class="token comment">// 1.</span>
        <span class="token keyword">if</span> <span class="token punctuation">(</span>Sessions<span class="token punctuation">.</span>Count <span class="token operator">==</span> <span class="token number">0</span><span class="token punctuation">)</span>
        <span class="token punctuation">{</span>
            <span class="token keyword">yield</span> <span class="token keyword">return</span> <span class="token keyword">new</span> <span class="token class-name">ValidationResult</span><span class="token punctuation">(</span>
                <span class="token string">"You must select at least one session."</span><span class="token punctuation">,</span>
                <span class="token punctuation">[</span><span class="token function">nameof</span><span class="token punctuation">(</span>Sessions<span class="token punctuation">)</span><span class="token punctuation">]</span><span class="token punctuation">)</span><span class="token punctuation">;</span>
        <span class="token punctuation">}</span>
        
        <span class="token comment">// 2.</span>
        <span class="token keyword">var</span> duplicates <span class="token operator">=</span> Sessions
            <span class="token punctuation">.</span><span class="token function">Where</span><span class="token punctuation">(</span>s <span class="token operator">=</span><span class="token operator">&gt;</span> <span class="token operator">!</span><span class="token keyword">string</span><span class="token punctuation">.</span><span class="token function">IsNullOrEmpty</span><span class="token punctuation">(</span>s<span class="token punctuation">.</span>SessionName<span class="token punctuation">)</span><span class="token punctuation">)</span>
            <span class="token punctuation">.</span><span class="token function">GroupBy</span><span class="token punctuation">(</span>s <span class="token operator">=</span><span class="token operator">&gt;</span> s<span class="token punctuation">.</span>SessionName<span class="token punctuation">)</span>
            <span class="token punctuation">.</span><span class="token function">Where</span><span class="token punctuation">(</span>g <span class="token operator">=</span><span class="token operator">&gt;</span> g<span class="token punctuation">.</span><span class="token function">Count</span><span class="token punctuation">(</span><span class="token punctuation">)</span> <span class="token operator">&gt;</span> <span class="token number">1</span><span class="token punctuation">)</span>
            <span class="token punctuation">.</span><span class="token function">Select</span><span class="token punctuation">(</span>g <span class="token operator">=</span><span class="token operator">&gt;</span> g<span class="token punctuation">.</span>Key<span class="token punctuation">)</span>
            <span class="token punctuation">.</span><span class="token function">ToList</span><span class="token punctuation">(</span><span class="token punctuation">)</span><span class="token punctuation">;</span>

        <span class="token keyword">if</span> <span class="token punctuation">(</span>duplicates<span class="token punctuation">.</span>Count <span class="token operator">&gt;</span> <span class="token number">0</span><span class="token punctuation">)</span>
        <span class="token punctuation">{</span>
            <span class="token keyword">yield</span> <span class="token keyword">return</span> <span class="token keyword">new</span> <span class="token class-name">ValidationResult</span><span class="token punctuation">(</span>
                $<span class="token string">"Duplicate sessions are not allowed: {string.Join("</span><span class="token punctuation">,</span> <span class="token string">", duplicates)}"</span><span class="token punctuation">,</span>
                <span class="token punctuation">[</span><span class="token function">nameof</span><span class="token punctuation">(</span>Sessions<span class="token punctuation">)</span><span class="token punctuation">]</span><span class="token punctuation">)</span><span class="token punctuation">;</span>
        <span class="token punctuation">}</span>
    <span class="token punctuation">}</span>
<span class="token punctuation">}</span>
</code></pre><p>In the code above:</p><ol><li>We validate that at least one session is selected.</li><li>We look for duplicate sessions.</li></ol><p>In case of any error, we return an <code>ValidationResult</code> indicating the error. When running the application, we see the following result if no session is selected:</p><p><img src="https://www.telerik.com/sfimages/default-source/blogs/2026/2026-05/validation-no-session-selected.png?sfvrsn=8e250e63_2" alt="Validation error shown for no session selected" /></p><p>Now, when duplicate sessions are selected, the following error is shown:</p><p><img src="https://www.telerik.com/sfimages/default-source/blogs/2026/2026-05/validation-warning-duplicate-sessions.png?sfvrsn=38a76043_2" alt="Validation warning indicating duplicate sessions selected" /></p><p>With this, we have created cross-field validation correctly using Blazor.</p><h3 id="improving-validations-using-fieldcssclassprovider">Improving Validations Using FieldCssClassProvider</h3><p>At this point we have a project that correctly validates the form information, thanks to the native capabilities of <code>TelerikForm</code>. We can go one step further and modify the project to add visual indicators at the section level that communicate to the user which sections have errors. We can do this thanks to the method <code>EditContext.IsValid(fieldIdentifier)</code> introduced in .NET 10, which allows directly checking whether a field is valid.</p><p>To use it, the first thing we will do is create a class that inherits from <code>FieldCssClassProvider</code>. For the demonstration I will create a class called <code>RegistrationFieldClassProvider</code> at the root level of the project that looks as follows:</p><pre class=" language-csharp"><code class="prism  language-csharp"><span class="token keyword">public</span> <span class="token keyword">class</span> <span class="token class-name">RegistrationFieldClassProvider</span> <span class="token punctuation">:</span> FieldCssClassProvider
<span class="token punctuation">{</span>
    <span class="token keyword">public</span> <span class="token keyword">override</span> <span class="token keyword">string</span> <span class="token function">GetFieldCssClass</span><span class="token punctuation">(</span>EditContext editContext<span class="token punctuation">,</span> <span class="token keyword">in</span> FieldIdentifier fieldIdentifier<span class="token punctuation">)</span>
    <span class="token punctuation">{</span>
        <span class="token keyword">if</span> <span class="token punctuation">(</span><span class="token operator">!</span>editContext<span class="token punctuation">.</span><span class="token function">IsModified</span><span class="token punctuation">(</span>fieldIdentifier<span class="token punctuation">)</span><span class="token punctuation">)</span>
            <span class="token keyword">return</span> <span class="token keyword">string</span><span class="token punctuation">.</span>Empty<span class="token punctuation">;</span>

        <span class="token keyword">var</span> isValid <span class="token operator">=</span> editContext<span class="token punctuation">.</span><span class="token function">IsValid</span><span class="token punctuation">(</span>fieldIdentifier<span class="token punctuation">)</span><span class="token punctuation">;</span>
        <span class="token keyword">return</span> isValid <span class="token operator">?</span> <span class="token string">"is-valid"</span> <span class="token punctuation">:</span> <span class="token string">"is-invalid"</span><span class="token punctuation">;</span>
    <span class="token punctuation">}</span>
<span class="token punctuation">}</span>
</code></pre><p>In the code above, it checks whether the field has been modified. Next <code>IsValid()</code> is used inside the method <code>GetFieldCssClass</code> to check if the field has associated validation messages. Finally, Bootstrap classes are returned that will provide feedback to the user about the validity of the sections.</p><p>To achieve this, we will make the card headers change color according to the state of their fields by modifying <code>Registration.razor</code> as follows:</p><ol><li>Add the event <code>OnValidSubmit</code> to <code>TelerikForm</code>:</li></ol><pre class=" language-xml"><code class="prism  language-xml"><span class="token tag"><span class="token tag"><span class="token punctuation">&lt;</span>TelerikForm</span> <span class="token attr-name">EditContext</span><span class="token attr-value"><span class="token punctuation">=</span><span class="token punctuation">"</span>editContext<span class="token punctuation">"</span></span>
             <span class="token attr-name">OnValidSubmit</span><span class="token attr-value"><span class="token punctuation">=</span><span class="token punctuation">"</span>HandleValidSubmit<span class="token punctuation">"</span></span>
             <span class="token attr-name">OnInvalidSubmit</span><span class="token attr-value"><span class="token punctuation">=</span><span class="token punctuation">"</span>HandleInvalidSubmit<span class="token punctuation">"</span></span><span class="token punctuation">&gt;</span></span>
</code></pre><ol start="2"><li>Find the <code>h5</code> elements that reference <strong>Attendee Information</strong> and <strong>Billing Address</strong>, and modify their container <code>div</code> as follows:</li></ol><pre class=" language-xml"><code class="prism  language-xml"><span class="token tag"><span class="token tag"><span class="token punctuation">&lt;</span>div</span> <span class="token attr-name">class</span><span class="token attr-value"><span class="token punctuation">=</span><span class="token punctuation">"</span>card-header @GetAttendeeHeaderClass()<span class="token punctuation">"</span></span><span class="token punctuation">&gt;</span></span>
    <span class="token tag"><span class="token tag"><span class="token punctuation">&lt;</span>h5</span> <span class="token attr-name">class</span><span class="token attr-value"><span class="token punctuation">=</span><span class="token punctuation">"</span>mb-0<span class="token punctuation">"</span></span><span class="token punctuation">&gt;</span></span>Attendee Information<span class="token tag"><span class="token tag"><span class="token punctuation">&lt;/</span>h5</span><span class="token punctuation">&gt;</span></span>
<span class="token tag"><span class="token tag"><span class="token punctuation">&lt;/</span>div</span><span class="token punctuation">&gt;</span></span>
...
<span class="token tag"><span class="token tag"><span class="token punctuation">&lt;</span>div</span> <span class="token attr-name">class</span><span class="token attr-value"><span class="token punctuation">=</span><span class="token punctuation">"</span>card-header @GetBillingHeaderClass()<span class="token punctuation">"</span></span><span class="token punctuation">&gt;</span></span>
    <span class="token tag"><span class="token tag"><span class="token punctuation">&lt;</span>h5</span> <span class="token attr-name">class</span><span class="token attr-value"><span class="token punctuation">=</span><span class="token punctuation">"</span>mb-0<span class="token punctuation">"</span></span><span class="token punctuation">&gt;</span></span>Billing Address<span class="token tag"><span class="token tag"><span class="token punctuation">&lt;/</span>h5</span><span class="token punctuation">&gt;</span></span>
<span class="token tag"><span class="token tag"><span class="token punctuation">&lt;/</span>div</span><span class="token punctuation">&gt;</span></span>
</code></pre><ol start="3"><li>Modify the code section by adding the following changes:</li></ol><pre class=" language-csharp"><code class="prism  language-csharp">@code <span class="token punctuation">{</span>
   <span class="token punctuation">.</span><span class="token punctuation">.</span><span class="token punctuation">.</span>
    <span class="token keyword">private</span> <span class="token keyword">bool</span> hasValidated<span class="token punctuation">;</span>

    <span class="token keyword">protected</span> <span class="token keyword">override</span> <span class="token keyword">void</span> <span class="token function">OnInitialized</span><span class="token punctuation">(</span><span class="token punctuation">)</span>
    <span class="token punctuation">{</span>
        editContext <span class="token operator">=</span> <span class="token keyword">new</span> <span class="token class-name">EditContext</span><span class="token punctuation">(</span>registration<span class="token punctuation">)</span><span class="token punctuation">;</span>
                
        editContext<span class="token punctuation">.</span><span class="token function">SetFieldCssClassProvider</span><span class="token punctuation">(</span><span class="token keyword">new</span> <span class="token class-name">RegistrationFieldClassProvider</span><span class="token punctuation">(</span><span class="token punctuation">)</span><span class="token punctuation">)</span><span class="token punctuation">;</span>
        editContext<span class="token punctuation">.</span>OnValidationStateChanged <span class="token operator">+</span><span class="token operator">=</span> <span class="token punctuation">(</span>_<span class="token punctuation">,</span> _<span class="token punctuation">)</span> <span class="token operator">=</span><span class="token operator">&gt;</span> <span class="token function">StateHasChanged</span><span class="token punctuation">(</span><span class="token punctuation">)</span><span class="token punctuation">;</span>        

        availableSessions <span class="token operator">=</span> SessionCatalog<span class="token punctuation">.</span><span class="token function">GetAvailableSessions</span><span class="token punctuation">(</span><span class="token punctuation">)</span><span class="token punctuation">;</span>
        preferenceLevels <span class="token operator">=</span> SessionCatalog<span class="token punctuation">.</span><span class="token function">GetPreferenceLevels</span><span class="token punctuation">(</span><span class="token punctuation">)</span><span class="token punctuation">;</span>
    <span class="token punctuation">}</span>
    
    <span class="token keyword">private</span> <span class="token keyword">bool</span> <span class="token generic-method function">IsFieldValid<span class="token punctuation">&lt;</span>T<span class="token punctuation">&gt;</span></span><span class="token punctuation">(</span>Expression<span class="token operator">&lt;</span>Func<span class="token operator">&lt;</span>T<span class="token operator">&gt;</span><span class="token operator">&gt;</span> accessor<span class="token punctuation">)</span>
       <span class="token operator">=</span><span class="token operator">&gt;</span> editContext<span class="token punctuation">.</span><span class="token function">IsValid</span><span class="token punctuation">(</span>FieldIdentifier<span class="token punctuation">.</span><span class="token function">Create</span><span class="token punctuation">(</span>accessor<span class="token punctuation">)</span><span class="token punctuation">)</span><span class="token punctuation">;</span>

    <span class="token keyword">private</span> <span class="token keyword">string</span> <span class="token function">GetAttendeeHeaderClass</span><span class="token punctuation">(</span><span class="token punctuation">)</span>
    <span class="token punctuation">{</span>
        <span class="token keyword">if</span> <span class="token punctuation">(</span><span class="token operator">!</span>hasValidated<span class="token punctuation">)</span> <span class="token keyword">return</span> <span class="token string">"bg-primary text-white"</span><span class="token punctuation">;</span>

        <span class="token keyword">bool</span> allValid <span class="token operator">=</span> <span class="token function">IsFieldValid</span><span class="token punctuation">(</span><span class="token punctuation">(</span><span class="token punctuation">)</span> <span class="token operator">=</span><span class="token operator">&gt;</span> registration<span class="token punctuation">.</span>Attendee<span class="token punctuation">.</span>FullName<span class="token punctuation">)</span>
            <span class="token operator">&amp;&amp;</span> <span class="token function">IsFieldValid</span><span class="token punctuation">(</span><span class="token punctuation">(</span><span class="token punctuation">)</span> <span class="token operator">=</span><span class="token operator">&gt;</span> registration<span class="token punctuation">.</span>Attendee<span class="token punctuation">.</span>Email<span class="token punctuation">)</span>
            <span class="token operator">&amp;&amp;</span> <span class="token function">IsFieldValid</span><span class="token punctuation">(</span><span class="token punctuation">(</span><span class="token punctuation">)</span> <span class="token operator">=</span><span class="token operator">&gt;</span> registration<span class="token punctuation">.</span>Attendee<span class="token punctuation">.</span>Phone<span class="token punctuation">)</span>
            <span class="token operator">&amp;&amp;</span> <span class="token function">IsFieldValid</span><span class="token punctuation">(</span><span class="token punctuation">(</span><span class="token punctuation">)</span> <span class="token operator">=</span><span class="token operator">&gt;</span> registration<span class="token punctuation">.</span>Attendee<span class="token punctuation">.</span>Company<span class="token punctuation">)</span>
            <span class="token operator">&amp;&amp;</span> <span class="token function">IsFieldValid</span><span class="token punctuation">(</span><span class="token punctuation">(</span><span class="token punctuation">)</span> <span class="token operator">=</span><span class="token operator">&gt;</span> registration<span class="token punctuation">.</span>Attendee<span class="token punctuation">.</span>JobTitle<span class="token punctuation">)</span><span class="token punctuation">;</span>

        <span class="token keyword">return</span> allValid <span class="token operator">?</span> <span class="token string">"bg-success text-white"</span> <span class="token punctuation">:</span> <span class="token string">"bg-danger text-white"</span><span class="token punctuation">;</span>
    <span class="token punctuation">}</span>

    <span class="token keyword">private</span> <span class="token keyword">string</span> <span class="token function">GetBillingHeaderClass</span><span class="token punctuation">(</span><span class="token punctuation">)</span>
    <span class="token punctuation">{</span>
        <span class="token keyword">if</span> <span class="token punctuation">(</span><span class="token operator">!</span>hasValidated<span class="token punctuation">)</span> <span class="token keyword">return</span> <span class="token string">"bg-primary text-white"</span><span class="token punctuation">;</span>

        <span class="token keyword">bool</span> allValid <span class="token operator">=</span> <span class="token function">IsFieldValid</span><span class="token punctuation">(</span><span class="token punctuation">(</span><span class="token punctuation">)</span> <span class="token operator">=</span><span class="token operator">&gt;</span> registration<span class="token punctuation">.</span>BillingAddress<span class="token punctuation">.</span>Street<span class="token punctuation">)</span>
            <span class="token operator">&amp;&amp;</span> <span class="token function">IsFieldValid</span><span class="token punctuation">(</span><span class="token punctuation">(</span><span class="token punctuation">)</span> <span class="token operator">=</span><span class="token operator">&gt;</span> registration<span class="token punctuation">.</span>BillingAddress<span class="token punctuation">.</span>City<span class="token punctuation">)</span>
            <span class="token operator">&amp;&amp;</span> <span class="token function">IsFieldValid</span><span class="token punctuation">(</span><span class="token punctuation">(</span><span class="token punctuation">)</span> <span class="token operator">=</span><span class="token operator">&gt;</span> registration<span class="token punctuation">.</span>BillingAddress<span class="token punctuation">.</span>State<span class="token punctuation">)</span>
            <span class="token operator">&amp;&amp;</span> <span class="token function">IsFieldValid</span><span class="token punctuation">(</span><span class="token punctuation">(</span><span class="token punctuation">)</span> <span class="token operator">=</span><span class="token operator">&gt;</span> registration<span class="token punctuation">.</span>BillingAddress<span class="token punctuation">.</span>PostalCode<span class="token punctuation">)</span>
            <span class="token operator">&amp;&amp;</span> <span class="token function">IsFieldValid</span><span class="token punctuation">(</span><span class="token punctuation">(</span><span class="token punctuation">)</span> <span class="token operator">=</span><span class="token operator">&gt;</span> registration<span class="token punctuation">.</span>BillingAddress<span class="token punctuation">.</span>Country<span class="token punctuation">)</span><span class="token punctuation">;</span>

        <span class="token keyword">return</span> allValid <span class="token operator">?</span> <span class="token string">"bg-success text-white"</span> <span class="token punctuation">:</span> <span class="token string">"bg-danger text-white"</span><span class="token punctuation">;</span>
    <span class="token punctuation">}</span>

    <span class="token punctuation">.</span><span class="token punctuation">.</span><span class="token punctuation">.</span>

    <span class="token keyword">private</span> <span class="token keyword">void</span> <span class="token function">HandleValidSubmit</span><span class="token punctuation">(</span>EditContext context<span class="token punctuation">)</span>
    <span class="token punctuation">{</span>        
        hasValidated <span class="token operator">=</span> <span class="token keyword">true</span><span class="token punctuation">;</span>        
        isSubmitted <span class="token operator">=</span> <span class="token keyword">true</span><span class="token punctuation">;</span>
    <span class="token punctuation">}</span>
        
    <span class="token keyword">private</span> <span class="token keyword">void</span> <span class="token function">HandleInvalidSubmit</span><span class="token punctuation">(</span>EditContext context<span class="token punctuation">)</span>
    <span class="token punctuation">{</span>
        hasValidated <span class="token operator">=</span> <span class="token keyword">true</span><span class="token punctuation">;</span>
    <span class="token punctuation">}</span>
<span class="token punctuation">}</span>
</code></pre><p>In the code above, I added the field <code>hasValidated</code> to check if the form has been submitted. I also modified <code>OnInitialized</code> by adding the handler for the event <code>OnValidationStateChanged</code>, which allows the UI to update reactively. I also added the helper <code>IsFieldValid&lt;T&gt;</code> and the methods <code>GetAttendeeHeaderClass</code> and <code>GetBillingHeaderClass</code>. This is the result:</p><p><img src="https://www.telerik.com/sfimages/default-source/blogs/2026/2026-05/form-section-error-summary.png?sfvrsn=64b57388_2" alt="Form displaying an error summary for entire sections" /></p><p>With this, we have managed to give the user better feedback about the sections they need to complete before proceeding.</p><h2 id="conclusion">Conclusion</h2><p>Throughout this article, we have explored the new features available in .NET 10 that will undoubtedly help you manage forms with nested objects and lists. We&rsquo;ve also looked at how to perform cross-validations and, finally, the process of carrying out more complex validations by checking data in sections.</p><p>Now it&rsquo;s your time to implement these new features in your own projects and provide better feedback to your users.</p><aside><hr data-sf-ec-immutable="" /><div class="row"><div class="col-4 u-normal-full u-small-mb0"><h4 class="u-fs20 u-fw5 u-lh125 u-mb0">120+ Enterprise-Grade Blazor UI Components</h4></div><div class="col-8"><p class="u-fs16 u-mb0">Accelerate app development with <a target="_blank" href="https://www.telerik.com https://www.telerik.com/blazor-ui">Telerik UI for Blazor</a>&mdash;a complete set of 120+ high-performance, accessible controls, MCP Servers and more. Available with a free 30-day trial.</p></div></div></aside><img src="https://feeds.telerik.com/link/23050/17353268.gif" height="1" width="1"/>]]></content>
  </entry>
  <entry>
    <id>urn:uuid:1feea2d1-2fa0-48fa-a5fa-f1d611bdf2d5</id>
    <title type="text">Streaming Server Events with SSE and Blazor</title>
    <summary type="text">Understand the SSE standard, the .NET 10  changes to simplify SSE endpoints and how to add real-time events to your Blazor clients.</summary>
    <published>2026-05-12T13:18:03Z</published>
    <updated>2026-08-24T02:17:02Z</updated>
    <author>
      <name>Héctor Pérez </name>
    </author>
    <link rel="alternate" href="https://feeds.telerik.com/link/23050/17339197/streaming-server-events-sse-blazor"/>
    <content type="text"><![CDATA[<p><span class="featured">Understand the SSE standard, the .NET 10 changes to simplify SSE endpoints and how to add real-time events to your Blazor clients.</span></p><p>In the world of web development, there are scenarios where you need to receive real-time information, such as notifications about an event, server metrics or live logs. One possible solution to achieve this is the use of Server-Sent Events (SSE). With the arrival of .NET 10, implementing this type of solution has become much easier, so let&rsquo;s see how to integrate this web standard into your projects.</p><h2 id="what-are-server-sent-events">What Are Server-Sent Events?</h2><p>The <a target="_blank" href="https://developer.mozilla.org/en-US/docs/Web/API/Server-sent_events">Server-Sent Events (SSE)</a> are not a new technology. Their origins date back to around 2006, and they are a web standard that allows data to be sent to clients continuously using a persistent HTTP connection.</p><p>If you wonder the difference compared to other similar technologies, we can make a comparison:</p><ul><li><p><strong>SSE vs. Polling</strong>: In the case of polling, the direction goes from the client to the server, using the HTTP protocol. We can see it as a client asking the server if there are updates at certain intervals. It involves low implementation complexity.</p></li><li><p><strong>SSE vs. WebSockets</strong>: With WebSockets there is bidirectional communication. It involves high complexity and is ideal for scenarios like video games, chats, etc. It works over the WS protocol.</p></li><li><p><strong>SSE vs. SignalR</strong>: SignalR also establishes bidirectional communication, with medium implementation complexity. It allows the use of binary protocols, which makes it a very good option for scalable enterprise apps. It uses variable protocols.</p></li></ul><p>Analyzing the above, we can conclude that SSE is ideal when the data flow is unidirectional, you need it to work over the HTTP protocol and it must be easy to implement.</p><h2 id="how-does-the-sse-protocol-work">How Does the SSE Protocol Work?</h2><p>The workings behind the scenes of the SSE protocol, in broad terms, are as follows: a server SSE endpoint needs to send an HTTP response of the type <code>Content-Type: text/event-stream</code>. The response looks similar to the following:</p><pre class=" language-json"><code class="prism  language-json">event<span class="token punctuation">:</span> app<span class="token operator">-</span>event
data<span class="token punctuation">:</span> <span class="token punctuation">{</span><span class="token string">"id"</span><span class="token punctuation">:</span><span class="token number">1</span><span class="token punctuation">,</span><span class="token string">"time"</span><span class="token punctuation">:</span><span class="token string">"10:30:45"</span><span class="token punctuation">,</span><span class="token string">"level"</span><span class="token punctuation">:</span><span class="token string">"Info"</span><span class="token punctuation">,</span><span class="token string">"source"</span><span class="token punctuation">:</span><span class="token string">"OrderService"</span><span class="token punctuation">,</span><span class="token string">"message"</span><span class="token punctuation">:</span><span class="token string">"Order #1234 placed successfully"</span><span class="token punctuation">}</span>
</code></pre><p>In the code above, there are some fields we should pay attention to:</p><ul><li><code>event</code>: Specifies the name of the event</li><li><code>data</code>: Is the content of the message</li><li><code>id</code>: Identifier used to perform a reconnection if needed</li></ul><h2 id="whats-new-in-.net-10-for-sse">What&rsquo;s New in .NET 10 for SSE</h2><p>The most important update in .NET 10 for working with SSE is that the ability to return a <code>ServerSentEvents</code> using the API <code>TypedResults.ServerSentEvents</code> has been implemented. This means that the method <code>TypedResults.ServerSentEvents&lt;T&gt;()</code> allows converting any <code>IAsyncEnumerable&lt;T&gt;</code> into a formatted SSE stream without needing to do anything else. Tasks like JSON serialization, HTTP headers, connection closing, etc. are handled automatically.</p><p>To better understand how it works, let&rsquo;s create a project using the SSE standard with ASP.NET 10.</p><h2 id="building-an-sse-project-using-asp.net-10">Building an SSE Project Using ASP.NET 10</h2><p>To practice the theoretical concepts covered so far, we&rsquo;ll create a page that shows a simulation of receiving events from backend services in real time. Using a Progress Telerik UI for <a target="_blank" href="https://www.telerik.com/blazor-ui/grid">Blazor Grid</a>, we&rsquo;ll perform tasks like filtering, grouping and analysis quickly.</p><h3 id="creating-and-configuring-the-project">Creating and Configuring the Project</h3><p>The first thing we&rsquo;ll do is create a project using the <strong>Blazor Web App</strong> template, selecting an <strong>Interactive render mode</strong> of <strong>Server</strong> and <strong>Interactivity location</strong> of <strong>Global</strong>. Next, we&rsquo;ll follow the official installation guide for <a target="_blank" href="https://www.telerik.com/blazor-ui">Telerik UI for Blazor</a> to configure the project and be able to use the Telerik components.</p><h3 id="creating-an-eventbroadcaster">Creating an EventBroadcaster</h3><p>For our project, we&rsquo;ll create an event broadcaster, which in simple terms will be a bus that SSE clients can connect to to consume events, while backend services will use it to publish events. First, we&rsquo;ll create a record that represents a system event:</p><pre class=" language-csharp"><code class="prism  language-csharp"><span class="token keyword">namespace</span> SSEDemo<span class="token punctuation">.</span>Services
<span class="token punctuation">{</span>
    <span class="token keyword">public</span> record <span class="token function">AppEvent</span><span class="token punctuation">(</span><span class="token keyword">int</span> Id<span class="token punctuation">,</span> <span class="token keyword">string</span> Time<span class="token punctuation">,</span> <span class="token keyword">string</span> Level<span class="token punctuation">,</span> <span class="token keyword">string</span> Source<span class="token punctuation">,</span> <span class="token keyword">string</span> Message<span class="token punctuation">)</span><span class="token punctuation">;</span>
<span class="token punctuation">}</span>
</code></pre><p>Next, we will create the class <code>EventBroadcaster</code> which will have the following definition:</p><pre class=" language-csharp"><code class="prism  language-csharp"><span class="token keyword">public</span> <span class="token keyword">class</span> <span class="token class-name">EventBroadcaster</span>
<span class="token punctuation">{</span>
    <span class="token comment">//1.</span>
    <span class="token keyword">private</span> <span class="token keyword">readonly</span> Channel<span class="token operator">&lt;</span>AppEvent<span class="token operator">&gt;</span> _channel <span class="token operator">=</span> Channel<span class="token punctuation">.</span><span class="token generic-method function">CreateBounded<span class="token punctuation">&lt;</span>AppEvent<span class="token punctuation">&gt;</span></span><span class="token punctuation">(</span>
    <span class="token keyword">new</span> <span class="token class-name">BoundedChannelOptions</span><span class="token punctuation">(</span><span class="token number">100</span><span class="token punctuation">)</span> <span class="token punctuation">{</span> FullMode <span class="token operator">=</span> BoundedChannelFullMode<span class="token punctuation">.</span>DropOldest <span class="token punctuation">}</span><span class="token punctuation">)</span><span class="token punctuation">;</span>

    <span class="token keyword">private</span> <span class="token keyword">int</span> _nextId<span class="token punctuation">;</span>

    <span class="token comment">// 2.</span>
    <span class="token keyword">public</span> <span class="token keyword">void</span> <span class="token function">Publish</span><span class="token punctuation">(</span><span class="token keyword">string</span> level<span class="token punctuation">,</span> <span class="token keyword">string</span> source<span class="token punctuation">,</span> <span class="token keyword">string</span> message<span class="token punctuation">)</span>
    <span class="token punctuation">{</span>
        <span class="token keyword">var</span> id <span class="token operator">=</span> Interlocked<span class="token punctuation">.</span><span class="token function">Increment</span><span class="token punctuation">(</span><span class="token keyword">ref</span> _nextId<span class="token punctuation">)</span><span class="token punctuation">;</span>
        <span class="token keyword">var</span> evt <span class="token operator">=</span> <span class="token keyword">new</span> <span class="token class-name">AppEvent</span><span class="token punctuation">(</span>id<span class="token punctuation">,</span> DateTime<span class="token punctuation">.</span>Now<span class="token punctuation">.</span><span class="token function">ToString</span><span class="token punctuation">(</span><span class="token string">"HH:mm:ss"</span><span class="token punctuation">)</span><span class="token punctuation">,</span> level<span class="token punctuation">,</span> source<span class="token punctuation">,</span> message<span class="token punctuation">)</span><span class="token punctuation">;</span>
        _channel<span class="token punctuation">.</span>Writer<span class="token punctuation">.</span><span class="token function">TryWrite</span><span class="token punctuation">(</span>evt<span class="token punctuation">)</span><span class="token punctuation">;</span>
    <span class="token punctuation">}</span>

    <span class="token comment">// 3.</span>
    <span class="token keyword">public</span> <span class="token keyword">async</span> IAsyncEnumerable<span class="token operator">&lt;</span>AppEvent<span class="token operator">&gt;</span> <span class="token function">Subscribe</span><span class="token punctuation">(</span>
        <span class="token punctuation">[</span>System<span class="token punctuation">.</span>Runtime<span class="token punctuation">.</span>CompilerServices<span class="token punctuation">.</span>EnumeratorCancellation<span class="token punctuation">]</span> CancellationToken ct<span class="token punctuation">)</span>
    <span class="token punctuation">{</span>
        <span class="token keyword">while</span> <span class="token punctuation">(</span><span class="token operator">!</span>ct<span class="token punctuation">.</span>IsCancellationRequested<span class="token punctuation">)</span>
        <span class="token punctuation">{</span>
            <span class="token keyword">bool</span> hasData<span class="token punctuation">;</span>
            <span class="token keyword">try</span>
            <span class="token punctuation">{</span>
                hasData <span class="token operator">=</span> <span class="token keyword">await</span> _channel<span class="token punctuation">.</span>Reader<span class="token punctuation">.</span><span class="token function">WaitToReadAsync</span><span class="token punctuation">(</span>ct<span class="token punctuation">)</span><span class="token punctuation">;</span>
            <span class="token punctuation">}</span>
            <span class="token keyword">catch</span> <span class="token punctuation">(</span><span class="token class-name">OperationCanceledException</span><span class="token punctuation">)</span>
            <span class="token punctuation">{</span>
                <span class="token keyword">yield</span> <span class="token keyword">break</span><span class="token punctuation">;</span>
            <span class="token punctuation">}</span>

            <span class="token keyword">if</span> <span class="token punctuation">(</span><span class="token operator">!</span>hasData<span class="token punctuation">)</span> <span class="token keyword">yield</span> <span class="token keyword">break</span><span class="token punctuation">;</span>

            <span class="token keyword">while</span> <span class="token punctuation">(</span>_channel<span class="token punctuation">.</span>Reader<span class="token punctuation">.</span><span class="token function">TryRead</span><span class="token punctuation">(</span><span class="token keyword">out</span> <span class="token keyword">var</span> evt<span class="token punctuation">)</span><span class="token punctuation">)</span>
            <span class="token punctuation">{</span>
                <span class="token keyword">yield</span> <span class="token keyword">return</span> evt<span class="token punctuation">;</span>
            <span class="token punctuation">}</span>
        <span class="token punctuation">}</span>
    <span class="token punctuation">}</span>
<span class="token punctuation">}</span>
</code></pre><p>In the code above, we have the following sections:</p><ol><li><p>Sets up the channel where events will be passed, with a queue limit of 100 messages. <code>FullMode = BoundedChannelFullMode.DropOldest</code> allows that if the queue fills up and a new message arrives, the oldest one is removed to make room for the new message.</p></li><li><p>The method <code>Publish</code> is the one that will be used to emit events. <code>Interlocked.Increment</code> allows generating sequential IDs in a safe manner, while <code>AppEvent</code> packages the received data together with the obtained id. Finally the method <code>TryWrite()</code> attempts to write the event to the channel asynchronously.</p></li><li><p>On the other hand, the method <code>Subscribe</code> returns a continuous stream of asynchronous data through the use of <code>IAsyncEnumerable&lt;AppEvent&gt;</code>. Inside its implementation an infinite loop is created that waits for data to be available in the channel. Once an event enters the channel, it is emitted to the consumer. This will happen until the <code>CancellationToken</code> called <code>ct</code> is canceled.</p></li></ol><h3 id="generating-test-events">Generating Test Events</h3><p>To test the bus defined above, we&rsquo;ll create a service that simulates the activity of multiple services:</p><pre class=" language-csharp"><code class="prism  language-csharp"><span class="token keyword">public</span> <span class="token keyword">class</span> <span class="token class-name">DemoEventGenerator</span><span class="token punctuation">(</span>EventBroadcaster broadcaster<span class="token punctuation">)</span> <span class="token punctuation">:</span> BackgroundService
<span class="token punctuation">{</span>
    <span class="token keyword">private</span> <span class="token keyword">static</span> <span class="token keyword">readonly</span> <span class="token keyword">string</span><span class="token punctuation">[</span><span class="token punctuation">]</span> Levels <span class="token operator">=</span> <span class="token punctuation">[</span><span class="token string">"Info"</span><span class="token punctuation">,</span> <span class="token string">"Warning"</span><span class="token punctuation">,</span> <span class="token string">"Error"</span><span class="token punctuation">,</span> <span class="token string">"Success"</span><span class="token punctuation">]</span><span class="token punctuation">;</span>
    <span class="token keyword">private</span> <span class="token keyword">static</span> <span class="token keyword">readonly</span> <span class="token keyword">string</span><span class="token punctuation">[</span><span class="token punctuation">]</span> Sources <span class="token operator">=</span>
        <span class="token punctuation">[</span><span class="token string">"OrderService"</span><span class="token punctuation">,</span> <span class="token string">"PaymentService"</span><span class="token punctuation">,</span> <span class="token string">"InventoryService"</span><span class="token punctuation">,</span> <span class="token string">"AuthService"</span><span class="token punctuation">,</span> <span class="token string">"ShippingService"</span><span class="token punctuation">]</span><span class="token punctuation">;</span>
    <span class="token keyword">private</span> <span class="token keyword">static</span> <span class="token keyword">readonly</span> <span class="token keyword">string</span><span class="token punctuation">[</span><span class="token punctuation">]</span><span class="token punctuation">[</span><span class="token punctuation">]</span> Messages <span class="token operator">=</span>
    <span class="token punctuation">[</span>
        <span class="token punctuation">[</span><span class="token string">"Order #{0} placed successfully"</span><span class="token punctuation">,</span> <span class="token string">"New customer registered"</span><span class="token punctuation">,</span> <span class="token string">"Product viewed: SKU-{0}"</span><span class="token punctuation">]</span><span class="token punctuation">,</span>
        <span class="token punctuation">[</span><span class="token string">"High latency detected: {0}ms"</span><span class="token punctuation">,</span> <span class="token string">"Retry attempt #{0}"</span><span class="token punctuation">,</span> <span class="token string">"Queue depth above threshold"</span><span class="token punctuation">]</span><span class="token punctuation">,</span>
        <span class="token punctuation">[</span><span class="token string">"Payment failed for order #{0}"</span><span class="token punctuation">,</span> <span class="token string">"Database timeout after {0}ms"</span><span class="token punctuation">,</span> <span class="token string">"Service unreachable"</span><span class="token punctuation">]</span><span class="token punctuation">,</span>
        <span class="token punctuation">[</span><span class="token string">"Deployment completed v2.{0}"</span><span class="token punctuation">,</span> <span class="token string">"Health check passed"</span><span class="token punctuation">,</span> <span class="token string">"Cache refreshed ({0} items)"</span><span class="token punctuation">]</span>
    <span class="token punctuation">]</span><span class="token punctuation">;</span>

    <span class="token keyword">protected</span> <span class="token keyword">override</span> <span class="token keyword">async</span> Task <span class="token function">ExecuteAsync</span><span class="token punctuation">(</span>CancellationToken stoppingToken<span class="token punctuation">)</span>
    <span class="token punctuation">{</span>
        <span class="token keyword">var</span> rng <span class="token operator">=</span> <span class="token keyword">new</span> <span class="token class-name">Random</span><span class="token punctuation">(</span><span class="token punctuation">)</span><span class="token punctuation">;</span>

        <span class="token keyword">while</span> <span class="token punctuation">(</span><span class="token operator">!</span>stoppingToken<span class="token punctuation">.</span>IsCancellationRequested<span class="token punctuation">)</span>
        <span class="token punctuation">{</span>            
            <span class="token keyword">await</span> Task<span class="token punctuation">.</span><span class="token function">Delay</span><span class="token punctuation">(</span>rng<span class="token punctuation">.</span><span class="token function">Next</span><span class="token punctuation">(</span><span class="token number">1500</span><span class="token punctuation">,</span> <span class="token number">4000</span><span class="token punctuation">)</span><span class="token punctuation">,</span> stoppingToken<span class="token punctuation">)</span><span class="token punctuation">;</span>

            <span class="token keyword">var</span> levelIdx <span class="token operator">=</span> rng<span class="token punctuation">.</span><span class="token function">Next</span><span class="token punctuation">(</span>Levels<span class="token punctuation">.</span>Length<span class="token punctuation">)</span><span class="token punctuation">;</span>
            <span class="token keyword">var</span> level <span class="token operator">=</span> Levels<span class="token punctuation">[</span>levelIdx<span class="token punctuation">]</span><span class="token punctuation">;</span>
            <span class="token keyword">var</span> source <span class="token operator">=</span> Sources<span class="token punctuation">[</span>rng<span class="token punctuation">.</span><span class="token function">Next</span><span class="token punctuation">(</span>Sources<span class="token punctuation">.</span>Length<span class="token punctuation">)</span><span class="token punctuation">]</span><span class="token punctuation">;</span>
            <span class="token keyword">var</span> templates <span class="token operator">=</span> Messages<span class="token punctuation">[</span>levelIdx<span class="token punctuation">]</span><span class="token punctuation">;</span>
            <span class="token keyword">var</span> message <span class="token operator">=</span> <span class="token keyword">string</span><span class="token punctuation">.</span><span class="token function">Format</span><span class="token punctuation">(</span>templates<span class="token punctuation">[</span>rng<span class="token punctuation">.</span><span class="token function">Next</span><span class="token punctuation">(</span>templates<span class="token punctuation">.</span>Length<span class="token punctuation">)</span><span class="token punctuation">]</span><span class="token punctuation">,</span> rng<span class="token punctuation">.</span><span class="token function">Next</span><span class="token punctuation">(</span><span class="token number">1000</span><span class="token punctuation">,</span> <span class="token number">9999</span><span class="token punctuation">)</span><span class="token punctuation">)</span><span class="token punctuation">;</span>

            broadcaster<span class="token punctuation">.</span><span class="token function">Publish</span><span class="token punctuation">(</span>level<span class="token punctuation">,</span> source<span class="token punctuation">,</span> message<span class="token punctuation">)</span><span class="token punctuation">;</span>
        <span class="token punctuation">}</span>
    <span class="token punctuation">}</span>
<span class="token punctuation">}</span>
</code></pre><p>The previous class is a random event generator, taking a random value from the arrays <code>Levels</code>, <code>Sources</code> and <code>Messages</code>. In addition, through the parameter <code>broadcaster</code>, the new event is published to the bus.</p><h3 id="creating-the-sse-endpoint">Creating the SSE Endpoint</h3><p>Now it&rsquo;s time to create the SSE endpoint, which will consume the shared <code>EventBroadcaster</code>, with the purpose of creating the Event Feed so clients can connect to receive events:</p><pre class=" language-csharp"><code class="prism  language-csharp"><span class="token keyword">public</span> <span class="token keyword">static</span> <span class="token keyword">class</span> <span class="token class-name">SseEndpoints</span>
<span class="token punctuation">{</span>
    <span class="token keyword">public</span> <span class="token keyword">static</span> <span class="token keyword">void</span> <span class="token function">MapSseEndpoints</span><span class="token punctuation">(</span><span class="token keyword">this</span> WebApplication app<span class="token punctuation">)</span>
    <span class="token punctuation">{</span>        
        app<span class="token punctuation">.</span><span class="token function">MapGet</span><span class="token punctuation">(</span><span class="token string">"/sse/events"</span><span class="token punctuation">,</span> <span class="token punctuation">(</span>EventBroadcaster broadcaster<span class="token punctuation">,</span> CancellationToken ct<span class="token punctuation">)</span> <span class="token operator">=</span><span class="token operator">&gt;</span>
            TypedResults<span class="token punctuation">.</span><span class="token function">ServerSentEvents</span><span class="token punctuation">(</span>broadcaster<span class="token punctuation">.</span><span class="token function">Subscribe</span><span class="token punctuation">(</span>ct<span class="token punctuation">)</span><span class="token punctuation">,</span> eventType<span class="token punctuation">:</span> <span class="token string">"app-event"</span><span class="token punctuation">)</span><span class="token punctuation">)</span><span class="token punctuation">;</span>
    <span class="token punctuation">}</span>
<span class="token punctuation">}</span>
</code></pre><p>In the code above you can notice how <code>EventBroadcaster</code> is injected as a parameter of <code>MapGet</code>. Likewise, <code>TypedResults.ServerSentEvent</code> is executed, which serializes the information and sends the correct SSE format to clients.</p><h3 id="registering-services-in-program.cs">Registering Services in Program.cs</h3><p>For everything to work as expected, we must register in <code>Program.cs</code> the different instances that will interact in the Blazor application. This means creating a singleton instance of <code>EventBroadcaster</code>, so that all systems have access to the same bus. Similarly, we will register <code>DemoEventGenerator</code> as a background service, through the method <code>AddHostedService</code>. This will allow simulated events to be generated in the background continuously:</p><pre class=" language-csharp"><code class="prism  language-csharp"><span class="token keyword">var</span> builder <span class="token operator">=</span> WebApplication<span class="token punctuation">.</span><span class="token function">CreateBuilder</span><span class="token punctuation">(</span>args<span class="token punctuation">)</span><span class="token punctuation">;</span>
<span class="token punctuation">.</span><span class="token punctuation">.</span><span class="token punctuation">.</span>
builder<span class="token punctuation">.</span>Services<span class="token punctuation">.</span><span class="token generic-method function">AddSingleton<span class="token punctuation">&lt;</span>EventBroadcaster<span class="token punctuation">&gt;</span></span><span class="token punctuation">(</span><span class="token punctuation">)</span><span class="token punctuation">;</span>
builder<span class="token punctuation">.</span>Services<span class="token punctuation">.</span><span class="token generic-method function">AddHostedService<span class="token punctuation">&lt;</span>DemoEventGenerator<span class="token punctuation">&gt;</span></span><span class="token punctuation">(</span><span class="token punctuation">)</span><span class="token punctuation">;</span>

<span class="token keyword">var</span> app <span class="token operator">=</span> builder<span class="token punctuation">.</span><span class="token function">Build</span><span class="token punctuation">(</span><span class="token punctuation">)</span><span class="token punctuation">;</span>
<span class="token punctuation">.</span><span class="token punctuation">.</span><span class="token punctuation">.</span>

app<span class="token punctuation">.</span><span class="token function">MapSseEndpoints</span><span class="token punctuation">(</span><span class="token punctuation">)</span><span class="token punctuation">;</span>

app<span class="token punctuation">.</span><span class="token function">Run</span><span class="token punctuation">(</span><span class="token punctuation">)</span><span class="token punctuation">;</span>
</code></pre><p>In the previous code, in addition to registering the services, <code>MapSseEndpoints</code> is invoked to enable SSE communication in the project.</p><h3 id="creating-the-blazor-application">Creating the Blazor Application</h3><p>Once we have the application infrastructure ready, it&rsquo;s time to move on to the UI part. At this point, let&rsquo;s start by creating a JavaScript client, because the standard requires using the browser&rsquo;s <code>EventSource</code> API. Since the project is configured as <code>InteractiveServer</code>, we cannot add inline <code>script</code> tags. To work around this, I will add a new file inside the <code>wwwroot/js</code> folder called <code>sse-demos.js</code>:</p><pre class=" language-javascript"><code class="prism  language-javascript"><span class="token comment">//1.</span>
<span class="token keyword">let</span> eventFeedSource <span class="token operator">=</span> <span class="token keyword">null</span><span class="token punctuation">;</span>

<span class="token number">2</span><span class="token punctuation">.</span>
<span class="token keyword">export</span> <span class="token keyword">function</span> <span class="token function">start</span><span class="token punctuation">(</span>dotNetRef<span class="token punctuation">)</span> <span class="token punctuation">{</span>
    <span class="token comment">// 3.</span>
    <span class="token keyword">if</span> <span class="token punctuation">(</span>eventFeedSource<span class="token punctuation">)</span> eventFeedSource<span class="token punctuation">.</span><span class="token function">close</span><span class="token punctuation">(</span><span class="token punctuation">)</span><span class="token punctuation">;</span>

<span class="token comment">//4.</span>
    <span class="token keyword">const</span> src <span class="token operator">=</span> <span class="token keyword">new</span> <span class="token class-name">EventSource</span><span class="token punctuation">(</span><span class="token string">'/sse/events'</span><span class="token punctuation">)</span><span class="token punctuation">;</span>

    <span class="token comment">// 5.</span>
    src<span class="token punctuation">.</span><span class="token function">addEventListener</span><span class="token punctuation">(</span><span class="token string">'app-event'</span><span class="token punctuation">,</span> <span class="token keyword">function</span> <span class="token punctuation">(</span>e<span class="token punctuation">)</span> <span class="token punctuation">{</span>
        dotNetRef<span class="token punctuation">.</span><span class="token function">invokeMethodAsync</span><span class="token punctuation">(</span><span class="token string">'OnEventReceived'</span><span class="token punctuation">,</span> JSON<span class="token punctuation">.</span><span class="token function">parse</span><span class="token punctuation">(</span>e<span class="token punctuation">.</span>data<span class="token punctuation">)</span><span class="token punctuation">)</span><span class="token punctuation">;</span>
    <span class="token punctuation">}</span><span class="token punctuation">)</span><span class="token punctuation">;</span>

    <span class="token comment">// 6.</span>
    src<span class="token punctuation">.</span><span class="token function-variable function">onopen</span> <span class="token operator">=</span> <span class="token keyword">function</span> <span class="token punctuation">(</span><span class="token punctuation">)</span> <span class="token punctuation">{</span> dotNetRef<span class="token punctuation">.</span><span class="token function">invokeMethodAsync</span><span class="token punctuation">(</span><span class="token string">'OnConnectionChanged'</span><span class="token punctuation">,</span> <span class="token boolean">true</span><span class="token punctuation">)</span><span class="token punctuation">;</span> <span class="token punctuation">}</span><span class="token punctuation">;</span>
    src<span class="token punctuation">.</span><span class="token function-variable function">onerror</span> <span class="token operator">=</span> <span class="token keyword">function</span> <span class="token punctuation">(</span><span class="token punctuation">)</span> <span class="token punctuation">{</span> dotNetRef<span class="token punctuation">.</span><span class="token function">invokeMethodAsync</span><span class="token punctuation">(</span><span class="token string">'OnConnectionChanged'</span><span class="token punctuation">,</span> <span class="token boolean">false</span><span class="token punctuation">)</span><span class="token punctuation">;</span> <span class="token punctuation">}</span><span class="token punctuation">;</span>

    eventFeedSource <span class="token operator">=</span> src<span class="token punctuation">;</span>
<span class="token punctuation">}</span>

<span class="token comment">//7.</span>
<span class="token keyword">export</span> <span class="token keyword">function</span> <span class="token function">stop</span><span class="token punctuation">(</span><span class="token punctuation">)</span> <span class="token punctuation">{</span>
    <span class="token keyword">if</span> <span class="token punctuation">(</span>eventFeedSource<span class="token punctuation">)</span> <span class="token punctuation">{</span>
        eventFeedSource<span class="token punctuation">.</span><span class="token function">close</span><span class="token punctuation">(</span><span class="token punctuation">)</span><span class="token punctuation">;</span>
        eventFeedSource <span class="token operator">=</span> <span class="token keyword">null</span><span class="token punctuation">;</span>
    <span class="token punctuation">}</span>
<span class="token punctuation">}</span>
</code></pre><p>The previous code does the following:</p><ol><li>A variable <code>eventFeedSource</code> is created to keep information about whether there is an active connection with the server.</li><li>A function named <code>start</code> should be called from C# code when you want to start receiving information&hellip;</li><li>It checks whether there is an open connection, in which case it is closed.</li><li>It tells the browser to connect to <code>/sse/events</code> and to listen for all events that the server sends.</li><li>It filters events named <code>app-event</code>.</li><li>We subscribe to the events <code>onopen</code> and <code>onerror</code>. Each will notify the method <code>OnConnectionChanged</code> about a change in the connection, which will allow showing a different state in the Blazor UI.</li><li>The function <code>stop</code> should be invoked to clean up memory when we want to close the connection.</li></ol><p>With the JS functions ready, the next step is to create the Blazor component. In this new component we will use a <a target="_blank" href="https://www.telerik.com/blazor-ui/grid">Blazor Data Grid</a> type component, because it is a highly configurable component that has built-in options to filter, group, etc., ideal for quickly obtaining information about events in the different systems.</p><p>To do the above, we will create a component called <code>EventFeed.razor</code>, which looks as follows:</p><pre class=" language-xml"><code class="prism  language-xml">@page "/events"
@rendermode InteractiveServer
@inject IJSRuntime JS
@implements IAsyncDisposable

<span class="token tag"><span class="token tag"><span class="token punctuation">&lt;</span>PageTitle</span><span class="token punctuation">&gt;</span></span>Live Event Feed<span class="token tag"><span class="token tag"><span class="token punctuation">&lt;/</span>PageTitle</span><span class="token punctuation">&gt;</span></span>

<span class="token tag"><span class="token tag"><span class="token punctuation">&lt;</span>h1</span> <span class="token attr-name">class</span><span class="token attr-value"><span class="token punctuation">=</span><span class="token punctuation">"</span>mb-4<span class="token punctuation">"</span></span><span class="token punctuation">&gt;</span></span>Live Event Feed<span class="token tag"><span class="token tag"><span class="token punctuation">&lt;/</span>h1</span><span class="token punctuation">&gt;</span></span>

<span class="token tag"><span class="token tag"><span class="token punctuation">&lt;</span>div</span> <span class="token attr-name">class</span><span class="token attr-value"><span class="token punctuation">=</span><span class="token punctuation">"</span>card shadow-sm<span class="token punctuation">"</span></span><span class="token punctuation">&gt;</span></span>
    <span class="token tag"><span class="token tag"><span class="token punctuation">&lt;</span>div</span> <span class="token attr-name">class</span><span class="token attr-value"><span class="token punctuation">=</span><span class="token punctuation">"</span>card-header d-flex align-items-center justify-content-between py-2<span class="token punctuation">"</span></span><span class="token punctuation">&gt;</span></span>
        <span class="token tag"><span class="token tag"><span class="token punctuation">&lt;</span>div</span> <span class="token attr-name">class</span><span class="token attr-value"><span class="token punctuation">=</span><span class="token punctuation">"</span>d-flex align-items-center gap-3<span class="token punctuation">"</span></span><span class="token punctuation">&gt;</span></span>
            @if (isStreaming)
            {
                &lt;span class="badge rounded-pill @(isConnected ? "bg-success" : "bg-secondary") fs-6"&gt;
                    <span class="token tag"><span class="token tag"><span class="token punctuation">&lt;</span>span</span> <span class="token attr-name">class</span><span class="token attr-value"><span class="token punctuation">=</span><span class="token punctuation">"</span>me-1<span class="token punctuation">"</span></span><span class="token punctuation">&gt;</span></span>⬤<span class="token tag"><span class="token tag"><span class="token punctuation">&lt;/</span>span</span><span class="token punctuation">&gt;</span></span>@(isConnected ? "Connected" : "Disconnected")
                <span class="token tag"><span class="token tag"><span class="token punctuation">&lt;/</span>span</span><span class="token punctuation">&gt;</span></span>
            }
            else
            {
                <span class="token tag"><span class="token tag"><span class="token punctuation">&lt;</span>span</span> <span class="token attr-name">class</span><span class="token attr-value"><span class="token punctuation">=</span><span class="token punctuation">"</span>badge rounded-pill bg-warning text-dark fs-6<span class="token punctuation">"</span></span><span class="token punctuation">&gt;</span></span>
                    <span class="token tag"><span class="token tag"><span class="token punctuation">&lt;</span>span</span> <span class="token attr-name">class</span><span class="token attr-value"><span class="token punctuation">=</span><span class="token punctuation">"</span>me-1<span class="token punctuation">"</span></span><span class="token punctuation">&gt;</span></span>⏸<span class="token tag"><span class="token tag"><span class="token punctuation">&lt;/</span>span</span><span class="token punctuation">&gt;</span></span>Paused
                <span class="token tag"><span class="token tag"><span class="token punctuation">&lt;/</span>span</span><span class="token punctuation">&gt;</span></span>
            }
            <span class="token tag"><span class="token tag"><span class="token punctuation">&lt;</span>span</span> <span class="token attr-name">class</span><span class="token attr-value"><span class="token punctuation">=</span><span class="token punctuation">"</span>text-muted<span class="token punctuation">"</span></span><span class="token punctuation">&gt;</span></span>
                Events received: <span class="token tag"><span class="token tag"><span class="token punctuation">&lt;</span>strong</span> <span class="token attr-name">class</span><span class="token attr-value"><span class="token punctuation">=</span><span class="token punctuation">"</span>text-dark<span class="token punctuation">"</span></span><span class="token punctuation">&gt;</span></span>@totalEventsReceived<span class="token tag"><span class="token tag"><span class="token punctuation">&lt;/</span>strong</span><span class="token punctuation">&gt;</span></span>
            <span class="token tag"><span class="token tag"><span class="token punctuation">&lt;/</span>span</span><span class="token punctuation">&gt;</span></span>
        <span class="token tag"><span class="token tag"><span class="token punctuation">&lt;/</span>div</span><span class="token punctuation">&gt;</span></span>
        <span class="token tag"><span class="token tag"><span class="token punctuation">&lt;</span>div</span> <span class="token attr-name">class</span><span class="token attr-value"><span class="token punctuation">=</span><span class="token punctuation">"</span>d-flex gap-2<span class="token punctuation">"</span></span><span class="token punctuation">&gt;</span></span>
            <span class="token tag"><span class="token tag"><span class="token punctuation">&lt;</span>TelerikButton</span> <span class="token attr-name">OnClick</span><span class="token attr-value"><span class="token punctuation">=</span><span class="token punctuation">"</span>ToggleStreaming<span class="token punctuation">"</span></span>
                           <span class="token attr-name">ThemeColor</span><span class="token attr-value"><span class="token punctuation">=</span><span class="token punctuation">"</span>@(isStreaming ? ThemeConstants.Button.ThemeColor.Primary : ThemeConstants.Button.ThemeColor.Success)<span class="token punctuation">"</span></span><span class="token punctuation">&gt;</span></span>
                @(isStreaming ? "⏸ Pause" : "▶ Resume")
            <span class="token tag"><span class="token tag"><span class="token punctuation">&lt;/</span>TelerikButton</span><span class="token punctuation">&gt;</span></span>
            <span class="token tag"><span class="token tag"><span class="token punctuation">&lt;</span>TelerikButton</span> <span class="token attr-name">OnClick</span><span class="token attr-value"><span class="token punctuation">=</span><span class="token punctuation">"</span>ClearGrid<span class="token punctuation">"</span></span> <span class="token attr-name">ThemeColor</span><span class="token attr-value"><span class="token punctuation">=</span><span class="token punctuation">"</span>@ThemeConstants.Button.ThemeColor.Light<span class="token punctuation">"</span></span><span class="token punctuation">&gt;</span></span> Clear<span class="token tag"><span class="token tag"><span class="token punctuation">&lt;/</span>TelerikButton</span><span class="token punctuation">&gt;</span></span>
        <span class="token tag"><span class="token tag"><span class="token punctuation">&lt;/</span>div</span><span class="token punctuation">&gt;</span></span>
    <span class="token tag"><span class="token tag"><span class="token punctuation">&lt;/</span>div</span><span class="token punctuation">&gt;</span></span>
    <span class="token tag"><span class="token tag"><span class="token punctuation">&lt;</span>div</span> <span class="token attr-name">class</span><span class="token attr-value"><span class="token punctuation">=</span><span class="token punctuation">"</span>card-body p-0<span class="token punctuation">"</span></span><span class="token punctuation">&gt;</span></span>
        <span class="token tag"><span class="token tag"><span class="token punctuation">&lt;</span>TelerikGrid</span> <span class="token attr-name">Data</span><span class="token attr-value"><span class="token punctuation">=</span><span class="token punctuation">"</span>@events<span class="token punctuation">"</span></span>
                     <span class="token attr-name">Height</span><span class="token attr-value"><span class="token punctuation">=</span><span class="token punctuation">"</span>560px<span class="token punctuation">"</span></span>
                     <span class="token attr-name">Sortable</span><span class="token attr-value"><span class="token punctuation">=</span><span class="token punctuation">"</span>true<span class="token punctuation">"</span></span>
                     <span class="token attr-name">Resizable</span><span class="token attr-value"><span class="token punctuation">=</span><span class="token punctuation">"</span>true<span class="token punctuation">"</span></span>
                     <span class="token attr-name">Reorderable</span><span class="token attr-value"><span class="token punctuation">=</span><span class="token punctuation">"</span>true<span class="token punctuation">"</span></span>
                     <span class="token attr-name">Groupable</span><span class="token attr-value"><span class="token punctuation">=</span><span class="token punctuation">"</span>true<span class="token punctuation">"</span></span>                     
                     <span class="token attr-name">ShowColumnMenu</span><span class="token attr-value"><span class="token punctuation">=</span><span class="token punctuation">"</span>true<span class="token punctuation">"</span></span><span class="token punctuation">&gt;</span></span>
            <span class="token tag"><span class="token tag"><span class="token punctuation">&lt;</span>GridColumns</span><span class="token punctuation">&gt;</span></span>
                <span class="token tag"><span class="token tag"><span class="token punctuation">&lt;</span>GridColumn</span> <span class="token attr-name">Field</span><span class="token attr-value"><span class="token punctuation">=</span><span class="token punctuation">"</span>@nameof(AppEvent.Time)<span class="token punctuation">"</span></span> <span class="token attr-name">Title</span><span class="token attr-value"><span class="token punctuation">=</span><span class="token punctuation">"</span>Time<span class="token punctuation">"</span></span> <span class="token attr-name">Width</span><span class="token attr-value"><span class="token punctuation">=</span><span class="token punctuation">"</span>110px<span class="token punctuation">"</span></span> <span class="token punctuation">/&gt;</span></span>
                <span class="token tag"><span class="token tag"><span class="token punctuation">&lt;</span>GridColumn</span> <span class="token attr-name">Field</span><span class="token attr-value"><span class="token punctuation">=</span><span class="token punctuation">"</span>@nameof(AppEvent.Level)<span class="token punctuation">"</span></span> <span class="token attr-name">Title</span><span class="token attr-value"><span class="token punctuation">=</span><span class="token punctuation">"</span>Level<span class="token punctuation">"</span></span> <span class="token attr-name">Width</span><span class="token attr-value"><span class="token punctuation">=</span><span class="token punctuation">"</span>120px<span class="token punctuation">"</span></span><span class="token punctuation">&gt;</span></span>
                    <span class="token tag"><span class="token tag"><span class="token punctuation">&lt;</span>Template</span><span class="token punctuation">&gt;</span></span>
                        @{
                            var item = (AppEvent)context;
                        }
                        <span class="token tag"><span class="token tag"><span class="token punctuation">&lt;</span>span</span> <span class="token attr-name">class</span><span class="token attr-value"><span class="token punctuation">=</span><span class="token punctuation">"</span>badge rounded-pill @GetBadgeClass(item.Level) px-3 py-2<span class="token punctuation">"</span></span><span class="token punctuation">&gt;</span></span>@item.Level<span class="token tag"><span class="token tag"><span class="token punctuation">&lt;/</span>span</span><span class="token punctuation">&gt;</span></span>
                    <span class="token tag"><span class="token tag"><span class="token punctuation">&lt;/</span>Template</span><span class="token punctuation">&gt;</span></span>
                <span class="token tag"><span class="token tag"><span class="token punctuation">&lt;/</span>GridColumn</span><span class="token punctuation">&gt;</span></span>
                <span class="token tag"><span class="token tag"><span class="token punctuation">&lt;</span>GridColumn</span> <span class="token attr-name">Field</span><span class="token attr-value"><span class="token punctuation">=</span><span class="token punctuation">"</span>@nameof(AppEvent.Source)<span class="token punctuation">"</span></span> <span class="token attr-name">Title</span><span class="token attr-value"><span class="token punctuation">=</span><span class="token punctuation">"</span>Source<span class="token punctuation">"</span></span> <span class="token attr-name">Width</span><span class="token attr-value"><span class="token punctuation">=</span><span class="token punctuation">"</span>140px<span class="token punctuation">"</span></span> <span class="token punctuation">/&gt;</span></span>
                <span class="token tag"><span class="token tag"><span class="token punctuation">&lt;</span>GridColumn</span> <span class="token attr-name">Field</span><span class="token attr-value"><span class="token punctuation">=</span><span class="token punctuation">"</span>@nameof(AppEvent.Message)<span class="token punctuation">"</span></span> <span class="token attr-name">Title</span><span class="token attr-value"><span class="token punctuation">=</span><span class="token punctuation">"</span>Message<span class="token punctuation">"</span></span> <span class="token punctuation">/&gt;</span></span>
            <span class="token tag"><span class="token tag"><span class="token punctuation">&lt;/</span>GridColumns</span><span class="token punctuation">&gt;</span></span>
        <span class="token tag"><span class="token tag"><span class="token punctuation">&lt;/</span>TelerikGrid</span><span class="token punctuation">&gt;</span></span>
    <span class="token tag"><span class="token tag"><span class="token punctuation">&lt;/</span>div</span><span class="token punctuation">&gt;</span></span>
<span class="token tag"><span class="token tag"><span class="token punctuation">&lt;/</span>div</span><span class="token punctuation">&gt;</span></span>

@code {
    private List<span class="token tag"><span class="token tag"><span class="token punctuation">&lt;</span>AppEvent</span><span class="token punctuation">&gt;</span></span> events = new();
    private bool isConnected;
    private bool isStreaming = true;
    private int totalEventsReceived;
    private DotNetObjectReference<span class="token tag"><span class="token tag"><span class="token punctuation">&lt;</span>EventFeed</span><span class="token punctuation">&gt;</span></span>? dotNetRef;
    private IJSObjectReference? jsModule;
    private bool _jsInitialized;

    protected override async Task OnAfterRenderAsync(bool firstRender)
    {
        if (firstRender)
        {
            dotNetRef = DotNetObjectReference.Create(this);
                       
            jsModule = await JS.InvokeAsync<span class="token tag"><span class="token tag"><span class="token punctuation">&lt;</span>IJSObjectReference</span><span class="token punctuation">&gt;</span></span>("import", "./js/sse-demos.js");
                        
            await jsModule.InvokeVoidAsync("start", dotNetRef);
            
            _jsInitialized = true;
        }
    }

    [JSInvokable]
    public void OnEventReceived(AppEvent appEvent)
    {
        totalEventsReceived++;
        var updated = new List<span class="token tag"><span class="token tag"><span class="token punctuation">&lt;</span>AppEvent</span><span class="token punctuation">&gt;</span></span>(events);
        updated.Insert(0, appEvent);
        if (updated.Count &gt; 50)
            updated.RemoveRange(50, updated.Count - 50);
        events = updated;
        InvokeAsync(StateHasChanged);
    }

    [JSInvokable]
    public void OnConnectionChanged(bool connected)
    {
        isConnected = connected;
        InvokeAsync(StateHasChanged);
    }

    private async Task ToggleStreaming()
    {
        isStreaming = !isStreaming;
        
        if (jsModule is not null)
        {
            if (isStreaming)
                await jsModule.InvokeVoidAsync("start", dotNetRef);
            else
                await jsModule.InvokeVoidAsync("stop");
        }
    }

    private void ClearGrid()
    {
        events = new List<span class="token tag"><span class="token tag"><span class="token punctuation">&lt;</span>AppEvent</span><span class="token punctuation">&gt;</span></span>();
        StateHasChanged();
    }

    private string GetBadgeClass(string level) =&gt; level switch
    {
        "Info" =&gt; "bg-info text-dark",
        "Warning" =&gt; "bg-warning text-dark",
        "Error" =&gt; "bg-danger",
        "Success" =&gt; "bg-success",
        _ =&gt; "bg-secondary"
    };

    public async ValueTask DisposeAsync()
    {
        if (_jsInitialized &amp;&amp; jsModule is not null)
        {
            try
            {                
                await jsModule.InvokeVoidAsync("stop");
                                
                await jsModule.DisposeAsync();
            }
            catch
            {                
            }
        }
        dotNetRef?.Dispose();
    }

    public class AppEvent
    {
        public int Id { get; set; }
        public string Time { get; set; } = string.Empty;
        public string Level { get; set; } = string.Empty;
        public string Source { get; set; } = string.Empty;
        public string Message { get; set; } = string.Empty;
    }
}
</code></pre><p>In the previous code, there are some points to highlight:</p><ul><li><code>jsModule</code> dynamically loads the JS module.</li><li>The variable <code>dotNetRef</code> wraps the instance of the Blazor component that we will use inside the JS code.</li><li>The method <code>InvokeVoidAsync</code> is used both to start and to stop the event streaming.</li><li>The method <code>OnEventReceived</code> is invoked from the JS code each time an event is received. This allows updating the list <code>events</code> to show the new information in <code>TelerikGrid</code>.</li><li>The <code>OnConnectionChanged</code> method receives a connection status from the JS code to update the UI according to any change in the connection.</li></ul><p>With the new component ready, we can test the application, which looks like the following:</p><p><img src="https://www.telerik.com/sfimages/default-source/blogs/2026/2026-04/telerik-datagrid-sse-event-feed.gif?sfvrsn=58cc913a_2" alt="Telerik DataGrid receiving live SSE event feed" /></p><p>With this, we verify that everything works correctly. Also, thanks to the Blazor DataGrid capabilities, we can perform operations such as monitoring only those high-severity events:</p><p><img src="https://www.telerik.com/sfimages/default-source/blogs/2026/2026-04/timeline-grouped-events-view.png?sfvrsn=5ae1f10_2" alt="Timeline view of events grouped by day" /></p><p>With this we have a nice event viewer that monitors the status of multiple fictitious systems.</p><h2 id="conclusion">Conclusion</h2><p>Throughout this article you have learned about the SSE standard. You have also seen how changes introduced in .NET 10 help simplify the creation of SSE endpoints, enabling the creation of applications that send real-time events to clients. Now it&rsquo;s your turn to explore when you might use this web standard in your own projects. See you in the next article!</p><hr /><p>Try all this yourself with a free 30-day trial of Telerik UI for Blazor.</p><p><a href="https://www.telerik.com/try/ui-for-blazor" target="_blank" class="Btn">Try Now</a></p><img src="https://feeds.telerik.com/link/23050/17339197.gif" height="1" width="1"/>]]></content>
  </entry>
</feed>