<?xml version="1.0" encoding="UTF-8"?>
<?xml-stylesheet type="text/xsl" media="screen" href="/~files/atom-premium.xsl"?>
                                                                                                                                                                                                                                                                                                                                                                                                                                                                                                                                             
<feed xmlns="http://www.w3.org/2005/Atom" xmlns:feedpress="https://feed.press/xmlns" xmlns:media="http://search.yahoo.com/mrss/">
  <feedpress:locale>en</feedpress:locale>
  <feedpress:newsletterId>telerik-blogs/-net</feedpress:newsletterId>
  <link rel="hub" href="http://feedpress.superfeedr.com/"/>
  <logo>https://static.feedpress.com/logo/telerik-blogs---net-5ab3c43252b20.jpg</logo>
  <title type="text">Telerik Blogs | .NET</title>
  <subtitle type="text">The official blog of Progress Telerik - expert articles and tutorials for .NET developers.</subtitle>
  <id>uuid:01438af8-2562-4bf5-9b1a-ba4e7445797b;id=68</id>
  <updated>2022-06-30T14:06:13Z</updated>
  <contributor>
    <name>Kamen Velikov </name>
  </contributor>
  <contributor>
    <name>Joseph Guadagno </name>
  </contributor>
  <contributor>
    <name>Sam Basu </name>
  </contributor>
  <contributor>
    <name>Yana Kerpecheva </name>
  </contributor>
  <contributor>
    <name>Dave Brock </name>
  </contributor>
  <contributor>
    <name>Assis Zang </name>
  </contributor>
  <contributor>
    <name>Dobrinka Yordanova </name>
  </contributor>
  <contributor>
    <name>Carl Bergenhem </name>
  </contributor>
  <contributor>
    <name>Maria Veledinova </name>
  </contributor>
  <link rel="alternate" href="https://www.telerik.com/"/>
  <link rel="self" type="application/atom+xml" href="https://feeds.telerik.com/blogs/.net"/>
  <entry>
    <id>urn:uuid:0aca0cb8-a9c3-4958-8f29-487e6fc9b342</id>
    <title type="text">What’s New in Unite UX 1.4.0 and 1.5.0</title>
    <summary type="text">The new Unite UX release is here, bringing commenting functionality, performance optimizations and more.</summary>
    <published>2021-12-21T14:50:59Z</published>
    <updated>2022-06-30T14:06:13Z</updated>
    <author>
      <name>Kamen Velikov </name>
    </author>
    <link rel="alternate" href="https://feeds.telerik.com/link/10825/15057268/whats-new-unite-ux-140-150"/>
    <content type="text"><![CDATA[<p>There were two Unite UX releases in the past month that bring commenting functionality, guided onboarding, performance optimizations and much more.</p>
<h2>Commenting Functionality</h2>
<p><img src="https://d585tldpucybw.cloudfront.net/sfimages/default-source/default-album/1-4-0---1.png?sfvrsn=2fa6abf2_0" data-displaymode="Original" alt="Comments" title="1.4.0 - 1"> </p>
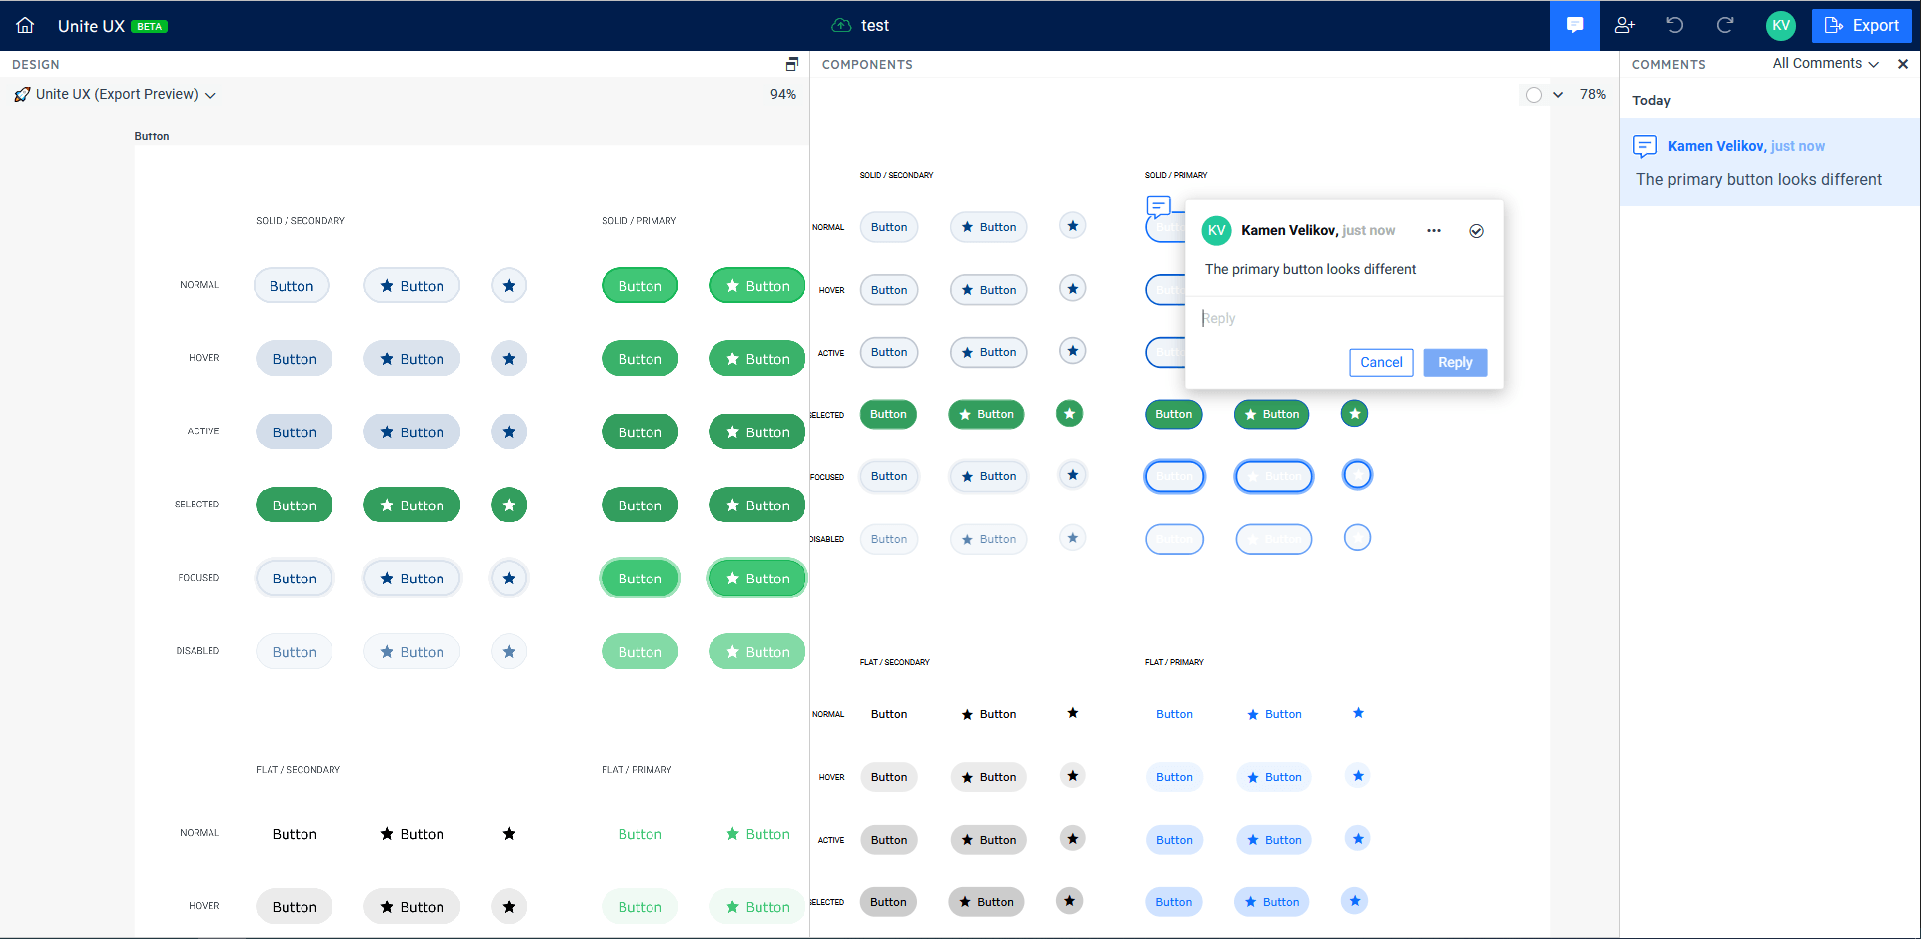
<p>With this release, we&rsquo;re introducing the commenting functionality that extends the collaborative capabilities of Unite UX. Now you don&rsquo;t have to leave the app to give feedback about the design or the implementation of your components. Just click on the spot and leave your thoughts. Use @ to mention anyone that has access to your project to notify them via email. Resolve the threads that are already fixed and build your design system just as intended.</p>
<h2>Onboarding</h2>
<p><img src="https://d585tldpucybw.cloudfront.net/sfimages/default-source/default-album/1-5-0---1.png?sfvrsn=27cd9439_0" data-displaymode="Original" alt="1.5.0 - 1" title="1.5.0 - 1"></p>
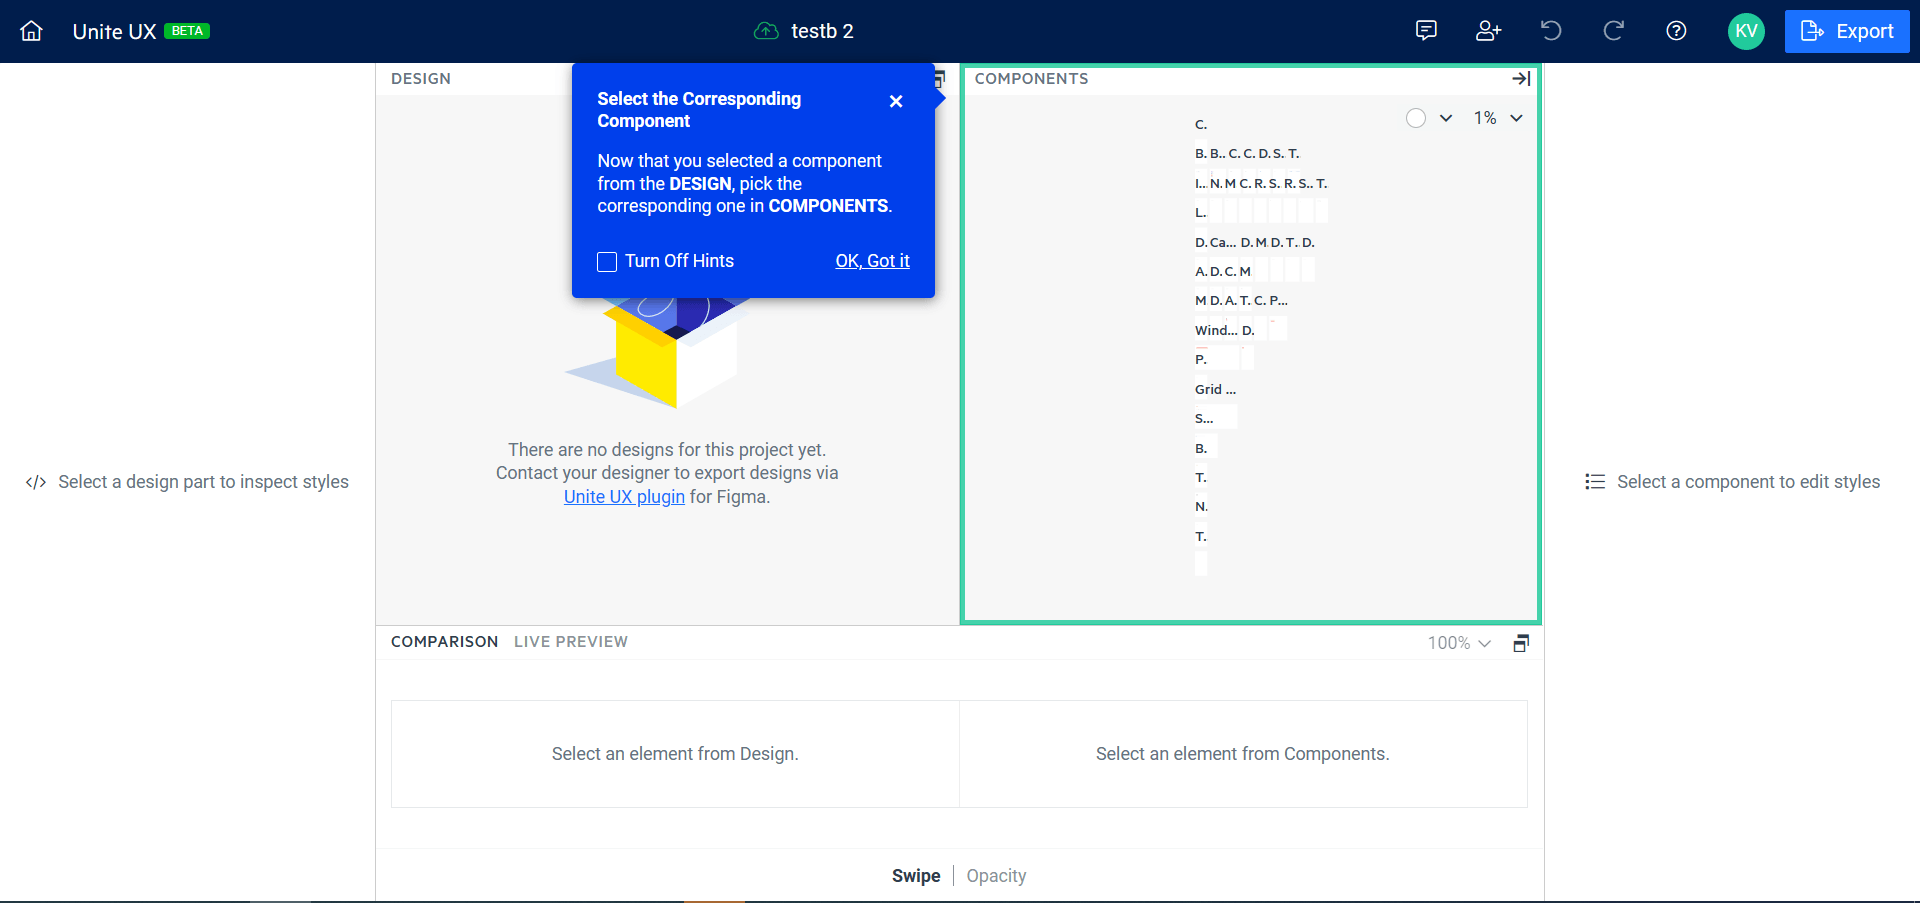
<p>The new Unite UX comes with some predefined flows that explain in detail how to get started using the product. You will see guided tutorials, tips and tricks and key functionalities, highlighted to help you get most of the product in no time. So, make sure not to skip it, but even if you do, you can always go back to it using the &lsquo;?&rsquo; button in the toolbar.</p>
<h2>Link functionality</h2>
<p><img src="https://d585tldpucybw.cloudfront.net/sfimages/default-source/default-album/1-5-0---2.png?sfvrsn=3155e784_0" data-displaymode="Original" alt="1.5.0 - 2" title="1.5.0 - 2"></p>
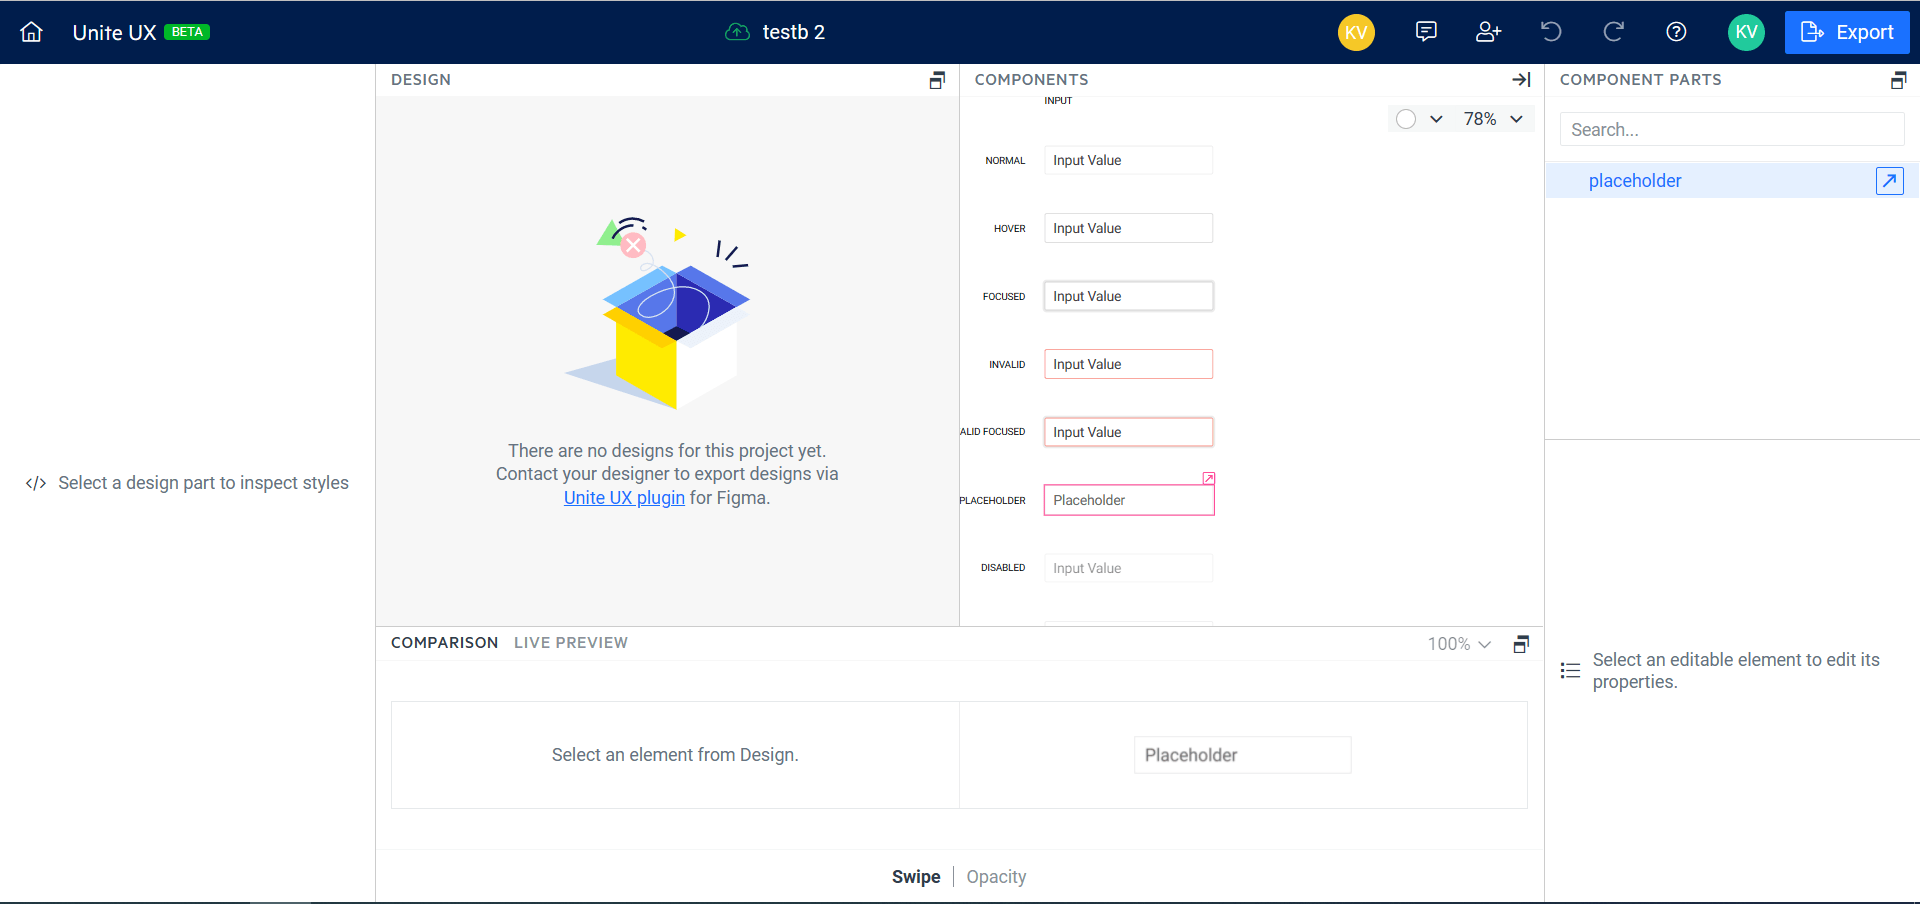
<p> The 1.5.0 release brings a new type of component parts&mdash;links. Sometimes, the components are complex and some of the parts are hidden in the components tree. To improve the visibility of some parts and at the same time preserve the top-right to bottom-left styling from one place algorithm, we&rsquo;ve extracted such parts and visualize them as links to their original parts where they can be edited. This will improve the overall visibility of the parts and preserve the natural way of styling things.</p>
<h2>Performance Optimizations </h2>
<p><img src="https://d585tldpucybw.cloudfront.net/sfimages/default-source/default-album/microsoftteams-image-(7).png?sfvrsn=f6d119c3_0" data-displaymode="Original" alt="Performance" title="MicrosoftTeams-image (7)"></p>
<p>The performance of the Unite UX is of highest importance for the team. With this release, we managed to locate and fix some bottlenecks, making the app blazing fast. No more endless loading indicator&mdash;everything will load before you know it. </p>
<h2>New Component Templates</h2>
<p>The 1.5.0 release includes 2 new components: The Card and the TextArea in the list of supported components. At the same time, we&rsquo;ve optimized the existing component parts to be more intuitive and easier to style&mdash;we have included the No Records template for the grid and redesigned the Button Group templates. And last but not least, all common drop-down (popup, list and items) templates are extracted to separate page in order to be styled globally.</p>
<h2>Various Bug Fixes</h2>
<p>Performance and quality come hand in hand. That&rsquo;s why we&rsquo;re always trying to fix as many things as we can&mdash;especially the things that are reported from our users. Here are the things we&rsquo;ve fixed in the 1.4.0 release:</p>
<ul>
    <li>Some component states cannot be styled</li>
    <li>Font detection doesn&rsquo;t work with some (icon) fonts</li>
    <li>Cannot change the color of the circle in Radio button</li>
    <li>Icon styles are not exported correctly</li>
    <li>Improved Font export performance</li>
    <li>Other minor fixes</li>
</ul>
<h2>Get your Unite UX Trial</h2>
<p>If you still haven&rsquo;t had the chance to try Unite UX, you can start your <a href="https://www.telerik.com/unite-ux/trial" target="_blank">21-day trial now</a>.</p><img src="https://feeds.telerik.com/link/10825/15057268.gif" height="1" width="1"/>]]></content>
  </entry>
  <entry>
    <id>urn:uuid:00826261-c4ee-4b01-a412-47dc754cea9b</id>
    <title type="text">What’s New With Visual Studio 2022</title>
    <summary type="text">This release adds a ton of new features and capabilities to the IDE. Now is a great time to start learning about them.</summary>
    <published>2021-12-15T09:52:01Z</published>
    <updated>2022-06-30T14:06:13Z</updated>
    <author>
      <name>Joseph Guadagno </name>
    </author>
    <link rel="alternate" href="https://feeds.telerik.com/link/10825/15057269/whats-new-visual-studio-2022"/>
    <content type="text"><![CDATA[<p><span class="featured">See what new features your favorite IDE has brought in this major release.</span></p>
<p>Visual Studio has had its first major release in about 18 months (depending on how you look at it).  This release adds a ton of new features and capabilities to the IDE. Now, is a great time to start learning about them.</p>
<h2 id="updated-user-interface">Updated User Interface</h2>
<p>The user experience of the IDE has been updated to be more consistent and more user friendly. This includes new icons, new fonts, new personalization and more.</p>
<ul>
    <li><a href="https://github.com/microsoft/cascadia-code#welcome" target="_blank">Cascadia Code</a> font is now the default font for the editor.</li>
    <li>Visual Studio now integrates with <a href="https://accessibilityinsights.io/" target="_blank">Accessibility Insights</a> to help you find accessibility issues in your code.</li>
</ul>
<h3 id="new-icons">New Icons</h3>
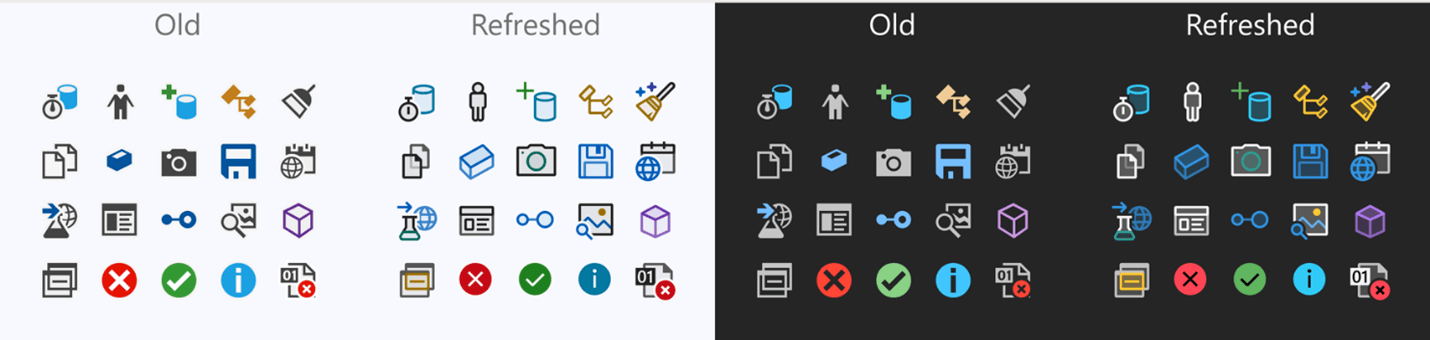
<p>The icons have been updated to be consistent across different icons while remaining legible and familiar to the user.</p>
<p><img src="https://www.telerik.com/sfimages/default-source/blogs/2021/2021-12/vs2022-icon-refresh.png" alt="Visual Studio 2022 - Icon Refresh" title="Visual Studio 2022 - Icon Refresh"></p>
<h3 id="theme-support">Theme Support</h3>
<p>You&rsquo;ve probably noticed in the image above that there are icons for a light and dark theme. While themes are not new to Visual Studio, Visual Studio now offers you the ability to sync your Visual Studio theme with your operating system theme.</p>
<p>The dark theme has been updated also to better align with the Microsoft design guidelines and improve accessibility.</p>
<p>Visual Studio now includes a <a href="https://github.com/microsoft/theme-converter-for-vs" target="_blank">Theme Converter</a>, which converts Visual Studio Code themes to Visual Studio themes.</p>
<h3 id="inlay-hints">Inlay Hints</h3>
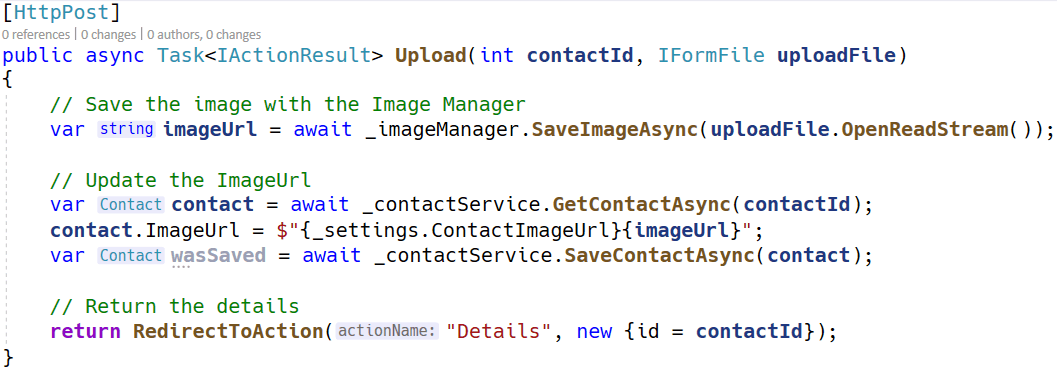
<p>Visual Studio now includes inlay hints for code completion, code lens and more. Inlay hints can display parameter name hints for literals, function calls and more.</p>
<p><img src="https://d585tldpucybw.cloudfront.net/sfimages/default-source/blogs/2021/2021-12/vs2022-inlay-hints.png" alt="Visual Studio 2022 - Inlay Hints" title="Visual Studio 2022 - Inlay Hints"></p>
<p>In this image, you can see that Visual Studio tells you that the type for variable <code>imageUrl</code> is <code>string</code> and <code>contact</code> is of type <code>Contact</code>.  Further down the image, the <code>RedirectToAction</code> method has a parameter named <code>actionName</code>, which this sample is using the <code>Details</code> action.</p>
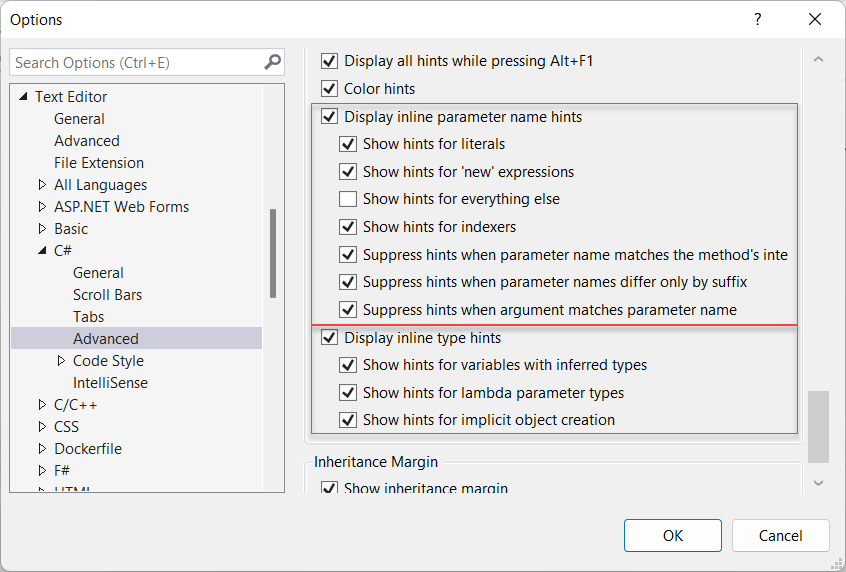
<p>Note, this feature is not on by default. You can enable it by going to the <strong>Tools &gt; Options &gt; Text Editor &gt; C# or Basic &gt; Advanced</strong> then select <strong>Inlay Hints</strong>.</p>
<p><img src="https://d585tldpucybw.cloudfront.net/sfimages/default-source/blogs/2021/2021-12/vs2022-inlay-options.png" alt="Visual Studio 2022 - Inlay Options" title="Visual Studio 2022 - Inlay Options"></p>
<h2 id="speeding-up-visual-studio">Speeding Up Visual Studio</h2>
<p>You might be saying that all these user interfaces are nice, but Visual Studio is slow enough already. Well, that might have been the case for earlier versions of Visual Studio, but that is not the case for Visual Studio 2022.</p>
<p>It&rsquo;s faster in part now that Visual Studio 2022 is a 64-bit application. This means that the main process (devenv.exe) is no longer limited to 4GB of memory. Now Visual Studio can load larger projects and load more projects at once. You&rsquo;ll also avoid the &ldquo;out of memory&rdquo; errors that Visual Studio was seeing before when opening large solutions, files or objects into memory.</p>
<p>Solution loading and file searching is now faster as well. Visual Studio now stores additional information about the solution in the .sln file. This information is used to speed up the loading of the solution. This information is also used to speed up the file searching.</p>
<aside>
<hr>
<div class="row">
<div class="col-4 u-normal-full u-small-mb0">
<h4 class="u-fs20 u-fw5 u-lh125 u-mb0">
What Was Added To <br>
C# 10</h4>
</div>
<div class="col-8">
<p class="u-fs16 u-mb0">
In case you missed it, <a href="https://www.telerik.com/blogs/what-was-added-csharp-10" target="_blank">here are some of Joe&rsquo;s favorite new features in C# 10 and how he imagines using them</a>.
</p>
</div>
</div>
<hr class="u-mb3">
</aside>
<p>To continue on the speeding-up Visual Studio theme, Microsoft also improved the <em><a href="https://github.com/dotnet/project-system/blob/main/docs/up-to-date-check.md" target="_blank">Fast up to date</a></em> feature to better check to see if a project or its dependencies are up to date or need to be rebuilt.</p>
<h2 id="new-debugging-features">New Debugging Features</h2>
<p>Visual Studio 2022 has added and enhanced the debugging features of Visual Studio.</p>
<h3 id="breakpoints">Breakpoints</h3>
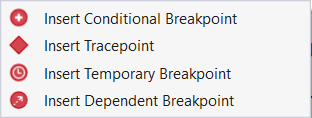
<p>Let&rsquo;s talk about breakpoints first. There are two new breakpoints that you can set in Visual Studio&mdash;temporary and dependent breakpoints&mdash;as shown in the image below.</p>
<p><img src="https://d585tldpucybw.cloudfront.net/sfimages/default-source/blogs/2021/2021-12/vs2022-debug-menu.png" alt="Visual Studio 2022 - Debug Breakpoint Menu" title="Visual Studio 2022 - Debug Breakpoint Menu"></p>
<p>The <a href="https://docs.microsoft.com/en-us/visualstudio/debugger/using-breakpoints?view=vs-2022#BKMK_set_a_temporary_breakpoint?WT.mc_id=AZ-MVP-4024623" target="_blank">Temporary breakpoint</a> is used to set a breakpoint that will only break once.  Once Visual Studio hits that breakpoint, it deletes it. This is helpful if you want to set a breakpoint only to validate that something is working, and you aren&rsquo;t debugging the code.</p>
<p>The <a href="https://docs.microsoft.com/en-us/visualstudio/debugger/using-breakpoints?view=vs-2022#BKMK_set_a_dependent_breakpoint?WT.mc_id=AZ-MVP-4024623" target="_blank">Dependent breakpoint</a> is used to set a breakpoint that will only break when another breakpoint is hit.</p>
<h3 id="force-run-to-cursor">Force Run To Cursor</h3>
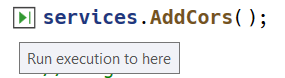
<p>Previous versions of Visual Studio added a feature called &ldquo;Run to Cursor.&rdquo; This feature was used to execute code up to the code at the cursor.</p>
<p><img src="https://d585tldpucybw.cloudfront.net/sfimages/default-source/blogs/2021/2021-12/vs2022-run-to-cursor.png" alt="Visual Studio 2022 - Run to Cursor" title="Visual Studio 2022 - Run to Cursor"></p>
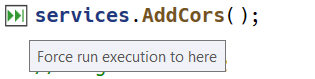
<p>However, if you had any breakpoints between where you were and where you wanted to run to, Visual Studio would stop at all those breakpoints. Now with <em>Force Run To Cursor</em>, you can run to the cursor without hitting any breakpoints. If you hold the shift key down while hovering over the <em>Run to Cursor</em> glyph, Visual Studio will change the glyph to a <em>Force Run To Cursor</em> glyph and will run to the cursor without hitting any breakpoints.</p>
<p><img src="https://d585tldpucybw.cloudfront.net/sfimages/default-source/blogs/2021/2021-12/vs2022-force-run-to-cursor.png" alt="Visual Studio 2022 - Force Run to Cursor" title="Visual Studio 2022 - Force Run to Cursor"></p>
<p>The <em>Force Run to Cursor</em> is also available in the <em>Debug</em> menu.</p>
<h3 id="other-debugging-features">Other Debugging Features</h3>
<p>For more on breakpoints or debugging tips and tricks in Visual Studio, check out this video:</p>
<p><iframe width="560" height="315" src="https://www.youtube.com/embed/otR7E-1Vg5s" title="YouTube video player"></iframe></p>
<h2 id="intellicode">IntelliCode</h2>
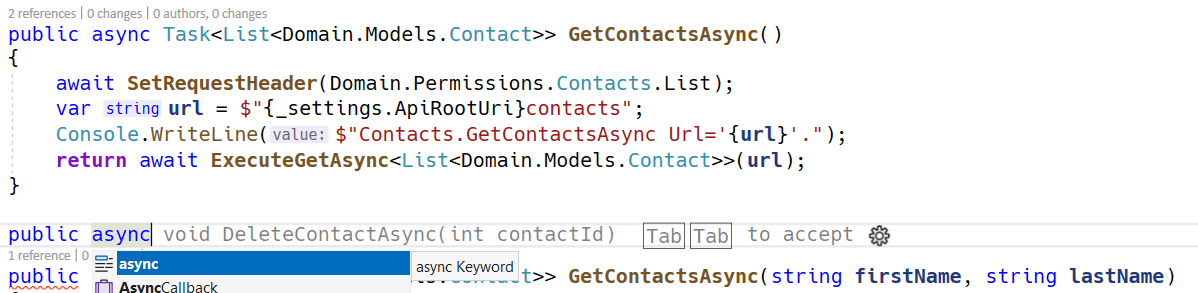
<p>IntelliCode improves IntelliSense by using AI to help you find the right code completion. IntelliCode is context-aware and will help you find the right code completion when you are typing a method call, a property or a variable.</p>
<p>In the image below, I start to create a new method after the <code>GetContactsAsync</code> method. After I type <code>public async</code>, IntelliCode is inferring that I want to create a <code>DeleteContactAsync</code> method with a parameter of type <code>contactId</code>. If that is what I want, I can hit the <code>Tab</code> key twice to insert the suggestion.</p>
<p><img src="https://d585tldpucybw.cloudfront.net/sfimages/default-source/blogs/2021/2021-12/vs2022-intellicode-suggestion.png" alt="Visual Studio 2022 - IntelliCode suggestion" title="Visual Studio 2022 - IntelliCode suggestion"></p>
<h2 id="git-support">Git Support</h2>
<p>We now have multiple-repository support, which includes the ability to track changes across all the repositories in a project. If you open a solution that has multiple Git repositories in it, Visual Studio will connect/activate those repositories. Right now, this is limited to a max of 10 repositories.</p>
<p>You will be able to tell if Visual Studio has connected to or activated your different Git repositories by looking at the repository picker on the status bar (located at the lower right corner), which will tell you the number of active repositories you have.</p>
<p>The Git integration with Visual Studio has been improved and include support for multiple repositories, including improvements to both the Solution Explorer and Code Editors.</p>
<h2 id="hot-reload">Hot Reload</h2>
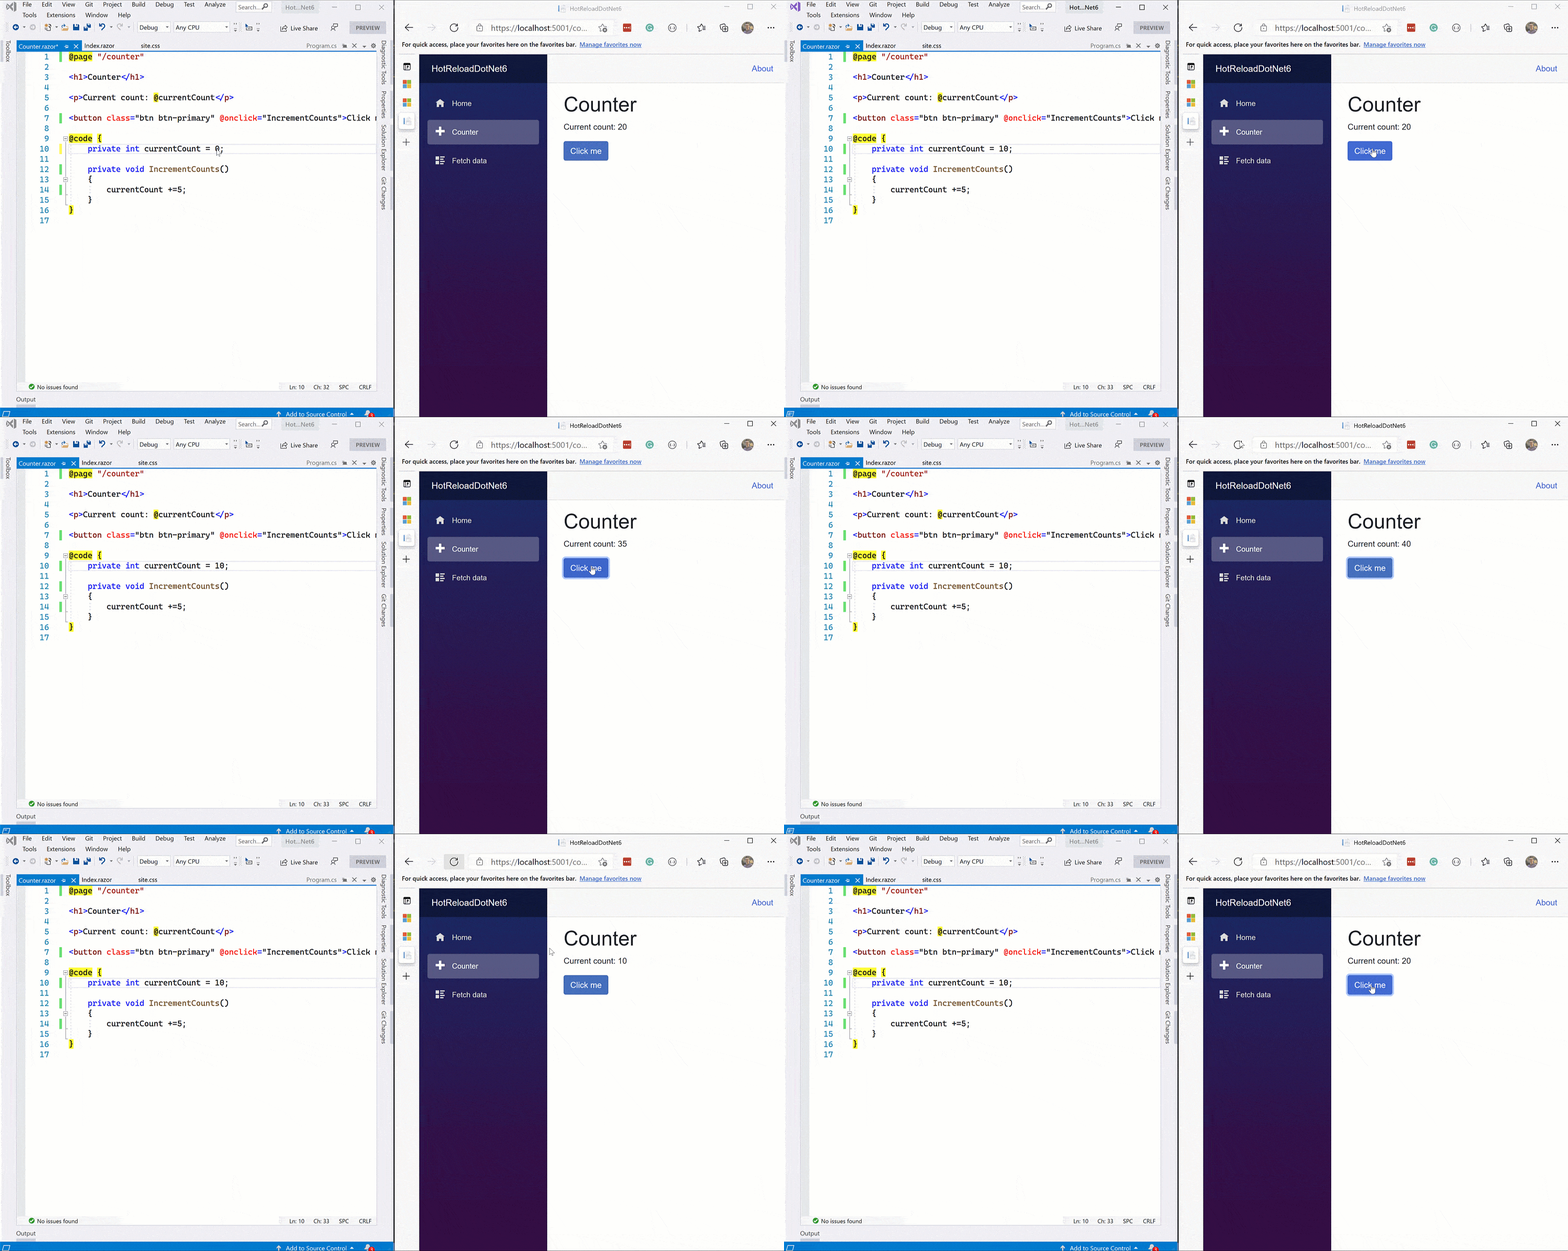
<p><a href="https://devblogs.microsoft.com/dotnet/update-on-net-hot-reload-progress-and-visual-studio-2022-highlights/?WT.mc_id=AZ-MVP-4024623" target="_blank">Hot Reload</a> is a feature of Visual Studio that allows you to modify your application&rsquo;s managed code while that application is running without the need to hit a breakpoint or pause the application. This is a cool feature that will save you a lot of time without pausing or stopping your application to see how the source code changes you made changed your application.</p>
<p>However, the support for this feature is still in progress. There are some scenarios and products that are not yet supported.</p>
<h2 id="coming-soon-to-mac">Coming Soon to Mac</h2>
<p>Visual Studio 2022 for Mac is coming. The Visual Studio team wants to make a modern .NET IDE tailored for the Mac that will look familiar to those using Visual Studio for Windows while using native macOS UI. For more on the Visual Studio 2022 for Mac and/or to join the private beta, please visit <a href="https://devblogs.microsoft.com/visualstudio/join-the-visual-studio-2022-for-mac-private-preview" target="_blank">here</a>.</p>
<h2 id="bye-bye-.net-5">Bye Bye .NET 5</h2>
<p>While technically not released with Visual Studio 2022, Microsoft released .NET 6 at the same time and includes the .NET 6 SDK in the Visual Studio installation. So now is the time to start migrating your .NET 5, and earlier, projects to .NET 6. As Barry Dorrans <a href="https://twitter.com/blowdart" target="_blank">@blowdart</a> points <a href="https://twitter.com/blowdart/status/1457819844858945537" target="_blank">out</a>, .NET 5 moves to end of life in May of 2022.</p>
<p>Some more details on the support policy for .NET are below.</p>
<h3 id="supported-versions">Supported Versions</h3>
<table class="telerik-reTable-2">
    <thead>
        <tr class="telerik-reTableHeaderRow-2">
            <th class="telerik-reTableHeaderEvenCol-2"><strong>Version</strong></th>
            <th class="telerik-reTableHeaderOddCol-2"><strong>Original Release Date</strong></th>
            <th class="telerik-reTableHeaderEvenCol-2"><strong>Latest Patch Version</strong></th>
            <th class="telerik-reTableHeaderOddCol-2"><strong>Patch Release Date</strong></th>
            <th class="telerik-reTableHeaderEvenCol-2"><strong>Support Level</strong></th>
            <th class="telerik-reTableHeaderOddCol-2"><strong>End of Support</strong></th>
        </tr>
    </thead>
    <tbody>
        <tr class="telerik-reTableOddRow-2">
            <td class="telerik-reTableEvenCol-2">.NET 6</td>
            <td class="telerik-reTableOddCol-2">November 08, 2021</td>
            <td class="telerik-reTableEvenCol-2">6.0.0</td>
            <td class="telerik-reTableOddCol-2">November 08, 2021</td>
            <td class="telerik-reTableEvenCol-2">LTS</td>
            <td class="telerik-reTableOddCol-2">November 08, 2024</td>
        </tr>
        <tr class="telerik-reTableEvenRow-2">
            <td class="telerik-reTableEvenCol-2">.NET 5</td>
            <td class="telerik-reTableOddCol-2">November 10, 2020</td>
            <td class="telerik-reTableEvenCol-2">5.0.12</td>
            <td class="telerik-reTableOddCol-2">November 08, 2021</td>
            <td class="telerik-reTableEvenCol-2">Current</td>
            <td class="telerik-reTableOddCol-2">May 08, 2022</td>
        </tr>
        <tr class="telerik-reTableOddRow-2">
            <td class="telerik-reTableEvenCol-2">.NET Core 3.1</td>
            <td class="telerik-reTableOddCol-2">December 3, 2019</td>
            <td class="telerik-reTableEvenCol-2">3.1.21</td>
            <td class="telerik-reTableOddCol-2">November 08, 2021</td>
            <td class="telerik-reTableEvenCol-2">LTS</td>
            <td class="telerik-reTableOddCol-2">December 3, 2022</td>
        </tr>
    </tbody>
</table>
<style type="text/css" id="telerik-reTable-2">
    .telerik-reTable-2 {
    border-collapse: collapse;
    border: solid 0px;
    font-family: Tahoma;
    }
    .telerik-reTable-2 tr.telerik-reTableHeaderRow-2 {
    border-width: 1.0pt 1.0pt 3.0pt 1.0pt;
    margin-top: 0in;
    margin-right: 0in;
    margin-bottom: 10.0pt;
    margin-left: 0in;
    line-height: 115%;
    font-size: 11.0pt;
    font-family: "Calibri", "sans-serif";
    width: 119.7pt;
    border: solid white 1.0pt;
    border-bottom: solid white 3.0pt;
    background: #4F81BD;
    padding: 0in 5.4pt 0in 5.4pt;
    color: #FFFFFF;
    }
    .telerik-reTable-2 td.telerik-reTableHeaderFirstCol-2 {
    border-width: 1.0pt 1.0pt 3.0pt 1.0pt;
    border: solid white 1.0pt;
    border-bottom: solid white 3.0pt;
    padding: 0in 5.4pt 0in 5.4pt;
    }
    .telerik-reTable-2 td.telerik-reTableHeaderLastCol-2 {
    border-width: 1.0pt 1.0pt 3.0pt 1.0pt;
    border: solid white 1.0pt;
    border-bottom: solid white 3.0pt;
    padding: 0in 5.4pt 0in 5.4pt;
    }
    .telerik-reTable-2 td.telerik-reTableHeaderOddCol-2 {
    border-width: 1.0pt 1.0pt 3.0pt 1.0pt;
    border: solid white 1.0pt;
    border-bottom: solid white 3.0pt;
    padding: 0in 5.4pt 0in 5.4pt;
    }
    .telerik-reTable-2 td.telerik-reTableHeaderEvenCol-2 {
    border-width: 1.0pt 1.0pt 3.0pt 1.0pt;
    border: solid white 1.0pt;
    border-bottom: solid white 3.0pt;
    padding: 0in 5.4pt 0in 5.4pt;
    }
    .telerik-reTable-2 tr.telerik-reTableOddRow-2 {
    color: #666666;
    background-color: #F2F3F4;
    font-size: 10pt;
    vertical-align: top;
    }
    .telerik-reTable-2 tr.telerik-reTableEvenRow-2 {
    color: #666666;
    background-color: #E7EBF7;
    font-size: 10pt;
    vertical-align: top;
    }
    .telerik-reTable-2 td.telerik-reTableFirstCol-2 {
    margin-top: 0in;
    margin-right: 0in;
    margin-bottom: 10.0pt;
    margin-left: 0in;
    line-height: 115%;
    font-size: 11.0pt;
    font-family: "Calibri", "sans-serif";
    width: 119.7pt;
    border-top: none;
    border-left: solid white 1.0pt;
    border-bottom: none;
    border-right: solid white 3.0pt;
    background: #4F81BD;
    padding: 0in 5.4pt 0in 5.4pt;
    color: #FFFFFF;
    }
    .telerik-reTable-2 td.telerik-reTableLastCol-2 {
    padding: 0in 5.4pt 0in 5.4pt;
    }
    .telerik-reTable-2 td.telerik-reTableOddCol-2 {
    padding: 0in 5.4pt 0in 5.4pt;
    }
    .telerik-reTable-2 td.telerik-reTableEvenCol-2 {
    padding: 0in 5.4pt 0in 5.4pt;
    }
    .telerik-reTable-2 tr.telerik-reTableFooterRow-2 {
    color: #666666;
    background-color: #FFFFFF;
    font-size: 10pt;
    vertical-align: top;
    padding: 0in 5.4pt 0in 5.4pt;
    }
    .telerik-reTable-2 td.telerik-reTableFooterFirstCol-2 {
    margin-top: 0in;
    margin-right: 0in;
    margin-bottom: 10.0pt;
    margin-left: 0in;
    line-height: 115%;
    font-size: 11.0pt;
    font-family: "Calibri", "sans-serif";
    width: 119.7pt;
    border-top: none;
    border-left: solid white 1.0pt;
    border-bottom: none;
    border-right: solid white 3.0pt;
    background: #4F81BD;
    padding: 0in 5.4pt 0in 5.4pt;
    color: #FFFFFF;
    }
    .telerik-reTable-2 td.telerik-reTableFooterLastCol-2 {
    padding: 0in 5.4pt 0in 5.4pt;
    }
    .telerik-reTable-2 td.telerik-reTableFooterOddCol-2 {
    padding: 0in 5.4pt 0in 5.4pt;
    }
    .telerik-reTable-2 td.telerik-reTableFooterEvenCol-2 {
    padding: 0in 5.4pt 0in 5.4pt;
    }
</style>
<br>
<p><em>Source:</em> <a href="https://dotnet.microsoft.com/platform/support/policy/dotnet-core" target="_blank">.NET Support Policy</a></p>
<h2 id="wrap-up">Wrap-up</h2>
<p>So, what&rsquo;s stopping you from upgrading your IDE and version of .NET?</p><img src="https://feeds.telerik.com/link/10825/15057269.gif" height="1" width="1"/>]]></content>
  </entry>
  <entry>
    <id>urn:uuid:a4612d10-4513-43ea-a5df-f8fd8490abe6</id>
    <title type="text">Sands of MAUI: Issue #37</title>
    <summary type="text">Welcome to the Sands of MAUI—newsletter-style issues dedicated to bringing together latest .NET MAUI content relevant to developers.</summary>
    <published>2021-12-13T14:44:55Z</published>
    <updated>2022-06-30T14:06:13Z</updated>
    <author>
      <name>Sam Basu </name>
    </author>
    <link rel="alternate" href="https://feeds.telerik.com/link/10825/15057270/sands-maui-issue-37"/>
    <content type="text"><![CDATA[<p><span class="featured">Welcome to the Sands of MAUI&mdash;newsletter-style issues dedicated to bringing together latest .NET MAUI content relevant to developers.</span></p>
<p>A particle of sand&mdash;tiny and innocuous. But put a lot of sand particles together and we have something big&mdash;a force to reckon with. It is the smallest grains of sand that often add up to form massive beaches, dunes and deserts.</p>
<p>Most .NET developers are looking forward to .NET Multi-platform App UI (<a href="https://github.com/dotnet/maui" target="_blank">MAUI</a>)&mdash;the evolution of Xamarin.Forms with .NET 6. Going forward, developers should have much more confidence in the technology stack and tools as .NET MAUI empowers native cross-platform solutions on mobile and desktop.</p>
<p>While it is a long flight until we reach the sands of MAUI, developer excitement is palpable in all the news/content as we tinker and prepare for .NET MAUI. Like the grains of sand, every piece of news/article/video/tutorial/stream contributes towards developer knowledge and we grow a community/ecosystem willing to learn and help.</p>
<p>Sands of MAUI is a humble attempt to collect all the .NET MAUI awesomeness in one place. Here's what is noteworthy for the week of <strong>December 13, 2021</strong>:</p>
<h2 id="toc_1">.NET Podcast App</h2>
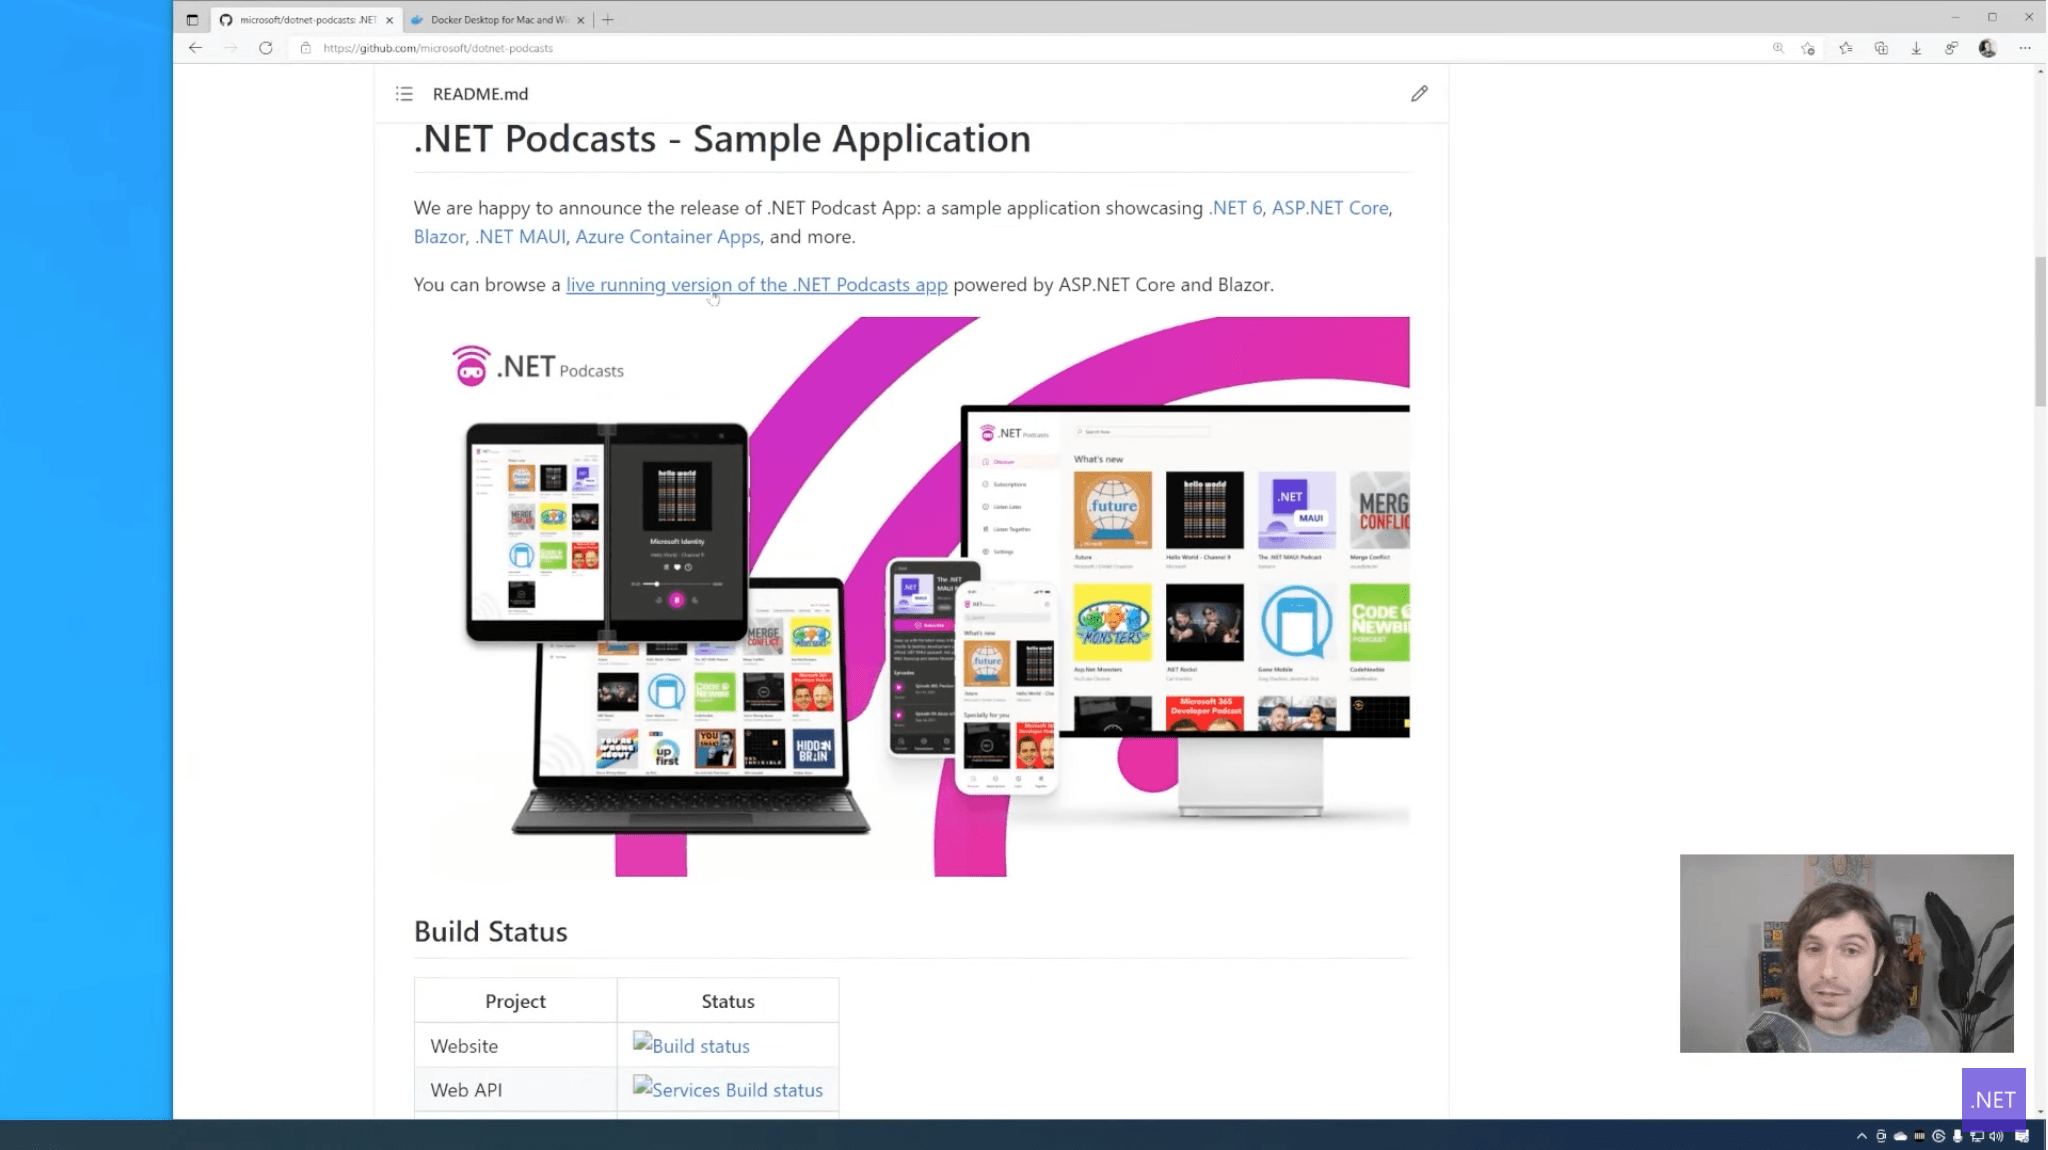
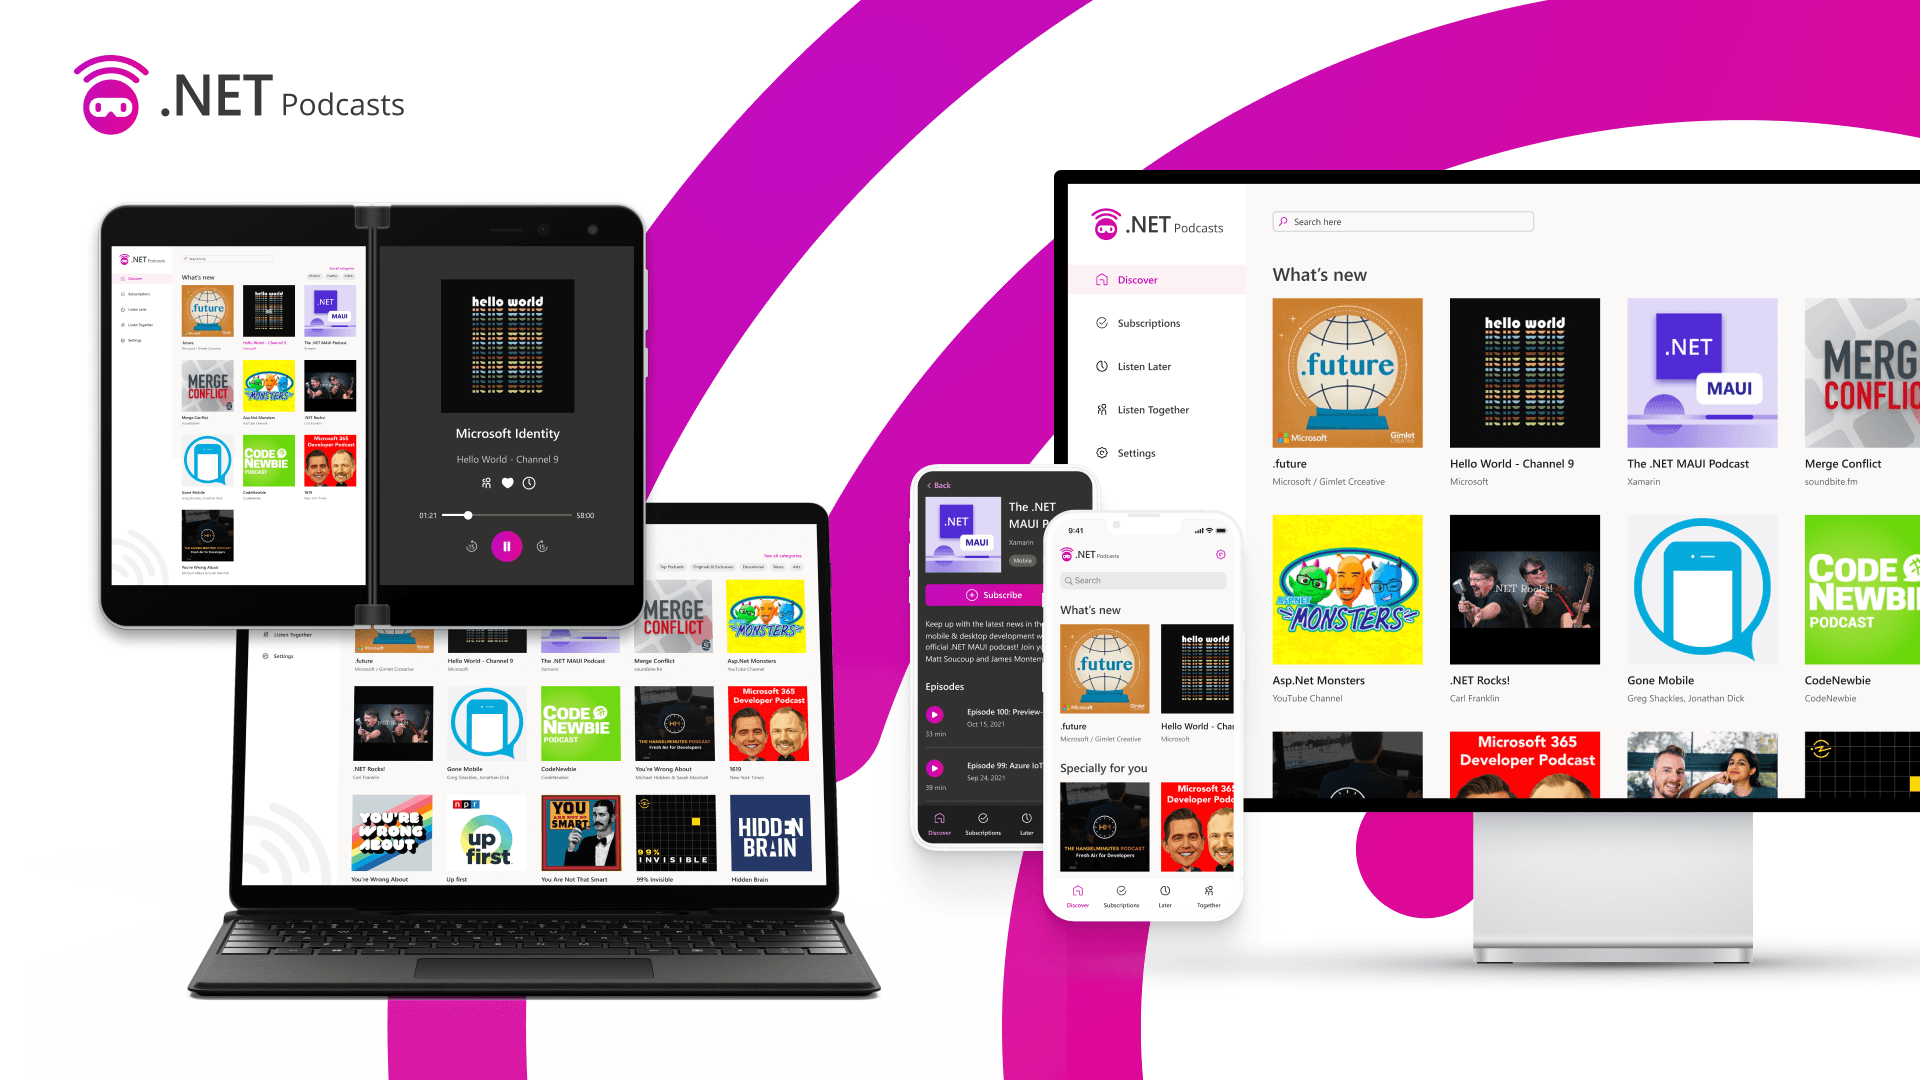
<p>The .NET Podcast app was a cornerstone demo during .NET Conf&mdash;a unified app running on multiple platforms and showcasing the flexibility of code sharing across Blazor, .NET MAUI and ASP.NET Core. The source code for the .NET Podcast app was recently open sourced, but running it locally involved a few steps&mdash;who knew a real world app had some moving pieces and architectural dependencies.</p>
<p><a href="https://twitter.com/JamesMontemagno" target="_blank">James Montemagno</a> produced a video showcasing <a href="https://www.youtube.com/watch?v=FJowBj-DBgI" target="_blank">local development walkthrough with the .NET Podcast app</a>&mdash;a how-to guide on grabbing source code and running the app locally. </p>
<p>Aside from .NET MAUI and Blazor code, the .NET Podcast app has Azure Container Service dependencies, uses GitHub Actions and utilizes backend APIs powered by ASP.NET Core. This is a great real-world sample app perfect for developer exploration and James shows how to have the full end-to-end demo running on developer local machine. </p>
<p><img src="https://d585tldpucybw.cloudfront.net/sfimages/default-source/default-album/dotnetpodcastapp.png?sfvrsn=bff054e2_0" data-displaymode="Original" alt="DotNetPodcastApp" title="DotNetPodcastApp"> </p>
<h2 id="toc_2">Hot Restart</h2>
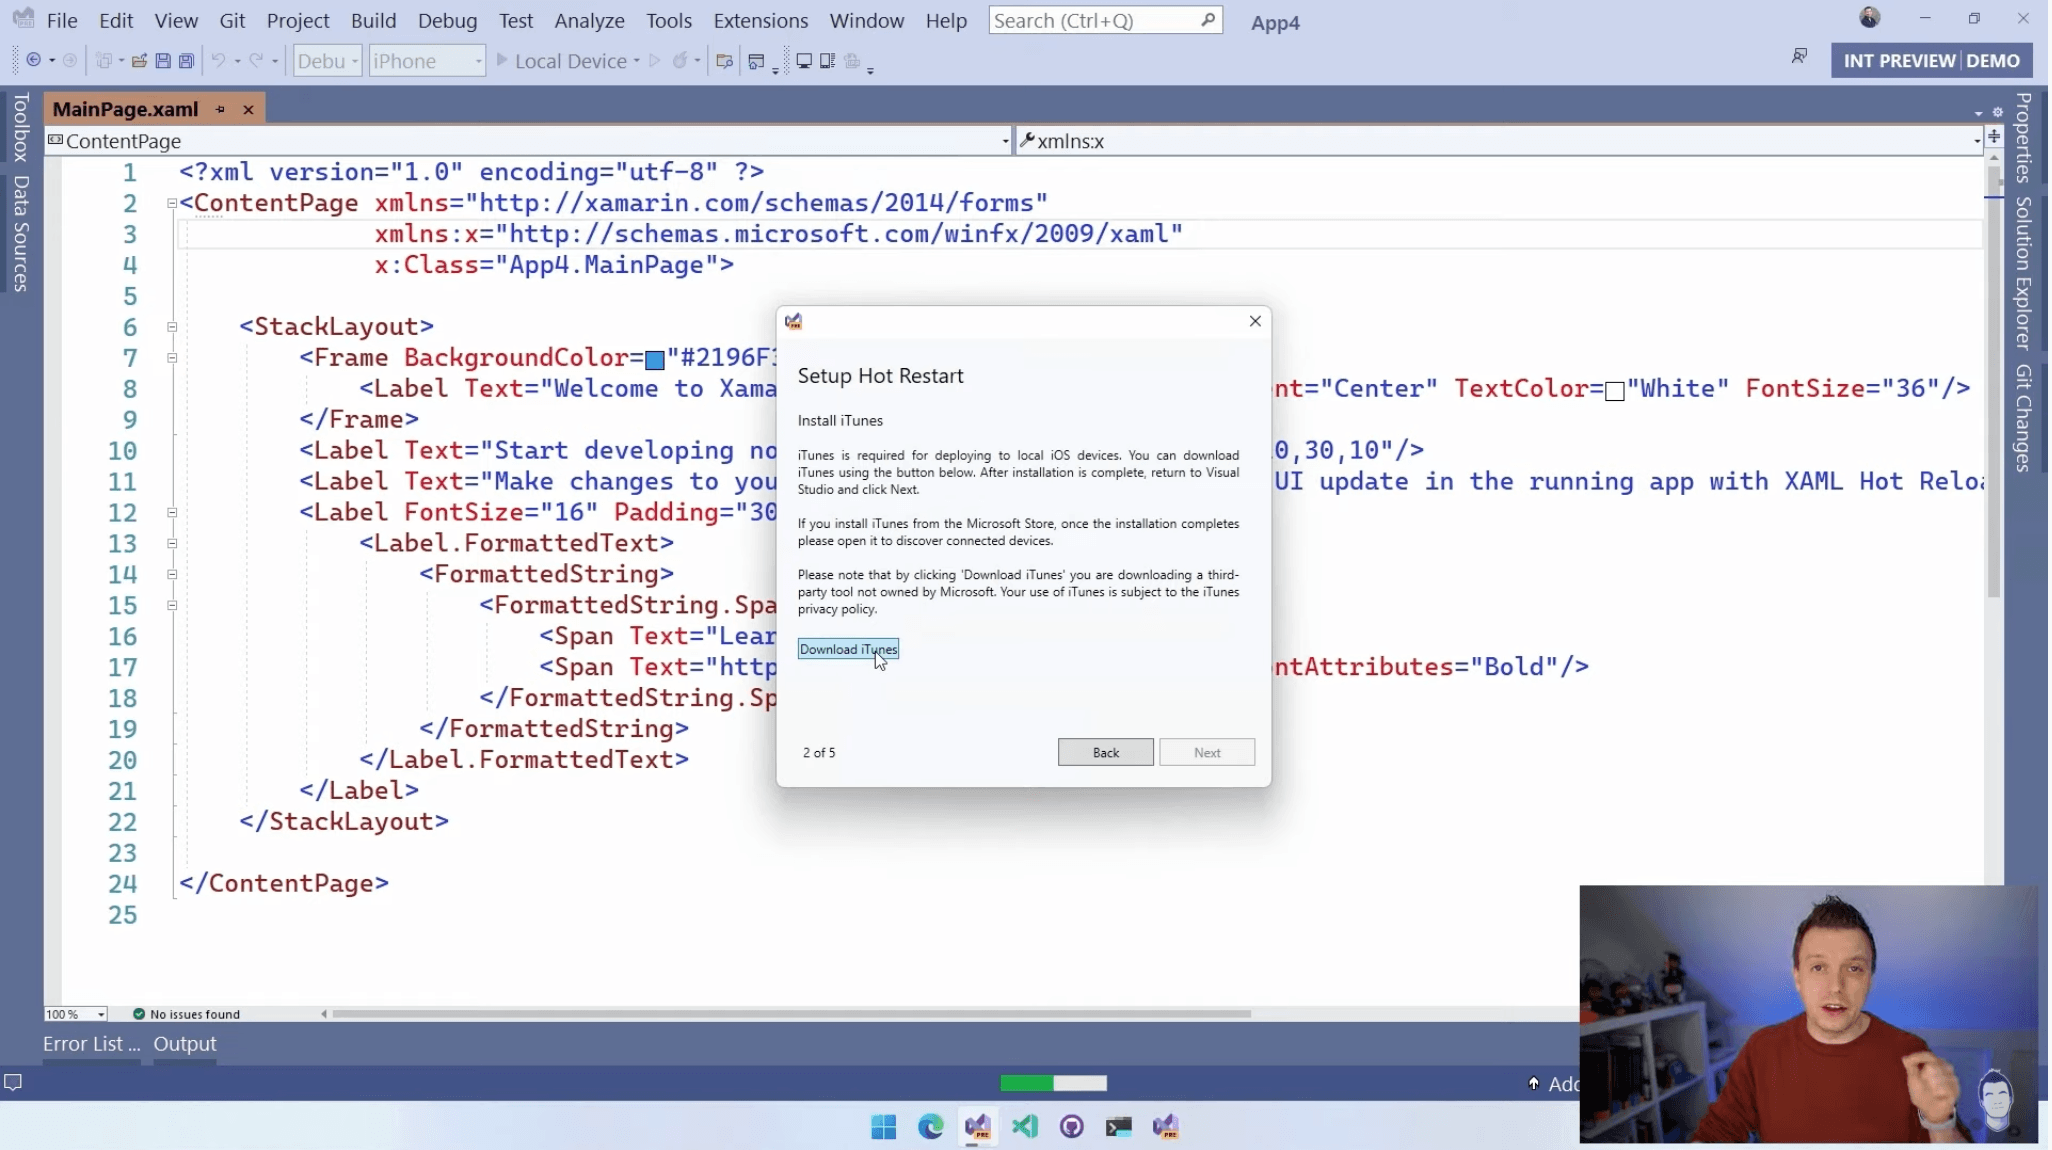
<p>Developers have always been told that one needs a Mac to build for iOS from Xamarin.Forms/.NET MAUI while on a Windows machine. Turns out, this is not entirely true thanks to a wonderful feature&mdash;Xamarin Hot Restart, which enables developers to quickly test code changes on an iOS device during app development. Armed with an iOS device and a connecting cable, developers can directly deploy apps to the device from Xamarin.Forms with Visual Studio while running on Windows.</p>
<p><a href="https://twitter.com/jfversluis" target="_blank">Gerald Versluis</a> produced a video exploring <a href="https://www.youtube.com/watch?v=tJUcBQ07jSc" target="_blank">iOS development without a Mac</a>&nbsp;and dived head first into Xamarin Hot Restart. As usual, Gerald makes the technology accessible to anyone&mdash;starting with the basics of Xamarin Hot Restart, developer setup, installing iTunes and connecting to physical iOS device.</p>
<p>With a paid Apple Developer Program subscription, developers can set up Visual Studio on Windows to directly deploy/test apps to iOS devices&mdash;and even publish apps to the App Store. </p>
<p><img src="https://d585tldpucybw.cloudfront.net/sfimages/default-source/default-album/hotrestart.png?sfvrsn=67c80323_0" data-displaymode="Original" alt="HotRestart" title="HotRestart"> </p>
<h2 id="toc_3">.NET FrontEnd Day</h2>
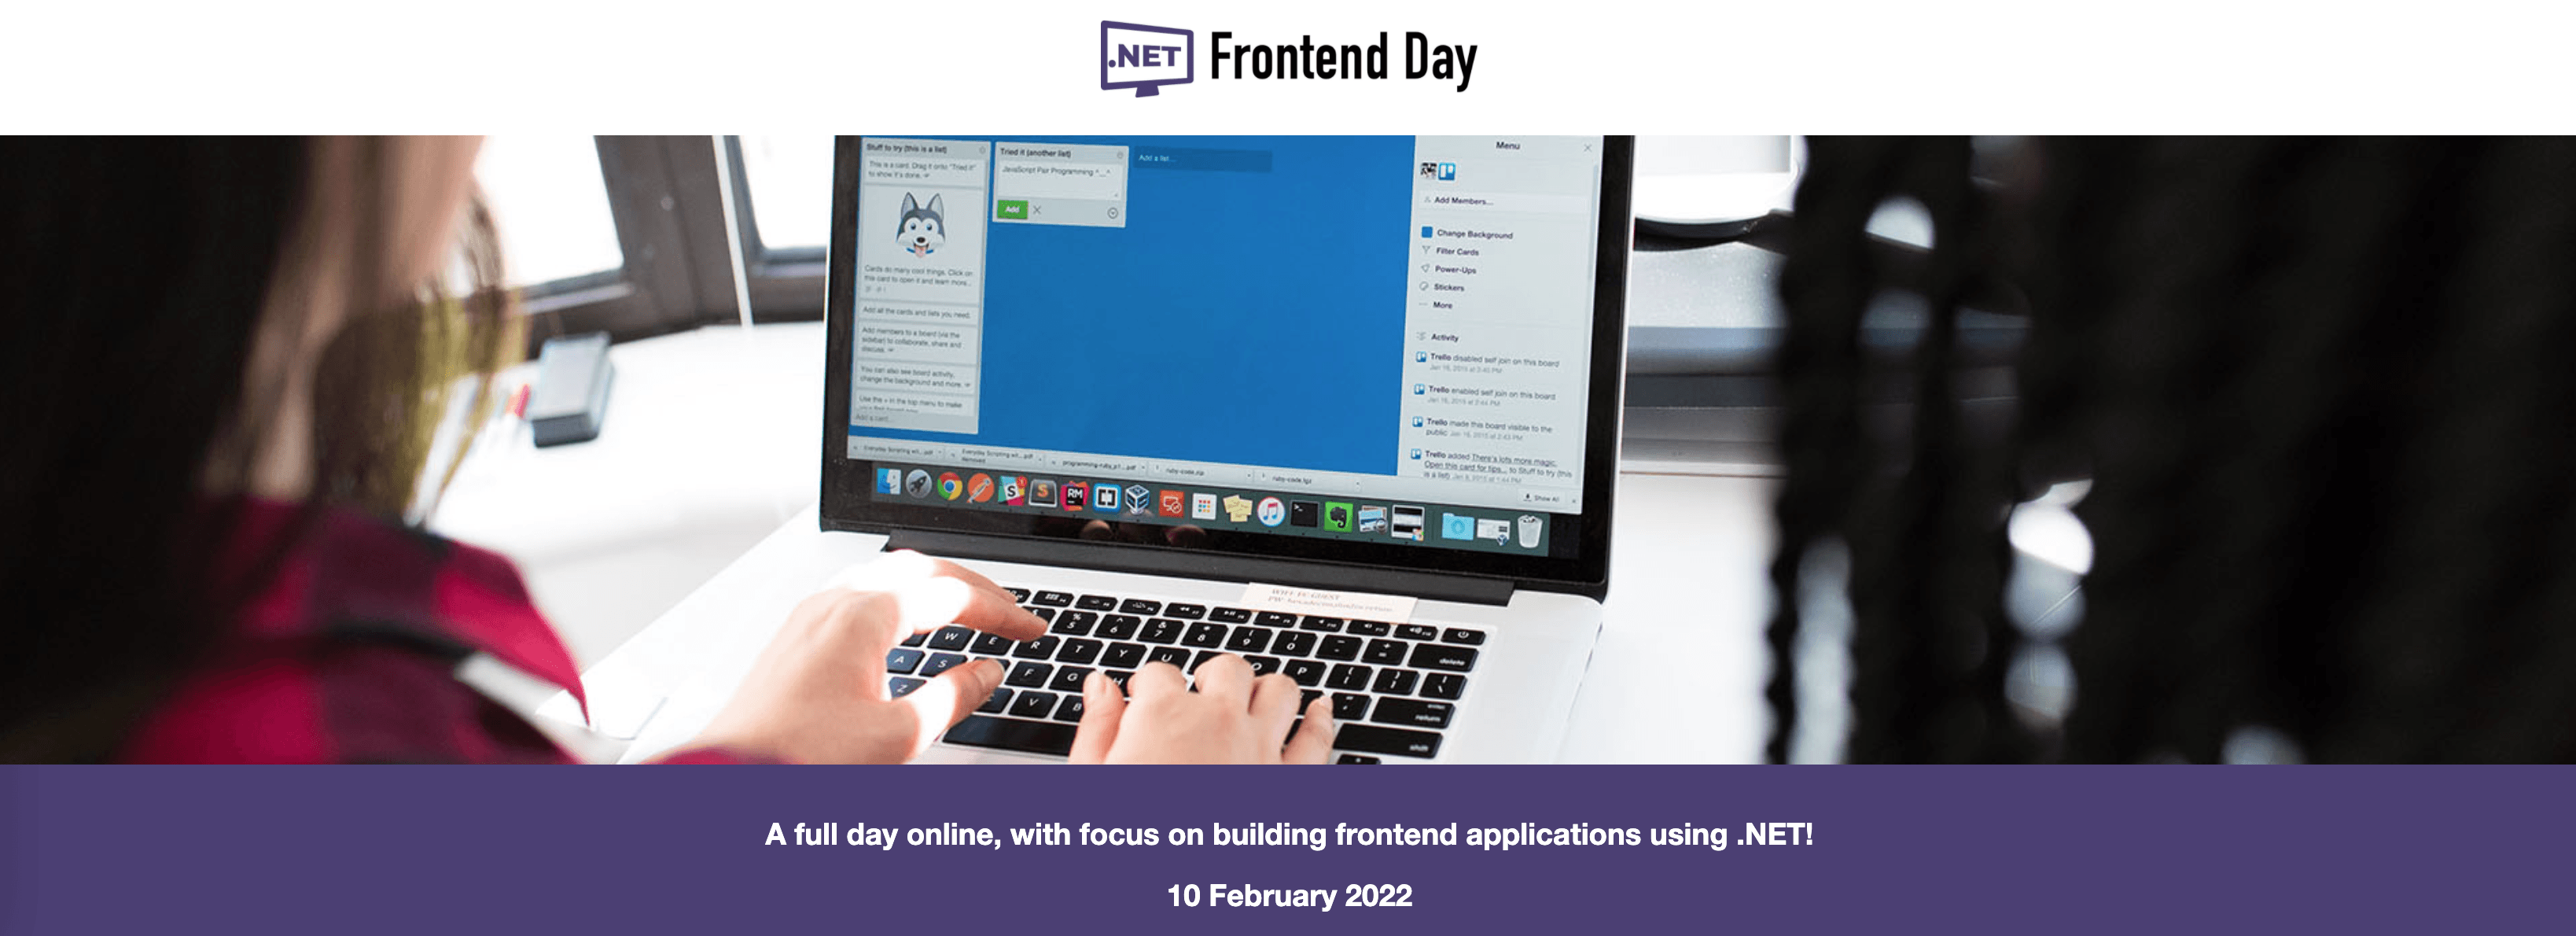
<p>Building client apps with .NET? You could be building web/desktop/mobile apps across a variety of platforms with some solid tooling. And nothing else celebrates .NET on the client side like <a href="https://twitter.com/dotnet_frontend" target="_blank">.NET FrontEnd Day</a>&mdash;a full day virtual conference, with focus on building frontend apps using .NET.</p>
<p>With a successful first year under the belt, .NET FrontEnd Day is gearing up for the <a href="https://dotnet-frontend.com/" target="_blank">second edition on Feb 10, 2022</a>&nbsp;and just announced their list of speakers. Rest assured, there would be no dearth of .NET MAUI and Blazor love&mdash;developers should register and tune in.</p>
<p><img src="https://d585tldpucybw.cloudfront.net/sfimages/default-source/default-album/dotnetfrontend.png?sfvrsn=35aebd40_0" data-displaymode="Original" alt="DotNetFrontEnd" title="DotNetFrontEnd"> </p>
<h2 id="toc_4">.NET Today &amp; Tomorrow</h2>
<p>.NET has come a long way and the future of the .NET developer ecosystem looks bright. There is, however, a lot to take in and the bigger picture story from experienced .NET developers help.</p>
<p><a href="https://twitter.com/EdCharbeneau" target="_blank">Ed Charbeneau</a> produced a video on the <a href="https://www.youtube.com/watch?v=Y1LOdEt28ak" target="_blank">.NET of Today and Tomorrow</a>, recapping some historical perspective and looking ahead at the future with .NET 6.</p>
<p>Ed talks about the .NET unification story and how .NET UI tooling from Progress Telerik can help .NET developers be more successful. It did not take long for Ed to dive into modern web development with .NET 6 and Blazor and exploring the code-sharing future with Hybrid apps using Blazor on top of .NET MAUI&mdash;all backed by solid demos and code walkthroughs. </p>
<p><img src="https://d585tldpucybw.cloudfront.net/sfimages/default-source/default-album/dotnettodaytomorrow.png?sfvrsn=fb768101_0" data-displaymode="Original" alt="DotNetTodayTomorrow" title="DotNetTodayTomorrow"> </p>
<h2 id="toc_5">.NET 6 Favorites</h2>
<p>.NET 6 is out and there was a lot of .NET developer content shared at .NET Conf. While most developers are still taking it all in, <a href="https://twitter.com/daveabrock" target="_blank">Dave Brock</a>&nbsp;wrote up an article on <a href="https://www.telerik.com/blogs/dotnet-6-arrived-here-few-my-favorite-things" target="_blank">favorite things in .NET 6</a>.</p>
<p>Dave correctly points out some of the major objectives with .NET 6&mdash;lower barrier to entry into .NET, improving app startup/performance metrics, elevated client app development experience and faster developer inner loop.</p>
<p>While most of Dave's favorites lean towards modern web development, many point to the core benefits of .NET 6 for .NET MAUI developers as well. Some of the .NET 6 excitement centers around Hot Reload, C# 10 features, Minimal APIs and Blazor improvements&mdash;the present unified reality of .NET is looking pretty good.</p>
<p><img src="https://d585tldpucybw.cloudfront.net/sfimages/default-source/default-album/dotnet6favs.png?sfvrsn=394b492f_0" data-displaymode="Original" alt="DotNet6Favs" title="DotNet6Favs"></p>
<p>That's it for now. </p>
<p>We'll see you next week with more awesome content relevant to .NET MAUI. </p>
<p>Cheers, developers!</p><img src="https://feeds.telerik.com/link/10825/15057270.gif" height="1" width="1"/>]]></content>
  </entry>
  <entry>
    <id>urn:uuid:7a969557-c6fa-4589-9902-264ce606226d</id>
    <title type="text">Angular on Desktop</title>
    <summary type="text">Developers have the flexibility of several ways to bring Angular goodness to desktop apps.</summary>
    <published>2021-12-09T16:21:51Z</published>
    <updated>2022-06-30T14:06:13Z</updated>
    <author>
      <name>Sam Basu </name>
    </author>
    <link rel="alternate" href="https://feeds.telerik.com/link/10825/15057271/angular-on-desktop"/>
    <content type="text"><![CDATA[<p><span class="featured">Developers have the flexibility of several ways to bring Angular goodness to desktop apps.</span></p>
<p>Let&rsquo;s talk <a href="https://angular.io/" target="_blank">Angular</a>&mdash;one of the most popular modern web application development platforms. With a long history, matured tooling and rich developer ecosystem, it is not difficult to see why Angular is the SPA framework of choice for building modern web/mobile apps.</p>
<p>However, how does Angular work for desktop apps? The classic software answer applies&mdash;it depends. There are strategies for code sharing with web, but a lot also depends on the type of app being built and the desktop integrations desired.</p>
<p>PWAs and ElectronJS are established ways of bringing web code to desktop apps, and they are both good options for Angular. For .NET developers, .NET MAUI is the next-generation platform for building native cross-platform apps for mobile and desktop. And with Blazor hybrid apps, Blazor code for web apps is very welcome in .NET MAUI for mobile/desktop.</p>
<p>However, a lot of .NET shops in the past few years have been doing .NET in the backend and building SPA apps with JS on the frontend&mdash;can any of those investments come over to .NET MAUI land? Let&rsquo;s talk about Angular, but the ways to enable desktop apps with web technologies should be about the same irrespective of the JS framework&mdash;so React, Vue and others should feel welcome too.</p>
<p>Angular goodness on desktop&mdash;let&rsquo;s do this.</p>
<p>This post was written and published as part of the <a href="https://www.csadvent.christmas/" target="_blank">2021 C# Advent</a>.</p>
<h2 id="toc_1">Get Started Right</h2>
<p>If you&rsquo;re new to the Angular world, one of the best ways to get started is the <a href="https://angular.io/guide/setup-local" target="_blank">Angular CLI</a>. The prerequisites to building with Angular are an LTS Node.js version for the runtime and npm for dependencies. It&rsquo;s easy to globally install the Angular CLI tool, like so:</p>
<div>
<pre><code class="language-bash">npm install -g @angular/cli</code></pre>
</div>
<p>We can then fire up a new Angular app&mdash;the template walks you through a few settings before creating the project.</p>
<div>
<pre><code class="language-bash">ng new angularcli</code></pre>
</div>
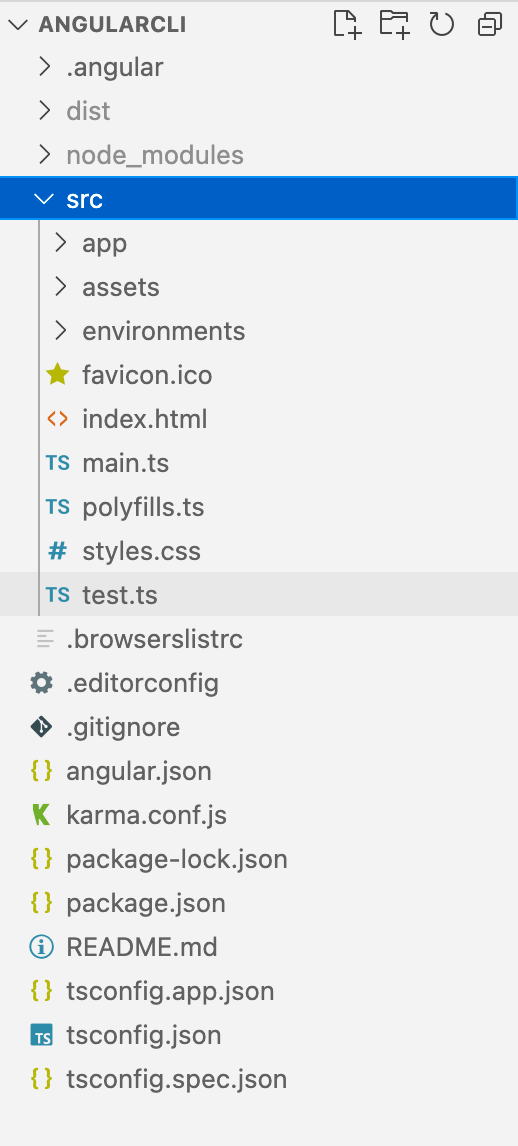
<p>The Angular CLI tool installs the necessary Angular npm packages and other dependencies&mdash;once done, we can navigate inside the project and see all the code/configurations. </p>
<div>
<pre><code class="language-bash">cd angularcli</code></pre>
</div>
<p><img src="https://d585tldpucybw.cloudfront.net/sfimages/default-source/default-album/angularproject.png?sfvrsn=412c66e6_0" data-displaymode="Original" alt="AngularProject Angular CLI > src > test.ts" title="AngularProject"></p>
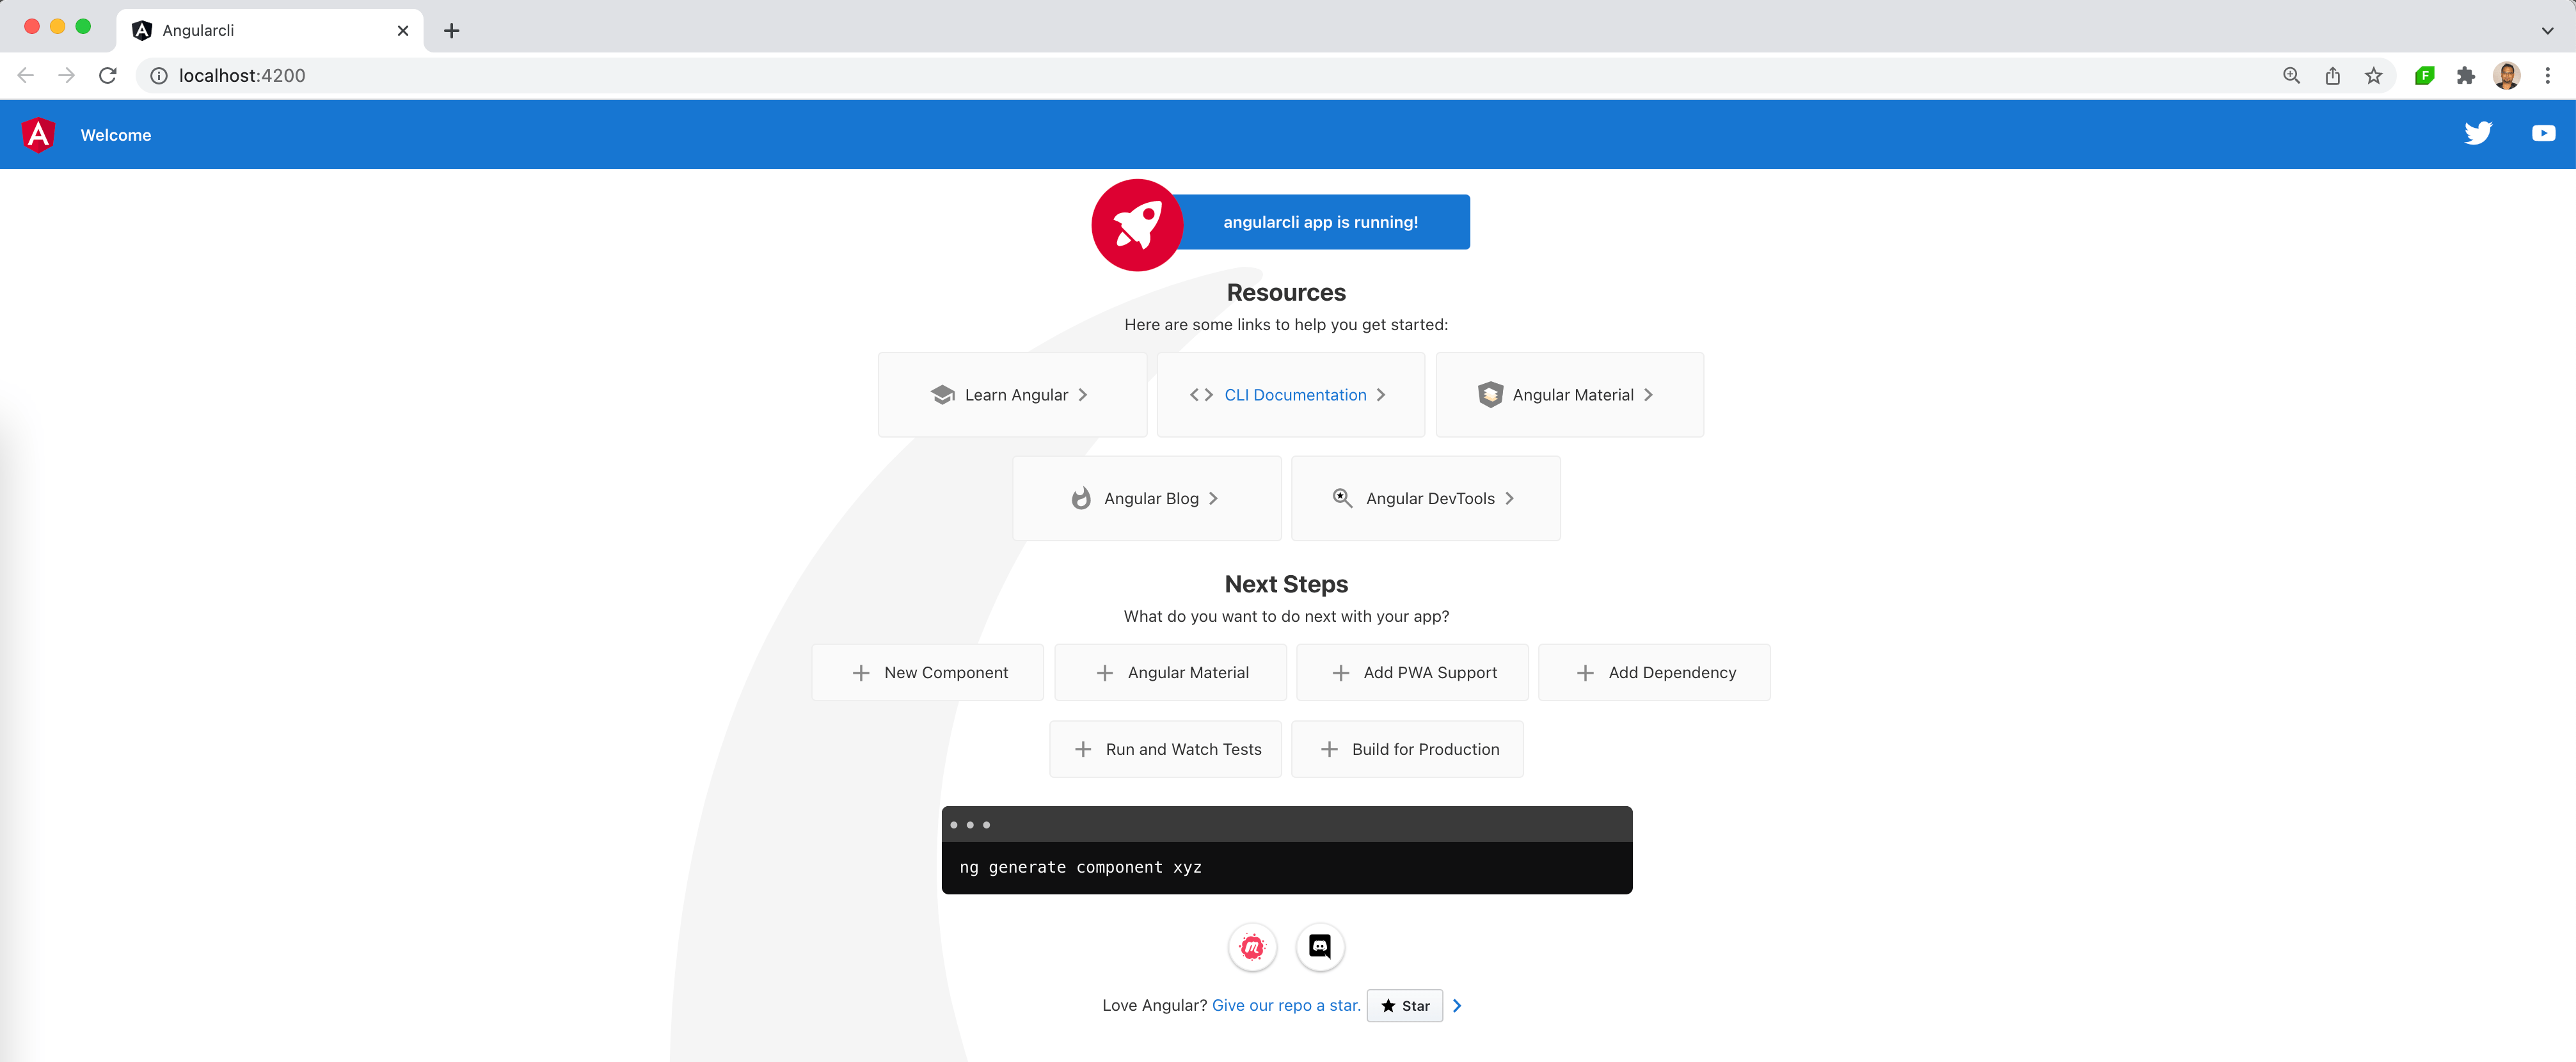
<p>Ready to run your Angular app locally? The <em>Serve</em> command compiles the app in memory, launches the server and watches local files for deploying changed components of the app. </p>
<div>
<pre><code class="language-bash">ng serve --open</code></pre>
</div>
<p><a href="https://d585tldpucybw.cloudfront.net/sfimages/default-source/default-album/angularcli.png?sfvrsn=acf0818d_0" target="_blank"><img src="https://d585tldpucybw.cloudfront.net/sfimages/default-source/default-album/angularcli.png?sfvrsn=acf0818d_0" data-displaymode="Original" alt="AngularCLI" title="AngularCLI" data-openoriginalimageonclick="true"></a></p>
<p>Voil&agrave;. That&rsquo;s how easy it is to start making modern web apps with Angular. And while you&rsquo;re getting started, it may be worth getting some UI ammunition to deliver good UX and performance&mdash;<a href="https://www.telerik.com/kendo-angular-ui" target="_blank">Kendo UI for Angular</a> can help.</p>
<img src="https://d585tldpucybw.cloudfront.net/sfimages/default-source/default-album/kuiangular.png?sfvrsn=4ebe2d9a_0" data-displaymode="Original" alt="KUIAngular" title="KUIAngular"><br>
&nbsp;
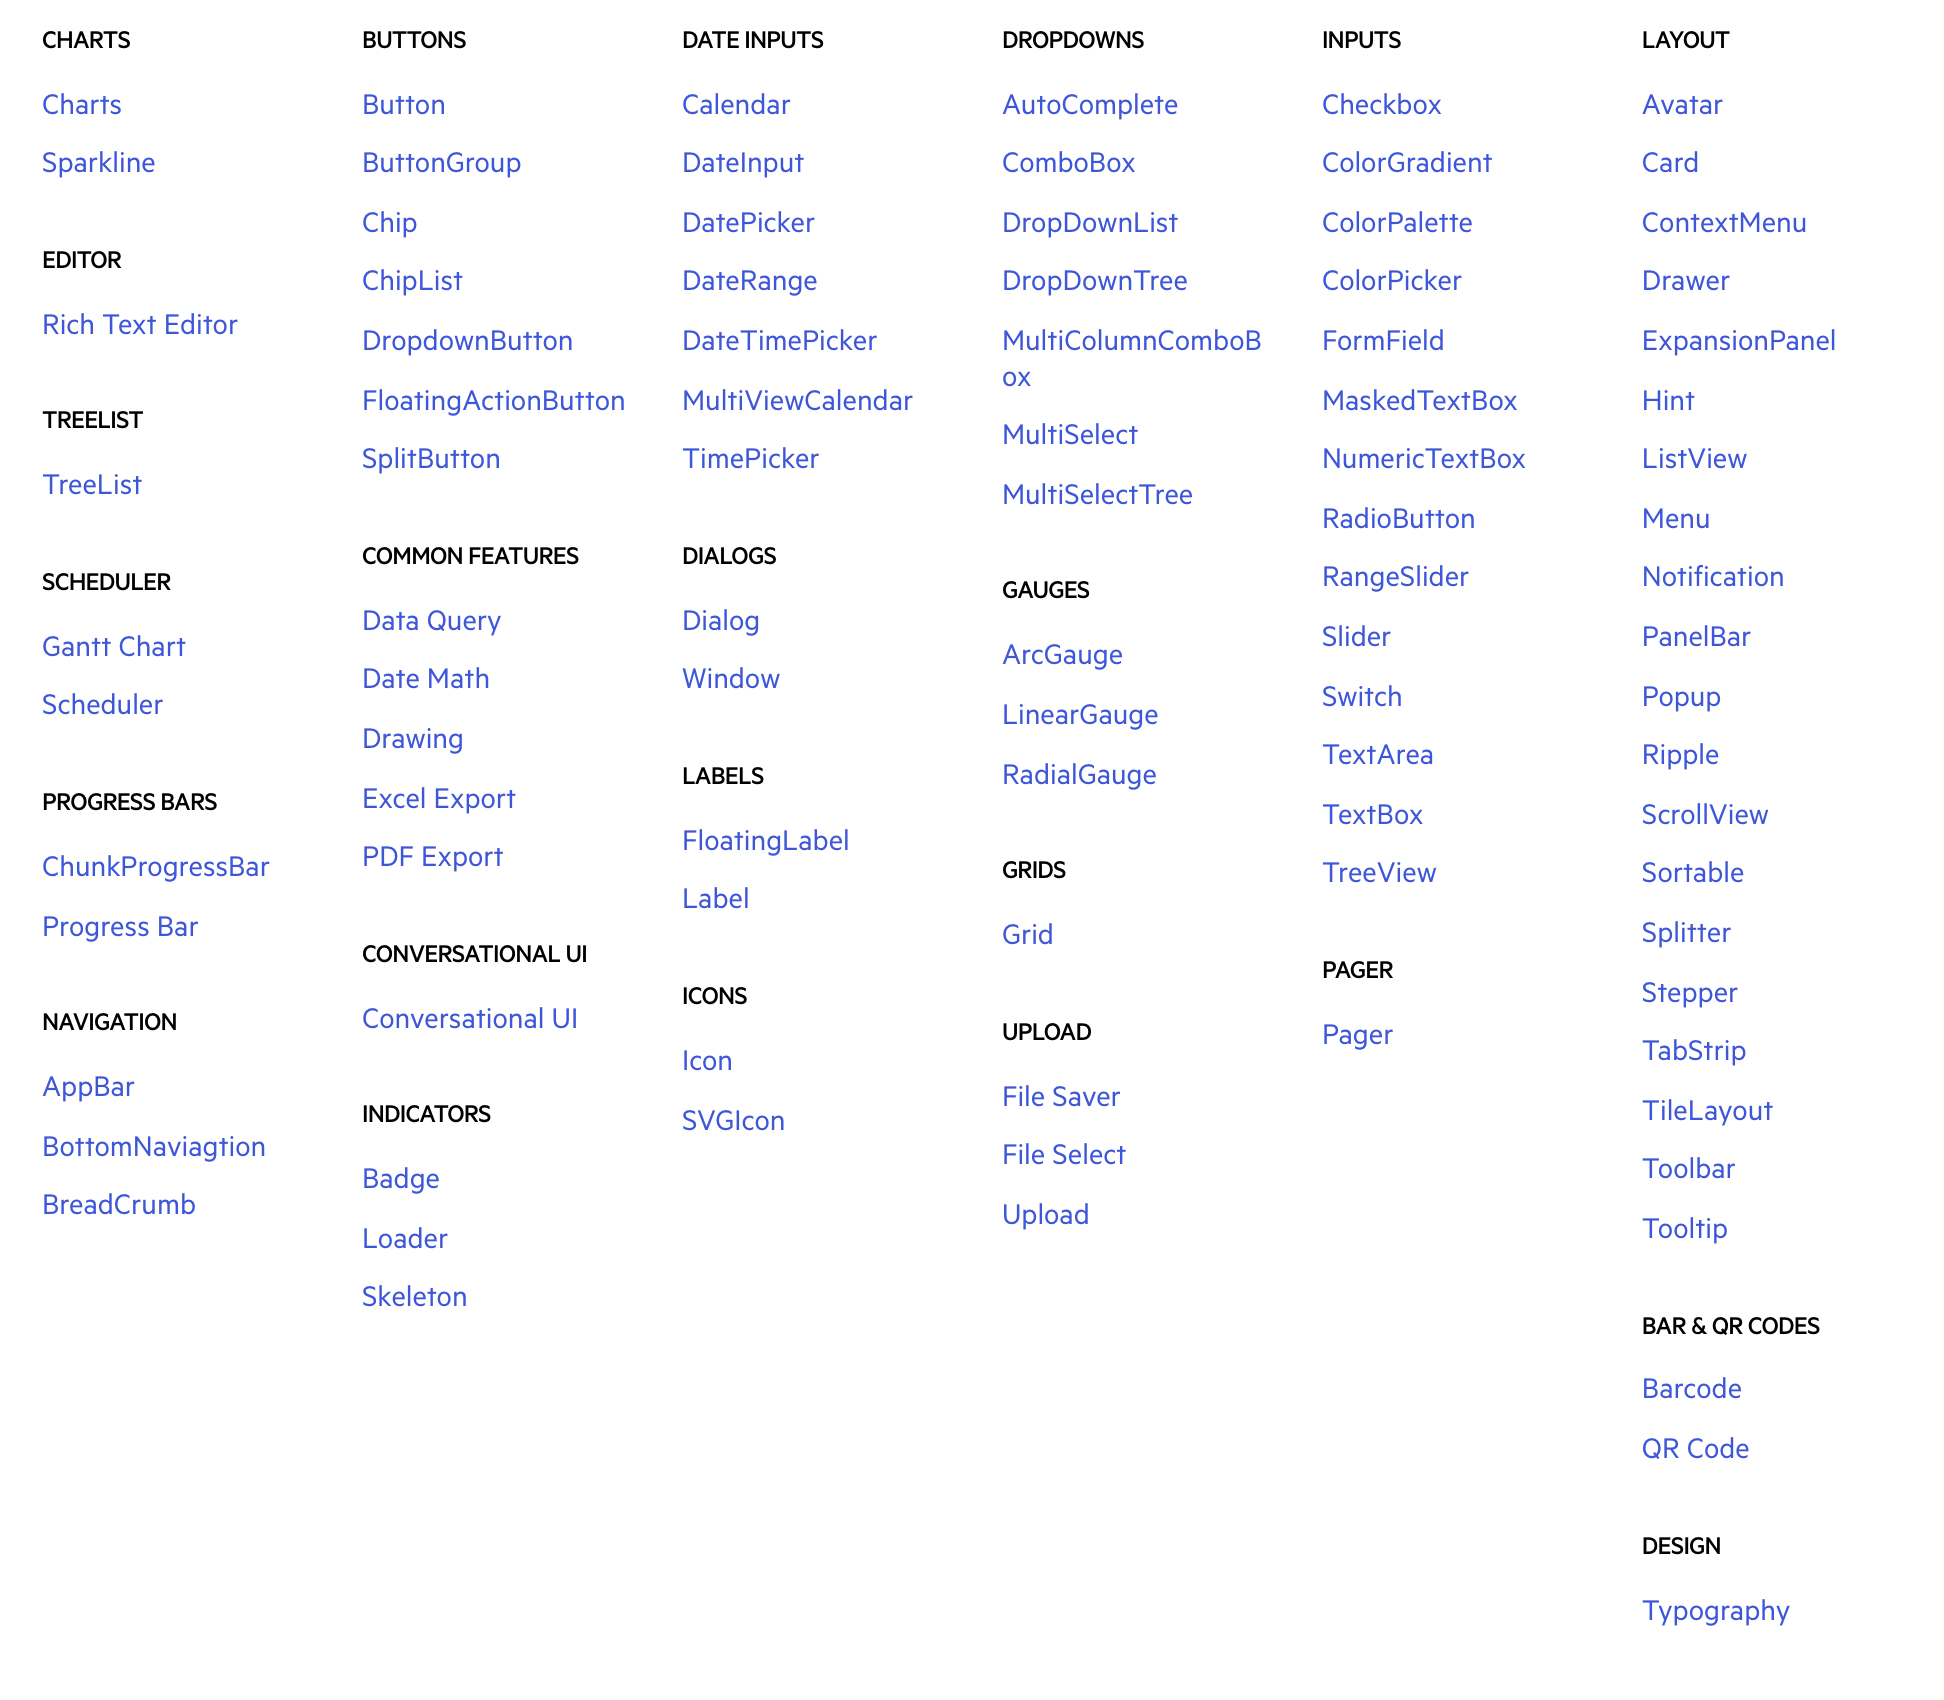
<p>Kendo UI for Angular delivers components to meet app requirements for data handling, performance, UX, design, accessibility and so much more&mdash;100+ fully native components for building high-quality modern Angular UI in no time. </p>
<p><img src="https://d585tldpucybw.cloudfront.net/sfimages/default-source/default-album/kuicomponents53986591411f43febc3b7663cab2d926.png?sfvrsn=64872649_0" data-displaymode="Original" alt="KUIComponents" title="KUIComponents"></p>
<p>Now that we have a basic Angular web app running, let&rsquo;s talk about options to get that Angular goodness on desktop apps.</p>
<h2 id="toc_2">Angular as PWA</h2>
<p>One of the easiest ways for a web app to work on desktop is <a href="https://docs.microsoft.com/en-us/microsoft-edge/progressive-web-apps-chromium/" target="_blank">PWA</a>&mdash;web apps can be progressively better citizens on mobile/desktop platforms. PWAs are essentially web apps, but with hooks to have native-like features&mdash;be installable on desktop and have service workers bring in offline support, push notifications, hardware access and more. It is pretty easy to start turning a regular Angular web app into a PWA&mdash;just a simple command:</p>
<div>
<pre><code class="language-bash">ng add @angular/pwa</code></pre>
</div>
<p>This actually touches a few things in an existing Angular app&mdash;a new manifest file is dropped in that tells the browser how the app should behave when installed by the user. The starter set has a variety of app icons for pinning to home screen, Touchbar and more&mdash;the default icons are added to an Asset's directory.</p>
<div>
<pre><code class="language-json">{
  "name": "angularpwa",
  "short_name": "angularpwa",
  "theme_color": "#1976d2",
  "background_color": "#fafafa",
  "display": "standalone",
  "scope": "./",
  "start_url": "./",
  "icons": [
    {
      "src": "assets/icons/icon-72x72.png",
      "sizes": "72x72",
      "type": "image/png",
      "purpose": "maskable any"
    },
    {
      "src": "assets/icons/icon-96x96.png",
      "sizes": "96x96",
      "type": "image/png",
      "purpose": "maskable any"
    },
    ...
    ...
  ]
}</code></pre>
</div>
<p>The startup <em>index.html</em> page now has a reference to the new web manifest file. </p>
<div>
<pre><code class="language-html">&lt;!doctype html&gt;
&lt;html lang="en"&gt;
&lt;head&gt;
  &lt;meta charset="utf-8"&gt;
  &lt;title&gt;Angularpwa&lt;/title&gt;
  &lt;base href="https://www.telerik.com/"&gt;
  &lt;meta name="viewport" content="width=device-width, initial-scale=1"&gt;
  &lt;link rel="icon" type="image/x-icon" href="https://www.telerik.comfavicon.ico"&gt;
  &lt;link rel="manifest" href="https://www.telerik.commanifest.webmanifest"&gt;
  &lt;meta name="theme-color" content="#1976d2"&gt;
&lt;/head&gt;
&lt;body&gt;
  &lt;app-root&gt;&lt;/app-root&gt;
  &lt;noscript&gt;Please enable JavaScript to continue using this application.&lt;/noscript&gt;
&lt;/body&gt;
&lt;/html&gt;</code></pre>
</div>
<p>A default caching service worker is dropped in as well, with configuration file namely <em>ngsw-config.json</em>&mdash;this indicates which types of assets can be cached.</p>
<div>
<pre><code class="language-json">{
  "$schema": "./node_modules/@angular/service-worker/config/schema.json",
  "index": "/index.html",
  "assetGroups": [
    {
      "name": "app",
      "installMode": "prefetch",
      "resources": {
        "files": [
          "/favicon.ico",
          "/index.html",
          "/manifest.webmanifest",
          "/*.css",
          "/*.js"
        ]
      }
    },
    {
      "name": "assets",
      "installMode": "lazy",
      "updateMode": "prefetch",
      "resources": {
        "files": [
          "/assets/**",
          "/*.(svg|cur|jpg|jpeg|png|apng|webp|avif|gif|otf|ttf|woff|woff2)"
        ]
      }
    }
  ]
}</code></pre>
</div>
<p>The ServiceWorker config file needs to be referenced in the <em>angular.json</em> file&mdash;the <em>ngswConfigPath</em> links the ServiceWorker, enabling production configuration in build schematics.</p>
<div>
<pre><code class="language-json">{
  "$schema": "./node_modules/@angular/cli/lib/config/schema.json",
  "version": 1,
  "newProjectRoot": "projects",
  "projects": {
    "angularpwa": {
      "projectType": "application",
      "schematics": {
        "@schematics/angular:application": {
          "strict": true
        }
      },
      "root": "",
      "sourceRoot": "src",
      "prefix": "app",
      "architect": {
        "build": {
          "builder": "@angular-devkit/build-angular:browser",
          "options": {
            "outputPath": "dist/angularpwa",
            "index": "src/index.html",
            "main": "src/main.ts",
            "polyfills": "src/polyfills.ts",
            "tsConfig": "tsconfig.app.json",
            "assets": [
              "src/favicon.ico",
              "src/assets",
              "src/manifest.webmanifest"
            ],
            "styles": [
              "src/styles.css"
            ],
            "scripts": [],
            "serviceWorker": true,
            "ngswConfigPath": "ngsw-config.json"
          },
          "configurations": {
            "production": {
              "budgets": [
                {
                  "type": "initial",
                  "maximumWarning": "500kb",
                  "maximumError": "1mb"
                },
                {
                  "type": "anyComponentStyle",
                  "maximumWarning": "2kb",
                  "maximumError": "4kb"
                }
              ],
              "fileReplacements": [
                {
                  "replace": "src/environments/environment.ts",
                  "with": "src/environments/environment.prod.ts"
                }
              ],
              "outputHashing": "all",
              "serviceWorker": true,
              "ngswConfigPath": "ngsw-config.json"
            },
            ...
            ...
          }
        }
      }
    }
  }
}</code></pre>
</div>
<p>And finally, the <em>app.module.ts</em> now imports in ServiceWorkerModule and registers the ServiceWorker.</p>
<div>
<pre><code class="language-typescript">import { NgModule } from '@angular/core';
import { BrowserModule } from '@angular/platform-browser';

import { AppRoutingModule } from './app-routing.module';
import { AppComponent } from './app.component';
import { ServiceWorkerModule } from '@angular/service-worker';
import { environment } from '../environments/environment';

@NgModule({
  declarations: [
    AppComponent
  ],
  imports: [
    BrowserModule,
    AppRoutingModule,
    ServiceWorkerModule.register('ngsw-worker.js', {
      enabled: environment.production,
      registrationStrategy: 'registerWhenStable:30000'
    })
  ],
  providers: [],
  bootstrap: [AppComponent]
})
export class AppModule { }</code></pre>
</div>
<p>That&rsquo;s a run-down of all the moving pieces that start transforming a regular Angular app into a PWA. However, we cannot just run the app with Angular Serve command&mdash;service workers do not work with in-memory compilations. We need a production build, like so:</p>
<div>
<pre><code class="language-bash">ng build --prod</code></pre>
</div>
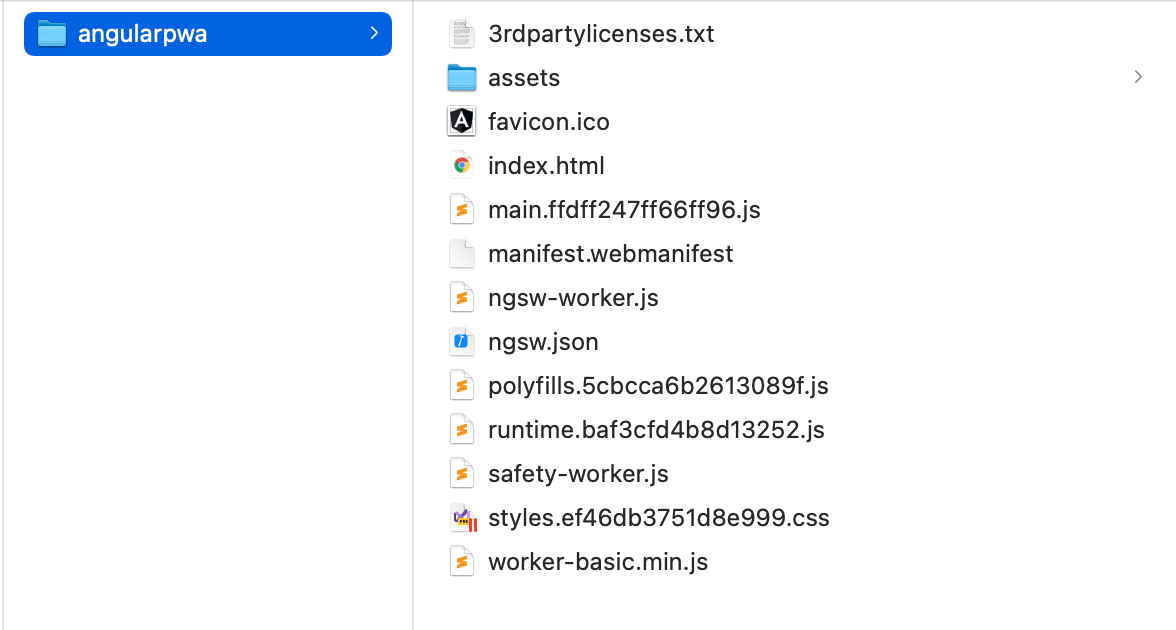
<p>Once the build is done with Production configuration, we can see the artifacts in the Distribution directory&mdash;everything is compiled down to deployable plain HTML/JS/CSS.</p>
<div>
<pre><code class="language-bash">cd dist/angularpwa</code></pre>
</div>
<img src="https://d585tldpucybw.cloudfront.net/sfimages/default-source/default-album/pwabuild.png?sfvrsn=296bc24f_0" data-displaymode="Original" alt="PWABuild" title="PWABuild"><br>
&nbsp;
<p>Next up, we need a small HTTP sever to expose the built files out to the browser as apps and fire things up.</p>
<div>
<pre><code class="language-bash">npm i -g http-server
http-server -p 8080 -c-1</code></pre>
</div>
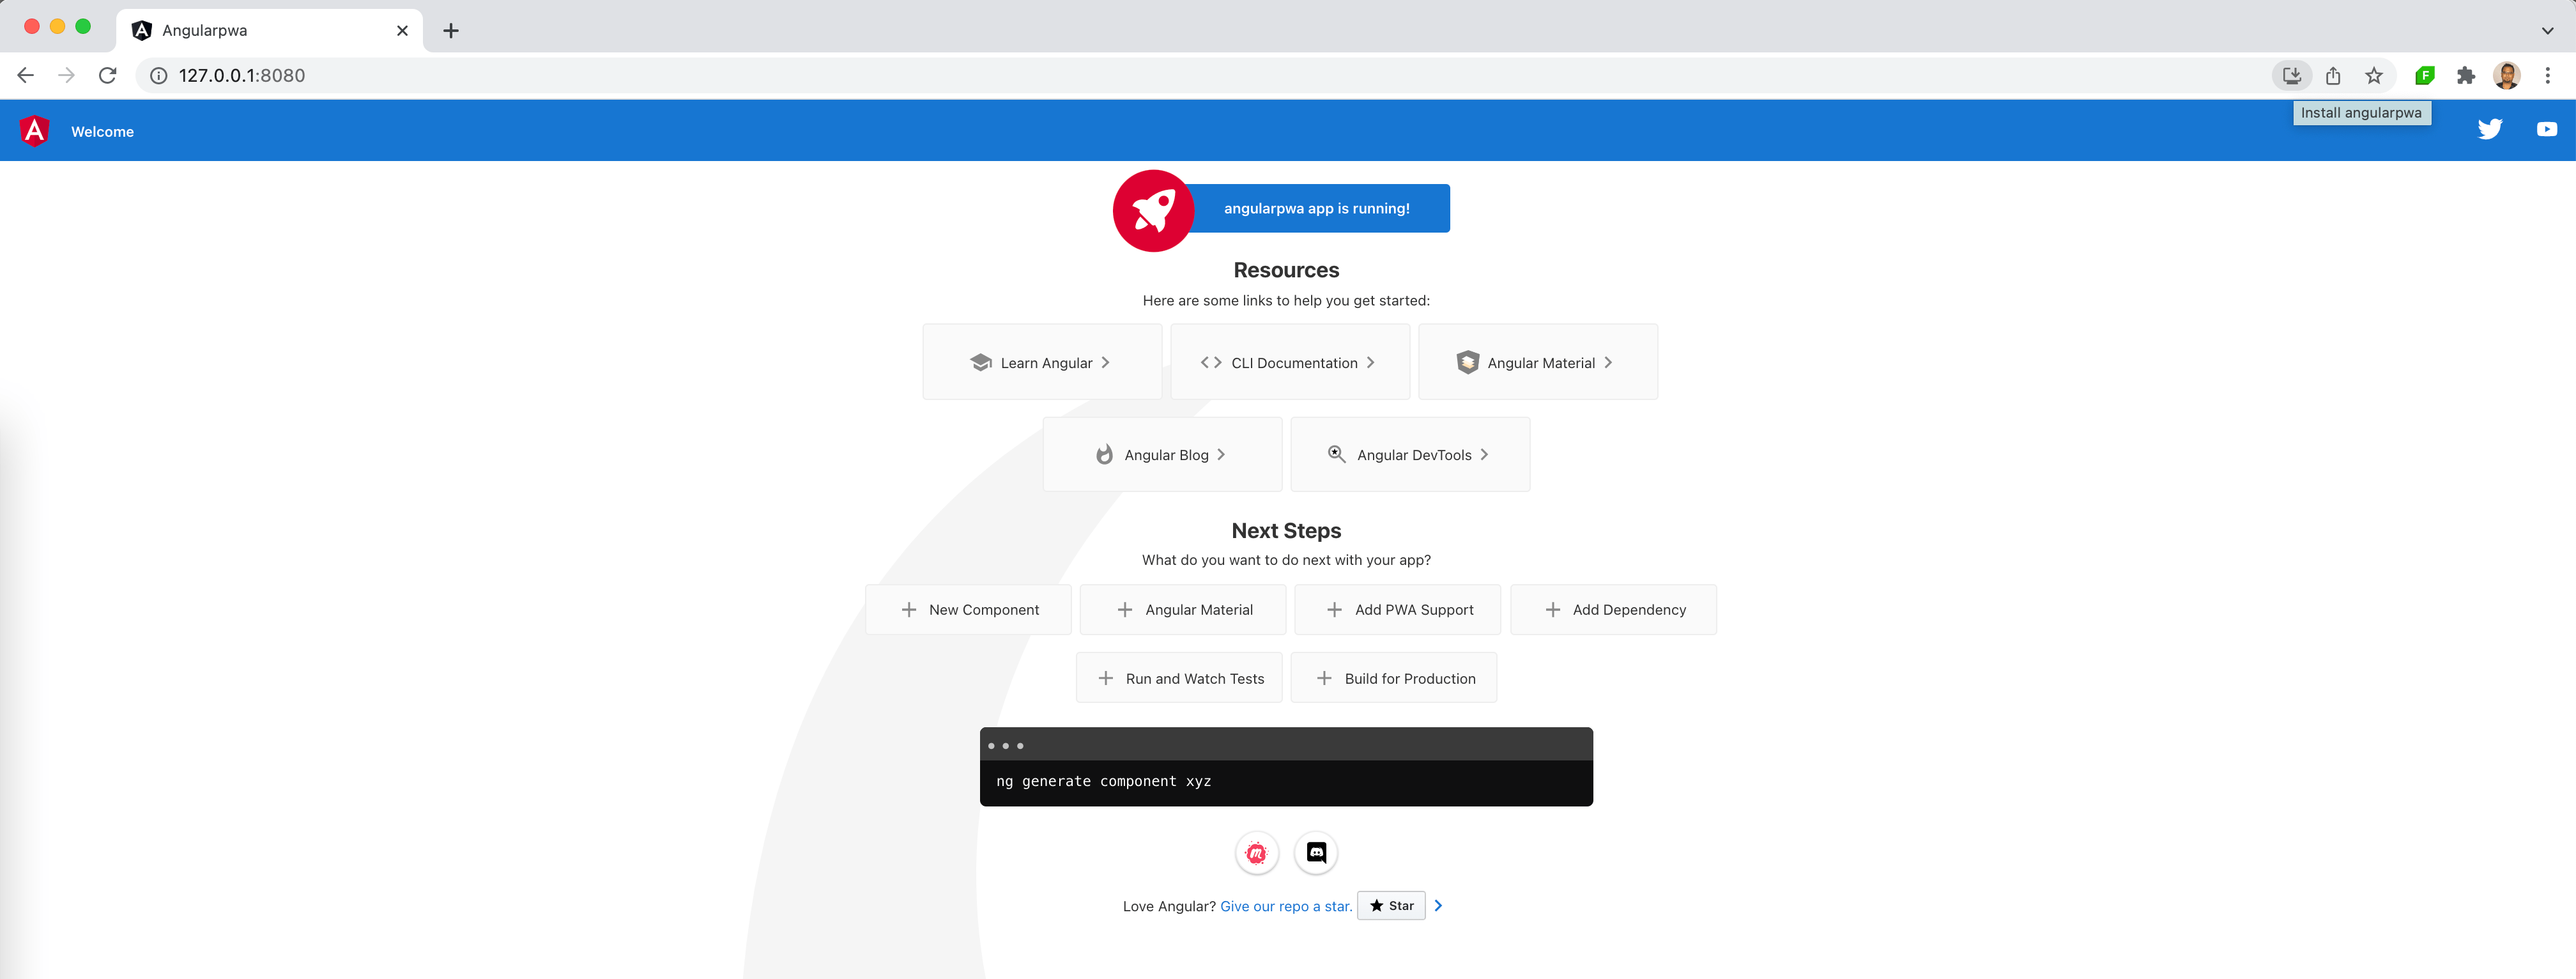
<p>Excellent&mdash;we can navigate to local HTTP server IP and see our PWA in action! Notice the install option, which indicates that the user can install and run this app on desktop without the browser chrome.</p>
<a href="https://d585tldpucybw.cloudfront.net/sfimages/default-source/default-album/angularpwa115740ef5cf746dcabedfcd427d24fe8.png?sfvrsn=b1a006db_0"><img src="https://d585tldpucybw.cloudfront.net/sfimages/default-source/default-album/angularpwa115740ef5cf746dcabedfcd427d24fe8.png?sfvrsn=b1a006db_0" data-displaymode="Original" alt="AngularPWA" title="AngularPWA" data-openoriginalimageonclick="true"></a><br>
&nbsp;
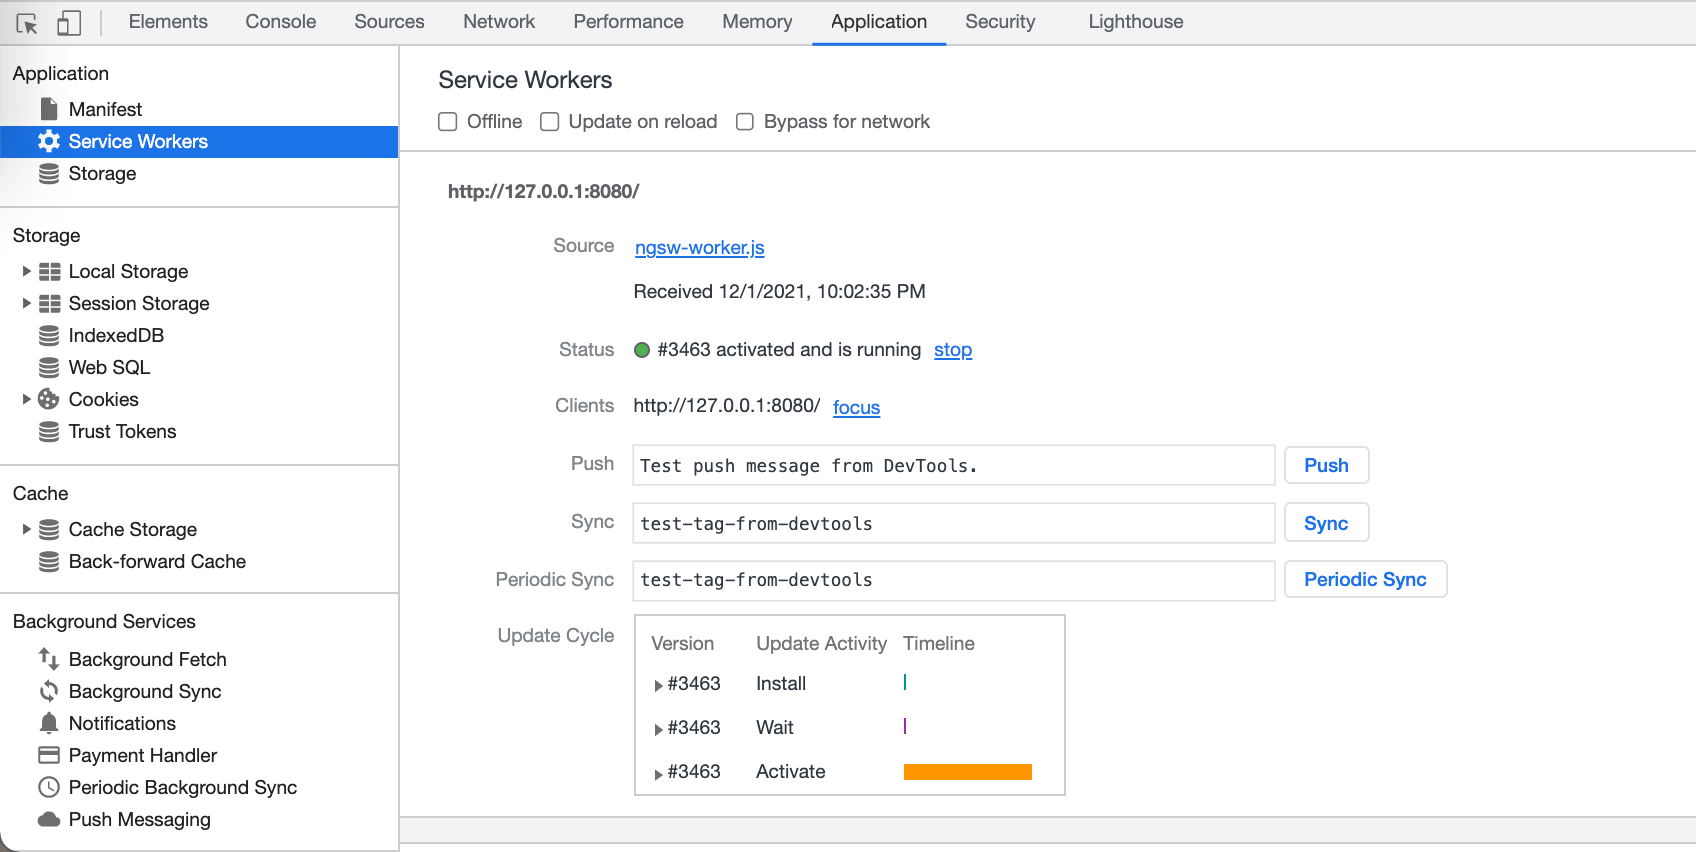
<p>If we open up Developer Tools on our browser, we can also see the default caching Service Worker being registered and running. This is just the start&mdash;developers can now start adding all the customizations to make a nice modern PWA with Angular.</p>
<a href="https://d585tldpucybw.cloudfront.net/sfimages/default-source/default-album/serviceworker.png?sfvrsn=ca18689d_0"><img src="https://d585tldpucybw.cloudfront.net/sfimages/default-source/default-album/serviceworker.png?sfvrsn=ca18689d_0" data-displaymode="Original" alt="ServiceWorker" title="ServiceWorker" data-openoriginalimageonclick="true"></a>&nbsp;
<p>&nbsp;</p>
<h2 id="toc_3">Angular in Electron</h2>
<p>Another strong contender for bringing Angular apps to desktop is <a href="https://www.electronjs.org/" target="_blank">Electron</a>&mdash;the popular open-source battle-tested way of hosting web apps on desktop.</p>
<p>Electron helps in building robust cross-platform desktop apps that are essentially HTML/CSS/JS, but with strong integrations with the host OS when running as a desktop app. Electron does pack two things to provide a consistent runtime and rendering canvas&mdash;Node.js and the Chromium engine.</p>
<p>Starting from a standard Angular CLI app, it is not difficult to add Electron support&mdash;let&rsquo;s bring in the Electron package as a dev dependency.</p>
<div>
<pre><code class="language-bash">npm install electron@latest --save-dev</code></pre>
</div>
<p>Now, to configure all things Electron inside an Angular project, let&rsquo;s add a simple <em>App.js</em> file. To bootstrap Electron to run on desktop, we essentially need to new-up a browser window with specified dimensions and load our Angular app&rsquo;s URL. We also need listeners for when the app windows open/close&mdash;here&rsquo;s the code:</p>
<div>
<pre><code class="language-javascript">const {
    app,
    BrowserWindow
    } = require('electron')
  const url = require("url");
  const path = require("path");

  let appWindow

  function initWindow() {
    appWindow = new BrowserWindow({
      width: 1000,
      height: 800,
      webPreferences: {
        nodeIntegration: true
      }
    })

    appWindow.loadURL(
      url.format({
        pathname: path.join(__dirname, `/dist/index.html`),
        protocol: "file:",
        slashes: true
      })
    );

    appWindow.on('closed', function () {
      appWindow = null
    })
  }

  app.on('ready', initWindow)

  app.on('window-all-closed', function () {
    if (process.platform !== 'darwin') {
      app.quit()
    }
  })

  app.on('activate', function () {
    if (win === null) {
      initWindow()
    }
  })</code></pre>
</div>
<p>Next up, we need to configure our Angular app to build itself and Bootstrap from the App.js file&mdash;here is the setup in <em>package.json</em> with the main entry point and a build script to start Electron:</p>
<div>
<pre><code class="language-json">{
  "name": "angularelectron",
  "version": "0.0.0",
  "main": "app.js",
  "scripts": {
    "ng": "ng",
    "start": "ng serve",
    "build": "ng build",
    "watch": "ng build --watch --configuration development",
    "test": "ng test",
    "start:electron": "ng build --base-href ./ &amp;&amp; electron ."
  },
  ...
  ...
}</code></pre>
</div>
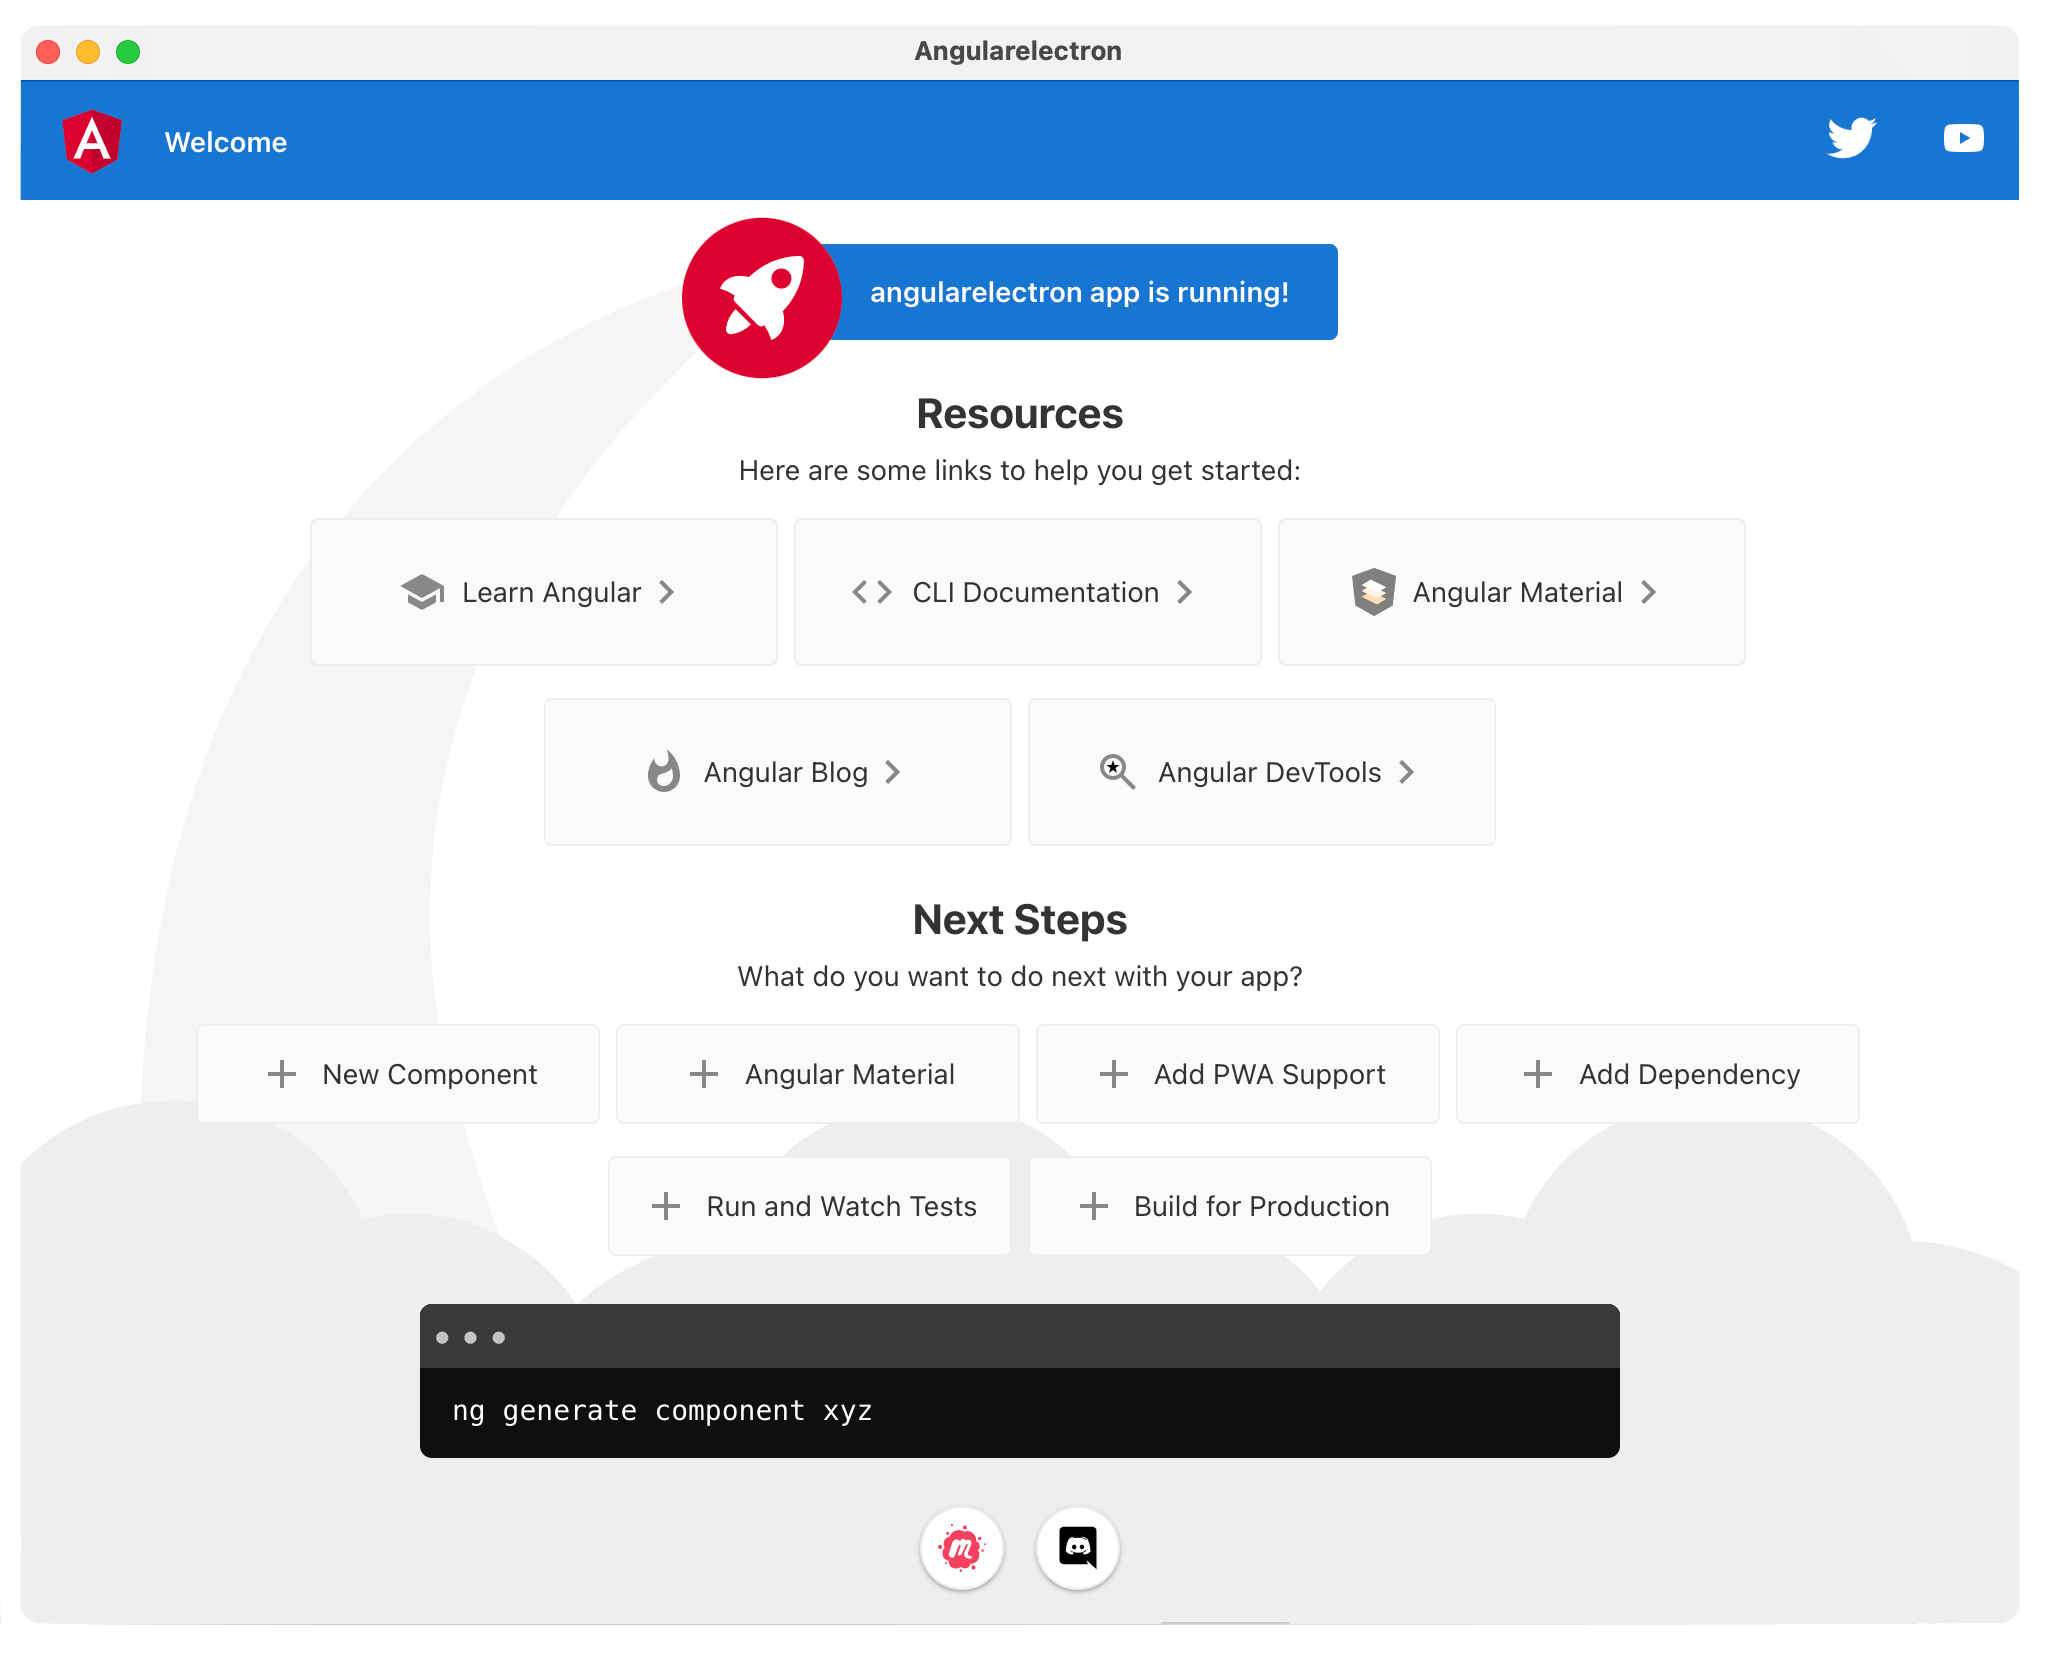
<p>That&rsquo;s all&mdash;now we can fire up our app, and see Angular hosted within the Electron shell.</p>
<div>
<pre><code class="language-bash">npm run start:electron</code></pre>
</div>
<br>
<a href="https://d585tldpucybw.cloudfront.net/sfimages/default-source/default-album/angularelectron.png?sfvrsn=8c9bfb7d_0"><img src="https://d585tldpucybw.cloudfront.net/sfimages/default-source/default-album/angularelectron.png?sfvrsn=8c9bfb7d_0" data-displaymode="Original" alt="AngularElectron" title="AngularElectron" data-openoriginalimageonclick="true"></a><br>
&nbsp;
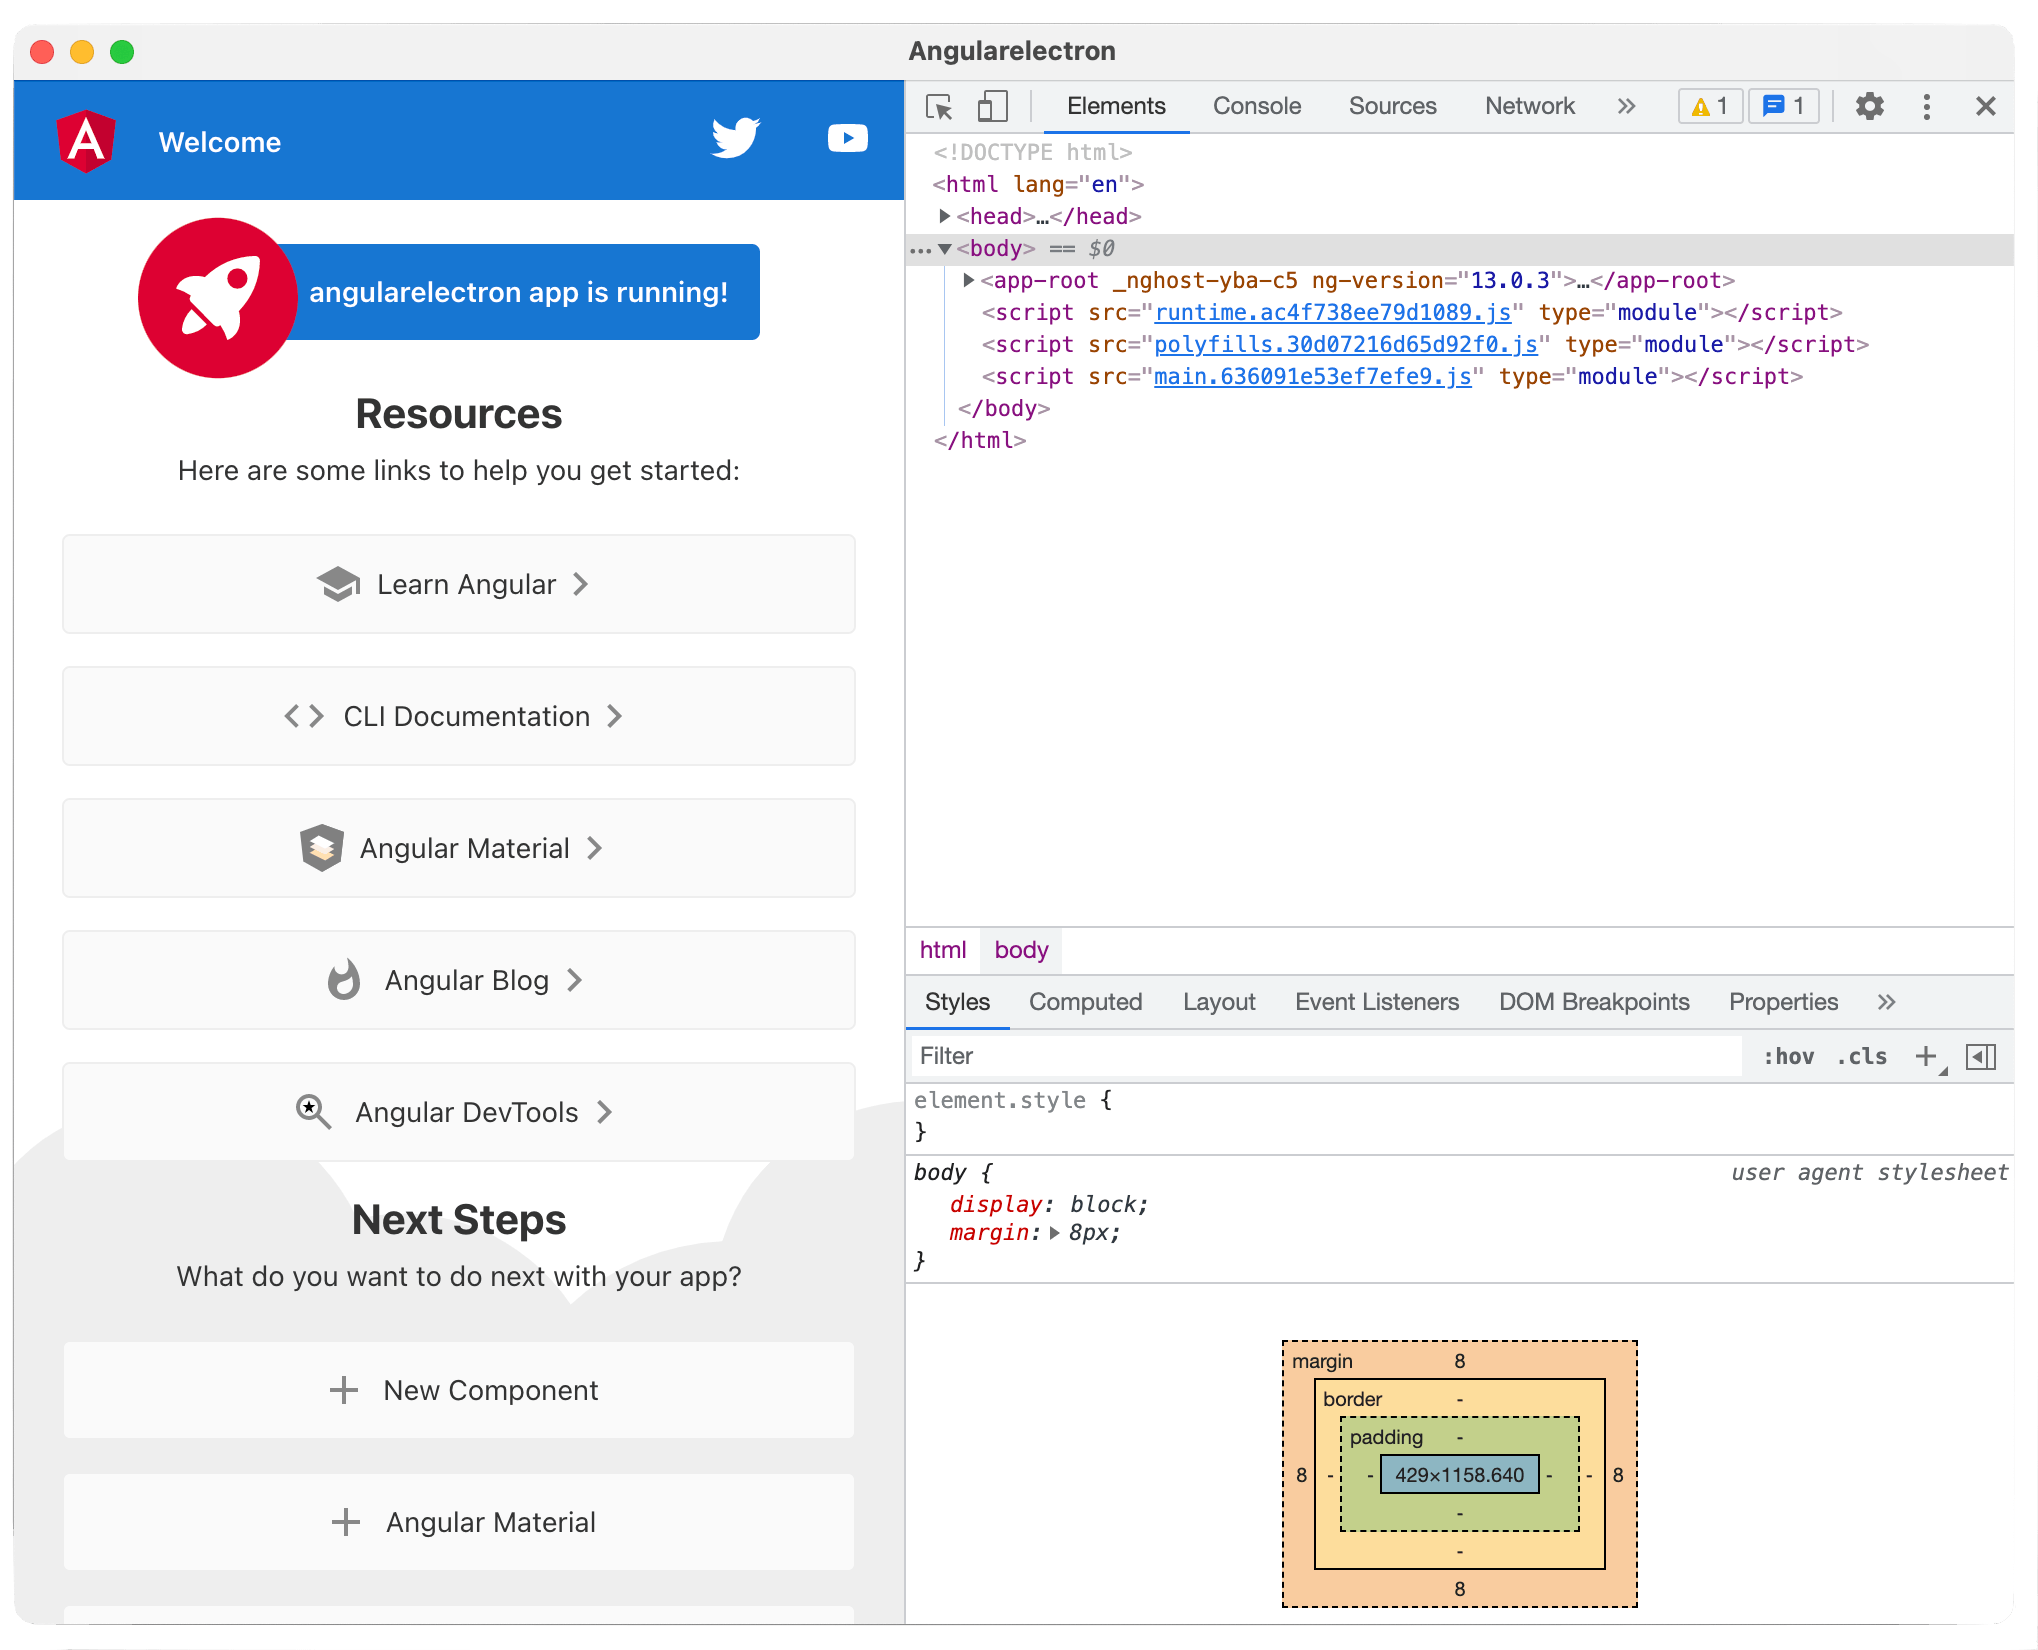
<p>We have a full Chromium engine embedded inside the app&mdash;so we could do things like opening up Chrome DevTools from code:</p>
<div>
<pre><code class="language-javascript">appWindow.webContents.openDevTools()</code></pre>
</div>
<br>
<a href="https://d585tldpucybw.cloudfront.net/sfimages/default-source/default-album/electrondevtools.png?sfvrsn=51bdb436_0"><img src="https://d585tldpucybw.cloudfront.net/sfimages/default-source/default-album/electrondevtools.png?sfvrsn=51bdb436_0" data-displaymode="Original" alt="ElectronDevTools" title="ElectronDevTools" data-openoriginalimageonclick="true"></a><br>
&nbsp;
<p>&nbsp;</p>
<h2 id="toc_4">Angular with .NET MAUI</h2>
<p><a href="https://docs.microsoft.com/en-us/dotnet/maui/what-is-maui" target="_blank">.NET MAUI</a> is the evolution of Xamarin.Forms and represents a modern cross-platform .NET solution to reach mobile and desktop platforms. Blazor is very welcome in .NET MAUI&mdash;essentially .NET MAUI bootstrapping the app and Blazor code rendering within the BlazorWebView. This is obviously a good story for app modernization&mdash;Blazor and .NET MAUI both run on .NET 6 and developers can now share code between web/desktop.</p>
<p>But what if you already had investments in JavaScript? What if you were already building modern web apps with JS SPA frameworks? Would any of that be brought over to .NET MAUI? Let&rsquo;s take a look at the Angular story.</p>
<aside>
<hr>
<div class="row">
<div class="col-4 u-normal-full u-small-mb0">
<h4 class="u-fs20 u-fw5 u-lh125 u-mb0">
Sands of MAUI      </h4>
</div>
<div class="col-8">
<p class="u-fs16 u-mb0">
<a href="https://www.telerik.com/blogs/tag/sands-of-maui" target="_blank">Stay up to date with .NET MAUI</a>, a weekly collection of developer news.
</p>
</div>
</div>
<hr class="u-mb3">
</aside>
<p>As we&rsquo;ve seen getting started with the Angular CLI, Angular web apps do depend on Node.js and Node modules&mdash;which is not something we have with .NET MAUI running on .NET 6. However, let&rsquo;s compile our Angular CLI app, like so:</p>
<div>
<pre><code class="language-bash">ng build --prod</code></pre>
</div>
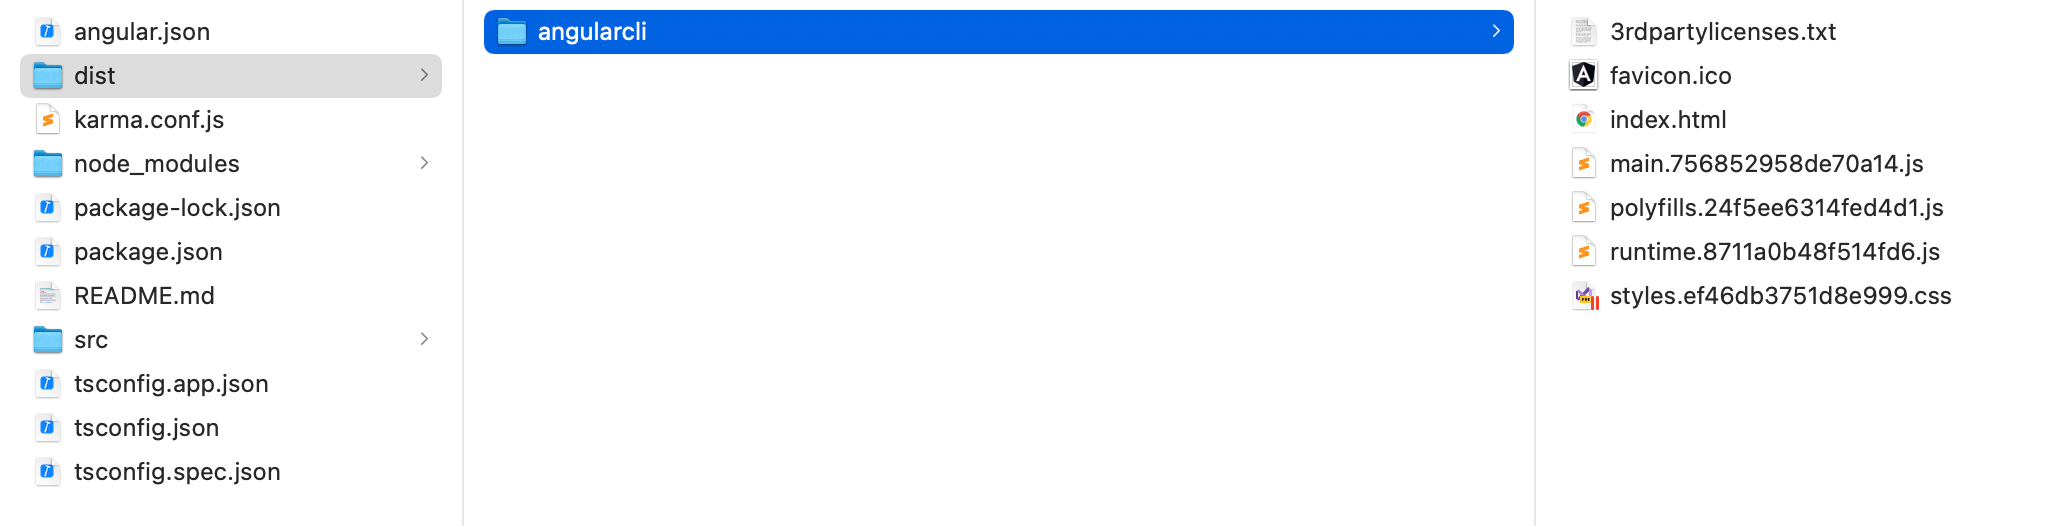
<p>If we look in the <em>dist</em> folder, the artifacts of the build are pure web assets&mdash;all the TypeScript, Node dependencies and other things get compiled down to basic HTML/JS/CSS.</p>
<a href="https://d585tldpucybw.cloudfront.net/sfimages/default-source/default-album/angularbuild.png?sfvrsn=399977f6_0"><img src="https://d585tldpucybw.cloudfront.net/sfimages/default-source/default-album/angularbuild.png?sfvrsn=399977f6_0" data-displaymode="Original" alt="AngularBuild" title="AngularBuild" data-openoriginalimageonclick="true"></a><br>
&nbsp;
<p>If we take a look at the index.html file, it simply references all the JavaScript and knows how to display the root app component.</p>
<div>
<pre><code class="language-html">&lt;!DOCTYPE html&gt;&lt;html lang="en"&gt;&lt;head&gt;
  &lt;meta charset="utf-8"&gt;
  &lt;title&gt;Angularcli&lt;/title&gt;
  &lt;base href="https://www.telerik.com/"&gt;
  &lt;meta name="viewport" content="width=device-width, initial-scale=1"&gt;
  &lt;link rel="icon" type="image/x-icon" href="https://www.telerik.comfavicon.ico"&gt;
&lt;link rel="stylesheet" href="https://www.telerik.comstyles.ef46db3751d8e999.css"&gt;&lt;/head&gt;
&lt;body&gt;
  &lt;app-root&gt;&lt;/app-root&gt;
&lt;script src="https://www.telerik.comruntime.8711a0b48f514fd6.js" type="module"&gt;&lt;/script&gt;&lt;script src="https://www.telerik.compolyfills.24f5ee6314fed4d1.js" type="module"&gt;&lt;/script&gt;&lt;script src="https://www.telerik.commain.756852958de70a14.js" type="module"&gt;&lt;/script&gt;

&lt;/body&gt;&lt;/html&gt;</code></pre>
</div>
<p>Let us start a .NET MAUI project with the <em>Maui-Blazor</em> template&mdash;essentially a hybrid app with full native capabilities, but with Blazor UI rendered through a modern WebView for mobile and desktop platforms.</p>
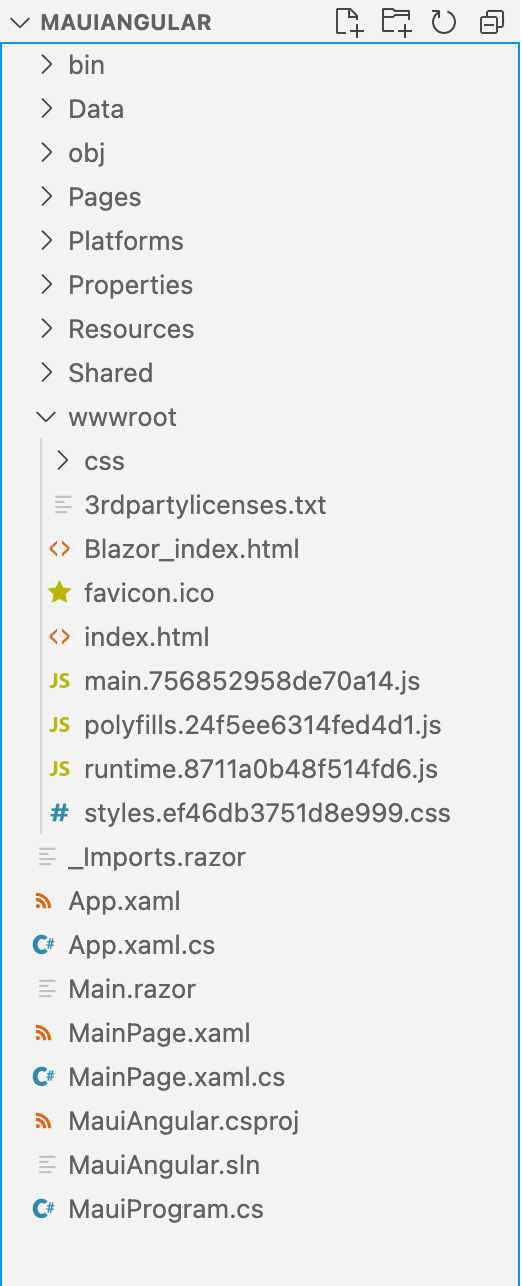
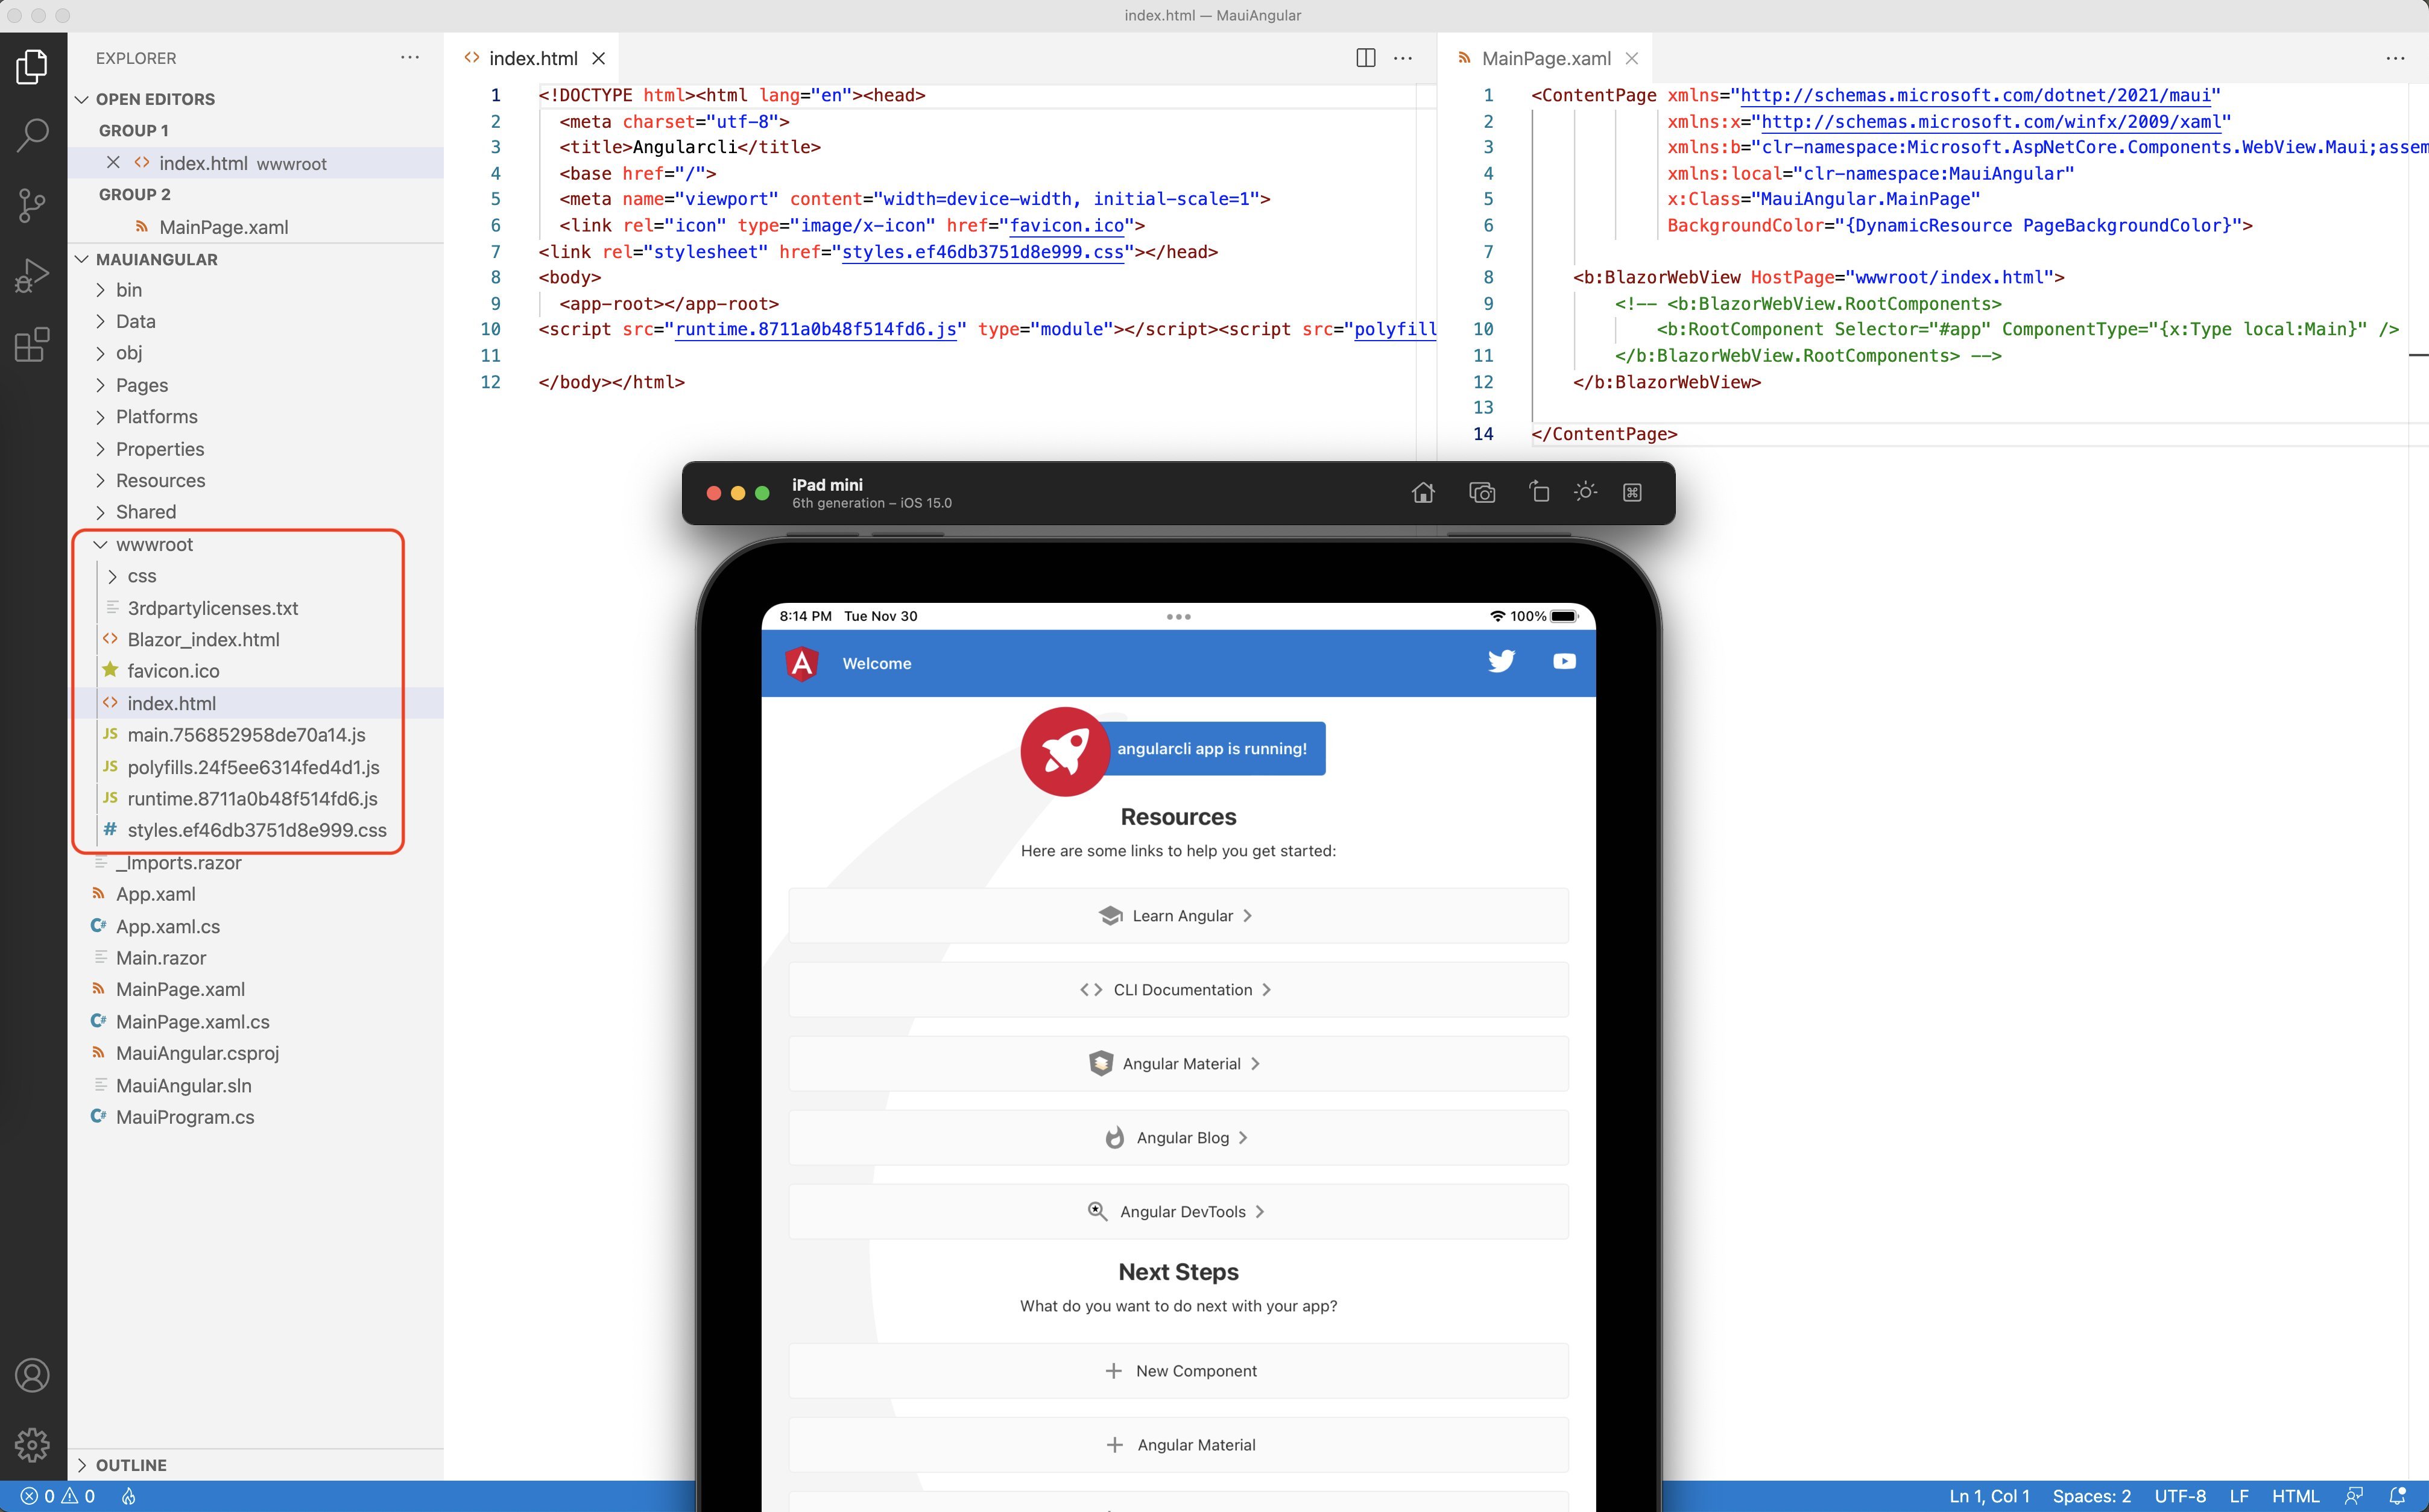
<p>However, could we swap out Blazor with Angular? They&rsquo;re both modern web frameworks rendering UI for the browser, but with different runtimes&mdash;maybe the WebView will not care? Let&rsquo;s bring the compiled Angular CLI app files into our .NET MAUI-Blazor app and drop them in the <em>wwwroot</em> directory as static files, like so:</p>
<img src="https://d585tldpucybw.cloudfront.net/sfimages/default-source/default-album/angularinmaui.png?sfvrsn=46155e1f_0" data-displaymode="Original" alt="AngularInMaui" title="AngularInMaui"><br>
&nbsp;
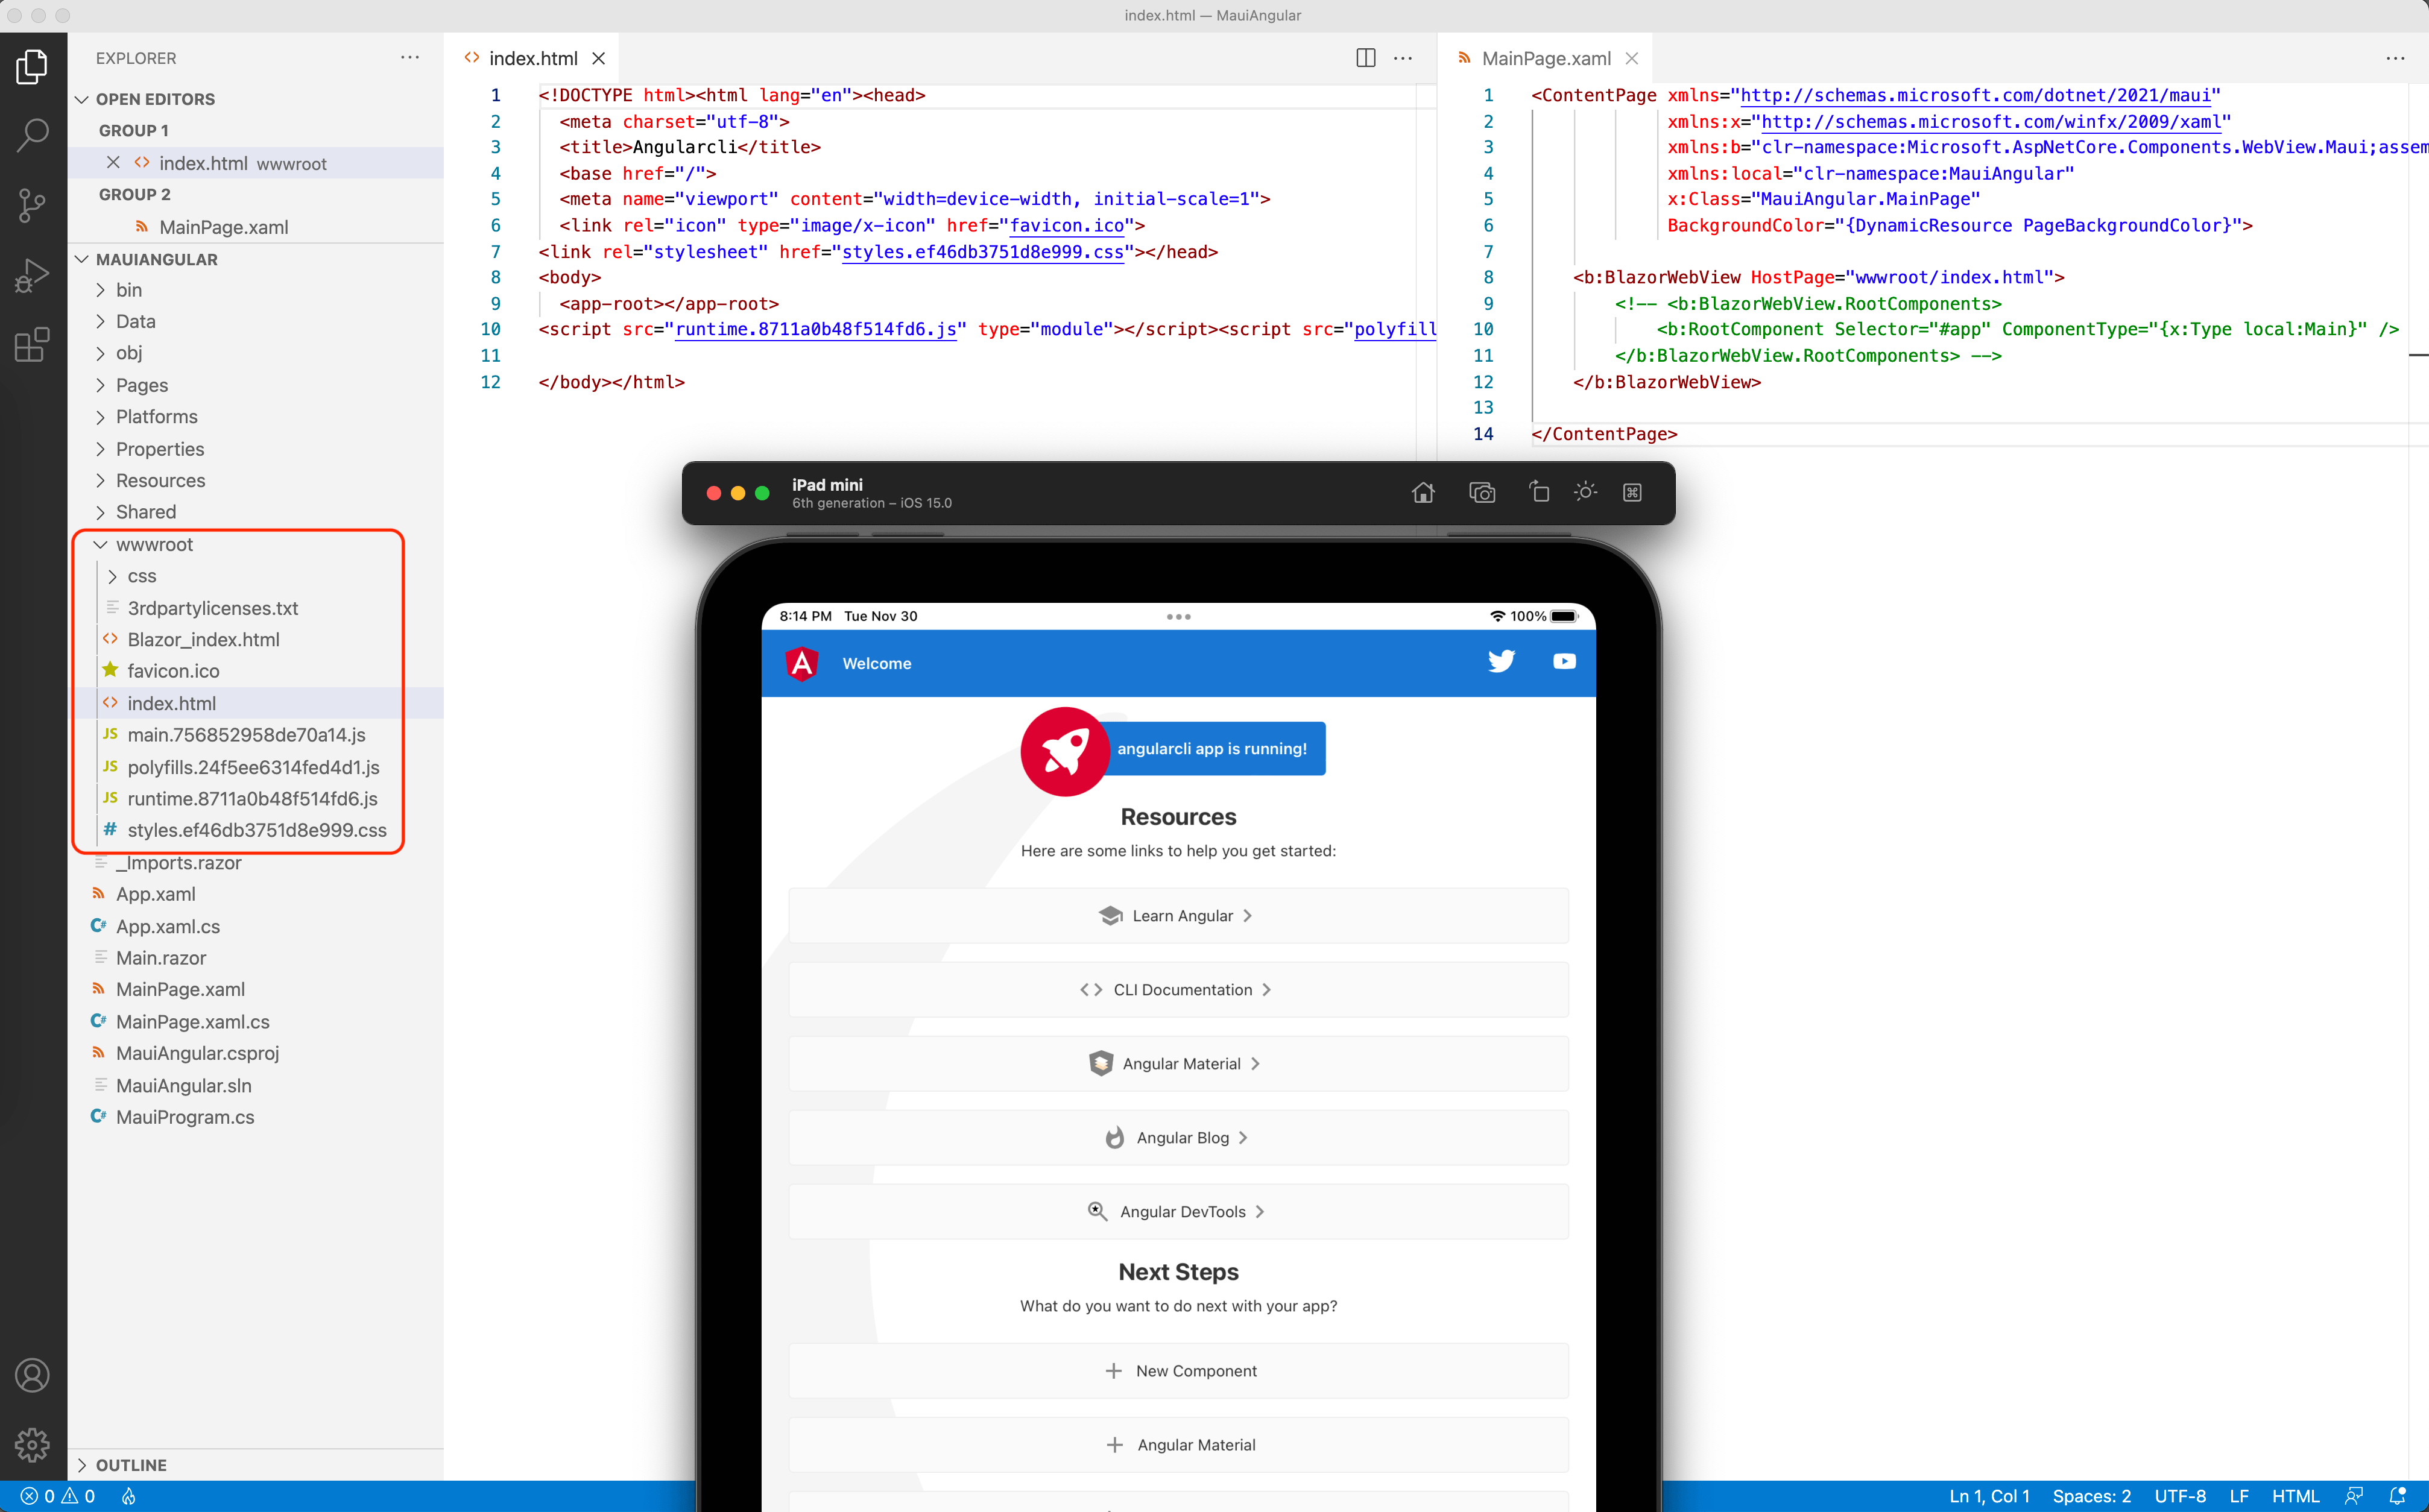
<p>The <em>index.html</em> files acts as the starting point for the Blazor inside .NET MAUI app&mdash;what if we replace it with the one we get from the Angular app? Let&rsquo;s go look in the <em>MainPage.xaml</em> file:</p>
<div>
<pre><code class="language-markup">&lt;ContentPage xmlns="http://schemas.microsoft.com/dotnet/2021/maui"
             xmlns:x="http://schemas.microsoft.com/winfx/2009/xaml"
             xmlns:b="clr-namespace:Microsoft.AspNetCore.Components.WebView.Maui;assembly=Microsoft.AspNetCore.Components.WebView.Maui"
             xmlns:local="clr-namespace:MauiAngular"
             x:Class="MauiAngular.MainPage"
             BackgroundColor="{DynamicResource PageBackgroundColor}"&gt;

    &lt;b:BlazorWebView HostPage="wwwroot/index.html"&gt;
        &lt;!-- &lt;b:BlazorWebView.RootComponents&gt;
            &lt;b:RootComponent Selector="#app" ComponentType="{x:Type local:Main}" /&gt;
        &lt;/b:BlazorWebView.RootComponents&gt; --&gt;
    &lt;/b:BlazorWebView&gt;

&lt;/ContentPage&gt;</code></pre>
</div>
<p>This is where the rubber meets the road&mdash;the .NET MAUI app throws up the big <em>BlazorWebView</em> component for Blazor to do its thing. BlazorWebView is essentially a wrapper&mdash;rendering Webiew2 on Windows, WKWebView on macOS or whichever is the latest relevant WebView component based on the platform where the app is running on.</p>
<p>Here in the MainPage.xaml, we can still point it to go render the <em>wwwroot/index.html</em> file, but we have it swapped with the Angular file now. And we stop Blazor from rendering its base Root component&mdash;so it should be all Angular driving the UI within the WebView. We hesitantly do a .NET MAUI build:</p>
<div>
<pre><code class="language-bash">dotnet build -t:Run -f net6.0-ios</code></pre>
</div>
<p>Voil&agrave;&mdash;we get the Angular CLI app now running inside of .NET MAUI on iOS!</p>
<p><a href="https://d585tldpucybw.cloudfront.net/sfimages/default-source/default-album/mauiangularb1ce55ac55a64b1693e7a1cebdc28ef4.png?sfvrsn=45681e4e_0"><img src="https://d585tldpucybw.cloudfront.net/sfimages/default-source/default-album/mauiangularb1ce55ac55a64b1693e7a1cebdc28ef4.png?sfvrsn=45681e4e_0" data-displaymode="Original" alt="MauiAngular" title="MauiAngular" data-openoriginalimageonclick="true"></a></p>
<p>Let&rsquo;s do a desktop build:</p>
<div>
<pre><code class="language-bash">dotnet build -t:Run -f net6.0-maccatalyst</code></pre>
</div>
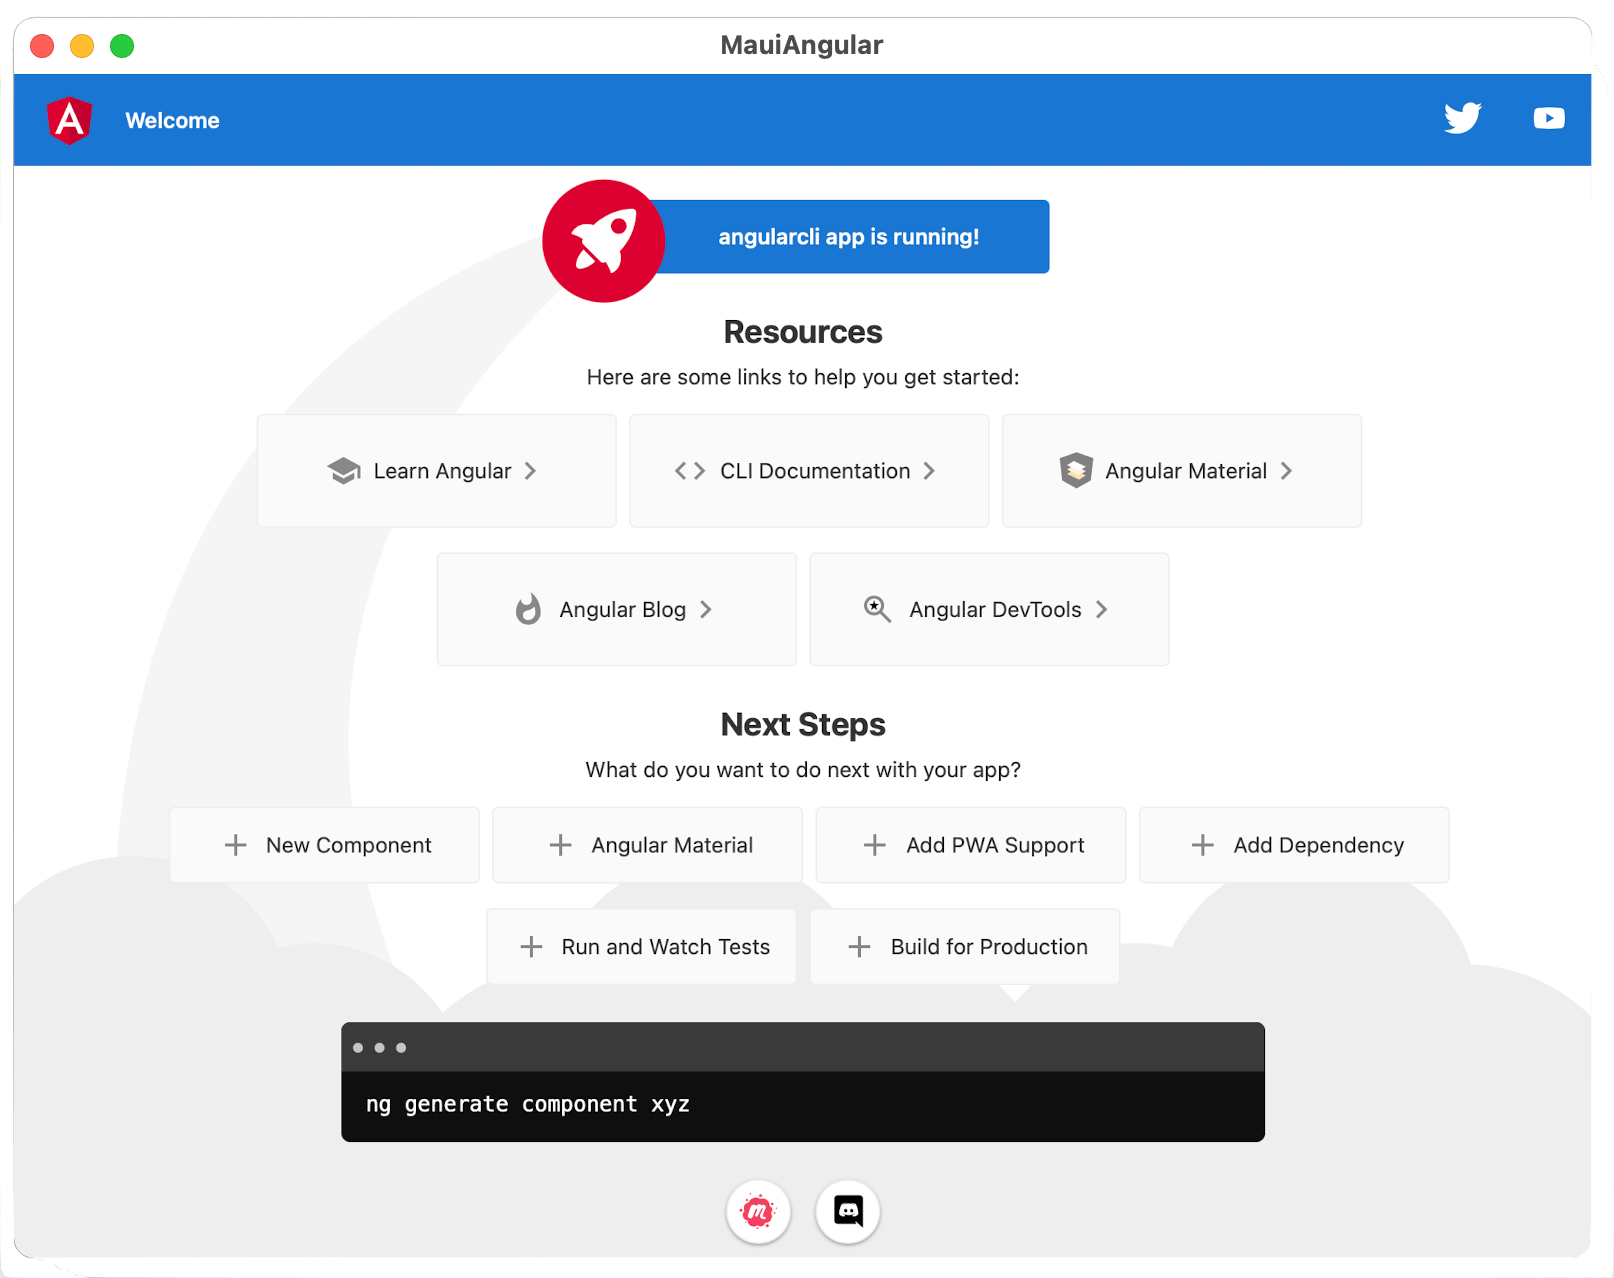
<p>Works on macOS, and Windows should be no different.</p>
<p><a href="https://d585tldpucybw.cloudfront.net/sfimages/default-source/default-album/mauiangularmace89c88915f67487bbebc133a5fe65782.png?sfvrsn=a4fbc068_0"><img src="https://d585tldpucybw.cloudfront.net/sfimages/default-source/default-album/mauiangularmace89c88915f67487bbebc133a5fe65782.png?sfvrsn=a4fbc068_0" data-displaymode="Original" alt="MauiAngularMac" title="MauiAngularMac" data-openoriginalimageonclick="true"></a></p>
<p>Since we fed the BlazorWebView with HTML/CSS/JS, it did not care that we did not render any Blazor UI&mdash;web UI is web UI. And now it is welcome inside .NET MAUI cross-platform apps. Angular code would need a JS Interop to talk to .NET code, but the promise to bring Angular to .NET desktop/mobile apps is just starting.</p>
<h2 id="toc_5">Conclusion</h2>
<p>Angular is wonderful and enables developers to build modern web apps. But much of the Angular goodness&mdash;components, data-binding, routing and more, can be brought over to desktop apps. While PWAs and Electron are the present reality, .NET MAUI represents the promise of tomorrow to bring Angular to Windows/macOS desktop. Let&rsquo;s reuse code!</p><img src="https://feeds.telerik.com/link/10825/15057271.gif" height="1" width="1"/>]]></content>
  </entry>
  <entry>
    <id>urn:uuid:18e65f35-8cb3-46ba-8f4f-691e030a7bc5</id>
    <title type="text">Create Data Matrix Barcodes Quickly and Easily With Telerik UI for Xamarin</title>
    <summary type="text">With the R3 2021 release of Telerik UI for Xamarin, we’ve added a new component to the Barcode family, namely Data Matrix.</summary>
    <published>2021-12-07T10:08:23Z</published>
    <updated>2022-06-30T14:06:13Z</updated>
    <author>
      <name>Yana Kerpecheva </name>
    </author>
    <link rel="alternate" href="https://feeds.telerik.com/link/10825/15057272/create-data-matrix-barcodes-quickly-easily-telerik-ui-xamarin"/>
    <content type="text"><![CDATA[<p><span class="featured">With the R3 2021 release of Telerik UI for Xamarin, we&rsquo;ve added a new component to the Barcode family, namely Data Matrix.</span></p>
<p>Barcodes can be found everywhere&mdash;no matter whether it is on the shipping package in logistics, on an invoice in accounting or on a component parts in industrial factories. They are widely used to help quickly share specific information.</p>
<p>With the R3 2021 release of <a href="https://www.telerik.com/xamarin-ui" target="_blank">Telerik UI for Xamarin</a> suite, we&rsquo;ve expanded our Barcode control to include a new Data Matrix component. Together with the QR Code and PDF417, DataMatrix is among the most popular two-dimensional barcode symbologies. DataMatrix is also available in our UI for WinUI, UI for WPF and UI for WinForms suites.</p>
<p><img src="https://d585tldpucybw.cloudfront.net/sfimages/default-source/default-album/xamarinbarcode_datamatrix.png?sfvrsn=8bbef151_0" data-displaymode="Original" alt="XamarinBarcode_DataMatrix" title="XamarinBarcode_DataMatrix" style="vertical-align: middle;"></p>
<h2>General Info on Data Matrix</h2>
<p>Data Matrix is a very efficient, two-dimensional (2D) barcode symbology consisting of black and white &ldquo;cells,&rdquo; or dots, arranged in either a square or rectangular pattern, also known as a matrix. The information to be encoded can be text or numeric data. With a usual data size from a few bytes up to 1,556 bytes (or up to up to 2,335 alphanumeric characters), DataMatrix barcode is one of the smallest barcodes while encoding the same data as other barcodes.</p>
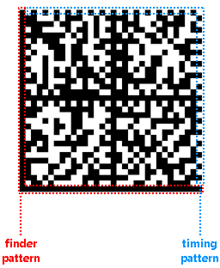
<p>Every Data Matrix is composed of two solid adjacent borders in an &ldquo;L&rdquo; shape (called the &ldquo;finder pattern&rdquo;) and two other borders consisting of alternating dark and light &ldquo;cells&rdquo; or modules (called the &ldquo;timing pattern&rdquo;). Within these borders are rows and columns of cells encoding information. The finder pattern is used to locate and orient the data matrix while the timing pattern provides a count of the number of rows and columns in the matrix.</p>
<p><img src="https://d585tldpucybw.cloudfront.net/sfimages/default-source/default-album/xamarindatamatrix_structure.png?sfvrsn=5d71ced0_0&amp;Width=220&amp;Height=268&amp;ScaleUp=false&amp;Quality=High&amp;Method=ResizeAndCropResizeAndCropArguments&amp;Signature=BC67E99E07EE9292DC2FA9D7B01F21D40AA27ABA" data-displaymode="Custom" alt="XamarinDataMatrix_Structure" title="XamarinDataMatrix_Structure" data-method="ResizeAndCropResizeAndCropArguments" data-customsizemethodproperties="{&quot;Width&quot;:&quot;220&quot;,&quot;Height&quot;:&quot;268&quot;,&quot;ScaleUp&quot;:false,&quot;Quality&quot;:&quot;High&quot;}"></p>
<h2>Data Matrix Advantages</h2>
<p>What are the specific benefits of Data Matrix over other 2D barcodes?</p>
<ul>
    <li>Occupies less space: Data Matrix has the ability to encode large amount of data in a small area.</li>
    <li>High fault tolerance: Data Matrix code includes an error-correction algorithm, making it able to reconstruct up to 30% of a damaged code image.</li>
    <li>Readability even with low contrast: A contrast of only 20% can be sufficient to successfully read the barcode.</li>
    <li>Read easily: It can be read in any position (0-360&deg;).</li>
</ul>
<h2>Configuration</h2>
<p>As always, we have ensured to provide you with various configuration options, so you get the exact DataMatrix barcode you need.&nbsp; Let&rsquo;s quickly go through the list of the available settings:</p>
<h3>Encodation</h3>
<p>The <strong>Encodation</strong> property determines the type of content encoded by the DataMatrix barcode. It&rsquo;s important to choose the proper encodation, as this reduces the barcode size and improves readability. Possible options are ASCII, Text and C40. Details on each of these can be found in our documentation here: <a href="https://docs.telerik.com/devtools/xamarin/controls/barcode/supported-types/2d-barcodes/barcode-datamatrix#encodation" target="_blank">Data Matrix Symbology Encodation</a>.</p>
<h3>Symbol Size</h3>
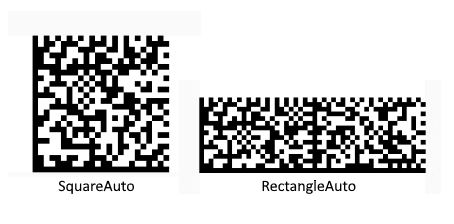
<p>Although the most popular DataMatrix is square, similar to the QR code, you also have the option to define it as a rectangle. This is controlled through the <strong>SymbolSize</strong> property. In addition to the shape, you can choose whether the size should be automatically determined by using &ldquo;SquareAuto&rdquo; or &ldquo;RectangleAuto,&rdquo; or manually define it by using values such as Square32x32 or Rectangle16x48.</p>
<p><img src="https://d585tldpucybw.cloudfront.net/sfimages/default-source/default-album/xamarindatamatrix_shape.png?sfvrsn=9ac4b608_0" data-displaymode="Original" alt="XamarinDataMatrix_Shape" title="XamarinDataMatrix_Shape"></p>
<h3>Text Encoding</h3>
<p>The <strong>TextEncoding</strong> property defines character encoding used to encode the barcode contents. By default, it is set to UTF-8, which uses more bits per character and may increase the size of the barcode image. TextEncoding is of type System.Text.Encoding and you can check the available values in MS Docs: <a href="https://docs.microsoft.com/en-us/dotnet/api/system.text.encoding?view=net-5.0" target="_blank">System.Text.Encoding Class</a>.</p>
<h2>Let&rsquo;s See It in Action</h2>
<p>Let&rsquo;s add a simple DataMatrix barcode to the Xamarin.Forms page.</p>
<ol>
    <li>Add a reference to the Telerik.UI.for.Xamarin NuGet package from the <a href="https://docs.telerik.com/devtools/xamarin/installation-and-deployment/telerik-nuget-server" target="_blank">Telerik NuGet Server</a>.</li>
    <li>Register the required for the Barcode namespace:<br>
    <br>
    <div class="reCodeBlock" style="border:solid 1px #7f9db9;width:;height:;overflow-y:auto;">
    <div style=" background-color: #fff;"><span style="margin-left: 0px !important;"><code style="color: #000;">xmlns:telerik="clr-namespace:Telerik.XamarinForms.Barcode;assembly=Telerik.XamarinForms.Barcode"</code></span></div>
    </div>
    </li>
    <li>Add the RadBarcode definition to the page with the DataMatrix symbology applied:<br>
    <br>
    <div class="reCodeBlock" style="border:solid 1px #7f9db9;width:;height:;overflow-y:auto;">
    <div style=" background-color: #fff;"><span style="margin-left: 0px !important;"><code style="color: #000;">&lt;</code><code style="color: #069;font-weight: bold;">telerik:RadBarcode</code> <code style="color: #808080;">x:Name</code><code style="color: #000;">=</code><code style="color: blue;">"dataMatrix"</code><code style="color: #000;">&gt;</code></span></div>
    <div style=" background-color: #F8F8F8;"><span style=" "><code style=" ">&nbsp;&nbsp;&nbsp;&nbsp;</code><span style="margin-left: 12px !important;"><code style="color: #000;">&lt;</code><code style="color: #069;font-weight: bold;">telerik:RadBarcode.Symbology</code><code style="color: #000;">&gt;</code></span></span></div>
    <div style=" background-color: #fff;"><span style=" "><code style=" ">&nbsp;&nbsp;&nbsp;&nbsp;&nbsp;&nbsp;&nbsp;&nbsp;</code><span style="margin-left: 24px !important;"><code style="color: #000;">&lt;</code><code style="color: #069;font-weight: bold;">telerik:DataMatrix</code> <code style="color: #808080;">Encodation</code><code style="color: #000;">=</code><code style="color: blue;">"Ascii"</code></span></span></div>
    <div style=" background-color: #F8F8F8;"><span style=" "><code style=" ">&nbsp;&nbsp;&nbsp;&nbsp;&nbsp;&nbsp;&nbsp;&nbsp;&nbsp;&nbsp;&nbsp;&nbsp;&nbsp;&nbsp;&nbsp;&nbsp;&nbsp;&nbsp;&nbsp;&nbsp;&nbsp;</code><span style="margin-left: 63px !important;"><code style="color: #808080;">SymbolSize</code><code style="color: #000;">=</code><code style="color: blue;">"SquareAuto"</code> <code style="color: #000;">/&gt;</code></span></span></div>
    <div style=" background-color: #fff;"><span style=" "><code style=" ">&nbsp;&nbsp;&nbsp;&nbsp;</code><span style="margin-left: 12px !important;"><code style="color: #000;">&lt;/</code><code style="color: #069;font-weight: bold;">telerik:RadBarcode.Symbology</code><code style="color: #000;">&gt;</code></span></span></div>
    <div style=" background-color: #F8F8F8;"><span style="margin-left: 0px !important;"><code style="color: #000;">&lt;/</code><code style="color: #069;font-weight: bold;">telerik:RadBarcode</code><code style="color: #000;">&gt;</code></span></div>
    </div>
    </li>
    <li>Set the information that needs to be encoded through the Data Matrix.&nbsp; For our example, I will encode some information on the Telerik UI for Xamarin product:<br>
    <br>
    <div class="reCodeBlock" style="border:solid 1px #7f9db9;width:;height:;overflow-y:auto;">
    <div style=" background-color: #fff;"><span style="margin-left: 0px !important;"><code style="color: #069;font-weight: bold;">string</code> <code style="color: #000;">productName = </code><code style="color: blue;">"Product Name: Telerik UI for Xamarin"</code><code style="color: #000;">;</code></span></div>
    <div style=" background-color: #F8F8F8;"><span style="margin-left: 0px !important;"><code style="color: #069;font-weight: bold;">string</code> <code style="color: #000;">productPage = </code><code style="color: blue;">"Product Page: <a href="https://www.telerik.com/xamarin-ui">https://www.telerik.com/xamarin-ui</a>"</code><code style="color: #000;">;</code></span></div>
    <div style=" background-color: #fff;"><span style="margin-left: 0px !important;"><code style="color: #069;font-weight: bold;">string</code> <code style="color: #000;">documentation = </code><code style="color: blue;">"Documentation: <a href="https://docs.telerik.com/devtools/xamarin/">https://docs.telerik.com/devtools/xamarin/</a>"</code><code style="color: #000;">;</code></span></div>
    <div style=" background-color: #F8F8F8;"><span style="margin-left: 0px !important;"><code style="color: #069;font-weight: bold;">string</code> <code style="color: #000;">release = </code><code style="color: blue;">"Recent Release: R3 2021"</code><code style="color: #000;">;</code></span></div>
    <div style=" background-color: #fff;"><span style=" "><code style=" ">&nbsp;&nbsp;&nbsp;&nbsp;&nbsp;&nbsp;&nbsp;&nbsp;&nbsp;</code><span style="margin-left: 27px !important;">&nbsp;</span></span></div>
    <div style=" background-color: #F8F8F8;"><span style="margin-left: 0px !important;"><code style="color: #000;">dataMatrix.Value = $</code><code style="color: blue;">"{productName}\n{productPage}\n{documentation}\n{release}"</code><code style="color: #000;">;</code></span></div>
    </div>
    </li>
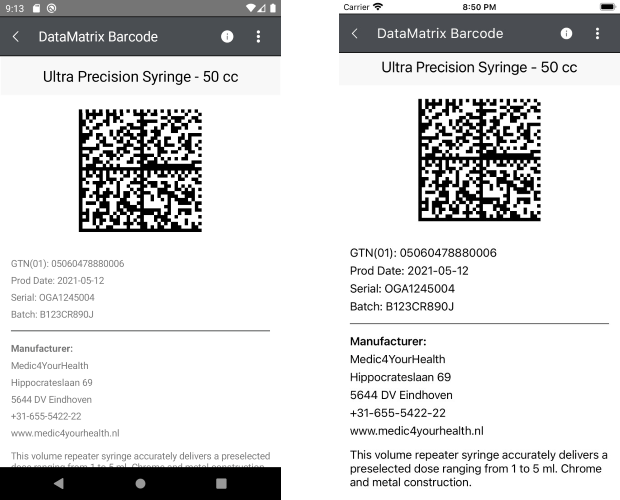
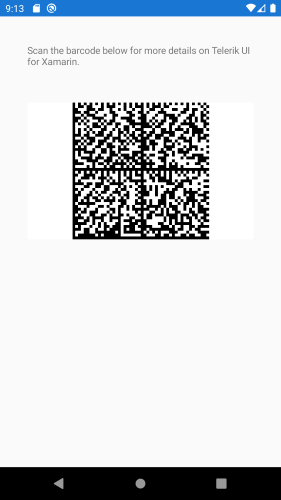
    <p>Check the result in Android emulator:</p>
    <p><img src="https://d585tldpucybw.cloudfront.net/sfimages/default-source/default-album/xamarindatamatrix_example.png?sfvrsn=c2ff34e0_0" data-displaymode="Original" alt="XamarinDataMatrix_Example" title="XamarinDataMatrix_Example"></p>
    <h2>Try It Out and Share Your Feedback</h2>
    <p>The <strong>R3 2021</strong> release is available for download in <a href="https://www.telerik.com/account/" target="_blank">customers&rsquo; accounts</a>. If you are new to Telerik UI for Xamarin, you can learn more about it via the <a href="https://www.telerik.com/xamarin-ui" target="_blank" data-track-instance="2">product page</a>. It comes with a <a href="https://www.telerik.com/download-trial-file/v2-b/ui-for-xamarin" target="_blank">30-day free trial</a>, giving you some time to explore the toolkit and consider using it for your current or upcoming Xamarin development.</p>
    <p>We would love to hear what you think, so should you have any questions and/or comments, please share them in our <a href="https://feedback.telerik.com/xamarin" target="_blank">Telerik UI for Xamarin Feedback Portal</a>.</p>
</ol><img src="https://feeds.telerik.com/link/10825/15057272.gif" height="1" width="1"/>]]></content>
  </entry>
  <entry>
    <id>urn:uuid:b5fa5cdc-98a2-4901-b210-8dfc6d10a340</id>
    <title type="text">Sands of MAUI: Issue #36</title>
    <summary type="text">Welcome to the Sands of MAUI—newsletter-style issues dedicated to bringing together latest .NET MAUI content relevant to developers.</summary>
    <published>2021-12-06T15:13:08Z</published>
    <updated>2022-06-30T14:06:13Z</updated>
    <author>
      <name>Sam Basu </name>
    </author>
    <link rel="alternate" href="https://feeds.telerik.com/link/10825/15057273/sands-maui-issue-36"/>
    <content type="text"><![CDATA[<p><span class="featured">Welcome to the Sands of MAUI&mdash;newsletter-style issues dedicated to bringing together latest .NET MAUI content relevant to developers.</span></p>
<p>A particle of sand&mdash;tiny and innocuous. But put a lot of sand particles together and we have something big&mdash;a force to reckon with. It is the smallest grains of sand that often add up to form massive beaches, dunes and deserts.</p>
<p>Most .NET developers are looking forward to .NET Multi-platform App UI (<a href="https://github.com/dotnet/maui" target="_blank">MAUI</a>)&mdash;the evolution of Xamarin.Forms with .NET 6. Going forward, developers should have much more confidence in the technology stack and tools as .NET MAUI empowers native cross-platform solutions on mobile and desktop.</p>
<p>While it is a long flight until we reach the sands of MAUI, developer excitement is palpable in all the news/content as we tinker and prepare for .NET MAUI. Like the grains of sand, every piece of news/article/video/tutorial/stream contributes towards developer knowledge and we grow a community/ecosystem willing to learn and help.</p>
<p>Sands of MAUI is a humble attempt to collect all the .NET MAUI awesomeness in one place. Here's what is noteworthy for the week of <strong>December 6, 2021</strong>:</p>
<h2 id="toc_1">.NET Podcast App</h2>
<p>.NET Conf 2021 was a massive success&mdash;great .NET content from Microsoft folks and speakers from all around the world. One of the key demo apps during the .NET Conf keynotes was a modern .NET Podcast app&mdash;a showcase of .NET MAUI and Blazor working together on top of .NET 6.</p>
<p><a href="https://twitter.com/JamesMontemagno" target="_blank">James Montemagno</a> wrote up a <a href="https://devblogs.microsoft.com/dotnet/net-conf-2021-recap-videos-slides-demos-and-more/" target="_blank">.NET Conf Recap post</a>&nbsp;pointing to some wonderful session recordings and behold&mdash;the <a href="https://github.com/microsoft/dotnet-podcasts" target="_blank">.NET Podcast app now open sourced</a>. This took some coordination and is a great showcase of a full-featured .NET MAUI app with Blazor and Azure Container Apps goodness baked in&mdash;a nicely architected codebase for developers to explore.</p>
<p><img src="https://d585tldpucybw.cloudfront.net/sfimages/default-source/default-album/dotnetpodcasts.png?sfvrsn=596a36d4_0" data-displaymode="Original" alt="DotNetPodcasts" title="DotNetPodcasts"> </p>
<h2 id="toc_2">.NET MAUI Community Standup</h2>
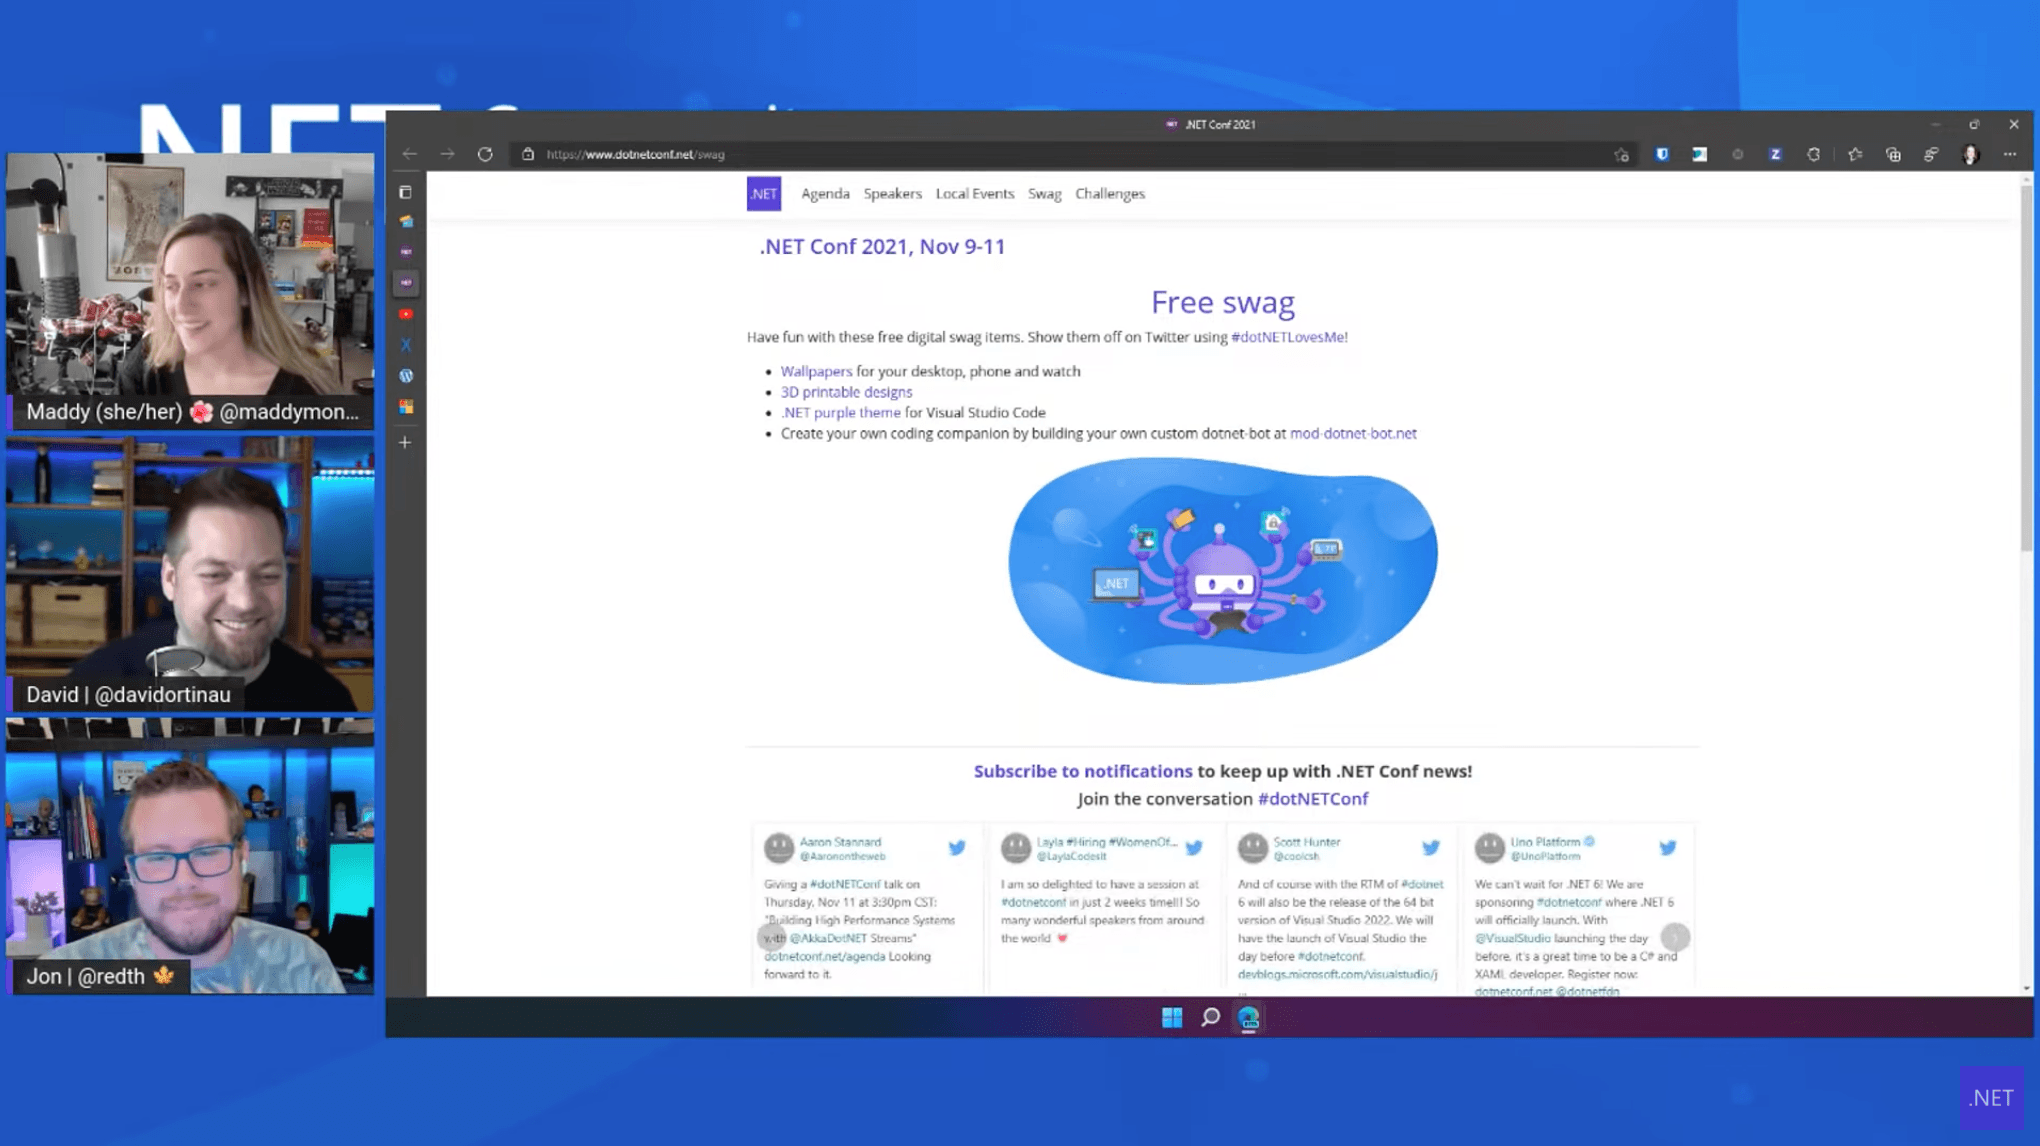
<p><a href="https://twitter.com/maddymontaquila" target="_blank">Maddy Montaquila</a>&nbsp;and&nbsp;<a href="https://twitter.com/davidortinau" target="_blank">David Ortinau</a>&nbsp;hosted <a href="https://www.youtube.com/watch?v=Gkg046mYE3M&amp;list=PLdo4fOcmZ0oX-DBuRG4u58ZTAJgBAeQ-t&amp;index=4" target="_blank">the latest .NET MAUI Community Standup</a>&nbsp;with an epic beginning and with special guest THE <a href="https://twitter.com/redth" target="_blank">Jonathan Dick</a>. On the cards was pointers to .NET Conf goodness around .NET MAUI/Blazor/C# and recapping exciting community blog updates.</p>
<p>David and Jon dug deep into Xamarin.Forms&mdash;the present reality that isn't shabby at all with latest service release and lots of community PRs. Next up was what we're all waiting on to close out the year strong&mdash;the next .NET MAUI release, aka Preview 11, due out soon. There is much to be excited about&mdash;Multi-Window support, Layout improvements, new controls/Handlers and performance tuning. </p>
<p>The next wave of tooling update riding out with Visual Studio 17.2 is scheduled to bring in Visual Diagnostics&mdash;a web DOM like view/selection of UI elements within a running .NET MAUI app and changing properties on the fly. David and Jon also did a lot of honest Q/A&mdash;the future looks productive for .NET MAUI developers. </p>
<p><img src="https://d585tldpucybw.cloudfront.net/sfimages/default-source/default-album/mauistandup5fabb53b5e56453baf45b3df655f13f4.png?sfvrsn=b2fdf0f4_0" data-displaymode="Original" alt="MauiStandup" title="MauiStandup"> </p>
<h2 id="toc_3">Customizing .NET MAUI Controls</h2>
<p>Both Xamarin.Forms and .NET MAUI provide abstraction over native UI across platforms&mdash;developers get to write C#/XAML that gets rendered as native controls on each respective platform. What if you wanted to customize the look and feel or some behavior of the native UI, perhaps on a per platform basis? This is where the evolution to .NET MAUI really makes a difference.</p>
<p>In Xamarin.Forms, one would have to write custom Effects or worst case, a whole custom renderer overriding a native platform implementation&mdash;this was not for the faint-hearted.</p>
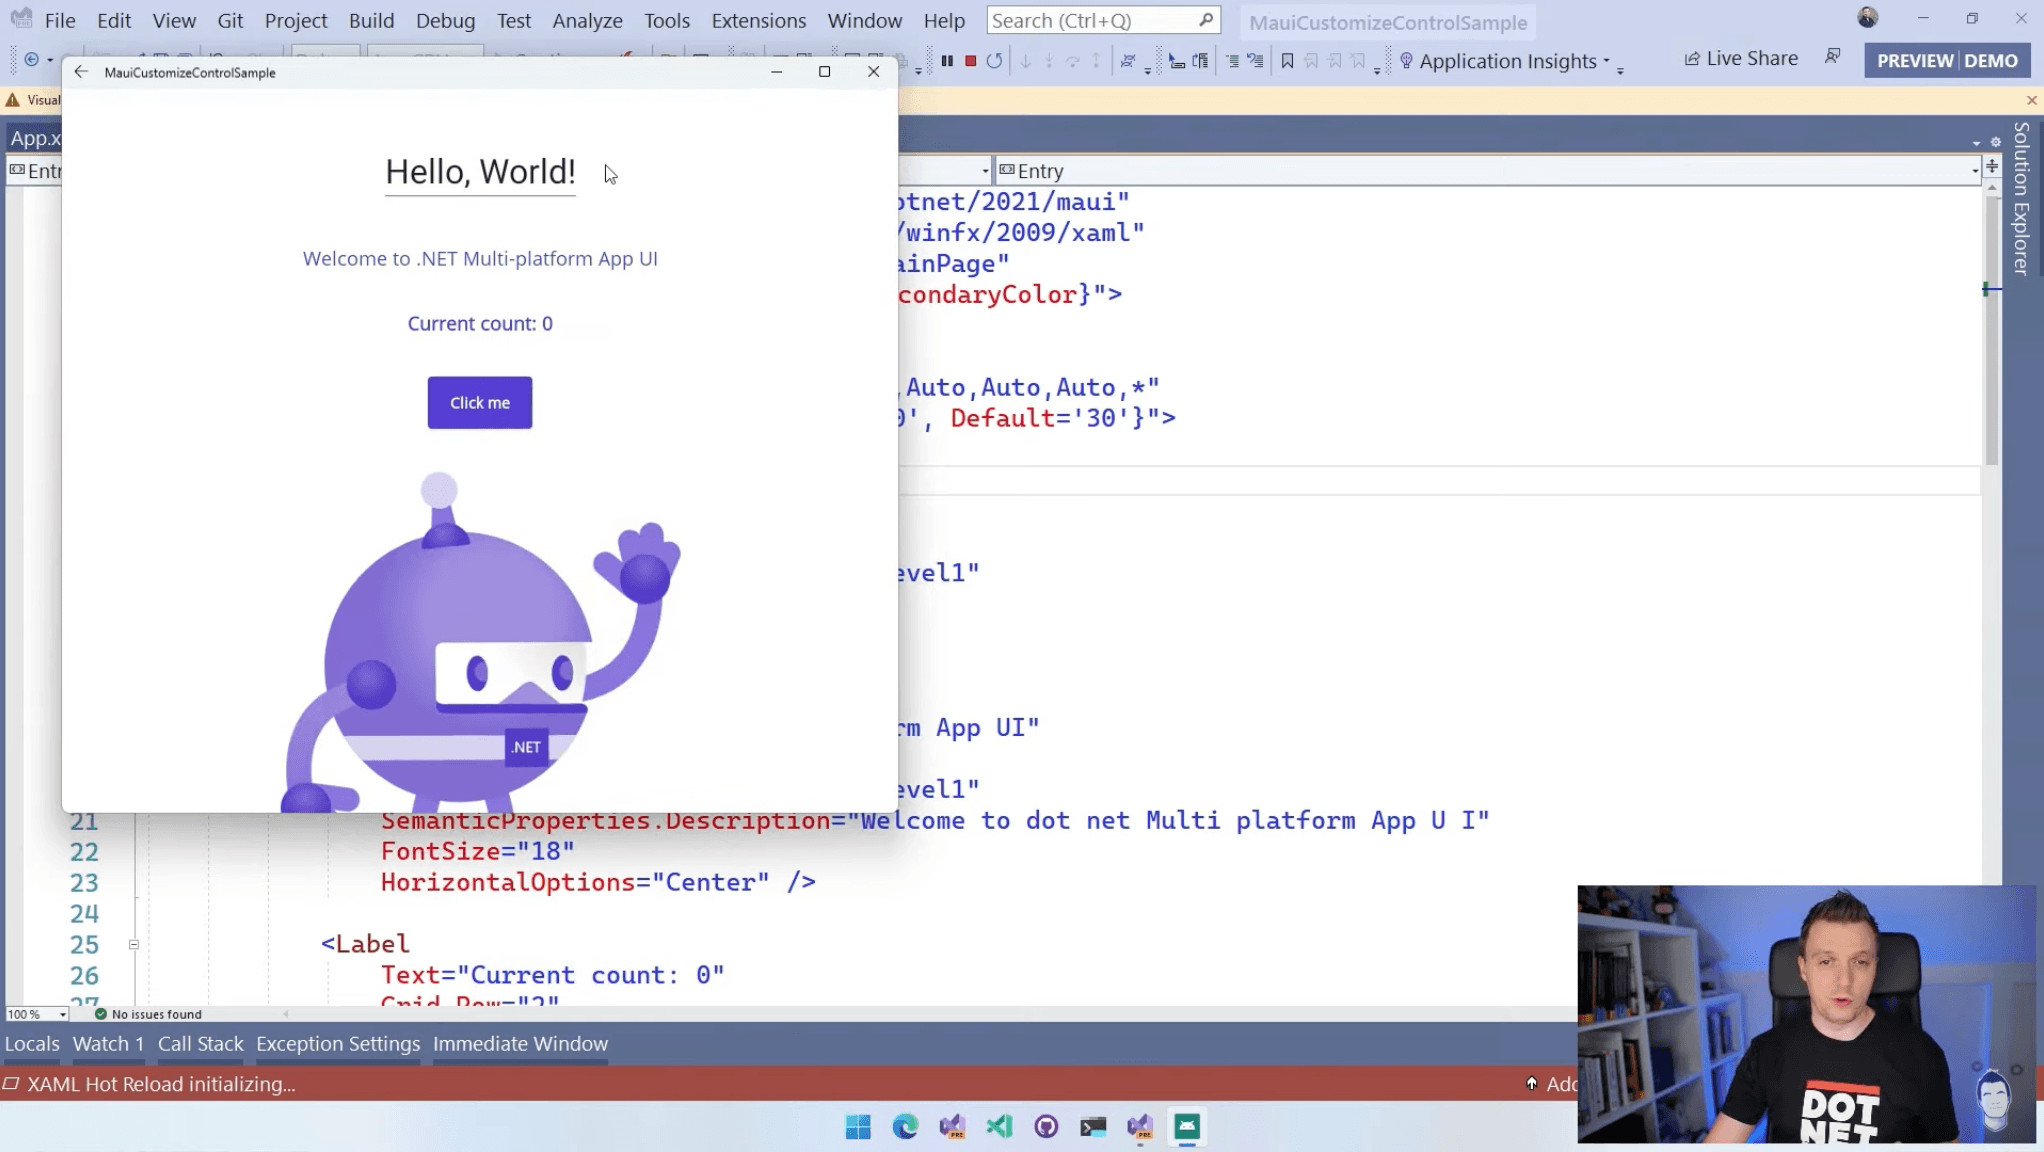
<p>.NET MAUI makes native UI customizations easy with the new Handler architecture, which provides hooks to tap into native control behavior. <a href="https://twitter.com/jfversluis" target="_blank">Gerald Versluis</a>&nbsp;produced a video on <a href="https://www.youtube.com/watch?v=k6Zk3Ho8YNw" target="_blank">customizing .NET MAUI controls with Handlers and Mappers</a>&mdash;an encore after some APIs changed with latest .NET MAUI Previews. </p>
<p>Gerald talks through how to override the Handler implementations through specific Mappers, with PrependToMapper, ModifyMapper or AppendToMapper methods&mdash;thus providing developers full flexibility as to how/when to customize control behavior. </p>
<p><img src="https://d585tldpucybw.cloudfront.net/sfimages/default-source/default-album/customizecontrols.png?sfvrsn=6aa59d08_0" data-displaymode="Original" alt="CustomizeControls" title="CustomizeControls"> </p>
<h2 id="toc_4">Angular with.NET MAUI</h2>
<p>Blazor Hybrid apps with .NET MAUI is a great story&mdash;brings in the goodness of web to native mobile/desktop apps. However,  what if you had investments in JavaScript, like in modern frontend apps with JS SPA frameworks? All this talk of modernizing desktop apps with web code got you thinking if your JS code can make it over the bridge if you give up NodeJs or JSX dependencies?</p>
<p>For modern frontend apps written with Angular/React/other SPA frameworks, PWA and Electron present two lucrative ways to bring the goodness over to desktop audiences. However, Blazor gets to use the BlazorWebView on top of .NET MAUI&mdash;and shouldn't a WebView component be able to render any web content?</p>
<p><a href="https://twitter.com/samidip" target="_blank">A curious developer</a> tried just that&mdash;would it be possible to <a href="https://twitter.com/samidip/status/1466049414804516869" target="_blank">render a fully compiled Angular web app inside a .NET MAUI app through the BlazorWebView</a>? Do a full build of an Angular app and you essentially get HTML, JS and CSS&mdash;BlazorWebView does not care and is happy to render.</p>
<p><img src="https://d585tldpucybw.cloudfront.net/sfimages/default-source/default-album/mauiangular.jpeg?sfvrsn=97df124a_0" data-displaymode="Original" alt="MauiAngular" title="MauiAngular"> </p>
<h2 id="toc_5">.NET MAUI Community Toolkit Unpacked</h2>
<p>Been hearing the buzz about .NET MAUI Community Toolkit but haven't given it a spin yet? <a href="https://twitter.com/TheCodeTraveler" target="_blank">Brandon Minnick</a>&nbsp;produced a short video from .NET Conf giving you the <a href="https://www.youtube.com/watch?v=UR6LC7IXkvY" target="_blank">essential rundown of .NET MAUI Community Toolkit</a>&nbsp;and how to get started using it.</p>
<p>.NET MAUI Community Toolkit is an open source toolkit meant to augment the .NET MAUI developer experience with Extensions, Behaviors, Converters, UI Elements and more&mdash;nothing stopping you from being more productive.</p>
<p><img src="https://d585tldpucybw.cloudfront.net/sfimages/default-source/default-album/mauitoolkitf7d4cc2722fb416bbd563e2e76b137dc.jpeg?sfvrsn=eb2f8d90_0" data-displaymode="Original" alt="MauiToolkit" title="MauiToolkit"> </p>
<p>That's it for now. </p>
<p>We'll see you next week with more awesome content relevant to .NET MAUI. </p>
<p>Cheers, developers!</p><img src="https://feeds.telerik.com/link/10825/15057273.gif" height="1" width="1"/>]]></content>
  </entry>
  <entry>
    <id>urn:uuid:596561ac-5798-4a33-adb1-5877087a6666</id>
    <title type="text">.NET 6 Has Arrived: Here Are a Few of My Favorite Things</title>
    <summary type="text">In this article, let’s explore .NET 6 features like Hot Reload, minimal APIs, HTTP Logging and Blazor improvements.</summary>
    <published>2021-12-02T21:34:51Z</published>
    <updated>2022-06-30T14:06:13Z</updated>
    <author>
      <name>Dave Brock </name>
    </author>
    <link rel="alternate" href="https://feeds.telerik.com/link/10825/15057274/dotnet-6-arrived-here-few-my-favorite-things"/>
    <content type="text"><![CDATA[<p><span class="featured">In this article, let&rsquo;s explore .NET 6 features like Hot Reload, minimal APIs, HTTP Logging and Blazor improvements.</span></p>
<p>For the second straight November, .NET developers have received an early holiday gift: <a href="https://devblogs.microsoft.com/dotnet/announcing-net-6/" target="_blank">a new release of the .NET platform</a>. Last month, Microsoft made .NET 6 generally available&mdash;and <a href="https://www.youtube.com/playlist?list=PLdo4fOcmZ0oVFtp9MDEBNbA2sSqYvXSXO" target="_blank">hosted a virtual conference</a> to celebrate its new features.</p>
<p>What were the goals of .NET 6? If you look at <em><a href="https://themesof.net/query" target="_blank">themesof.net</a></em>, you can quickly see the themes of the .NET 6 release, which include some of the following:</p>
<ul>
    <li>Appeal to net-new devs, students and new technologists</li>
    <li>Improve startup and throughput using runtime exception information</li>
    <li>The client app development experience</li>
    <li>Recognized as a compelling framework for cloud-native apps</li>
    <li>Improve inner-loop performance for .NET developers</li>
</ul>
<p>We could spend the next 10 blog posts writing about all the new .NET 6 improvements and features. I&rsquo;d love to do that, but I haven&rsquo;t even <em>started</em> shopping for the holidays.</p>
<p>Instead, I&rsquo;d like to show off some of my favorite things that I&rsquo;ll be using on my .NET 6 projects. Most of these changes revolve around <a href="https://devblogs.microsoft.com/dotnet/announcing-asp-net-core-in-net-6/" target="_blank">web development in ASP.NET Core 6</a> since this site focuses on those topics.</p>
<h2 id="hot-reload">Hot Reload</h2>
<p>Way back in April, I <a href="https://www.telerik.com/blogs/instant-feedback-is-here-introducing-hot-reload-in-dotnet-6" target="_blank">wrote here about the Hot Reload capability</a> in .NET 6. We&rsquo;ve come a long way since then, but I felt the same as I do now: This is the biggest boost to a .NET web developer&rsquo;s productivity over the last few years. If you aren&rsquo;t familiar with Hot Reload, let&rsquo;s quickly recap.</p>
<p>The idea of &ldquo;hot reload&rdquo; has been around for quite a few years: You save a file, and the change appears almost instantaneously. Once you work with hot reloading, it&rsquo;s tough to go back.</p>
<p>As the .NET team tries to attract outsiders and new developers, not having this feature can be a non-starter to outsiders: It&rsquo;s table stakes for many developers. The concept is quite popular in the frontend space, and .NET developers have been asking for this for a while. (Admittedly, introducing hot reload to a statically typed language is much more complex than doing it for a traditionally interpreted language like JavaScript.)</p>
<p>With .NET 6, you can use Hot Reload to make changes to your app without needing to restart or rebuild it. Hot Reload doesn&rsquo;t just work with static content, either&mdash;it works with most C# use cases and also preserves the state of your application as well&mdash;but you&rsquo;ll want to hit up the Microsoft Docs to learn about <a href="https://docs.microsoft.com/en-us/visualstudio/debugger/supported-code-changes-csharp?view=vs-2022" target="_blank">unsupported app scenarios</a>.</p>
<p>Here&rsquo;s a quick example to show how the application state gets preserved in a Blazor web app. If I&rsquo;m in the middle of an interaction and I update the <code>currentCount</code> from <code>0</code> to <code>10</code>, will things reset? No! Notice how I can continue increasing the counter, and then my counter starts at 10 when I refresh the page.</p>
<p><img src="https://d585tldpucybw.cloudfront.net/sfimages/default-source/blogs/2021/2021-11/hr-preserve-state.gif" alt="Hot Reload preserve state" title="Hot Reload preserve state"></p>
<p>You can leverage Hot Reload in whatever way you prefer: Powerful IDEs like <a href="https://blog.jetbrains.com/dotnet/2021/10/25/hot-reload-for-net-6-in-rider-2021-3/" target="_blank">JetBrains Rider</a> and <a href="https://devblogs.microsoft.com/dotnet/update-on-net-hot-reload-progress-and-visual-studio-2022-highlights/#improved-user-experience-in-visual-studio-2022" target="_blank">Visual Studio 2022</a> have this capability. You can also utilize it from the command line if you prefer (yes, <a href="https://devblogs.microsoft.com/dotnet/net-hot-reload-support-via-cli/" target="_blank">we do</a>). It&rsquo;s important to mention that this works for all ASP.NET Core Web apps.</p>
<h2 id="minimal-apis">Minimal APIs</h2>
<p>Have you ever wanted to write simple APIs in ASP.NET Core quickly but felt helpless under the bloat of ASP.NET Core MVC, wishing you could have an <a href="http://expressjs.com/en/starter/hello-world.html" target="_blank">Express-like model</a> for writing APIs?</p>
<p>The ASP.NET team has rolled out minimal APIs&mdash;a new, simple way to build small microservices and HTTP APIs in ASP.NET Core. Minimal APIs hook into ASP.NET Core&rsquo;s hosting and routing capabilities and allow you to build fully functioning APIs with just a few lines of code.</p>
<p>Minimal APIs do not replace building APIs with MVC&mdash;if you are building complex APIs or prefer MVC, you can keep using it as you always have&mdash;but it&rsquo;s an excellent approach to writing no-frills APIs. We <a href="https://www.telerik.com/blogs/low-ceremony-high-value-tour-minimal-apis-dotnet-6" target="_blank">wrote about it in June</a>, but things have evolved <em>a lot</em> since then. Let&rsquo;s write a simple API to show it off.</p>
<p>First, the basics: Thanks to lambdas, top-level statements, and C# 10 global usings, this is all it takes to write a &ldquo;Hello, Telerik!&rdquo; API.</p>
<pre class=" language-csharp"><code class="prism  language-csharp"><span class="token keyword">var</span> app <span class="token operator">=</span> WebApplication<span class="token punctuation">.</span><span class="token function">Create</span><span class="token punctuation">(</span>args<span class="token punctuation">)</span><span class="token punctuation">;</span>
app<span class="token punctuation">.</span><span class="token function">MapGet</span><span class="token punctuation">(</span><span class="token string">"/"</span><span class="token punctuation">,</span> <span class="token punctuation">(</span><span class="token punctuation">)</span> <span class="token operator">=</span><span class="token operator">&gt;</span> <span class="token string">"Hello, Telerik!"</span><span class="token punctuation">)</span><span class="token punctuation">;</span>
app<span class="token punctuation">.</span><span class="token function">Run</span><span class="token punctuation">(</span><span class="token punctuation">)</span><span class="token punctuation">;</span>
</code></pre>
<p>Of course, we&rsquo;ll want to get past the basics. How can I <em>really</em> use it? Using <code>WebApplication</code>, you can add middleware just like you previously would in the <code>Configure</code> method in <code>Startup.cs</code>. In .NET 6, your configuration takes place in Program.cs instead of a separate <code>Startup</code> class.</p>
<pre class=" language-csharp"><code class="prism  language-csharp"><span class="token keyword">var</span> app <span class="token operator">=</span> WebApplication<span class="token punctuation">.</span><span class="token function">Create</span><span class="token punctuation">(</span>args<span class="token punctuation">)</span><span class="token punctuation">;</span>
app<span class="token punctuation">.</span><span class="token function">UseResponseCaching</span><span class="token punctuation">(</span><span class="token punctuation">)</span><span class="token punctuation">;</span> 
app<span class="token punctuation">.</span><span class="token function">UseResponseCompression</span><span class="token punctuation">(</span><span class="token punctuation">)</span><span class="token punctuation">;</span> 
app<span class="token punctuation">.</span><span class="token function">UseStaticFiles</span><span class="token punctuation">(</span><span class="token punctuation">)</span><span class="token punctuation">;</span>

<span class="token comment">// ...</span>

app<span class="token punctuation">.</span><span class="token function">Run</span><span class="token punctuation">(</span><span class="token punctuation">)</span><span class="token punctuation">;</span>
</code></pre>
<p>If you want to do anything substantial, though, you&rsquo;ll want to add services using a <code>WebApplicationBuilder</code> (again, like you typically would previously in the <code>ConfigureServices</code> method in <code>Startup.cs</code>):</p>
<pre class=" language-csharp"><code class="prism  language-csharp"><span class="token keyword">var</span> builder <span class="token operator">=</span> WebApplication<span class="token punctuation">.</span><span class="token function">CreateBuilder</span><span class="token punctuation">(</span>args<span class="token punctuation">)</span><span class="token punctuation">;</span>
builder<span class="token punctuation">.</span>Services<span class="token punctuation">.</span><span class="token generic-method function">AddSingleton<span class="token punctuation">&lt;</span>MyCoolService<span class="token punctuation">&gt;</span></span><span class="token punctuation">(</span><span class="token punctuation">)</span><span class="token punctuation">;</span>
builder<span class="token punctuation">.</span>Services<span class="token punctuation">.</span><span class="token generic-method function">AddSingleton<span class="token punctuation">&lt;</span>MyReallyCoolService<span class="token punctuation">&gt;</span></span><span class="token punctuation">(</span><span class="token punctuation">)</span><span class="token punctuation">;</span>

builder<span class="token punctuation">.</span>Services<span class="token punctuation">.</span><span class="token function">AddSwaggerGen</span><span class="token punctuation">(</span>c <span class="token operator">=</span><span class="token operator">&gt;</span>
<span class="token punctuation">{</span>
    c<span class="token punctuation">.</span><span class="token function">SwaggerDoc</span><span class="token punctuation">(</span><span class="token string">"v1"</span><span class="token punctuation">,</span> <span class="token keyword">new</span><span class="token punctuation">(</span><span class="token punctuation">)</span> <span class="token punctuation">{</span>
        Title <span class="token operator">=</span> builder<span class="token punctuation">.</span>Environment<span class="token punctuation">.</span>ApplicationName<span class="token punctuation">,</span> Version <span class="token operator">=</span> <span class="token string">"v1"</span> <span class="token punctuation">}</span><span class="token punctuation">)</span><span class="token punctuation">;</span>
<span class="token punctuation">}</span><span class="token punctuation">)</span><span class="token punctuation">;</span>

<span class="token keyword">var</span> app <span class="token operator">=</span> builder<span class="token punctuation">.</span><span class="token function">Build</span><span class="token punctuation">(</span><span class="token punctuation">)</span><span class="token punctuation">;</span>

<span class="token comment">// ...</span>

app<span class="token punctuation">.</span><span class="token function">Run</span><span class="token punctuation">(</span><span class="token punctuation">)</span><span class="token punctuation">;</span>
</code></pre>
<p>Putting it all together, let&rsquo;s write a simple CRUD API that works with Entity Framework Core and a <code>DbContext</code>. We&rsquo;ll work with some superheroes because, apparently, <a href="https://www.daveabrock.com/2021/10/21/csharp-10-global-usings/" target="_blank">that&rsquo;s what I do</a>. With the help of <a href="https://docs.microsoft.com/en-us/dotnet/csharp/language-reference/builtin-types/record" target="_blank">record types</a>, we can make our data models a little less verbose, too.</p>
<pre class=" language-csharp"><code class="prism  language-csharp"><span class="token keyword">using</span> Microsoft<span class="token punctuation">.</span>EntityFrameworkCore<span class="token punctuation">;</span>

<span class="token keyword">var</span> builder <span class="token operator">=</span> WebApplication<span class="token punctuation">.</span><span class="token function">CreateBuilder</span><span class="token punctuation">(</span>args<span class="token punctuation">)</span><span class="token punctuation">;</span>
builder<span class="token punctuation">.</span>Services<span class="token punctuation">.</span><span class="token generic-method function">AddDbContext<span class="token punctuation">&lt;</span>SuperheroDb<span class="token punctuation">&gt;</span></span><span class="token punctuation">(</span>o <span class="token operator">=</span><span class="token operator">&gt;</span> o<span class="token punctuation">.</span><span class="token function">UseInMemoryDatabase</span><span class="token punctuation">(</span><span class="token string">"Superheroes"</span><span class="token punctuation">)</span><span class="token punctuation">)</span><span class="token punctuation">;</span>

builder<span class="token punctuation">.</span>Services<span class="token punctuation">.</span><span class="token function">AddSwaggerGen</span><span class="token punctuation">(</span>c <span class="token operator">=</span><span class="token operator">&gt;</span>
<span class="token punctuation">{</span>
    c<span class="token punctuation">.</span><span class="token function">SwaggerDoc</span><span class="token punctuation">(</span><span class="token string">"v1"</span><span class="token punctuation">,</span> <span class="token keyword">new</span><span class="token punctuation">(</span><span class="token punctuation">)</span> <span class="token punctuation">{</span>
        Title <span class="token operator">=</span> builder<span class="token punctuation">.</span>Environment<span class="token punctuation">.</span>ApplicationName<span class="token punctuation">,</span> Version <span class="token operator">=</span> <span class="token string">"v1"</span> <span class="token punctuation">}</span><span class="token punctuation">)</span><span class="token punctuation">;</span>
<span class="token punctuation">}</span><span class="token punctuation">)</span><span class="token punctuation">;</span>

<span class="token keyword">var</span> app <span class="token operator">=</span> builder<span class="token punctuation">.</span><span class="token function">Build</span><span class="token punctuation">(</span><span class="token punctuation">)</span><span class="token punctuation">;</span>

app<span class="token punctuation">.</span><span class="token function">MapGet</span><span class="token punctuation">(</span><span class="token string">"/superheroes"</span><span class="token punctuation">,</span> <span class="token keyword">async</span> <span class="token punctuation">(</span>SuperheroDb db<span class="token punctuation">)</span> <span class="token operator">=</span><span class="token operator">&gt;</span>
<span class="token punctuation">{</span>
    <span class="token keyword">await</span> db<span class="token punctuation">.</span>Superheroes<span class="token punctuation">.</span><span class="token function">ToListAsync</span><span class="token punctuation">(</span><span class="token punctuation">)</span><span class="token punctuation">;</span>
<span class="token punctuation">}</span><span class="token punctuation">)</span><span class="token punctuation">;</span>

app<span class="token punctuation">.</span><span class="token function">MapGet</span><span class="token punctuation">(</span><span class="token string">"/superheroes/{id}"</span><span class="token punctuation">,</span> <span class="token keyword">async</span> <span class="token punctuation">(</span>SuperheroDb db<span class="token punctuation">,</span> <span class="token keyword">int</span> id<span class="token punctuation">)</span> <span class="token operator">=</span><span class="token operator">&gt;</span>
<span class="token punctuation">{</span>
    <span class="token keyword">await</span> db<span class="token punctuation">.</span>Superheroes<span class="token punctuation">.</span><span class="token function">FindAsync</span><span class="token punctuation">(</span>id<span class="token punctuation">)</span> <span class="token keyword">is</span> Superhero superhero <span class="token operator">?</span>
    Results<span class="token punctuation">.</span><span class="token function">Ok</span><span class="token punctuation">(</span>superhero<span class="token punctuation">)</span> <span class="token punctuation">:</span> Results<span class="token punctuation">.</span><span class="token function">NotFound</span><span class="token punctuation">(</span><span class="token punctuation">)</span><span class="token punctuation">;</span>
<span class="token punctuation">}</span><span class="token punctuation">)</span><span class="token punctuation">;</span>

app<span class="token punctuation">.</span><span class="token function">MapPost</span><span class="token punctuation">(</span><span class="token string">"/superheroes"</span><span class="token punctuation">,</span> <span class="token keyword">async</span> <span class="token punctuation">(</span>SuperheroDb db<span class="token punctuation">,</span> Superhero hero<span class="token punctuation">)</span> <span class="token operator">=</span><span class="token operator">&gt;</span>
<span class="token punctuation">{</span>
    db<span class="token punctuation">.</span>Superheroes<span class="token punctuation">.</span><span class="token function">Add</span><span class="token punctuation">(</span>hero<span class="token punctuation">)</span><span class="token punctuation">;</span>
    <span class="token keyword">await</span> db<span class="token punctuation">.</span><span class="token function">SaveChangesAsync</span><span class="token punctuation">(</span><span class="token punctuation">)</span><span class="token punctuation">;</span>

    <span class="token keyword">return</span> Results<span class="token punctuation">.</span><span class="token function">Created</span><span class="token punctuation">(</span>$<span class="token string">"/superheroes/{hero.Id}"</span><span class="token punctuation">,</span> hero<span class="token punctuation">)</span><span class="token punctuation">;</span>
<span class="token punctuation">}</span><span class="token punctuation">)</span><span class="token punctuation">;</span>

app<span class="token punctuation">.</span><span class="token function">MapPut</span><span class="token punctuation">(</span><span class="token string">"/superheroes/{id}"</span><span class="token punctuation">,</span>
    <span class="token keyword">async</span> <span class="token punctuation">(</span>SuperheroDb db<span class="token punctuation">,</span> <span class="token keyword">int</span> id<span class="token punctuation">,</span> Superhero heroInput<span class="token punctuation">)</span> <span class="token operator">=</span><span class="token operator">&gt;</span>
    <span class="token punctuation">{</span>
        <span class="token keyword">var</span> hero <span class="token operator">=</span> <span class="token keyword">await</span> db<span class="token punctuation">.</span>Superheroes<span class="token punctuation">.</span><span class="token function">FindAsync</span><span class="token punctuation">(</span>id<span class="token punctuation">)</span><span class="token punctuation">;</span>
        
        <span class="token keyword">if</span> <span class="token punctuation">(</span>hero <span class="token keyword">is</span> <span class="token keyword">null</span><span class="token punctuation">)</span>
           <span class="token keyword">return</span> Results<span class="token punctuation">.</span><span class="token function">NotFound</span><span class="token punctuation">(</span><span class="token punctuation">)</span><span class="token punctuation">;</span>

        db<span class="token punctuation">.</span><span class="token function">Update</span><span class="token punctuation">(</span>heroInput<span class="token punctuation">)</span><span class="token punctuation">;</span>
        <span class="token keyword">await</span> db<span class="token punctuation">.</span><span class="token function">SaveChangesAsync</span><span class="token punctuation">(</span><span class="token punctuation">)</span><span class="token punctuation">;</span>

        <span class="token keyword">return</span> Results<span class="token punctuation">.</span><span class="token function">NoContent</span><span class="token punctuation">(</span><span class="token punctuation">)</span><span class="token punctuation">;</span>
    <span class="token punctuation">}</span><span class="token punctuation">)</span><span class="token punctuation">;</span>


app<span class="token punctuation">.</span><span class="token function">MapDelete</span><span class="token punctuation">(</span><span class="token string">"/superheroes/{id}"</span><span class="token punctuation">,</span>
    <span class="token keyword">async</span> <span class="token punctuation">(</span>SuperheroDb db<span class="token punctuation">,</span> <span class="token keyword">int</span> id<span class="token punctuation">)</span> <span class="token operator">=</span><span class="token operator">&gt;</span>
    <span class="token punctuation">{</span>
        <span class="token keyword">var</span> hero <span class="token operator">=</span> <span class="token keyword">await</span> db<span class="token punctuation">.</span>Superheroes<span class="token punctuation">.</span><span class="token function">FindAsync</span><span class="token punctuation">(</span>id<span class="token punctuation">)</span><span class="token punctuation">;</span>
        <span class="token keyword">if</span> <span class="token punctuation">(</span>hero <span class="token keyword">is</span> <span class="token keyword">null</span><span class="token punctuation">)</span>
            <span class="token keyword">return</span> Results<span class="token punctuation">.</span><span class="token function">NotFound</span><span class="token punctuation">(</span><span class="token punctuation">)</span><span class="token punctuation">;</span>

        db<span class="token punctuation">.</span>Superheroes<span class="token punctuation">.</span><span class="token function">Remove</span><span class="token punctuation">(</span>hero<span class="token punctuation">)</span><span class="token punctuation">;</span>
        <span class="token keyword">await</span> db<span class="token punctuation">.</span><span class="token function">SaveChangesAsync</span><span class="token punctuation">(</span><span class="token punctuation">)</span><span class="token punctuation">;</span>
        <span class="token keyword">return</span> Results<span class="token punctuation">.</span><span class="token function">Ok</span><span class="token punctuation">(</span><span class="token punctuation">)</span><span class="token punctuation">;</span>
    <span class="token punctuation">}</span><span class="token punctuation">)</span><span class="token punctuation">;</span>

app<span class="token punctuation">.</span><span class="token function">Run</span><span class="token punctuation">(</span><span class="token punctuation">)</span><span class="token punctuation">;</span>

record <span class="token function">Superhero</span><span class="token punctuation">(</span><span class="token keyword">int</span> Id<span class="token punctuation">,</span> <span class="token keyword">string</span><span class="token operator">?</span> Name<span class="token punctuation">,</span> <span class="token keyword">int</span> maxSpeed<span class="token punctuation">)</span><span class="token punctuation">;</span>

<span class="token keyword">class</span> <span class="token class-name">SuperheroDb</span> <span class="token punctuation">:</span> DbContext
<span class="token punctuation">{</span>
    <span class="token keyword">public</span> <span class="token function">SuperheroDb</span><span class="token punctuation">(</span>DbContextOptions<span class="token operator">&lt;</span>SuperheroDb<span class="token operator">&gt;</span> options<span class="token punctuation">)</span>
        <span class="token punctuation">:</span> <span class="token keyword">base</span><span class="token punctuation">(</span>options<span class="token punctuation">)</span> <span class="token punctuation">{</span> <span class="token punctuation">}</span>

    <span class="token keyword">public</span> DbSet<span class="token operator">&lt;</span>Superhero<span class="token operator">&gt;</span> Superheroes <span class="token operator">=</span><span class="token operator">&gt;</span> <span class="token generic-method function">Set<span class="token punctuation">&lt;</span>Superhero<span class="token punctuation">&gt;</span></span><span class="token punctuation">(</span><span class="token punctuation">)</span><span class="token punctuation">;</span>
<span class="token punctuation">}</span>
</code></pre>
<p>As you can see, you can <a href="https://docs.microsoft.com/en-us/aspnet/core/fundamentals/minimal-apis?view=aspnetcore-6.0" target="_blank">do a lot with minimal APIs</a> while keeping them relatively lightweight. If you want to continue using MVC, that&rsquo;s your call&mdash;but with APIs in .NET, you no longer have to worry about the overhead of MVC if you don&rsquo;t want it. If you want to learn more, David Fowler has put together <a href="https://gist.github.com/davidfowl/ff1addd02d239d2d26f4648a06158727" target="_blank">a comprehensive document on how to leverage minimal APIs</a>&mdash;it&rsquo;s worth checking out.</p>
<p>Looking at the code sample above, it&rsquo;s easy to wonder if this is all a race to see what we can throw in the <code>Program.cs</code> file and how easy it is to get messy. This can happen in any app&mdash;I don&rsquo;t know about you, but I&rsquo;ve seen my share of controllers that were rife for abuse.</p>
<p>It&rsquo;s essential to see the true value of this model&mdash;not how cool and sexy it is to write an entire .NET CRUD API in one file, but the ability to write simple APIs with minimal dependencies and exceptional performance. If things look unwieldy, organize your project as you see fit, just like you always have.</p>
<h2 id="simplified-http-logging">Simplified HTTP Logging</h2>
<p>How often have you used custom middleware, libraries or solutions to log simple HTTP requests? I&rsquo;ve done it more than I&rsquo;d like to admit. .NET 6 introduces HTTP Logging middleware for ASP.NET Core apps that <a href="https://docs.microsoft.com/en-us/aspnet/core/fundamentals/http-logging/?view=aspnetcore-6.0" target="_blank">log information about HTTP requests and responses for you</a>, like:</p>
<ul>
    <li>Request information</li>
    <li>Properties</li>
    <li>Headers</li>
    <li>Body data</li>
    <li>Response information</li>
</ul>
<p>You can also select which logging properties to include, which can help with performance too.</p>
<p>To get started, add this in your project&rsquo;s middleware:</p>
<pre class=" language-csharp"><code class="prism  language-csharp"><span class="token keyword">public</span> <span class="token keyword">void</span> <span class="token function">Configure</span><span class="token punctuation">(</span>IApplicationBuilder app<span class="token punctuation">,</span> IWebHostEnvironment env<span class="token punctuation">)</span>
<span class="token punctuation">{</span>
    app<span class="token punctuation">.</span><span class="token function">UseHttpLogging</span><span class="token punctuation">(</span><span class="token punctuation">)</span><span class="token punctuation">;</span>

    <span class="token comment">// other stuff here, removed for brevity</span>
<span class="token punctuation">}</span>
</code></pre>
<p>To customize the logger, you can use <code>AddHttpLogging</code>:</p>
<pre class=" language-csharp"><code class="prism  language-csharp"><span class="token keyword">public</span> <span class="token keyword">void</span> <span class="token function">ConfigureServices</span><span class="token punctuation">(</span>IServiceCollection services<span class="token punctuation">)</span>
<span class="token punctuation">{</span>
    services<span class="token punctuation">.</span><span class="token function">AddHttpLogging</span><span class="token punctuation">(</span>logging <span class="token operator">=</span><span class="token operator">&gt;</span>
    <span class="token punctuation">{</span>
        logging<span class="token punctuation">.</span>LoggingFields <span class="token operator">=</span> HttpLoggingFields<span class="token punctuation">.</span>All<span class="token punctuation">;</span>
        logging<span class="token punctuation">.</span>RequestHeaders<span class="token punctuation">.</span><span class="token function">Add</span><span class="token punctuation">(</span><span class="token string">"X-Request-Header"</span><span class="token punctuation">)</span><span class="token punctuation">;</span>
        logging<span class="token punctuation">.</span>ResponseHeaders<span class="token punctuation">.</span><span class="token function">Add</span><span class="token punctuation">(</span><span class="token string">"X-Response-Header"</span><span class="token punctuation">)</span><span class="token punctuation">;</span>
        logging<span class="token punctuation">.</span>RequestBodyLogLimit <span class="token operator">=</span> <span class="token number">4096</span><span class="token punctuation">;</span>
        logging<span class="token punctuation">.</span>ResponseBodyLogLimit <span class="token operator">=</span> <span class="token number">4096</span><span class="token punctuation">;</span>
    <span class="token punctuation">}</span><span class="token punctuation">)</span><span class="token punctuation">;</span>
<span class="token punctuation">}</span>
</code></pre>
<p>If we want to pair this with a minimal API, here&rsquo;s how it would look:</p>
<pre class=" language-csharp"><code class="prism  language-csharp"><span class="token keyword">using</span> Microsoft<span class="token punctuation">.</span>AspNetCore<span class="token punctuation">.</span>HttpLogging<span class="token punctuation">;</span>

<span class="token keyword">var</span> builder <span class="token operator">=</span> WebApplication<span class="token punctuation">.</span><span class="token function">CreateBuilder</span><span class="token punctuation">(</span>args<span class="token punctuation">)</span><span class="token punctuation">;</span>
builder<span class="token punctuation">.</span>Services<span class="token punctuation">.</span><span class="token function">AddHttpLogging</span><span class="token punctuation">(</span>logging <span class="token operator">=</span><span class="token operator">&gt;</span>
<span class="token punctuation">{</span>
    logging<span class="token punctuation">.</span>LoggingFields <span class="token operator">=</span> HttpLoggingFields<span class="token punctuation">.</span>All<span class="token punctuation">;</span>
    logging<span class="token punctuation">.</span>RequestHeaders<span class="token punctuation">.</span><span class="token function">Add</span><span class="token punctuation">(</span><span class="token string">"X-Request-Header"</span><span class="token punctuation">)</span><span class="token punctuation">;</span>
    logging<span class="token punctuation">.</span>RequestHeaders<span class="token punctuation">.</span><span class="token function">Add</span><span class="token punctuation">(</span><span class="token string">"X-Response-Header"</span><span class="token punctuation">)</span><span class="token punctuation">;</span>
    logging<span class="token punctuation">.</span>RequestBodyLogLimit <span class="token operator">=</span> <span class="token number">4096</span><span class="token punctuation">;</span>
    logging<span class="token punctuation">.</span>ResponseBodyLogLimit <span class="token operator">=</span> <span class="token number">4096</span><span class="token punctuation">;</span>
<span class="token punctuation">}</span><span class="token punctuation">)</span><span class="token punctuation">;</span>

<span class="token keyword">var</span> app <span class="token operator">=</span> builder<span class="token punctuation">.</span><span class="token function">Build</span><span class="token punctuation">(</span><span class="token punctuation">)</span><span class="token punctuation">;</span>
app<span class="token punctuation">.</span><span class="token function">UseHttpLogging</span><span class="token punctuation">(</span><span class="token punctuation">)</span><span class="token punctuation">;</span>

app<span class="token punctuation">.</span><span class="token function">MapGet</span><span class="token punctuation">(</span><span class="token string">"/"</span><span class="token punctuation">,</span> <span class="token punctuation">(</span><span class="token punctuation">)</span> <span class="token operator">=</span><span class="token operator">&gt;</span> <span class="token string">"I just logged the HTTP request!"</span><span class="token punctuation">)</span><span class="token punctuation">;</span>

app<span class="token punctuation">.</span><span class="token function">Run</span><span class="token punctuation">(</span><span class="token punctuation">)</span><span class="token punctuation">;</span>
</code></pre>
<h2 id="blazor-improvements">Blazor Improvements</h2>
<p>.NET 6 ships with many great updates to <a href="https://dotnet.microsoft.com/apps/aspnet/web-apps/blazor" target="_blank">Blazor</a>, the client-side UI library that&rsquo;s packaged with ASP.NET Core. I want to discuss my favorite updates: error boundaries, dynamic components and preserving pre-rendered state.</p>
<h3 id="error-boundaries">Error Boundaries</h3>
<p>Blazor error boundaries provide an easy way to handle exceptions within your component hierarchy. When an unhandled exception occurs in Blazor Server, it&rsquo;s treated as a fatal error because the circuit hangs in an undefined state. As a result, your app is as good as dead, it loses its state, and your users are met with an undesirable <em>An unhandled error has occurred</em> message, with a link to reload the page.</p>
<p>Inspired by error boundaries in React, the <code>ErrorBoundary</code> component attempts to catch recoverable errors that can&rsquo;t permanently corrupt state&mdash;and like the React feature, it also renders a fallback UI.</p>
<p>I can add an <code>ErrorBoundary</code> around the <code>@Body</code> of a Blazor app&rsquo;s default layout, like so.</p>
<pre class=" language-html"><code class="prism  language-html"><span class="token tag"><span class="token tag"><span class="token punctuation">&lt;</span>div</span> <span class="token attr-name">class</span><span class="token attr-value"><span class="token punctuation">=</span><span class="token punctuation">"</span>main<span class="token punctuation">"</span></span><span class="token punctuation">&gt;</span></span>
    <span class="token tag"><span class="token tag"><span class="token punctuation">&lt;</span>div</span> <span class="token attr-name">class</span><span class="token attr-value"><span class="token punctuation">=</span><span class="token punctuation">"</span>content px-4<span class="token punctuation">"</span></span><span class="token punctuation">&gt;</span></span>
        <span class="token tag"><span class="token tag"><span class="token punctuation">&lt;</span>ErrorBoundary</span><span class="token punctuation">&gt;</span></span>
            @Body
        <span class="token tag"><span class="token tag"><span class="token punctuation">&lt;/</span>ErrorBoundary</span><span class="token punctuation">&gt;</span></span>
    <span class="token tag"><span class="token tag"><span class="token punctuation">&lt;/</span>div</span><span class="token punctuation">&gt;</span></span>
<span class="token tag"><span class="token tag"><span class="token punctuation">&lt;/</span>div</span><span class="token punctuation">&gt;</span></span>
</code></pre>
<p>If I get an unhandled exception, I&rsquo;ll get the default fallback error message.</p>
<p><img src="https://d585tldpucybw.cloudfront.net/sfimages/default-source/blogs/2021/2021-11/error-boundary.png" alt="error boundary message: An error has occurred" title="error boundary"></p>
<p>Of course, you can always customize the UI yourself.</p>
<pre class=" language-html"><code class="prism  language-html"><span class="token tag"><span class="token tag"><span class="token punctuation">&lt;</span>ErrorBoundary</span><span class="token punctuation">&gt;</span></span>
    <span class="token tag"><span class="token tag"><span class="token punctuation">&lt;</span>ChildContent</span><span class="token punctuation">&gt;</span></span>
        @Body
    <span class="token tag"><span class="token tag"><span class="token punctuation">&lt;/</span>ChildContent</span><span class="token punctuation">&gt;</span></span>
    <span class="token tag"><span class="token tag"><span class="token punctuation">&lt;</span>ErrorContent</span><span class="token punctuation">&gt;</span></span>
        <span class="token tag"><span class="token tag"><span class="token punctuation">&lt;</span>p</span> <span class="token attr-name">class</span><span class="token attr-value"><span class="token punctuation">=</span><span class="token punctuation">"</span>custom-error<span class="token punctuation">"</span></span><span class="token punctuation">&gt;</span></span>Woah, what happened?<span class="token tag"><span class="token tag"><span class="token punctuation">&lt;/</span>p</span><span class="token punctuation">&gt;</span></span>
    <span class="token tag"><span class="token tag"><span class="token punctuation">&lt;/</span>ErrorContent</span><span class="token punctuation">&gt;</span></span>
<span class="token tag"><span class="token tag"><span class="token punctuation">&lt;/</span>ErrorBoundary</span><span class="token punctuation">&gt;</span></span>
</code></pre>
<p>If you&rsquo;d like the complete treatment, check out <a href="https://www.telerik.com/blogs/work-unhandled-exceptions-gracefully-blazor-server-dotnet-6-error-boundaries" target="_blank">my post from earlier this summer</a>.  It still holds up (even the MAUI Man references).</p>
<h3 id="dynamic-components">Dynamic Components</h3>
<p>What happens if you want to render your components dynamically when you don&rsquo;t know your types ahead of time? It previously was a pain in Blazor through a custom render tree or declaring a series of <code>RenderFragment</code> components. With .NET 6, you can render a component specified by type. When you bring in the component, you set the <code>Type</code> and optionally a dictionary of <code>Parameters</code>.</p>
<pre class=" language-html"><code class="prism  language-html"><span class="token tag"><span class="token tag"><span class="token punctuation">&lt;</span>DynamicComponent</span> <span class="token attr-name">Type</span><span class="token attr-value"><span class="token punctuation">=</span><span class="token punctuation">"</span>@myType<span class="token punctuation">"</span></span> <span class="token attr-name">Parameters</span><span class="token attr-value"><span class="token punctuation">=</span><span class="token punctuation">"</span>@myParameterDictionary<span class="token punctuation">"</span></span> <span class="token punctuation">/&gt;</span></span>
</code></pre>
<p>I find dynamic components especially valuable when working with form data&mdash;you can render data based on selected values without iterating through a bunch of possible types. If this interests you (or if you like rockets), <a href="https://docs.microsoft.com/en-us/aspnet/core/blazor/components/dynamiccomponent?view=aspnetcore-6.0" target="_blank">check out the official documentation</a>.</p>
<h3 id="preserving-pre-rendered-state">Preserving Pre-rendered State</h3>
<p>Despite all the performance and trimming improvements with Blazor WebAssembly, initial load time remains a consideration. To help with this, you can prerender apps from the server to help with its <em>perceived</em> load time. This means that Blazor can immediately render your app&rsquo;s HTML while it is wiring up its dynamic bits. That&rsquo;s great, but it also previously meant that any state was lost.</p>
<aside>
<hr>
<div class="row">
<div class="col-4 u-normal-full u-small-mb0">
<h4 class="u-fs20 u-fw5 u-lh125 u-mb0">Final Blazor Improvements<br>
Before .NET 6</h4>
</div>
<div class="col-8">
<p class="u-fs16 u-mb0">
<a href="https://www.telerik.com https://www.telerik.com/blogs/final-blazor-improvements-before-dotnet-6" target="_blank"> What were the final noteworthy pieces of Blazor to be unveiled in .NET 6 RC1 and RC2?</a></p>
</div>
</div>
<hr class="u-mb3">
</aside>
<p>Help has arrived. To persist state, there&rsquo;s a new <code>persist-component-state</code> tag helper that you can utilize:</p>
<pre class=" language-html"><code class="prism  language-html"><span class="token tag"><span class="token tag"><span class="token punctuation">&lt;</span>component</span> <span class="token attr-name">type</span><span class="token attr-value"><span class="token punctuation">=</span><span class="token punctuation">"</span>typeof(App)<span class="token punctuation">"</span></span> <span class="token attr-name">render-mode</span><span class="token attr-value"><span class="token punctuation">=</span><span class="token punctuation">"</span>ServerPrerendered<span class="token punctuation">"</span></span> <span class="token punctuation">/&gt;</span></span>
    <span class="token tag"><span class="token tag"><span class="token punctuation">&lt;</span>persist-component-state</span> <span class="token punctuation">/&gt;</span></span>
</code></pre>
<p>In your C# code, you can inject <code>PersistComponentState</code> and register an event to retrieve and ultimately persist the objects. On subsequent loads, your <code>OnInitializedAsync</code> method can retrieve data from the persisted state&mdash;if it doesn&rsquo;t exist, it&rsquo;ll get the data from your original method (typically a service of some sort).</p>
<p>To see it in action, check out the <a href="https://docs.microsoft.com/en-us/aspnet/core/mvc/views/tag-helpers/built-in/persist-component-state?view=aspnetcore-6.0" target="_blank">Microsoft documentation</a>.</p>
<h2 id="c-10-updates">C# 10 Updates</h2>
<p>Along with .NET 6, we&rsquo;ve also got a new version of C#&mdash;C# 10. It ships with some great new features, like file-scoped namespaces, global usings, lambda improvements, extended property patterns, null argument checks and much more. Check out <a href="https://www.telerik.com/blogs/what-was-added-csharp-10" target="_blank">Joseph Guadagno&rsquo;s blog post for more details</a>, as well as <a href="https://devblogs.microsoft.com/dotnet/welcome-to-csharp-10" target="_blank">Microsoft&rsquo;s blog post</a>.</p><img src="https://feeds.telerik.com/link/10825/15057274.gif" height="1" width="1"/>]]></content>
  </entry>
  <entry>
    <id>urn:uuid:dd2ae93e-a6e2-4991-b23b-15659ab63321</id>
    <title type="text">Checking the Health of Your ASP.NET Core APIs</title>
    <summary type="text">With the advent and popularization of web APIs and microservices, monitoring their health is indispensable, and when dealing with multiple APIs at the same time, this task can become quite challenging. But there are some features that help us develop checks quickly and accurately—health checks.</summary>
    <published>2021-11-30T10:00:04Z</published>
    <updated>2022-06-30T14:06:13Z</updated>
    <author>
      <name>Assis Zang </name>
    </author>
    <link rel="alternate" href="https://feeds.telerik.com/link/10825/15057275/checking-health-aspnet-core-apis"/>
    <content type="text"><![CDATA[<p><span class="featured">With the advent and popularization of web APIs and microservices, monitoring their health is indispensable, and when dealing with multiple APIs at the same time, this task can become quite challenging. But there are some features that help us develop checks quickly and accurately&mdash;health checks.</span></p>
<h2 id="what-are-health-checks-in-asp.-net-core">What Are Health Checks in ASP.NET Core?</h2>
<p>Health checks are part of the middleware and libraries provided by ASP.NET Core to help report the health of application infrastructure components.</p>
<h2 id="why-do-we-need-health-checks">Why Do We Need Health Checks?</h2>
<p>Because through them we can monitor the functioning of an application in real time, in a simple and direct way. &zwj;⚕️</p>
<h2 id="how-do-health-checks-work">How Do Health Checks Work?</h2>
<p>To know if an API is running in a healthy way or not, we use a health check to validate the status of a service and its dependencies through an endpoint in the API of the REST service.</p>
<p>This allows us to quickly and in a standardized manner decide if the service or our dependences is off.</p>
<p>This endpoint uses a separate service that assesses the availability of the functions of the rest of the system and also the state of its dependencies.</p>
<p>The information collected during the check can include performance calculations, runtime or connection to other downstream services. After completing the evaluation, an HTTP code and a JSON object are returned depending on the evaluation of the services in the health check.</p>
<aside>
<hr>
<div class="row">
<div class="col-4 u-normal-full u-small-mb0">
<h4 class="u-fs20 u-fw5 u-lh125 u-mb0">
ASP.NET Core for Beginners: Web APIs</h4>
</div>
<div class="col-8">
<p class="u-fs16 u-mb0">
<a href="https://www.telerik.com/blogs/aspnet-core-beginners-web-apis" target="_blank">You need to know about Web APIs</a>&mdash;robust and secure applications that use the HTTP protocol to communicate between servers and clients and are in high demand in the market.
</p>
</div>
</div>
<hr class="u-mb3">
</aside>
<p>Now that we know the basics about health checks, we can implement an example and see in practice how it works.</p>
<p>&zwj; You can access the full <a href="https://github.com/zangassis/health-check-api" target="_blank">source code here</a>.</p>
<h2 id="creating-the-project">Creating the Project</h2>
<p>Open a PowerShell console in the folder where you want to create the project, then give the command below. This command will create an ASP.NET 5 Web API project with the name &ldquo;HealthCheck.&rdquo; Once it&rsquo;s created, you can open the file &ldquo;HealthCheck.csproj&rdquo; with Visual Studio.</p>
<p><code>dotnet new webapi -n HealthCheck --framework net5.0</code></p>
<p>Then create a new controller named &ldquo;HealthController&rdquo; and add the following code:</p>
<pre class=" language-csharp"><code class="prism  language-csharp"><span class="token keyword">using</span> Microsoft<span class="token punctuation">.</span>AspNetCore<span class="token punctuation">.</span>Mvc<span class="token punctuation">;</span>
<span class="token keyword">using</span> Microsoft<span class="token punctuation">.</span>Extensions<span class="token punctuation">.</span>Diagnostics<span class="token punctuation">.</span>HealthChecks<span class="token punctuation">;</span>
<span class="token keyword">using</span> Microsoft<span class="token punctuation">.</span>Extensions<span class="token punctuation">.</span>Logging<span class="token punctuation">;</span>
<span class="token keyword">using</span> System<span class="token punctuation">.</span>Net<span class="token punctuation">;</span>
<span class="token keyword">using</span> System<span class="token punctuation">.</span>Threading<span class="token punctuation">.</span>Tasks<span class="token punctuation">;</span>

<span class="token keyword">namespace</span> HealthCheck<span class="token punctuation">.</span>Controllers
<span class="token punctuation">{</span>
    <span class="token punctuation">[</span>Controller<span class="token punctuation">]</span>
    <span class="token punctuation">[</span><span class="token function">Route</span><span class="token punctuation">(</span><span class="token string">"health"</span><span class="token punctuation">)</span><span class="token punctuation">]</span>
    <span class="token keyword">public</span> <span class="token keyword">class</span> <span class="token class-name">HealthController</span> <span class="token punctuation">:</span> ControllerBase
    <span class="token punctuation">{</span>
        <span class="token keyword">private</span> <span class="token keyword">readonly</span> ILogger<span class="token operator">&lt;</span>HealthController<span class="token operator">&gt;</span> _logger<span class="token punctuation">;</span>
        <span class="token keyword">private</span> <span class="token keyword">readonly</span> HealthCheckService _service<span class="token punctuation">;</span>

        <span class="token keyword">public</span> <span class="token function">HealthController</span><span class="token punctuation">(</span>ILogger<span class="token operator">&lt;</span>HealthController<span class="token operator">&gt;</span> logger<span class="token punctuation">,</span> HealthCheckService service<span class="token punctuation">)</span>
        <span class="token punctuation">{</span>
            _logger <span class="token operator">=</span> logger<span class="token punctuation">;</span>
            _service <span class="token operator">=</span> service<span class="token punctuation">;</span>
        <span class="token punctuation">}</span>

        <span class="token punctuation">[</span>HttpGet<span class="token punctuation">]</span>
        <span class="token keyword">public</span> <span class="token keyword">async</span> Task<span class="token operator">&lt;</span>IActionResult<span class="token operator">&gt;</span> <span class="token function">Get</span><span class="token punctuation">(</span><span class="token punctuation">)</span>
        <span class="token punctuation">{</span>
            <span class="token keyword">var</span> report <span class="token operator">=</span> <span class="token keyword">await</span> _service<span class="token punctuation">.</span><span class="token function">CheckHealthAsync</span><span class="token punctuation">(</span><span class="token punctuation">)</span><span class="token punctuation">;</span>

            _logger<span class="token punctuation">.</span><span class="token function">LogInformation</span><span class="token punctuation">(</span>$<span class="token string">"Get Health Information: {report}"</span><span class="token punctuation">)</span><span class="token punctuation">;</span>

            <span class="token keyword">return</span> report<span class="token punctuation">.</span>Status <span class="token operator">==</span> HealthStatus<span class="token punctuation">.</span>Healthy <span class="token operator">?</span> <span class="token function">Ok</span><span class="token punctuation">(</span>report<span class="token punctuation">)</span> <span class="token punctuation">:</span> <span class="token function">StatusCode</span><span class="token punctuation">(</span><span class="token punctuation">(</span><span class="token keyword">int</span><span class="token punctuation">)</span>HttpStatusCode<span class="token punctuation">.</span>ServiceUnavailable<span class="token punctuation">,</span> report<span class="token punctuation">)</span><span class="token punctuation">;</span>
        <span class="token punctuation">}</span>
    <span class="token punctuation">}</span>
<span class="token punctuation">}</span>
</code></pre>
<p>Our controller will contain the method responsible for checking the API health. When it receives a request, it will check it, and then it will return a JSON with the response content and, as a good practice, we added a method to log the execution.</p>
<h2 id="registering-the-healthcheck-service">Registering the HealthCheck Service</h2>
<p>Open the file &ldquo;Startup.cs&rdquo; and inside it find the method &ldquo;ConfigureServices&rdquo;. Inside it, add this code snippet:</p>
<pre class=" language-csharp"><code class="prism  language-csharp">services<span class="token punctuation">.</span><span class="token function">AddHealthChecks</span><span class="token punctuation">(</span><span class="token punctuation">)</span><span class="token punctuation">;</span>
</code></pre>
<p>Now you can start the application, and you will see the /health route that we just created. You can use Fiddler to make the request like in the image below:</p>
<p><a href="https://d585tldpucybw.cloudfront.net/sfimages/default-source/blogs/2021/2021-10/get-health-by-fiddler-everywhere.png" target="_blank"><img src="https://d585tldpucybw.cloudfront.net/sfimages/default-source/blogs/2021/2021-10/get-health-by-fiddler-everywhere.png" alt="Get Health By Fiddler Everywhere" title="get health by fiddler everywhere"></a></p>
<p>When we sent a request to the /health route, the application returned a JSON object with some information:</p>
<p><strong>Entries:</strong> A dictionary-type object in this case is empty.</p>
<p><strong>Status:</strong> 2 - Derives from the &ldquo;HealthStatus&rdquo; enum and as the summary means: <em>&ldquo;Indicates that the health check determined that the component was healthy.&rdquo;</em></p>
<p><strong>TotalDuration:</strong> Health Check runtime information.</p>
<p>In simple terms, our API is &ldquo;healthy&rdquo;&mdash;no problems were found and we now have a route just to check this. </p>
<h2 id="health-check-in-database">Health Check in Database</h2>
<p>In addition to the integrity of the application, we can also check other basic factors such as the connection to a database.</p>
<p>In this case, we will use Redis as a database. You need to have it running on your machine in a Docker image or directly. If you want you can use any other database just change the connection string.</p>
<p>For that, we need to install the package: &ldquo;AspNetCore.HealthChecks.Redis&rdquo; - Version=&ldquo;5.0.2&rdquo;.</p>
<p>You can install it in the project with NugetPackage or from the console with the command:</p>
<p><code>dotnet add package AspNetCore.HealthChecks.Redis</code></p>
<p>Now let&rsquo;s create a &ldquo;Helper&rdquo; class where we&rsquo;ll put the connection string with Redis. Then create a folder called &ldquo;Helpers&rdquo; in the project, and inside it create a static class called &ldquo;UtilsHelpers&rdquo; and inside it put the following code:</p>
<pre class=" language-csharp"><code class="prism  language-csharp"><span class="token keyword">public</span> <span class="token keyword">static</span> <span class="token keyword">string</span> <span class="token function">GetConnectionString</span><span class="token punctuation">(</span><span class="token punctuation">)</span>
<span class="token punctuation">{</span>
<span class="token keyword">return</span> <span class="token string">"localhost:6379"</span><span class="token punctuation">;</span>
<span class="token punctuation">}</span>
</code></pre>
<p>In the file &ldquo;Startup.cs&rdquo; add the method responsible for verifying the connection with Redis. It will use the connection string that we just created.</p>
<p>So the Startup&rsquo;s &ldquo;ConfigureServices&rdquo; method should look like this:</p>
<pre class=" language-csharp"><code class="prism  language-csharp"> <span class="token keyword">public</span> <span class="token keyword">void</span> <span class="token function">ConfigureServices</span><span class="token punctuation">(</span>IServiceCollection services<span class="token punctuation">)</span>
        <span class="token punctuation">{</span>
            <span class="token comment">//Here is HealthCheck and the connection to Redis</span>
            services<span class="token punctuation">.</span><span class="token function">AddHealthChecks</span><span class="token punctuation">(</span><span class="token punctuation">)</span>
                <span class="token punctuation">.</span><span class="token function">AddRedis</span><span class="token punctuation">(</span>redisConnectionString<span class="token punctuation">:</span> UtilsHelpers<span class="token punctuation">.</span><span class="token function">GetConnectionString</span><span class="token punctuation">(</span><span class="token punctuation">)</span><span class="token punctuation">,</span> name<span class="token punctuation">:</span> <span class="token string">"Redis instance"</span><span class="token punctuation">)</span><span class="token punctuation">;</span>

            services<span class="token punctuation">.</span><span class="token function">AddControllers</span><span class="token punctuation">(</span><span class="token punctuation">)</span><span class="token punctuation">;</span>
            services<span class="token punctuation">.</span><span class="token function">AddSwaggerGen</span><span class="token punctuation">(</span>c <span class="token operator">=</span><span class="token operator">&gt;</span>
            <span class="token punctuation">{</span>
                c<span class="token punctuation">.</span><span class="token function">SwaggerDoc</span><span class="token punctuation">(</span><span class="token string">"v1"</span><span class="token punctuation">,</span> <span class="token keyword">new</span> <span class="token class-name">OpenApiInfo</span> <span class="token punctuation">{</span> Title <span class="token operator">=</span> <span class="token string">"HealthCheck"</span><span class="token punctuation">,</span> Version <span class="token operator">=</span> <span class="token string">"v1"</span> <span class="token punctuation">}</span><span class="token punctuation">)</span><span class="token punctuation">;</span>
            <span class="token punctuation">}</span><span class="token punctuation">)</span><span class="token punctuation">;</span>
        <span class="token punctuation">}</span>
</code></pre>
<p>If your connection to Redis or another database you have used is OK, when you make the request through Fiddler, we will get the following result, showing the information about the connection:</p>
<p><a href="https://d585tldpucybw.cloudfront.net/sfimages/default-source/blogs/2021/2021-10/health-redis-by-fiddler-everywhere.png" target="_blank"><img src="https://d585tldpucybw.cloudfront.net/sfimages/default-source/blogs/2021/2021-10/health-redis-by-fiddler-everywhere.png" alt="Health Redis By Fiddler Everywhere" title="health redis by fiddler everywhere"></a></p>
<h2 id="healthcheck-through-a-graphical-interface">HealthCheck Through a Graphical Interface</h2>
<p>Another interesting function that the ASP.NET Core health checks provide is a graphical interface with a kind of fun dashboard so that we can view the events that took place during the checks and the history of the entire execution.</p>
<p>So, let&rsquo;s implement it and see this working. For that, we need to install the following dependencies in the project:</p>
<ul>
    <li>AspNetCore.HealthChecks.UI</li>
    <li>AspNetCore.HealthChecks.UI.Client</li>
    <li>AspNetCore.HealthChecks.UI.InMemory.Storage</li>
</ul>
<p>Now at the &ldquo;Startup&rdquo; of the project, we will add the configurations of the libraries that we just installed in the project, then replace the method &ldquo;ConfigureServices&rdquo; with this one below. You can see in the comments the responsibility of each configuration.</p>
<pre class=" language-csharp"><code class="prism  language-csharp">        <span class="token keyword">public</span> <span class="token keyword">void</span> <span class="token function">ConfigureServices</span><span class="token punctuation">(</span>IServiceCollection services<span class="token punctuation">)</span>
        <span class="token punctuation">{</span>
            <span class="token comment">//Here is HealthCheck and the connection to Redis</span>
            services<span class="token punctuation">.</span><span class="token function">AddHealthChecks</span><span class="token punctuation">(</span><span class="token punctuation">)</span>
                <span class="token punctuation">.</span><span class="token function">AddRedis</span><span class="token punctuation">(</span>redisConnectionString<span class="token punctuation">:</span> UtilsHelpers<span class="token punctuation">.</span><span class="token function">GetConnectionString</span><span class="token punctuation">(</span><span class="token punctuation">)</span><span class="token punctuation">,</span> name<span class="token punctuation">:</span> <span class="token string">"Redis instance"</span><span class="token punctuation">)</span><span class="token punctuation">;</span>

            services<span class="token punctuation">.</span><span class="token function">AddControllers</span><span class="token punctuation">(</span><span class="token punctuation">)</span><span class="token punctuation">;</span>
            services<span class="token punctuation">.</span><span class="token function">AddSwaggerGen</span><span class="token punctuation">(</span>c <span class="token operator">=</span><span class="token operator">&gt;</span>
            <span class="token punctuation">{</span>
                c<span class="token punctuation">.</span><span class="token function">SwaggerDoc</span><span class="token punctuation">(</span><span class="token string">"v1"</span><span class="token punctuation">,</span> <span class="token keyword">new</span> <span class="token class-name">OpenApiInfo</span> <span class="token punctuation">{</span> Title <span class="token operator">=</span> <span class="token string">"HealthCheck"</span><span class="token punctuation">,</span> Version <span class="token operator">=</span> <span class="token string">"v1"</span> <span class="token punctuation">}</span><span class="token punctuation">)</span><span class="token punctuation">;</span>
            <span class="token punctuation">}</span><span class="token punctuation">)</span><span class="token punctuation">;</span>

            <span class="token comment">// Here is the GUI setup and history storage</span>
            services<span class="token punctuation">.</span><span class="token function">AddHealthChecksUI</span><span class="token punctuation">(</span>options <span class="token operator">=</span><span class="token operator">&gt;</span>
            <span class="token punctuation">{</span>
                options<span class="token punctuation">.</span><span class="token function">SetEvaluationTimeInSeconds</span><span class="token punctuation">(</span><span class="token number">5</span><span class="token punctuation">)</span><span class="token punctuation">;</span> <span class="token comment">//Sets the time interval in which HealthCheck will be triggered</span>
                options<span class="token punctuation">.</span><span class="token function">MaximumHistoryEntriesPerEndpoint</span><span class="token punctuation">(</span><span class="token number">10</span><span class="token punctuation">)</span><span class="token punctuation">;</span> <span class="token comment">//Sets the maximum number of records displayed in history</span>
                options<span class="token punctuation">.</span><span class="token function">AddHealthCheckEndpoint</span><span class="token punctuation">(</span><span class="token string">"Health Checks API"</span><span class="token punctuation">,</span> <span class="token string">"/health"</span><span class="token punctuation">)</span><span class="token punctuation">;</span> <span class="token comment">//Sets the Health Check endpoint</span>
            <span class="token punctuation">}</span><span class="token punctuation">)</span><span class="token punctuation">.</span><span class="token function">AddInMemoryStorage</span><span class="token punctuation">(</span><span class="token punctuation">)</span><span class="token punctuation">;</span> <span class="token comment">//Here is the memory bank configuration</span>
        <span class="token punctuation">}</span>
</code></pre>
<p>And the &ldquo;Configure&rdquo; method replace it with this:</p>
<pre class=" language-csharp"><code class="prism  language-csharp"><span class="token keyword">public</span> <span class="token keyword">void</span> <span class="token function">Configure</span><span class="token punctuation">(</span>IApplicationBuilder app<span class="token punctuation">,</span> IWebHostEnvironment env<span class="token punctuation">)</span>
        <span class="token punctuation">{</span>
            <span class="token keyword">if</span> <span class="token punctuation">(</span>env<span class="token punctuation">.</span><span class="token function">IsDevelopment</span><span class="token punctuation">(</span><span class="token punctuation">)</span><span class="token punctuation">)</span>
            <span class="token punctuation">{</span>
                app<span class="token punctuation">.</span><span class="token function">UseDeveloperExceptionPage</span><span class="token punctuation">(</span><span class="token punctuation">)</span><span class="token punctuation">;</span>
                app<span class="token punctuation">.</span><span class="token function">UseSwagger</span><span class="token punctuation">(</span><span class="token punctuation">)</span><span class="token punctuation">;</span>
                app<span class="token punctuation">.</span><span class="token function">UseSwaggerUI</span><span class="token punctuation">(</span>c <span class="token operator">=</span><span class="token operator">&gt;</span> c<span class="token punctuation">.</span><span class="token function">SwaggerEndpoint</span><span class="token punctuation">(</span><span class="token string">"/swagger/v1/swagger.json"</span><span class="token punctuation">,</span> <span class="token string">"HealthCheck v1"</span><span class="token punctuation">)</span><span class="token punctuation">)</span><span class="token punctuation">;</span>
            <span class="token punctuation">}</span>

            app<span class="token punctuation">.</span><span class="token function">UseHttpsRedirection</span><span class="token punctuation">(</span><span class="token punctuation">)</span><span class="token punctuation">;</span>

            app<span class="token punctuation">.</span><span class="token function">UseRouting</span><span class="token punctuation">(</span><span class="token punctuation">)</span><span class="token punctuation">;</span>

            app<span class="token punctuation">.</span><span class="token function">UseAuthorization</span><span class="token punctuation">(</span><span class="token punctuation">)</span><span class="token punctuation">;</span>

            app<span class="token punctuation">.</span><span class="token function">UseEndpoints</span><span class="token punctuation">(</span>endpoints <span class="token operator">=</span><span class="token operator">&gt;</span>
            <span class="token punctuation">{</span>
                endpoints<span class="token punctuation">.</span><span class="token function">MapControllers</span><span class="token punctuation">(</span><span class="token punctuation">)</span><span class="token punctuation">;</span>

                <span class="token comment">//Sets the health endpoint</span>
                endpoints<span class="token punctuation">.</span><span class="token function">MapHealthChecks</span><span class="token punctuation">(</span><span class="token string">"/health"</span><span class="token punctuation">)</span><span class="token punctuation">;</span>
            <span class="token punctuation">}</span><span class="token punctuation">)</span><span class="token punctuation">;</span>

            <span class="token comment">//Sets Health Check dashboard options</span>
            app<span class="token punctuation">.</span><span class="token function">UseHealthChecks</span><span class="token punctuation">(</span><span class="token string">"/health"</span><span class="token punctuation">,</span> <span class="token keyword">new</span> <span class="token class-name">HealthCheckOptions</span>
            <span class="token punctuation">{</span>
                Predicate <span class="token operator">=</span> p <span class="token operator">=</span><span class="token operator">&gt;</span> <span class="token keyword">true</span><span class="token punctuation">,</span>
                ResponseWriter <span class="token operator">=</span> UIResponseWriter<span class="token punctuation">.</span>WriteHealthCheckUIResponse
            <span class="token punctuation">}</span><span class="token punctuation">)</span><span class="token punctuation">;</span>

            <span class="token comment">//Sets the Health Check dashboard configuration</span>
            app<span class="token punctuation">.</span><span class="token function">UseHealthChecksUI</span><span class="token punctuation">(</span>options <span class="token operator">=</span><span class="token operator">&gt;</span> <span class="token punctuation">{</span> options<span class="token punctuation">.</span>UIPath <span class="token operator">=</span> <span class="token string">"/dashboard"</span><span class="token punctuation">;</span> <span class="token punctuation">}</span><span class="token punctuation">)</span><span class="token punctuation">;</span>
        <span class="token punctuation">}</span>
</code></pre>
<p>Our dashboard is almost ready to work. Now, in the &ldquo;UtilsHelpers&rdquo; class, add the following method:</p>
<pre class=" language-csharp"><code class="prism  language-csharp"> <span class="token keyword">public</span> <span class="token keyword">static</span> <span class="token keyword">string</span> <span class="token function">ToJSON</span><span class="token punctuation">(</span><span class="token keyword">this</span> <span class="token keyword">object</span> @<span class="token keyword">object</span><span class="token punctuation">)</span> <span class="token operator">=</span><span class="token operator">&gt;</span> JsonConvert<span class="token punctuation">.</span><span class="token function">SerializeObject</span><span class="token punctuation">(</span>@<span class="token keyword">object</span><span class="token punctuation">,</span> Formatting<span class="token punctuation">.</span>None<span class="token punctuation">)</span><span class="token punctuation">;</span>
</code></pre>
<p> <strong>Important!</strong> To use the &ldquo;SerializeObject&rdquo; method, you need to install &ldquo;Newtonsoft.Json&rdquo; - Version=&ldquo;13.0.1&rdquo; as dependency.</p>
<p>And now, in the &ldquo;HealthController&rdquo; replace the &ldquo;Get&rdquo; method with this:</p>
<pre class=" language-csharp"><code class="prism  language-csharp">        <span class="token punctuation">[</span>HttpGet<span class="token punctuation">]</span>
        <span class="token keyword">public</span> <span class="token keyword">async</span> Task<span class="token operator">&lt;</span>IActionResult<span class="token operator">&gt;</span> <span class="token function">Get</span><span class="token punctuation">(</span><span class="token punctuation">)</span>
        <span class="token punctuation">{</span>
            <span class="token keyword">var</span> report <span class="token operator">=</span> <span class="token keyword">await</span> _service<span class="token punctuation">.</span><span class="token function">CheckHealthAsync</span><span class="token punctuation">(</span><span class="token punctuation">)</span><span class="token punctuation">;</span>
            <span class="token keyword">var</span> reportToJson <span class="token operator">=</span> report<span class="token punctuation">.</span><span class="token function">ToJSON</span><span class="token punctuation">(</span><span class="token punctuation">)</span><span class="token punctuation">;</span>

            _logger<span class="token punctuation">.</span><span class="token function">LogInformation</span><span class="token punctuation">(</span>$<span class="token string">"Get Health Information: {reportToJson}"</span><span class="token punctuation">)</span><span class="token punctuation">;</span>

            <span class="token keyword">return</span> report<span class="token punctuation">.</span>Status <span class="token operator">==</span> HealthStatus<span class="token punctuation">.</span>Healthy <span class="token operator">?</span> <span class="token function">Ok</span><span class="token punctuation">(</span>reportToJson<span class="token punctuation">)</span> <span class="token punctuation">:</span> <span class="token function">StatusCode</span><span class="token punctuation">(</span><span class="token punctuation">(</span><span class="token keyword">int</span><span class="token punctuation">)</span>HttpStatusCode<span class="token punctuation">.</span>ServiceUnavailable<span class="token punctuation">,</span> reportToJson<span class="token punctuation">)</span><span class="token punctuation">;</span>
        <span class="token punctuation">}</span>
</code></pre>
<p>Finally, we can see our dashboard. For that, start the application and go to &ldquo;localhost:PORT/dashboard&rdquo;. If you followed all the previous steps, you will see in your browser this beautiful dashboard with the verification data:</p>
<p><a href="https://d585tldpucybw.cloudfront.net/sfimages/default-source/blogs/2021/2021-10/health-check-dashboard.png" target="_blank"><img src="https://d585tldpucybw.cloudfront.net/sfimages/default-source/blogs/2021/2021-10/health-check-dashboard.png" alt="Health Check Dashboard" title="health-check-dashboard"></a></p>
<h2 id="customizing-the-checks">Customizing the Checks</h2>
<p>An interesting feature is the possibility of customizing the checks, choosing how we want to return the results.</p>
<p>For this we need to create a class that will inherit the interface &ldquo;IHealthCheck&rdquo;. Then create a folder called &ldquo;Custom&rdquo; and inside it create a class named &ldquo;CustomHealthChecks&rdquo; and put the code below in it:</p>
<pre class=" language-csharp"><code class="prism  language-csharp"><span class="token keyword">using</span> Microsoft<span class="token punctuation">.</span>Extensions<span class="token punctuation">.</span>Diagnostics<span class="token punctuation">.</span>HealthChecks<span class="token punctuation">;</span>
<span class="token keyword">using</span> System<span class="token punctuation">;</span>
<span class="token keyword">using</span> System<span class="token punctuation">.</span>Net<span class="token punctuation">;</span>
<span class="token keyword">using</span> System<span class="token punctuation">.</span>Net<span class="token punctuation">.</span>Http<span class="token punctuation">;</span>
<span class="token keyword">using</span> System<span class="token punctuation">.</span>Threading<span class="token punctuation">;</span>
<span class="token keyword">using</span> System<span class="token punctuation">.</span>Threading<span class="token punctuation">.</span>Tasks<span class="token punctuation">;</span>

<span class="token keyword">namespace</span> HealthCheck<span class="token punctuation">.</span>Custom
<span class="token punctuation">{</span>
    <span class="token keyword">public</span> <span class="token keyword">class</span> <span class="token class-name">CustomHealthChecks</span> <span class="token punctuation">:</span> IHealthCheck
    <span class="token punctuation">{</span>
        <span class="token keyword">public</span> <span class="token keyword">async</span> Task<span class="token operator">&lt;</span>HealthCheckResult<span class="token operator">&gt;</span> <span class="token function">CheckHealthAsync</span><span class="token punctuation">(</span>HealthCheckContext context<span class="token punctuation">,</span> CancellationToken cancellationToken <span class="token operator">=</span> <span class="token keyword">default</span><span class="token punctuation">)</span>
        <span class="token punctuation">{</span>
            <span class="token keyword">var</span> catUrl <span class="token operator">=</span> <span class="token string">"https://http.cat/401"</span><span class="token punctuation">;</span>

            <span class="token keyword">var</span> client <span class="token operator">=</span> <span class="token keyword">new</span> <span class="token class-name">HttpClient</span><span class="token punctuation">(</span><span class="token punctuation">)</span><span class="token punctuation">;</span>

            client<span class="token punctuation">.</span>BaseAddress <span class="token operator">=</span> <span class="token keyword">new</span> <span class="token class-name">Uri</span><span class="token punctuation">(</span>catUrl<span class="token punctuation">)</span><span class="token punctuation">;</span>

            HttpResponseMessage response <span class="token operator">=</span> <span class="token keyword">await</span> client<span class="token punctuation">.</span><span class="token function">GetAsync</span><span class="token punctuation">(</span><span class="token string">""</span><span class="token punctuation">)</span><span class="token punctuation">;</span>

            <span class="token keyword">return</span> response<span class="token punctuation">.</span>StatusCode <span class="token operator">==</span> HttpStatusCode<span class="token punctuation">.</span>OK <span class="token operator">?</span> 
                <span class="token keyword">await</span> Task<span class="token punctuation">.</span><span class="token function">FromResult</span><span class="token punctuation">(</span><span class="token keyword">new</span> <span class="token class-name">HealthCheckResult</span><span class="token punctuation">(</span>
                      status<span class="token punctuation">:</span> HealthStatus<span class="token punctuation">.</span>Healthy<span class="token punctuation">,</span>
                      description<span class="token punctuation">:</span> <span class="token string">"The API is healthy （。＾▽＾）"</span><span class="token punctuation">)</span><span class="token punctuation">)</span> <span class="token punctuation">:</span>
                <span class="token keyword">await</span> Task<span class="token punctuation">.</span><span class="token function">FromResult</span><span class="token punctuation">(</span><span class="token keyword">new</span> <span class="token class-name">HealthCheckResult</span><span class="token punctuation">(</span>
                      status<span class="token punctuation">:</span> HealthStatus<span class="token punctuation">.</span>Unhealthy<span class="token punctuation">,</span> 
                      description<span class="token punctuation">:</span> <span class="token string">"The API is sick (&lsquo;﹏*๑)"</span><span class="token punctuation">)</span><span class="token punctuation">)</span><span class="token punctuation">;</span>
        <span class="token punctuation">}</span>
    <span class="token punctuation">}</span>
<span class="token punctuation">}</span>
</code></pre>
<p>In this class, we are creating a method that makes a request to a &ldquo;cat&rdquo; API and returns the result with a funny Kaomoji.</p>
<p>But it&rsquo;s not done yet&mdash;we need to do the class dependency injection.</p>
<p>So at startup, we&rsquo;re going to add the check in the class right after the Redis check, so the &ldquo;ConfigureServices&rdquo; method should look like this:</p>
<pre class=" language-csharp"><code class="prism  language-csharp">       <span class="token keyword">public</span> <span class="token keyword">void</span> <span class="token function">ConfigureServices</span><span class="token punctuation">(</span>IServiceCollection services<span class="token punctuation">)</span>
        <span class="token punctuation">{</span>
            <span class="token comment">//Here is HealthCheck and the connection to Redis</span>
            services<span class="token punctuation">.</span><span class="token function">AddHealthChecks</span><span class="token punctuation">(</span><span class="token punctuation">)</span>
                <span class="token punctuation">.</span><span class="token function">AddRedis</span><span class="token punctuation">(</span>redisConnectionString<span class="token punctuation">:</span> UtilsHelpers<span class="token punctuation">.</span><span class="token function">GetConnectionString</span><span class="token punctuation">(</span><span class="token punctuation">)</span><span class="token punctuation">,</span> name<span class="token punctuation">:</span> <span class="token string">"Redis instance"</span><span class="token punctuation">)</span>
                <span class="token punctuation">.</span><span class="token generic-method function">AddCheck<span class="token punctuation">&lt;</span>CustomHealthChecks<span class="token punctuation">&gt;</span></span><span class="token punctuation">(</span><span class="token string">"Custom Health Checks"</span><span class="token punctuation">)</span><span class="token punctuation">;</span> <span class="token comment">//Here is the custom class dependency injection</span>

            services<span class="token punctuation">.</span><span class="token function">AddControllers</span><span class="token punctuation">(</span><span class="token punctuation">)</span><span class="token punctuation">;</span>
            services<span class="token punctuation">.</span><span class="token function">AddSwaggerGen</span><span class="token punctuation">(</span>c <span class="token operator">=</span><span class="token operator">&gt;</span>
            <span class="token punctuation">{</span>
                c<span class="token punctuation">.</span><span class="token function">SwaggerDoc</span><span class="token punctuation">(</span><span class="token string">"v1"</span><span class="token punctuation">,</span> <span class="token keyword">new</span> <span class="token class-name">OpenApiInfo</span> <span class="token punctuation">{</span> Title <span class="token operator">=</span> <span class="token string">"HealthCheck"</span><span class="token punctuation">,</span> Version <span class="token operator">=</span> <span class="token string">"v1"</span> <span class="token punctuation">}</span><span class="token punctuation">)</span><span class="token punctuation">;</span>
            <span class="token punctuation">}</span><span class="token punctuation">)</span><span class="token punctuation">;</span>

            <span class="token comment">// Here is the GUI setup and history storage</span>
            services<span class="token punctuation">.</span><span class="token function">AddHealthChecksUI</span><span class="token punctuation">(</span>options <span class="token operator">=</span><span class="token operator">&gt;</span>
            <span class="token punctuation">{</span>
                options<span class="token punctuation">.</span><span class="token function">SetEvaluationTimeInSeconds</span><span class="token punctuation">(</span><span class="token number">5</span><span class="token punctuation">)</span><span class="token punctuation">;</span> <span class="token comment">//Sets the time interval in which HealthCheck will be triggered</span>
                options<span class="token punctuation">.</span><span class="token function">MaximumHistoryEntriesPerEndpoint</span><span class="token punctuation">(</span><span class="token number">10</span><span class="token punctuation">)</span><span class="token punctuation">;</span> <span class="token comment">//Sets the maximum number of records displayed in history</span>
                options<span class="token punctuation">.</span><span class="token function">AddHealthCheckEndpoint</span><span class="token punctuation">(</span><span class="token string">"Health Checks API"</span><span class="token punctuation">,</span> <span class="token string">"/health"</span><span class="token punctuation">)</span><span class="token punctuation">;</span> <span class="token comment">//Sets the Health Check endpoint</span>
            <span class="token punctuation">}</span><span class="token punctuation">)</span><span class="token punctuation">.</span><span class="token function">AddInMemoryStorage</span><span class="token punctuation">(</span><span class="token punctuation">)</span><span class="token punctuation">;</span> <span class="token comment">//Here is the memory bank configuration</span>
        <span class="token punctuation">}</span>
</code></pre>
<p>Now we can start the application again and we will have the following result in the dashboard:</p>
<p><a href="https://d585tldpucybw.cloudfront.net/sfimages/default-source/blogs/2021/2021-10/health-check-dashboard-custom.png" target="_blank"><img src="https://d585tldpucybw.cloudfront.net/sfimages/default-source/blogs/2021/2021-10/health-check-dashboard-custom.png" alt="Health Check Dashboard Custom" title="health-check-dashboard-custom"></a></p>
<h2 id="conclusion">Conclusion</h2>
<p>In this article, we saw the importance of doing the health check in our APIs and how to implement it in a simple way with health check resources. We also learned how to use the dashboard&rsquo;s graphical interface and customize the results.</p>
<p>I hope this article is helpful in creating your health checks! See you soon.</p><img src="https://feeds.telerik.com/link/10825/15057275.gif" height="1" width="1"/>]]></content>
  </entry>
  <entry>
    <id>urn:uuid:88db9c3f-c1c0-4b9f-b7ce-8577794466e2</id>
    <title type="text">Sands of MAUI: Issue #35</title>
    <summary type="text">Welcome to the Sands of MAUI—newsletter-style issues dedicated to bringing together latest .NET MAUI content relevant to developers.</summary>
    <published>2021-11-29T14:56:06Z</published>
    <updated>2022-06-30T14:06:13Z</updated>
    <author>
      <name>Sam Basu </name>
    </author>
    <link rel="alternate" href="https://feeds.telerik.com/link/10825/15057276/sands-maui-issue-35"/>
    <content type="text"><![CDATA[<p><span class="featured">Welcome to the Sands of MAUI&mdash;newsletter-style issues dedicated to bringing together latest .NET MAUI content relevant to developers.</span></p>
<p>A particle of sand&mdash;tiny and innocuous. But put a lot of sand particles together and we have something big&mdash;a force to reckon with. It is the smallest grains of sand that often add up to form massive beaches, dunes and deserts.</p>
<p>Most .NET developers are looking forward to .NET Multi-platform App UI (<a href="https://github.com/dotnet/maui" target="_blank">MAUI</a>)&mdash;the evolution of Xamarin.Forms with .NET 6. Going forward, developers should have much more confidence in the technology stack and tools as .NET MAUI empowers native cross-platform solutions on mobile and desktop.</p>
<p>While it is a long flight until we reach the sands of MAUI, developer excitement is palpable in all the news/content as we tinker and prepare for .NET MAUI. Like the grains of sand, every piece of news/article/video/tutorial/stream contributes towards developer knowledge and we grow a community/ecosystem willing to learn and help.</p>
<p>Sands of MAUI is a humble attempt to collect all the .NET MAUI awesomeness in one place. Here's what is noteworthy for the week of <strong>November 29, 2021</strong>:</p>
<h2 id="toc_1">Blazor with .NET MAUI</h2>
<p>.NET developers building web apps are understandably excited about Blazor&mdash;C# code front and back with familiar Razor syntax and productive tooling. With .NET MAUI, the story gets better with Blazor goodness now welcome on native cross-platform apps for mobile and desktop. <a href="https://twitter.com/original_ejl" target="_blank">Eilon Lipton</a>&nbsp;did an awesome session at .NET Conf covering the <a href="https://www.youtube.com/watch?v=Dr8L7zXxwLI&amp;list=PLdo4fOcmZ0oVFtp9MDEBNbA2sSqYvXSXO&amp;index=17&amp;t=379s" target="_blank">promise of Blazor on native apps</a>&mdash;powered by .NET MAUI.</p>
<p>Developers get to write true Blazor code and bring in Razor Class Libraries into native apps bootstrapped by .NET MAUI&mdash;all possible with the modern light weight BlazorWebView component, while maintaining full native device API access. This promise of Blazor on mobile/desktop with .NET MAUI should be the foundation of migrating/modernizing older apps while sharing code with web apps&mdash;the future looks good!</p>
<p><img src="https://d585tldpucybw.cloudfront.net/sfimages/default-source/default-album/blazorhybridafd249d602df46999ae3f0114565c776.png?sfvrsn=5d0d0f39_0" data-displaymode="Original" alt="BlazorHybrid" title="BlazorHybrid"> </p>
<h2 id="toc_2">Cross-Platform Apps with .NET MAUI</h2>
<p><a href="https://twitter.com/nishanil" target="_blank">Nish Anil</a> and <a href="https://twitter.com/vivek_sridhar" target="_blank">Vivek Sridhar</a> hosted the latest Microsoft Reactor show called <a href="https://www.youtube.com/watch?v=dYF_BJUaz4g" target="_blank">SamosaChai.NET</a>&mdash;what better way to learn .NET than over the classic Indian snack time. The guest was none other than <a href="https://twitter.com/JamesMontemagno" target="_blank">James Montemagno</a> who talked through building mobile/desktop apps with .NET MAUI and Blazor.</p>
<p>Over friendly banter, James walked through the .NET MAUI basics, from getting started with the templated solutions to building the complex .NET Conf podcast app. If you are still on the fence about .NET MAUI, this is a great starting point to see the future of cross-platform app development with .NET.</p>
<p><img src="https://d585tldpucybw.cloudfront.net/sfimages/default-source/default-album/samosachai.png?sfvrsn=4240fab2_0" data-displaymode="Original" alt="SamosaChai" title="SamosaChai"> </p>
<h2 id="toc_3">.NET 6 Unleashed</h2>
<p><a href="https://twitter.com/codemillmatt" target="_blank">Matt Soucoup</a> hosted the latest <a href="https://www.dotnetmauipodcast.com/101" target="_blank">.NET MAUI podcast</a>&nbsp;and invited <a href="https://twitter.com/JamesMontemagno" target="_blank">James Montemagno</a>&nbsp;and&nbsp;<a href="https://twitter.com/davidortinau" target="_blank">David Ortinau</a>&nbsp;for company. On the cards was celebrating all things .NET 6&mdash;the release, tooling, .NET Conf and of course, .NET MAUI. When friends hang out live on air, they share customer stories and quality ramblings about the state of modern .NET. </p>
<p>Key takeaways include developer flexibility with .NET&mdash;the right tools for the right job without being forced into it. Client developers with .NET have a native desktop and mobile technology stacks to reach just about any device. Web developers doing .NET could be doing some flavor of ASP.NET or Blazor, but many enterprises also have investments in JS stacks with Angular/React&mdash;all of which is now welcome in cross-platform native apps with .NET MAUI. Choice in technology stack is a good thing and .NET developers love the flexibility. </p>
<p><img src="https://d585tldpucybw.cloudfront.net/sfimages/default-source/default-album/mauipodcast101.png?sfvrsn=b46e94ff_0" data-displaymode="Original" alt="MauiPodcast101" title="MauiPodcast101"> </p>
<h2 id="toc_4">.NET MAUI in .NET Curry</h2>
<p><a href="https://twitter.com/DotNetCurry" target="_blank">DotNetCurry</a>, better known as 'DNC', produces a free digital magazine publication bringing the latest from the .NET/JavaScript worlds, presented by Microsoft MVP's and industry veterans. DNC Magazine recently hit the <a href="http://www.dotnetcurry.net/2021/dnc-mag-50th-single" target="_blank">50th edition</a>&mdash;big congratulations are due for continued efforts to maintain quality and reaching the milestone. The 50th edition does not disappoint and is packed with loads of .NET/JS content, including big coverage of .NET MAUI.</p>
<p><a href="https://twitter.com/jfversluis" target="_blank">Gerald Versluis</a> turned off his usual camera/microphone and took to the keyboard to write up a piece of what developers can expect with .NET MAUI. Gerald covers the .NET MAUI basics, the new Handler architecture, Host Builder model, bringing in Blazor goodness and several other benefits that .NET MAUI brings to the table. Going offline for a bit? This 50th edition DNC Magazine is a must to download and soak in all the latest developer content. </p>
<p><img src="https://d585tldpucybw.cloudfront.net/sfimages/default-source/default-album/dnc.png?sfvrsn=5c6f96d3_0" data-displaymode="Original" alt="DNC" title="DNC"> </p>
<h2 id="toc_5">TinyMvvm for .NET MAUI</h2>
<p>For good reason, the MVVM design pattern works well for XAML/C# codebases and much of the core features are supported out of the box in Xamarin.Forms/.NET MAUI. When you need just a little bit more help, but want to stay away from heavier MVVM frameworks, you may look at TinyMvvm, an open-source light-weight MVVM library custom built for Xamarin.Forms.</p>
<p>Wondering what the future holds with TinyMvvm with .NET MAUI? Developer <a href="https://twitter.com/hindrikes" target="_blank">Daniel Hindrikes</a>&nbsp;has you covered. After the 3.0 release, the <a href="https://danielhindrikes.se/index.php/2021/11/16/tinymvvm-for-net-maui-preview/" target="_blank">first preview of TinyMvvm for .NET MAUI</a>&nbsp;is now out and ready for you to give things a spin. Not surprisingly, the MauiAppBuilder Host Builder pattern to bootstrap .NET MAUI apps works well with dependency injection&mdash;it would be really simple to use an extension method with a resolver and get rolling using TinyMvvm for .NET MAUI apps. </p>
<p><img src="https://d585tldpucybw.cloudfront.net/sfimages/default-source/default-album/tinymvvm.png?sfvrsn=a57e553a_0" data-displaymode="Original" alt="TinyMVVM" title="TinyMVVM"></p>
<p>That's it for now. </p>
<p>We'll see you next week with more awesome content relevant to .NET MAUI. </p>
<p>Cheers, developers!</p><img src="https://feeds.telerik.com/link/10825/15057276.gif" height="1" width="1"/>]]></content>
  </entry>
  <entry>
    <id>urn:uuid:cccd2384-7b48-4afc-a3fa-aa47367ab08d</id>
    <title type="text">Sands of MAUI: Issue #34</title>
    <summary type="text">Welcome to the Sands of MAUI—newsletter-style issues dedicated to bringing together latest .NET MAUI content relevant to developers.</summary>
    <published>2021-11-22T14:41:38Z</published>
    <updated>2022-06-30T14:06:13Z</updated>
    <author>
      <name>Sam Basu </name>
    </author>
    <link rel="alternate" href="https://feeds.telerik.com/link/10825/15057277/sands-maui-issue-34"/>
    <content type="text"><![CDATA[<p><span class="featured">Welcome to the Sands of MAUI&mdash;newsletter-style issues dedicated to bringing together latest .NET MAUI content relevant to developers.</span></p>
<p>A particle of sand&mdash;tiny and innocuous. But put a lot of sand particles together and we have something big&mdash;a force to reckon with. It is the smallest grains of sand that often add up to form massive beaches, dunes and deserts.</p>
<p>Most .NET developers are looking forward to .NET Multi-platform App UI (<a href="https://github.com/dotnet/maui" target="_blank">MAUI</a>)&mdash;the evolution of Xamarin.Forms with .NET 6. Going forward, developers should have much more confidence in the technology stack and tools as .NET MAUI empowers native cross-platform solutions on mobile and desktop.</p>
<p>While it is a long flight until we reach the sands of MAUI, developer excitement is palpable in all the news/content as we tinker and prepare for .NET MAUI. Like the grains of sand, every piece of news/article/video/tutorial/stream contributes towards developer knowledge and we grow a community/ecosystem willing to learn and help.</p>
<p>Sands of MAUI is a humble attempt to collect all the .NET MAUI awesomeness in one place. Here's what is noteworthy for the week of <strong>November 22, 2021</strong>:</p>
<h2 id="toc_1">Future of .NET</h2>
<p>Hot off the heels of .NET 6 launch at .NET Conf, three developer advocate stooges invited an old friend to relive all the excitement: <a href="https://twitter.com/EdCharbeneau" target="_blank">Ed Charbeneau</a>, <a href="https://twitter.com/AlyssaNicoll" target="_blank">Alyssa Nicoll</a>, <a href="https://twitter.com/samidip" target="_blank">Sam Basu</a>&nbsp;and <a href="https://twitter.com/csharpfritz" target="_blank">Jeff Fritz</a>&nbsp;hosted the <a href="https://www.youtube.com/watch?v=Bg6A0u-qdpA" target="_blank">Future of .NET webinar</a>.</p>
<p>This was a fun 2 hours breaking down all the big announcements from a developer's perspective and whipping up quick demos to showcase the hot bits. Discussions evolved around the significance of .NET 6, VS 2022 launch, C# 10 features, .NET MAUI updates and bringing Blazor goodness to desktop with hybrid apps. With .NET 6 carrying the LTS badge, migration and modernization would be top of mind for lot of existing apps&mdash;it was good to see an honest conversation about all the options on the table.</p>
<p><img src="https://d585tldpucybw.cloudfront.net/sfimages/default-source/default-album/futureofdotnet.png?sfvrsn=2b1becba_0" data-displaymode="Original" alt="FutureOfDotNet" title="FutureOfDotNet"> </p>
<h2 id="toc_2">.NET MAUI Preview 10 Recap</h2>
<p>How can a .NET MAUI release go by without some expected YouTube goodness? <a href="https://twitter.com/jfversluis" target="_blank">Gerald Versluis</a>&nbsp;put out a video for <a href="https://www.youtube.com/watch?v=P3VNZNZpMYk&amp;list=PLfbOp004UaYWu-meDkRN6_Y1verl96npI&amp;t=1s" target="_blank">all things .NET MAUI Preview 10</a>&nbsp;and recapped some tooling goodness with VS 2022. Gerald also went on to cover the sweet cross-platform real-time podcast app demo from .NET Conf keynote, showcasing the best of code sharing with .NET MAUI and Hybrid apps with Blazor.</p>
<p>One call to action is clear&mdash;if you haven't already, now is a great time to get started with .NET MAUI. The promise is coming together nicely.</p>
<p><img src="https://d585tldpucybw.cloudfront.net/sfimages/default-source/default-album/maui10recap.png?sfvrsn=7fb458b0_0" data-displaymode="Original" alt="Maui10Recap" title="Maui10Recap"> </p>
<h2 id="toc_3">.NET Updates</h2>
<p><a href="https://twitter.com/JamesMontemagno" target="_blank">James Montemagno</a>&nbsp;and&nbsp;<a href="https://twitter.com/praeclarum" target="_blank">Frank Krueger</a>&nbsp;hosted the latest episode of the <a href="https://www.mergeconflict.fm/280" target="_blank">Merge Conflict podcast</a>, diving into all the details of .NET 6 and Visual Studio 2022 releases.</p>
<p>While developer excitement is palpable, it was good to see the acknowledgement that there is a lot to take in&mdash;developers may need some time to settle in with the new .NET bits and Azure cloud services. James shared some good info on some of the behind-the-scenes work that went in towards making the cross-platform podcast demo app for .NET Conf&mdash;something soon to be open sourced for developers to tinker with. </p>
<p><img src="https://d585tldpucybw.cloudfront.net/sfimages/default-source/default-album/mergeconflict280.png?sfvrsn=479efe52_0" data-displaymode="Original" alt="MergeConflict280" title="MergeConflict280"> </p>
<h2 id="toc_4">Drawn Controls in .NET MAUI</h2>
<p>There was a ton of content from passionate developers from around the world at .NET Conf&mdash;and some real gems for those interested in .NET MAUI. <a href="https://twitter.com/jsuarezruiz" target="_blank">Javier Suarez</a>&nbsp;did a session on <a href="https://www.youtube.com/watch?v=-lbBFTpp25k" target="_blank">Drawn Controls in .NET MAUI</a>, diving into much of the awesome work that him and the team has been putting together.</p>
<p>Javier started with the basics of .NET MAUI and&nbsp;<em>Microsoft.Maui.Graphics</em> library, giving developers the freedom to render native UI per their needs. Javier then dived into the meat of things&mdash;the goodness evolving from the <em>Microsoft.Maui.Graphics.Controls</em> library.</p>
<p>While experimental, this new cross-platform graphics library allows developers to render fully drawn UI components with .NET MAUI, catering to popular design systems like Cupertino, Fluent and Material. Javier showed off some cool demos and talked through performance and extensibility of drawn controls&mdash;definitely a wonderful development within the .NET MAUI stack.</p>
<p><img src="https://d585tldpucybw.cloudfront.net/sfimages/default-source/default-album/mauidrawnui.png?sfvrsn=8861858e_0" data-displaymode="Original" alt="MauiDrawnUI" title="MauiDrawnUI"> </p>
<h2 id="toc_5">MAUIAppBuilder Code</h2>
<p><a href="https://twitter.com/luismatosluna" target="_blank">Luis Matos</a> continues his excellent <a href="https://luismts.com/exploring-maui-app-builder-net-6/" target="_blank">series on the MauiAppBuilder</a>&mdash;this time <a href="https://luismts.com/code-behind-mauiappbuilder/" target="_blank">diving into much of the code</a>&nbsp;that now powers the bootstrapping of .NET MAUI apps using the generic .NET Builder pattern.</p>
<p>Luis talks about how to initialize a MauiAppBuilder instance using a Static method with default configurations and dives into the MauiAppBuilder Public API. This API is where a lot of the plumbing happens&mdash;lot of properties/configurations and a single method called <em>Build()</em> which creates the MauiApp. Luis dives into some tricky internal code unapologetically and teaches us a lot&mdash;looking forward to the rest of the series.</p>
<p><img src="https://d585tldpucybw.cloudfront.net/sfimages/default-source/default-album/appbuildercode.png?sfvrsn=686c304b_0" data-displaymode="Original" alt="AppBuilderCode" title="AppBuilderCode"></p>
<p>That's it for now. </p>
<p>We'll see you next week with more awesome content relevant to .NET MAUI. </p>
<p>Cheers, developers!</p><img src="https://feeds.telerik.com/link/10825/15057277.gif" height="1" width="1"/>]]></content>
  </entry>
  <entry>
    <id>urn:uuid:8c19edbf-020d-4f93-ab97-c0ae1e231e91</id>
    <title type="text">ASP.NET Core for Beginners: Web APIs</title>
    <summary type="text">If you work with the .NET platform or are new to this area, you need to know about Web APIs—robust and secure applications that use the HTTP protocol to communicate between servers and clients and are in high demand in the market.</summary>
    <published>2021-11-19T10:47:00Z</published>
    <updated>2022-06-30T14:06:13Z</updated>
    <author>
      <name>Assis Zang </name>
    </author>
    <link rel="alternate" href="https://feeds.telerik.com/link/10825/15057278/aspnet-core-beginners-web-apis"/>
    <content type="text"><![CDATA[<p><span class="featured">If you work with the .NET platform or are new to this area, you need to know about Web APIs&mdash;robust and secure applications that use the HTTP protocol to communicate between servers and clients and are in high demand in the market</span>.</p>
<h2 id="what-is-a-web-api">What Is a Web API?</h2>
<p><img src="https://d585tldpucybw.cloudfront.net/sfimages/default-source/blogs/2021/2021-10/api-basic-operation.png" alt="API Basic operation" title="api basic operation"></p>
<p>Application Programming Interfaces (APIs) are basically HTTP services that are used to communicate between applications in a simple and centralized way.</p>
<p>Microsoft through the ASP.NET framework provides ways to build Web APIs that can be accessed from any client, such as browsers, desktop applications and mobile devices.</p>
<p>ASP.NET Web API can be used to build REST and SOAP services.</p>
<p>Following are some benefits of working with an ASP.NET Web API:</p>
<ul>
    <li>It works the way HTTP works, using standard HTTP verbs like GET, POST, PUT, DELETE for all CRUD operations.</li>
    <li>Full support for routing.</li>
    <li>Response is generated in JSON and XML format using MediaTypeFormatter.</li>
    <li>It can be hosted on IIS as well as auto-hosted outside of IIS.</li>
    <li>Supports template binding and validation.</li>
    <li>Supports URL patterns and HTTP methods.</li>
    <li>It has a simple form of dependency injection.</li>
    <li>Can be versioned.</li>
</ul>
<h2 id="how-do-asp.-net-web-apis-work">How Do ASP.NET Web APIs Work?</h2>
<p>An ASP.NET Core Web API basically consists of one or more controller class that derives from ControllerBase. The ControllerBase class provides many methods and properties that are useful for working with HTTP requests.</p>
<p><img src="https://d585tldpucybw.cloudfront.net/sfimages/default-source/blogs/2021/2021-10/asp-net-core-web-api-flowchart.png" alt="ASP.NET Core Web API Flowchart" title="asp.net core web api flowchart"></p>
<p>As you can see in the image above, a &ldquo;client&rdquo; makes an &ldquo;HTTP request&rdquo; to the API, which&mdash;through the &ldquo;controller&rdquo;&mdash;identifies the call and makes the Read or Write in the &ldquo;data access layer.&rdquo; The &ldquo;Model&rdquo; is returned, in this case, a JSON object &ldquo;Contact: Name&rdquo; in the &ldquo;HTTP response.&rdquo; In simple terms, the API is bridging the &ldquo;client&rdquo; and the &ldquo;data&rdquo; in a simple and safe way.</p>
<p><strong>Example console API response</strong></p>
<p><img src="https://d585tldpucybw.cloudfront.net/sfimages/default-source/blogs/2021/2021-10/api-response.png" alt="API Response" title="api response"></p>
<p>Now that we&rsquo;ve seen the basics of Web APIs, let&rsquo;s create an API and see in practice how it works.</p>
<h2 id="creating-an-asp.-net-core-5-web-api">Creating an ASP.NET Core 5 Web API</h2>
<p>To create an ASP.NET Core 5 Web API application, we will use:</p>
<ul>
    <li>
    <p><strong>.NET SDK:</strong> The .NET SDK is a toolkit for developers that you&rsquo;ll need to start developing in the .NET platform. You can download the version  <a href="https://dotnet.microsoft.com/download" target="_blank">here</a> (the .NET 5.0 is recommended because it already contains the anterior versions).</p>
    </li>
    <li>
    <p><strong>Visual Studio 2019:</strong> You can download the Community Version <a href="https://visualstudio.microsoft.com/en-us/vs/community/" target="_blank">here</a>&mdash;it&rsquo;s free  and contains all of the features you need to create, test and deploy a Web API application.</p>
    </li>
</ul>
<p> You can download the project&rsquo;s source code <a href="https://github.com/zangassis/my-reading-list" target="_blank">here</a>.</p>
<p>Below we will have some steps to build our application:</p>
<ol>
    <li>
    <p>Open the Visual Studio 2019 &rarr; Click on <strong>&ldquo;Create a new project.&rdquo;</strong></p>
    </li>
    <li>
    <p>Choose option <strong>&ldquo;ASP.NET Core Web API.&rdquo;</strong>&nbsp;Click <strong>&ldquo;Next.&rdquo;</strong></p>
    </li>
    <li>
    <p>Write the project name (my suggestion is &ldquo;MyReadingList.WebAPI&rdquo;) and the solution name folder (my suggestion is &ldquo;MyReadingList&rdquo;), then Click <strong>&ldquo;Next.&rdquo;</strong></p>
    </li>
    <li>
    <p>In the &ldquo;Target Framework&rdquo; choose &ldquo;.NET 5.0&rdquo;, and Click <strong>&ldquo;Create.&rdquo;</strong></p>
    </li>
</ol>
<p>By default, our newly created API comes with the basics to run it, with an example controller. If you click on &ldquo;IIS Express&rdquo; or press the &ldquo;F5&rdquo; key on your keyboard, the application will start and can be accessed through the URL:</p>
<pre><code>
https://localhost:44345/swagger/index.html

</code></pre>
<p>The GIF below shows the execution of the procedure.</p>
<p><img src="https://d585tldpucybw.cloudfront.net/sfimages/default-source/blogs/2021/2021-10/create-first-aspnet-web-api.gif" alt="Create First ASPNET Web API" title="create first aspnet web api"></p>
<p>When we created our API, it already had an example called &ldquo;WeatherForecast&rdquo; that you just ran, but let&rsquo;s not waste time with that&mdash;we&rsquo;ll make our own example API: a reading list and then we&rsquo;ll add our favorite books. </p>
<p>First, let&rsquo;s create our &ldquo;Book&rdquo; Model class, which is a class that represents a &ldquo;Book&rdquo; entity. To do this, right-click on the project and add a folder called &ldquo;Models&rdquo; and then within Models create a class called &ldquo;Book&rdquo;.</p>
<pre class=" language-csharp"><code class="prism  language-csharp"><span class="token keyword">public</span> <span class="token keyword">class</span> <span class="token class-name">Book</span>
<span class="token punctuation">{</span>
  <span class="token keyword">public</span> Guid Id <span class="token punctuation">{</span> <span class="token keyword">get</span><span class="token punctuation">;</span> <span class="token keyword">set</span><span class="token punctuation">;</span> <span class="token punctuation">}</span>
  <span class="token keyword">public</span> <span class="token keyword">string</span> Name <span class="token punctuation">{</span> <span class="token keyword">get</span><span class="token punctuation">;</span> <span class="token keyword">set</span><span class="token punctuation">;</span> <span class="token punctuation">}</span>
  <span class="token keyword">public</span> <span class="token keyword">string</span> Author <span class="token punctuation">{</span> <span class="token keyword">get</span><span class="token punctuation">;</span> <span class="token keyword">set</span><span class="token punctuation">;</span> <span class="token punctuation">}</span>
  <span class="token keyword">public</span> <span class="token keyword">string</span> Genre <span class="token punctuation">{</span> <span class="token keyword">get</span><span class="token punctuation">;</span> <span class="token keyword">set</span><span class="token punctuation">;</span> <span class="token punctuation">}</span>
  <span class="token keyword">public</span> <span class="token keyword">bool</span> Read <span class="token punctuation">{</span> <span class="token keyword">get</span><span class="token punctuation">;</span> <span class="token keyword">set</span><span class="token punctuation">;</span> <span class="token punctuation">}</span>
<span class="token punctuation">}</span>
</code></pre>
<h2 id="creating-database-context">Creating Database Context</h2>
<p>The context class is responsible for interacting with data objects. It manages the entity objects during runtime, which includes filling object values with data coming from a database, tracking changes made and persisting the data to our database.</p>
<p>One way to work with the &ldquo;context&rdquo; paradigm is to define a class that derives from DbContext and exposes the model class as a property of DbSet.</p>
<p>The Entity Framework allows us to query, insert, update and delete data using objects known as <strong>entities</strong>. It maps the entities and relationships that are defined in your entity model and provides functions to perform the following tasks:</p>
<ol>
    <li>Materialize data returned from the database as objects</li>
    <li>Control the changes made to objects</li>
    <li>Make changes to the database</li>
    <li>Work with the competition</li>
    <li>Link objects to controls</li>
</ol>
<p>In this project, we will use a database called SQLite, which is a C-language library that implements a small, fast, self-contained, highly reliable and full-featured SQL database engine.</p>
<p>We need to install the following packages in the project:</p>
<ul>
    <li>&ldquo;Microsoft.EntityFrameworkCore&rdquo; Version=&ldquo;5.0.9&rdquo;</li>
    <li>&ldquo;Microsoft.EntityFrameworkCore.Design&rdquo; Version=&ldquo;5.0.9&rdquo;</li>
    <li>&ldquo;Microsoft.EntityFrameworkCore.Sqlite&rdquo; Version=&ldquo;5.0.9&rdquo;</li>
    <li>&ldquo;Microsoft.EntityFrameworkCore.Sqlite.Design&rdquo; Version=&ldquo;1.1.6&rdquo;</li>
    <li>&ldquo;Microsoft.EntityFrameworkCore.Tools&rdquo; Version=&ldquo;5.0.9&rdquo;</li>
</ul>
<p>You can do this through the NuGet package manager.</p>
<p>Then still inside the Models folder, create a class called &ldquo;BookContext&rdquo; and put the following code in it:</p>
<pre class=" language-csharp"><code class="prism  language-csharp"><span class="token keyword">public</span> <span class="token keyword">class</span> <span class="token class-name">BookContext</span> <span class="token punctuation">:</span> DbContext
<span class="token punctuation">{</span>
  <span class="token keyword">public</span> <span class="token function">BookContext</span><span class="token punctuation">(</span>DbContextOptions<span class="token operator">&lt;</span>BookContext<span class="token operator">&gt;</span> options<span class="token punctuation">)</span> <span class="token punctuation">:</span> <span class="token keyword">base</span><span class="token punctuation">(</span>options<span class="token punctuation">)</span> <span class="token punctuation">{</span> <span class="token punctuation">}</span>
  <span class="token keyword">public</span> DbSet<span class="token operator">&lt;</span>Book<span class="token operator">&gt;</span> Books <span class="token punctuation">{</span> <span class="token keyword">get</span><span class="token punctuation">;</span> <span class="token keyword">set</span><span class="token punctuation">;</span> <span class="token punctuation">}</span>
  <span class="token keyword">protected</span> <span class="token keyword">override</span> <span class="token keyword">void</span> <span class="token function">OnModelCreating</span><span class="token punctuation">(</span>ModelBuilder builder<span class="token punctuation">)</span>
  <span class="token punctuation">{</span>
    builder<span class="token punctuation">.</span><span class="token generic-method function">Entity<span class="token punctuation">&lt;</span>Book<span class="token punctuation">&gt;</span></span><span class="token punctuation">(</span><span class="token punctuation">)</span><span class="token punctuation">.</span><span class="token function">HasKey</span><span class="token punctuation">(</span>b <span class="token operator">=</span><span class="token operator">&gt;</span> b<span class="token punctuation">.</span>Id<span class="token punctuation">)</span><span class="token punctuation">;</span>
    <span class="token keyword">base</span><span class="token punctuation">.</span><span class="token function">OnModelCreating</span><span class="token punctuation">(</span>builder<span class="token punctuation">)</span><span class="token punctuation">;</span>
  <span class="token punctuation">}</span>
<span class="token punctuation">}</span>
</code></pre>
<p>With this code, we define that &ldquo;Book&rdquo; is our context class, which will receive in the database an entity of the same name and will have its properties (name, author, etc.) as columns in the book table.</p>
<p>We also defined that the Id will be the primary key of the table through the <code>OnModelCreating</code> method.</p>
<h2 id="creating-sqlite-connection-string">Creating SQLite Connection String</h2>
<p>Let&rsquo;s create our connection string, which will open a connection to the database we&rsquo;ll call &ldquo;ReadingList.db&rdquo;.</p>
<p>Open the archive &ldquo;appsettings.json&rdquo; and put this code before &ldquo;Logging&rdquo;:</p>
<pre class=" language-csharp"><code class="prism  language-csharp"><span class="token string">"ConnectionSqlite"</span><span class="token punctuation">:</span> <span class="token punctuation">{</span> <span class="token string">"SqliteConnectionString"</span><span class="token punctuation">:</span> <span class="token string">"Data Source=ReadingList.db"</span> <span class="token punctuation">}</span><span class="token punctuation">,</span>
</code></pre>
<h2 id="registering-context-with-dependency-injection">Registering Context With Dependency Injection</h2>
<p>ASP.NET Core implements dependency injection by default. Now that we have created our Context class, we need to do the dependency injection of this class. ASP.NET Core allows us to do the injection when our application is started.</p>
<p>To do this, open the <strong>Startup.cs</strong> file and replace the ConfigureServices method with this:</p>
<pre class=" language-csharp"><code class="prism  language-csharp"><span class="token keyword">public</span> <span class="token keyword">void</span> <span class="token function">ConfigureServices</span><span class="token punctuation">(</span>IServiceCollection services<span class="token punctuation">)</span>
<span class="token punctuation">{</span>
  services<span class="token punctuation">.</span><span class="token function">AddControllers</span><span class="token punctuation">(</span><span class="token punctuation">)</span><span class="token punctuation">;</span>
  services<span class="token punctuation">.</span><span class="token function">AddSwaggerGen</span><span class="token punctuation">(</span>c <span class="token operator">=</span><span class="token operator">&gt;</span>
  <span class="token punctuation">{</span>
    c<span class="token punctuation">.</span><span class="token function">SwaggerDoc</span><span class="token punctuation">(</span><span class="token string">"v1"</span><span class="token punctuation">,</span> <span class="token keyword">new</span> <span class="token class-name">OpenApiInfo</span> <span class="token punctuation">{</span> Title <span class="token operator">=</span> <span class="token string">"MyReadingList.WebAPI"</span><span class="token punctuation">,</span> Version <span class="token operator">=</span> <span class="token string">"v1"</span> <span class="token punctuation">}</span><span class="token punctuation">)</span><span class="token punctuation">;</span>
  <span class="token punctuation">}</span><span class="token punctuation">)</span><span class="token punctuation">;</span>

  <span class="token keyword">var</span> connection <span class="token operator">=</span> Configuration<span class="token punctuation">[</span><span class="token string">"ConnectionSqlite:SqliteConnectionString"</span><span class="token punctuation">]</span><span class="token punctuation">;</span>
  services<span class="token punctuation">.</span><span class="token generic-method function">AddDbContext<span class="token punctuation">&lt;</span>BookContext<span class="token punctuation">&gt;</span></span><span class="token punctuation">(</span>options <span class="token operator">=</span><span class="token operator">&gt;</span> options<span class="token punctuation">.</span><span class="token function">UseSqlite</span><span class="token punctuation">(</span>connection<span class="token punctuation">)</span><span class="token punctuation">)</span><span class="token punctuation">;</span>
<span class="token punctuation">}</span>
</code></pre>
<h2 id="creating-the-database">Creating the Database</h2>
<p>Now that we have everything set up, we can create the database from the model using &ldquo;Migrations.&rdquo;</p>
<p>The migrations feature enables you to make changes to your model and then propagate those changes to your database schema. Migrations are enabled by default in EF Core.</p>
<aside>
<hr>
<div class="row">
<div class="col-4 u-normal-full u-small-mb0">
<h4 class="u-fs20 u-fw5 u-lh125 u-mb0">
Instant Feedback Is Here: Hot Reload in <br>
.NET 6
</h4>
</div>
<div class="col-8">
<p class="u-fs16 u-mb0">
.NET 6 Preview 3 introduced hot reloading for ASP.NET Core apps. <a href="https://www.telerik.com https://www.telerik.com/blogs/instant-feedback-is-here-introducing-hot-reload-in-dotnet-6" target="_blank">This post shows you how hot reloading supercharges your productivity, plus any limitations you should expect.</a>
</p>
</div>
</div>
<hr class="u-mb3">
</aside>
<p>The process is very simple. Go to the folder where the project was created, open a console and enter the commands below.</p>
<pre><code>dotnet ef migrations add InitialModel
</code></pre>
<p>And then:</p>
<pre><code>dotnet ef database update
</code></pre>
<p><img src="https://d585tldpucybw.cloudfront.net/sfimages/default-source/blogs/2021/2021-10/powershell-commands.png" alt="Powershell commands" title="powershell commands"></p>
<p>The first command is to support migration and create the initial set of tables for the model. The second is to apply the migration to the database.</p>
<p> <strong>Important!</strong> If while running the commands you get any errors related to the version of EntityFramework, run this command in the console:</p>
<pre><code>dotnet tool update --global dotnet-ef --version 5.0.9
</code></pre>
<p>If everything worked out, you will see the database created at the root of the project&mdash;where you opened the console, in the file &ldquo;ReadingList.db&rdquo;, that&rsquo;s where our database is. To open this file and see the tables created as in our model, you will need to download an SQLite-compatible app. If you use Windows, I recommend the &ldquo;SQLite Viewer Editor&rdquo;&mdash;it is free and can be downloaded directly from the Microsoft Store.</p>
<p><strong>The database in "SQLite Viewer Editor"</strong></p>
<p><img src="https://d585tldpucybw.cloudfront.net/sfimages/default-source/blogs/2021/2021-10/database-in-sqlite-viewer-editor.png" alt="Database in SQLite Viewer Editor" title="database in sqlite viewer editor"></p>
<p>In addition to the &ldquo;Books&rdquo; table, we also have the &ldquo;__EFMigrationsHistory&rdquo; which is automatically created when we apply Migrations and is used to track change versions, like a history.</p>
<h2 id="creating-the-controller">Creating the Controller</h2>
<p>Now we are going to create a controller to be able to do CRUD operations in our database. To do this, perform the following steps:</p>
<ol>
    <li>Right-click on the &ldquo;Controllers&rdquo; folder &rarr; Add  &rarr; Controller  &rarr;  Select  &ldquo;MVC Controller - Empty&rdquo;  &rarr; Add</li>
    <li>Name it &ldquo;BooksController&rdquo;</li>
    <li>Open the generated file and replace your code with this:</li>
</ol>
<pre class=" language-csharp"><code class="prism  language-csharp"><span class="token keyword">using</span> Microsoft<span class="token punctuation">.</span>AspNetCore<span class="token punctuation">.</span>Mvc<span class="token punctuation">;</span>
<span class="token keyword">using</span> MyReadingList<span class="token punctuation">.</span>WebAPI<span class="token punctuation">.</span>Models<span class="token punctuation">;</span>

<span class="token keyword">namespace</span> MyReadingList<span class="token punctuation">.</span>WebAPI<span class="token punctuation">.</span>Controllers
<span class="token punctuation">{</span>
  <span class="token punctuation">[</span><span class="token function">Route</span><span class="token punctuation">(</span><span class="token string">"api/[controller]"</span><span class="token punctuation">)</span><span class="token punctuation">]</span>
  <span class="token punctuation">[</span>ApiController<span class="token punctuation">]</span>
  <span class="token keyword">public</span> <span class="token keyword">class</span> <span class="token class-name">BooksController</span> <span class="token punctuation">:</span> Controller
  <span class="token punctuation">{</span>
    <span class="token keyword">private</span> <span class="token keyword">readonly</span> BookContext _context<span class="token punctuation">;</span>
    <span class="token keyword">public</span> <span class="token function">BooksController</span><span class="token punctuation">(</span>BookContext context<span class="token punctuation">)</span>
    <span class="token punctuation">{</span>
      _context <span class="token operator">=</span> context<span class="token punctuation">;</span>
    <span class="token punctuation">}</span>
  <span class="token punctuation">}</span>
<span class="token punctuation">}</span>
</code></pre>
<p>With this code we made the context dependency injection in the controller. Next we will implement the methods responsible for performing the operations (CRUD):</p>
<table class="telerik-reTable-1">
    <thead>
        <tr class="telerik-reTableHeaderRow-1">
            <th class="telerik-reTableHeaderEvenCol-1">HTTP Method</th>
            <th class="telerik-reTableHeaderOddCol-1">Route</th>
            <th class="telerik-reTableHeaderEvenCol-1">Description</th>
            <th class="telerik-reTableHeaderOddCol-1">Request body</th>
            <th class="telerik-reTableHeaderEvenCol-1">Response body</th>
        </tr>
    </thead>
    <tbody>
        <tr class="telerik-reTableOddRow-1">
            <td class="telerik-reTableEvenCol-1">GET</td>
            <td class="telerik-reTableOddCol-1">/api/books</td>
            <td class="telerik-reTableEvenCol-1">Get all books</td>
            <td class="telerik-reTableOddCol-1">None</td>
            <td class="telerik-reTableEvenCol-1">Array of books</td>
        </tr>
        <tr class="telerik-reTableEvenRow-1">
            <td class="telerik-reTableEvenCol-1">GET</td>
            <td class="telerik-reTableOddCol-1">/api/books/read=true</td>
            <td class="telerik-reTableEvenCol-1">Get all books read</td>
            <td class="telerik-reTableOddCol-1">None</td>
            <td class="telerik-reTableEvenCol-1">Array of books</td>
        </tr>
        <tr class="telerik-reTableOddRow-1">
            <td class="telerik-reTableEvenCol-1">GET</td>
            <td class="telerik-reTableOddCol-1">/api/books/{id}</td>
            <td class="telerik-reTableEvenCol-1">Get a book by Id</td>
            <td class="telerik-reTableOddCol-1">None</td>
            <td class="telerik-reTableEvenCol-1">Book</td>
        </tr>
        <tr class="telerik-reTableEvenRow-1">
            <td class="telerik-reTableEvenCol-1">POST</td>
            <td class="telerik-reTableOddCol-1">/api/books</td>
            <td class="telerik-reTableEvenCol-1">Add a new book</td>
            <td class="telerik-reTableOddCol-1">Book</td>
            <td class="telerik-reTableEvenCol-1">Book</td>
        </tr>
        <tr class="telerik-reTableOddRow-1">
            <td class="telerik-reTableEvenCol-1">PUT</td>
            <td class="telerik-reTableOddCol-1">/api/books/{id}</td>
            <td class="telerik-reTableEvenCol-1">Update an existing book</td>
            <td class="telerik-reTableOddCol-1">Book</td>
            <td class="telerik-reTableEvenCol-1">None</td>
        </tr>
        <tr class="telerik-reTableEvenRow-1">
            <td class="telerik-reTableEvenCol-1">DELETE</td>
            <td class="telerik-reTableOddCol-1">/api/books/{id}</td>
            <td class="telerik-reTableEvenCol-1">Delete a book</td>
            <td class="telerik-reTableOddCol-1">None</td>
            <td class="telerik-reTableEvenCol-1">None</td>
        </tr>
    </tbody>
</table>
<style type="text/css" id="telerik-reTable-1">
    .telerik-reTable-1 {
    border-width: 0px;
    border-style: none;
    border-collapse: collapse;
    font-family: Tahoma;
    }
    .telerik-reTable-1 tr.telerik-reTableHeaderRow-1 {
    margin: 10px;
    padding: 10px;
    color: #3F4D6B;
    background: #D6E8FF;
    text-align: left;
    font-size: 10pt;
    font-style: normal;
    font-family: Tahoma;
    text-transform: capitalize;
    font-weight: bold;
    border-spacing: 10px;
    line-height: 14pt;
    vertical-align: top;
    }
    .telerik-reTable-1 td.telerik-reTableHeaderFirstCol-1 {
    padding: 0in 5.4pt 0in 5.4pt;
    color: #3a4663;
    line-height: 14pt;
    }
    .telerik-reTable-1 td.telerik-reTableHeaderLastCol-1 {
    padding: 0in 5.4pt 0in 5.4pt;
    color: #3a4663;
    line-height: 14pt;
    }
    .telerik-reTable-1 td.telerik-reTableHeaderOddCol-1 {
    padding: 0in 5.4pt 0in 5.4pt;
    color: #3a4663;
    line-height: 14pt;
    }
    .telerik-reTable-1 td.telerik-reTableHeaderEvenCol-1 {
    padding: 0in 5.4pt 0in 5.4pt;
    color: #3a4663;
    line-height: 14pt;
    }
    .telerik-reTable-1 tr.telerik-reTableOddRow-1 {
    color: #666666;
    background-color: #F2F3F4;
    font-size: 10pt;
    vertical-align: top;
    }
    .telerik-reTable-1 tr.telerik-reTableEvenRow-1 {
    color: #666666;
    background-color: #E7EBF7;
    font-size: 10pt;
    vertical-align: top;
    }
    .telerik-reTable-1 td.telerik-reTableFirstCol-1 {
    padding: 0in 5.4pt 0in 5.4pt;
    }
    .telerik-reTable-1 td.telerik-reTableLastCol-1 {
    padding: 0in 5.4pt 0in 5.4pt;
    }
    .telerik-reTable-1 td.telerik-reTableOddCol-1 {
    padding: 0in 5.4pt 0in 5.4pt;
    }
    .telerik-reTable-1 td.telerik-reTableEvenCol-1 {
    padding: 0in 5.4pt 0in 5.4pt;
    }
    .telerik-reTable-1 tr.telerik-reTableFooterRow-1 {
    background-color: #D6E8FF;
    color: #4A5A80;
    font-weight: 500;
    font-size: 10pt;
    font-family: Tahoma;
    line-height: 11pt;
    }
    .telerik-reTable-1 td.telerik-reTableFooterFirstCol-1 {
    padding: 0in 5.4pt 0in 5.4pt;
    border-top: solid gray 1.0pt;
    text-align: left;
    }
    .telerik-reTable-1 td.telerik-reTableFooterLastCol-1 {
    padding: 0in 5.4pt 0in 5.4pt;
    border-top: solid gray 1.0pt;
    text-align: left;
    }
    .telerik-reTable-1 td.telerik-reTableFooterOddCol-1 {
    padding: 0in 5.4pt 0in 5.4pt;
    text-align: left;
    border-top: solid gray 1.0pt;
    }
    .telerik-reTable-1 td.telerik-reTableFooterEvenCol-1 {
    padding: 0in 5.4pt 0in 5.4pt;
    text-align: left;
    border-top: solid gray 1.0pt;
    }
</style>
<br>
<h2 id="implementing-api-methods">Implementing API Methods</h2>
<p>Following the order in the table above, we will implement the API methods responsible for doing CRUD operations in the database. Still in &ldquo;BooksController,&rdquo; you can put this code right below the dependency injection:</p>
<pre class=" language-csharp"><code class="prism  language-csharp"><span class="token comment">//Get all books</span>
<span class="token punctuation">[</span>HttpGet<span class="token punctuation">]</span>
<span class="token keyword">public</span> <span class="token keyword">async</span> Task<span class="token operator">&lt;</span>ActionResult<span class="token operator">&lt;</span>IEnumerable<span class="token operator">&lt;</span>Book<span class="token operator">&gt;</span><span class="token operator">&gt;</span><span class="token operator">&gt;</span> <span class="token function">GetBooks</span><span class="token punctuation">(</span><span class="token punctuation">)</span>
<span class="token punctuation">{</span>
  <span class="token keyword">return</span> <span class="token keyword">await</span> _context<span class="token punctuation">.</span>Books<span class="token punctuation">.</span><span class="token function">ToListAsync</span><span class="token punctuation">(</span><span class="token punctuation">)</span><span class="token punctuation">;</span>
<span class="token punctuation">}</span>

<span class="token comment">//Get all books read</span>
<span class="token punctuation">[</span><span class="token function">HttpGet</span><span class="token punctuation">(</span><span class="token string">"read"</span><span class="token punctuation">)</span><span class="token punctuation">]</span>
<span class="token keyword">public</span> <span class="token keyword">async</span> Task<span class="token operator">&lt;</span>ActionResult<span class="token operator">&lt;</span>IEnumerable<span class="token operator">&lt;</span>Book<span class="token operator">&gt;</span><span class="token operator">&gt;</span><span class="token operator">&gt;</span> <span class="token function">GetBooksRead</span><span class="token punctuation">(</span><span class="token punctuation">)</span>
<span class="token punctuation">{</span>
  <span class="token keyword">bool</span> read <span class="token operator">=</span> <span class="token keyword">true</span><span class="token punctuation">;</span>
  <span class="token keyword">var</span> books <span class="token operator">=</span> <span class="token keyword">await</span> _context<span class="token punctuation">.</span>Books<span class="token punctuation">.</span><span class="token function">ToListAsync</span><span class="token punctuation">(</span><span class="token punctuation">)</span><span class="token punctuation">;</span>
  
  <span class="token keyword">var</span> booksRead <span class="token operator">=</span> <span class="token punctuation">(</span><span class="token keyword">from</span> book <span class="token keyword">in</span> books <span class="token keyword">where</span> book<span class="token punctuation">.</span>Read <span class="token operator">==</span> read <span class="token keyword">select</span> book<span class="token punctuation">)</span><span class="token punctuation">.</span><span class="token function">ToList</span><span class="token punctuation">(</span><span class="token punctuation">)</span><span class="token punctuation">;</span>
  
  <span class="token keyword">return</span> booksRead<span class="token punctuation">;</span>
<span class="token punctuation">}</span>

<span class="token comment">//Get a Book by id</span>
<span class="token punctuation">[</span><span class="token function">HttpGet</span><span class="token punctuation">(</span><span class="token string">"{id}"</span><span class="token punctuation">)</span><span class="token punctuation">]</span>
<span class="token keyword">public</span> <span class="token keyword">async</span> Task<span class="token operator">&lt;</span>ActionResult<span class="token operator">&lt;</span>Book<span class="token operator">&gt;</span><span class="token operator">&gt;</span> <span class="token function">GetBook</span><span class="token punctuation">(</span><span class="token keyword">string</span> id<span class="token punctuation">)</span>
<span class="token punctuation">{</span>
  Guid guidId <span class="token operator">=</span> Guid<span class="token punctuation">.</span><span class="token function">Parse</span><span class="token punctuation">(</span>id<span class="token punctuation">)</span><span class="token punctuation">;</span>
  
  <span class="token keyword">var</span> book <span class="token operator">=</span> <span class="token keyword">await</span> _context<span class="token punctuation">.</span>Books<span class="token punctuation">.</span><span class="token function">FindAsync</span><span class="token punctuation">(</span>guidId<span class="token punctuation">)</span><span class="token punctuation">;</span>
  
  <span class="token keyword">if</span> <span class="token punctuation">(</span>book <span class="token operator">==</span> <span class="token keyword">null</span><span class="token punctuation">)</span>
    <span class="token keyword">return</span> <span class="token function">NotFound</span><span class="token punctuation">(</span><span class="token punctuation">)</span><span class="token punctuation">;</span>
  
  <span class="token keyword">return</span> book<span class="token punctuation">;</span>
<span class="token punctuation">}</span>

<span class="token comment">//Add a new book</span>
<span class="token punctuation">[</span>HttpPost<span class="token punctuation">]</span>
<span class="token punctuation">[</span><span class="token function">Route</span><span class="token punctuation">(</span><span class="token string">"create"</span><span class="token punctuation">)</span><span class="token punctuation">]</span>
<span class="token keyword">public</span> <span class="token keyword">async</span> Task<span class="token operator">&lt;</span>ActionResult<span class="token operator">&lt;</span>Book<span class="token operator">&gt;</span><span class="token operator">&gt;</span> <span class="token function">Create</span><span class="token punctuation">(</span>Book book<span class="token punctuation">)</span>
<span class="token punctuation">{</span>
  _context<span class="token punctuation">.</span>Books<span class="token punctuation">.</span><span class="token function">Add</span><span class="token punctuation">(</span>book<span class="token punctuation">)</span><span class="token punctuation">;</span>
  <span class="token keyword">await</span> _context<span class="token punctuation">.</span><span class="token function">SaveChangesAsync</span><span class="token punctuation">(</span><span class="token punctuation">)</span><span class="token punctuation">;</span>
  <span class="token keyword">return</span> <span class="token function">CreatedAtAction</span><span class="token punctuation">(</span><span class="token string">"GetBook"</span><span class="token punctuation">,</span> <span class="token keyword">new</span> <span class="token punctuation">{</span> id <span class="token operator">=</span> book<span class="token punctuation">.</span>Id <span class="token punctuation">}</span><span class="token punctuation">,</span> book<span class="token punctuation">)</span><span class="token punctuation">;</span>
<span class="token punctuation">}</span>

<span class="token comment">//Update an existing book</span>
<span class="token punctuation">[</span><span class="token function">HttpPut</span><span class="token punctuation">(</span><span class="token string">"{id}"</span><span class="token punctuation">)</span><span class="token punctuation">]</span>
<span class="token keyword">public</span> <span class="token keyword">async</span> Task<span class="token operator">&lt;</span>IActionResult<span class="token operator">&gt;</span> <span class="token function">Update</span><span class="token punctuation">(</span><span class="token keyword">string</span> id<span class="token punctuation">,</span> Book book<span class="token punctuation">)</span>
<span class="token punctuation">{</span>
  <span class="token keyword">if</span> <span class="token punctuation">(</span>id <span class="token operator">!=</span> Convert<span class="token punctuation">.</span><span class="token function">ToString</span><span class="token punctuation">(</span>book<span class="token punctuation">.</span>Id<span class="token punctuation">)</span><span class="token punctuation">.</span><span class="token function">ToUpper</span><span class="token punctuation">(</span><span class="token punctuation">)</span><span class="token punctuation">)</span>
    <span class="token keyword">return</span> <span class="token function">BadRequest</span><span class="token punctuation">(</span><span class="token punctuation">)</span><span class="token punctuation">;</span>

  _context<span class="token punctuation">.</span><span class="token function">Entry</span><span class="token punctuation">(</span>book<span class="token punctuation">)</span><span class="token punctuation">.</span>State <span class="token operator">=</span> EntityState<span class="token punctuation">.</span>Modified<span class="token punctuation">;</span>

  <span class="token keyword">try</span>
  <span class="token punctuation">{</span>
    <span class="token keyword">await</span> _context<span class="token punctuation">.</span><span class="token function">SaveChangesAsync</span><span class="token punctuation">(</span><span class="token punctuation">)</span><span class="token punctuation">;</span>
  <span class="token punctuation">}</span>
  <span class="token keyword">catch</span> <span class="token punctuation">(</span><span class="token class-name">DbUpdateConcurrencyException</span><span class="token punctuation">)</span>
  <span class="token punctuation">{</span>
    <span class="token keyword">if</span> <span class="token punctuation">(</span><span class="token operator">!</span><span class="token function">BookExists</span><span class="token punctuation">(</span>id<span class="token punctuation">)</span><span class="token punctuation">)</span>
      <span class="token keyword">return</span> <span class="token function">NotFound</span><span class="token punctuation">(</span><span class="token punctuation">)</span><span class="token punctuation">;</span>
    <span class="token punctuation">}</span>

  <span class="token keyword">return</span> <span class="token function">NoContent</span><span class="token punctuation">(</span><span class="token punctuation">)</span><span class="token punctuation">;</span>
<span class="token punctuation">}</span>

<span class="token comment">//Delete an existing book</span>
<span class="token punctuation">[</span><span class="token function">HttpDelete</span><span class="token punctuation">(</span><span class="token string">"{id}"</span><span class="token punctuation">)</span><span class="token punctuation">]</span>
<span class="token keyword">public</span> <span class="token keyword">async</span> Task<span class="token operator">&lt;</span>IActionResult<span class="token operator">&gt;</span> <span class="token function">Delete</span><span class="token punctuation">(</span><span class="token keyword">string</span> id<span class="token punctuation">)</span>
<span class="token punctuation">{</span>
  Guid guidId <span class="token operator">=</span> Guid<span class="token punctuation">.</span><span class="token function">Parse</span><span class="token punctuation">(</span>id<span class="token punctuation">)</span><span class="token punctuation">;</span>

  <span class="token keyword">var</span> book <span class="token operator">=</span> <span class="token keyword">await</span> _context<span class="token punctuation">.</span>Books<span class="token punctuation">.</span><span class="token function">FindAsync</span><span class="token punctuation">(</span>guidId<span class="token punctuation">)</span><span class="token punctuation">;</span>

  <span class="token keyword">if</span> <span class="token punctuation">(</span>book <span class="token operator">==</span> <span class="token keyword">null</span><span class="token punctuation">)</span>
    <span class="token keyword">return</span> <span class="token function">NotFound</span><span class="token punctuation">(</span><span class="token punctuation">)</span><span class="token punctuation">;</span>

  _context<span class="token punctuation">.</span>Books<span class="token punctuation">.</span><span class="token function">Remove</span><span class="token punctuation">(</span>book<span class="token punctuation">)</span><span class="token punctuation">;</span>

  <span class="token keyword">await</span> _context<span class="token punctuation">.</span><span class="token function">SaveChangesAsync</span><span class="token punctuation">(</span><span class="token punctuation">)</span><span class="token punctuation">;</span>

  <span class="token keyword">return</span> <span class="token function">NoContent</span><span class="token punctuation">(</span><span class="token punctuation">)</span><span class="token punctuation">;</span>
<span class="token punctuation">}</span>

<span class="token comment">//Check if the book exists in the database</span>
<span class="token keyword">private</span> <span class="token keyword">bool</span> <span class="token function">BookExists</span><span class="token punctuation">(</span><span class="token keyword">string</span> id<span class="token punctuation">)</span>
<span class="token punctuation">{</span>
  <span class="token keyword">return</span> _context<span class="token punctuation">.</span>Books<span class="token punctuation">.</span><span class="token function">Any</span><span class="token punctuation">(</span>e <span class="token operator">=</span><span class="token operator">&gt;</span> Convert<span class="token punctuation">.</span><span class="token function">ToString</span><span class="token punctuation">(</span>e<span class="token punctuation">.</span>Id<span class="token punctuation">)</span> <span class="token operator">==</span> id<span class="token punctuation">)</span><span class="token punctuation">;</span>
<span class="token punctuation">}</span>
</code></pre>
<h2 id="performing-operations-crud-with-fiddler-everywhere">Performing Operations (CRUD) With Fiddler Everywhere</h2>
<p>Now we have the basics we need to create, update, delete and fetch books from the database. To do this, first, run the project by clicking on the run icon in Visual Studio or pressing the &ldquo;F5&rdquo; key.</p>
<h3 id="create">Create</h3>
<p>To do the operations we will use <a href="https://www.telerik.com/fiddler/fiddler-everywhere" target="_blank">Fiddler Everywhere</a>, which can be used to make HTTP requests to Web APIs simply and quickly, and has many other features.</p>
<p>Follow the steps in the image below to add a book to the database via the Create method of the API. Afterward, you can open the ReadingList.db file with SQLite Viewer Editor and see the record in the table.</p>
<p><img src="https://d585tldpucybw.cloudfront.net/sfimages/default-source/blogs/2021/2021-10/create-book-fiddler.png" alt="Create book" title="create book"></p>
<p> Important! The example images will have the localhost port set to 44345, but you must change it based on the port your application runs on.</p>
<h3 id="get-all-books">Get All Books</h3>
<p>Now that we have inserted our book (you can insert as many as you like, just edit the data sent in the &ldquo;body&rdquo;), we can search them through the &ldquo;GET&rdquo; route.</p>
<p><img src="https://d585tldpucybw.cloudfront.net/sfimages/default-source/blogs/2021/2021-10/get-all-books-fiddler.png" alt="Get All Books" title="get all books fiddler"></p>
<h3 id="update">Update</h3>
<p>For Update, in Fiddler Everywhere create the method &ldquo;Update book,&rdquo; in the contents of the &ldquo;Body&rdquo; change the data from &ldquo;read&rdquo; to &ldquo;true&rdquo; and click on &ldquo;Send.&rdquo;</p>
<p>The record has now been changed to &ldquo;read&rdquo; and can be fetched on the next route.</p>
<p><img src="https://d585tldpucybw.cloudfront.net/sfimages/default-source/blogs/2021/2021-10/update-book-fiddler.png" alt="Update a book" title="update a book fiddler"></p>
<h3 id="get-all-books-read">Get All Books (Read)</h3>
<p>We will only look for books that have already been read. For that we will use another route, and this route will only return records that have the property &ldquo;read&rdquo;=&ldquo;true&rdquo;, as you can see in the image below:</p>
<p><img src="https://d585tldpucybw.cloudfront.net/sfimages/default-source/blogs/2021/2021-10/get-all-books-read-fiddler.png" alt="Get All Books Read" title="get all books read fiddler"></p>
<h3 id="get-a-book-by-id">Get a Book by Id</h3>
<p>To search for a single specific book, we will use the same &ldquo;GET&rdquo; route, but passing in the route the Id of the book we want to see details.</p>
<p><img src="https://d585tldpucybw.cloudfront.net/sfimages/default-source/blogs/2021/2021-10/get-book-by-id-fiddler.png" alt="Get a Book by Id" title="get a book by id fiddler"></p>
<h3 id="delete">Delete</h3>
<p>To delete a record is very simple&mdash;just pass the id of the record you want to delete in the route, as in the example below:</p>
<p><img src="https://d585tldpucybw.cloudfront.net/sfimages/default-source/blogs/2021/2021-10/delete-book-fiddler.png" alt="Delete a book" title="delete a book fiddler"></p>
<h2 id="conclusion">Conclusion</h2>
<p>Finally! Our API is 100 percent functional! ✨</p>
<p>In this article, we looked at the basics of ASP.NET Core Web APIs, created a project using Visual Studio, added a database, and performed the four basic operations (CRUD) with Fiddler Everywhere.</p>
<p>Now you can fill your list with your favorite books. Feel free to add new fields and features.</p>
<p>In the next post on APIs we will develop a frontend application and integrate it with our API to display the records. See you soon! &zwj;♂️</p><img src="https://feeds.telerik.com/link/10825/15057278.gif" height="1" width="1"/>]]></content>
  </entry>
  <entry>
    <id>urn:uuid:225a14cd-1459-4832-8d00-7dc290401365</id>
    <title type="text">Sands of MAUI: Issue #33</title>
    <summary type="text">Welcome to the Sands of MAUI—newsletter-style issues dedicated to bringing together latest .NET MAUI content relevant to developers.</summary>
    <published>2021-11-15T14:42:58Z</published>
    <updated>2022-06-30T14:06:13Z</updated>
    <author>
      <name>Sam Basu </name>
    </author>
    <link rel="alternate" href="https://feeds.telerik.com/link/10825/15057279/sands-maui-issue-33"/>
    <content type="text"><![CDATA[<p><span class="featured">Welcome to the Sands of MAUI&mdash;newsletter-style issues dedicated to bringing together latest .NET MAUI content relevant to developers.</span></p>
<p>A particle of sand&mdash;tiny and innocuous. But put a lot of sand particles together and we have something big&mdash;a force to reckon with. It is the smallest grains of sand that often add up to form massive beaches, dunes and deserts.</p>
<p>Most .NET developers are looking forward to .NET Multi-platform App UI (<a href="https://github.com/dotnet/maui" target="_blank">MAUI</a>)&mdash;the evolution of Xamarin.Forms with .NET 6. Going forward, developers should have much more confidence in the technology stack and tools as .NET MAUI empowers native cross-platform solutions on mobile and desktop.</p>
<p>While it is a long flight until we reach the sands of MAUI, developer excitement is palpable in all the news/content as we tinker and prepare for .NET MAUI. Like the grains of sand, every piece of news/article/video/tutorial/stream contributes towards developer knowledge and we grow a community/ecosystem willing to learn and help.</p>
<p>Sands of MAUI is a humble attempt to collect all the .NET MAUI awesomeness in one place. Here's what is noteworthy for the week of <strong>November 15, 2021</strong>:</p>
<h2 id="toc_1">.NET 6</h2>
<p>Welcome to <a href="https://dotnet.microsoft.com/download/dotnet/6.0" target="_blank">.NET 6</a>. After a year of work from the .NET teams and the developer community, .NET 6 is out in full glory and proudly carries the Long Term Support (LTS) badge. <a href="https://twitter.com/runfaster2000" target="_blank">Richard Lander</a>&nbsp;wrote up the <a href="https://devblogs.microsoft.com/dotnet/announcing-net-6/" target="_blank">epic .NET 6 announcement post</a> and the key point to take away is massive gains in performance.</p>
<p>.NET 6 is the first .NET release that natively supports Apple Silicon for MacOS and Windows Arm64, paving the path for .NET apps to run on new frontiers. .NET 6 is a massive unification effort with web, cloud, desktop, IoT and mobile apps all using the same .NET Libraries&mdash;this makes it easy for developers to share code easily across apps/platforms.</p>
<p>Tooling for .NET 6 development gets better across the board, with Hot Reload support everywhere and tons of new language features in C# 10 and F# 6. Just one word sums it all up: yay!</p>
<p><img src="https://d585tldpucybw.cloudfront.net/sfimages/default-source/default-album/net64482785782de466abd9fedf963ca34a1.png?sfvrsn=2b5c3e9c_0" data-displaymode="Original" alt="Net6" title="Net6"> </p>
<h2 id="toc_2">.NET MAUI Preview 10</h2>
<p>Sitting pretty on top of stable .NET 6 LTS runtime is the next iteration of .NET MAUI&mdash;Preview 10 is now out. <a href="https://twitter.com/davidortinau" target="_blank">David Ortinau</a> wrote up the <a href="https://devblogs.microsoft.com/dotnet/announcing-net-maui-preview-10/" target="_blank">post announcing .NET MAUI Preview 10</a>. The key to note here is how easy it is to get started. The best developer experience with .NET MAUI is through the latest Visual Studio 2022 Preview 17.1, which shipped alongside the GA VS 2022 17.0 version.</p>
<p>All one has to do to get started is to install the 'Mobile development with .NET' workload during VS 2022 setup&mdash;all of the .NET MAUI dependencies and mobile platform runtimes/SDKs/simulators are included with a simple checkbox. </p>
<p>.NET MAUI Preview 10 release brings in the Handler implementations of the popular CollectionView and IndicatorView controls, as well as property implementations and improvements with a bunch of other UI controls. The .NET MAUI GA goal is looking closer every single day with platform and tooling updates. </p>
<p><img src="https://d585tldpucybw.cloudfront.net/sfimages/default-source/default-album/maui10.jpeg?sfvrsn=3ba08b55_0" data-displaymode="Original" alt="Maui10" title="Maui10"> </p>
<h2 id="toc_3">.NET Conf 2021 Keynote</h2>
<p>Modern .NET is the developer platform for building anything for anywhere and nothing celebrates .NET quite like <a href="https://www.dotnetconf.net/" target="_blank">.NET Conf</a>. In its 11th year, .NET Conf was held Nov 9-11 this year&mdash;2 days of awesome content from Microsoft folks, before a full 24 hours of non-stop livestream with passionate community speakers from all around the world.</p>
<p><a href="https://twitter.com/coolcsh" target="_blank">Scott Hunter</a> opened <a href="https://www.youtube.com/watch?v=gYQxBHjRNr0&amp;t=2412s" target="_blank">.NET Conf with a wonderful keynote</a>, tapping into some well-known faces from the .NET team and together, they did kick up the excitement around the .NET ecosystem. The keynote covered a plethora of topics&mdash;.NET 6, C# 10, Minimal APIs, Blazor updates, .NET MAUI updates, Hybrid Apps with Blazor/.NET MAUI, Azure support and a whole lot more. Want to get the latest scoop on .NET? This is the keynote to start with.</p>
<p><img src="https://d585tldpucybw.cloudfront.net/sfimages/default-source/default-album/netconf.png?sfvrsn=c86268ca_0" data-displaymode="Original" alt="NetConf" title="NetConf"> </p>
<h2 id="toc_4">Introduction to .NET MAUI</h2>
<p>After the .NET Conf keynote, <a href="https://twitter.com/maddymontaquila" target="_blank">Maddy Leger Montaquila</a> took the stage to talk about something dear to all our hearts&mdash;<a href="https://www.youtube.com/watch?v=HMYpAw2sl58" target="_blank">all things.NET MAUI</a>. Maddy started with the basics and provided the latest updates with .NET MAUI Preview 10, including the ease of development with Windows Subsystem for Android.</p>
<p>Tooling for .NET MAUI is catching up fast. While <a href="https://twitter.com/maddymontaquila/status/1459271940149891073" target="_blank">Maddy may be a little uncomfortably fond of her Mac</a>, Hot Reload (both XAML and C#) is starting to work just about everywhere. Add the promise of Hybrid apps bringing Blazor goodness and code sharing into desktop, you can see why developers and enterprises cannot wait for the .NET MAUI GA release coming early next year.</p>
<p><img src="https://d585tldpucybw.cloudfront.net/sfimages/default-source/default-album/mauiintro.png?sfvrsn=b7a2f730_0" data-displaymode="Original" alt="MauiIntro" title="MauiIntro"> </p>
<h2 id="toc_5">C# 10</h2>
<p>No matter the platform or tooling, developer experience is largely shaped by the programming language&mdash;C# does not disappoint for .NET MAUI. Along with .NET 6 and VS 2022 launch comes the next language update&mdash;welcome to C# 10. <a href="https://twitter.com/KathleenDollard" target="_blank">Kathleen Dollard</a> wrote up the <a href="https://devblogs.microsoft.com/dotnet/welcome-to-csharp-10/" target="_blank">C# 10 announcement post</a>&mdash;covering all the features that make your code run faster and be more prettier/expressive.</p>
<p>The plethora of improvements in C# 10 include some key features that aid in big mobile/cross-platform projects&mdash;such as Global Usings, Implicit Usings, File-scoped namespaces, Improvements for Lambda expressions, better parity between Structs and Classes and more. C# 10 is here to allow .NET MAUI developers write cleaner and more easily maintainable code.</p>
<p><img src="https://d585tldpucybw.cloudfront.net/sfimages/default-source/default-album/c10.jpeg?sfvrsn=5b9f68e0_0" data-displaymode="Original" alt="C10" title="C10"></p>
<p>That's it for now. </p>
<p>We'll see you next week with more awesome content relevant to .NET MAUI. </p>
<p>Cheers, developers!</p><img src="https://feeds.telerik.com/link/10825/15057279.gif" height="1" width="1"/>]]></content>
  </entry>
  <entry>
    <id>urn:uuid:7d2a4a8e-9538-4a53-bc7a-9a46f6e6e261</id>
    <title type="text">Working With Images in Telerik RichTextEditor for Xamarin—More Than Easy!</title>
    <summary type="text">Quickly and easily add, edit and remove images and more with Telerik UI for Xamarin RichTextEditor control.</summary>
    <published>2021-11-12T10:30:01Z</published>
    <updated>2022-06-30T14:06:13Z</updated>
    <author>
      <name>Dobrinka Yordanova </name>
    </author>
    <link rel="alternate" href="https://feeds.telerik.com/link/10825/15057280/working-images-telerik-richtexteditor-xamarin-easy"/>
    <content type="text"><![CDATA[<p><span class="featured">Quickly and easily add, edit and remove images and more with Telerik UI for Xamarin RichTextEditor control.</span></p>
<p>With the R3 2021 official release of <a href="https://www.telerik.com/xamarin-ui" target="_blank">Telerik UI for Xamarin</a>, we introduced a new feature in our RichTextEditor control. This feature gives you the option to work with images.  You can quickly and easily add, edit and remove images in your mobile and desktop apps.  In addition, these options come with built-in toolbar items.</p>
<p>This blog post will get you familiar with all the built-in tools you can use to make your work with images in the document easier.  You can work with the following image formats: <strong>PNG, JPEG, SVG, GIF, WebP</strong>.</p>
<h2>Toolbar Items for Editing Images</h2>
<p><img src="https://d585tldpucybw.cloudfront.net/sfimages/default-source/default-album/rte-edit-image-toolbar-items.png?sfvrsn=3d6018c5_0" data-displaymode="Original" alt="edit-image-toolbar-items" title="rte-edit-image-toolbar-items"></p>
<p>Let&rsquo;s review the power of the built-in toolbar items for working with images. Of course, we have prepared a sample demo for you! </p>
<p>The built-in Toolbar items for working with images are:</p>
<ul>
    <li><strong>AddImageToolbarItem</strong> &ndash; add an image.</li>
    <li><strong>EditImageToolbarItem</strong> &ndash; resize the image. Additional dialog is visualized when the toolbar item is tapped/clicked. You can also add images from the dialog.</li>
    <li><strong>CutToolbarItem</strong> &ndash; cut the selected HTML/image to the clipboard.</li>
    <li><strong>CopyToolbarItem</strong> &ndash; copy the selected HTML/image to the clipboard.</li>
    <li><strong>PasteHtmlToolbarItem</strong> &ndash; paste HTML/image from the clipboard.</li>
    <li><strong>RemoveImageToolbarItem</strong> &ndash; remove the currently selected image from the document.</li>
    <li><strong>ImagePickerToolbarItem</strong> &ndash; additional toolbar item for inserting images from a collection of pre-defined images.</li>
</ul>
<h3>AddImageToolbarItem</h3>
<p><img src="https://d585tldpucybw.cloudfront.net/sfimages/default-source/default-album/add-image-toolbar-item.png?sfvrsn=652668b6_0" data-displaymode="Original" alt="add images in editor for xamarin" title="add-image-toolbar-item"></p>
<p>When the <strong>AddImageToolbarItem </strong>is tapped/clicked, a <strong>PickImage </strong>event is fired. If you want to work with images from the device gallery, then you have to grant permissions. You need to manually implement the logic for selecting an image inside the PickImage event handler. The steps needed for permissions are described in our <a href="https://docs.telerik.com/devtools/xamarin/controls/richtexteditor/working-with-images/richtexteditor-images-overview#permissions-if-adding-images-from-gallery" target="_blank">help article</a>.</p>
<p>A sample demo with permissions can be found in our <a href="https://github.com/telerik/xamarin-forms-sdk/tree/master/XamarinSDK/SDKBrowser/SDKBrowser/Examples/RichTextEditorControl/FeaturesCategory/InsertImagesExample" target="_blank">SDK Browser Application</a> and <a href="https://github.com/telerik/telerik-xamarin-forms-samples/tree/master/QSF/QSF/Examples/RichTextEditorControl/FirstLookExample" target="_blank">Telerik UI for Xamarin Samples Application</a>.</p>
<h3>EditImageToolbarItem</h3>
<p>Mainly the <strong>EditImageToolbarItem </strong>helps you to resize the current selected image. If you haven&rsquo;t selected one, the toolbar allows you to pick an image (the RichTextEditor.<strong>PickImage </strong>event is fired) using the <strong>PickButton</strong>.</p>
<p><img src="https://d585tldpucybw.cloudfront.net/sfimages/default-source/default-album/edit-dialod-images.png?sfvrsn=7e6f621f_0" data-displaymode="Original" alt="edit dialog for images in editor for Xamarin with pick button and resize slider" title="edit-dialog-images"></p>
<p>The edit image dialog is highly customizable. For more details visit our <a href="https://docs.telerik.com/devtools/xamarin/controls/richtexteditor/working-with-images/richtexteditor-insert-images#edit-image-toolbaritem" target="_blank">help topic</a>.</p>
<p><strong>CutToolbarItem</strong>, <strong>CopyToolbarItem</strong>, <strong>PasteHtmlToolbarItem </strong>and <strong>RemoveImageToolbarItem </strong>work in the scenario when there is a selected image. You can cut, copy, paste or remove the currently selected image.</p>
<h2>Demo</h2>
<p>For the demo I will use the <strong>ImagePickerToolbarItem</strong>. As I shared, this toolbar item can be populated with predefined images.</p>
<p>Here are the RichTextEditor and the RichTextEditor Toolbar definitions in XAML:</p>
<div class="reCodeBlock" style="border:solid 1px #7f9db9;width:;height:;overflow-y:auto;">
<div style=" background-color: #fff;"><span style="margin-left: 0px !important;"><code style="color: #000;">&lt;</code><code style="color: #069;font-weight: bold;">Grid</code> <code style="color: #808080;">RowDefinitions</code><code style="color: #000;">=</code><code style="color: blue;">"*,Auto"</code><code style="color: #000;">&gt;</code></span></div>
<div style=" background-color: #F8F8F8;"><span style=" "><code style=" ">    </code><span style="margin-left: 12px !important;"><code style="color: #000;">&lt;</code><code style="color: #069;font-weight: bold;">telerikRichTextEditor:RadRichTextEditor</code> <code style="color: #808080;">x:Name</code><code style="color: #000;">=</code><code style="color: blue;">"richTextEditor"</code><code style="color: #000;">/&gt;</code></span></span></div>
<div style=" background-color: #fff;"><span style=" "><code style=" ">    </code><span style="margin-left: 12px !important;"><code style="color: #000;">&lt;</code><code style="color: #069;font-weight: bold;">telerikRichTextEditor:RadRichTextEditorToolbar</code> <code style="color: #808080;">x:Name</code><code style="color: #000;">=</code><code style="color: blue;">"richTextToolbar"</code></span></span></div>
<div style=" background-color: #F8F8F8;"><span style=" "><code style=" ">                                     </code><span style="margin-left: 111px !important;"><code style="color: #808080;">Grid.Row</code><code style="color: #000;">=</code><code style="color: blue;">"1"</code></span></span></div>
<div style=" background-color: #fff;"><span style=" "><code style=" ">                                     </code><span style="margin-left: 111px !important;"><code style="color: #808080;">RichTextEditor</code><code style="color: #000;">=</code><code style="color: blue;">"{x:Reference richTextEditor}"</code></span></span></div>
<div style=" background-color: #F8F8F8;"><span style=" "><code style=" ">                                     </code><span style="margin-left: 111px !important;"><code style="color: #808080;">AutoGenerateItems</code><code style="color: #000;">=</code><code style="color: blue;">"False"</code><code style="color: #000;">&gt;</code></span></span></div>
<div style=" background-color: #fff;"><span style=" "><code style=" ">        </code><span style="margin-left: 24px !important;"><code style="color: #000;">&lt;</code><code style="color: #069;font-weight: bold;">telerikRichTextEditor:ImagePickerToolbarItem</code> <code style="color: #808080;"><strong>x:Name</strong></code><strong><code style="color: #000;">=</code><code style="color: blue;"></code></strong><code style="color: blue;"><strong>"imagePicker"</strong></code> <code style="color: #808080;">Text</code><code style="color: #000;">=</code><code style="color: blue;">"Select"</code><code style="color: #000;">/&gt;</code></span></span></div>
<div style=" background-color: #F8F8F8;"><span style=" "><code style=" ">    </code><span style="margin-left: 12px !important;"><code style="color: #000;">&lt;/</code><code style="color: #069;font-weight: bold;">telerikRichTextEditor:RadRichTextEditorToolbar</code><code style="color: #000;">&gt;</code></span></span></div>
<div style=" background-color: #fff;"><span style="margin-left: 0px !important;"><code style="color: #000;">&lt;/</code><code style="color: #069;font-weight: bold;">Grid</code><code style="color: #000;">&gt;</code></span></div>
</div>
<p><strong>Our HTML document:</strong></p>
<div class="reCodeBlock" style="border:solid 1px #7f9db9;width:;height:;overflow-y:auto;">
<div style=" background-color: #fff;"><span style="margin-left: 0px !important;"><code style="color: #000;">&lt;</code><code style="color: #069;font-weight: bold;">html</code><code style="color: #000;">&gt;</code></span></div>
<div style=" background-color: #F8F8F8;"><span style="margin-left: 0px !important;"><code style="color: #000;">&lt;</code><code style="color: #069;font-weight: bold;">head</code> <code style="color: #000;">/&gt;</code></span></div>
<div style=" background-color: #fff;"><span style="margin-left: 0px !important;"><code style="color: #000;">&lt;</code><code style="color: #069;font-weight: bold;">body</code><code style="color: #000;">&gt;</code></span></div>
<div style=" background-color: #F8F8F8;"><span style=" "><code style=" ">    </code><span style="margin-left: 12px !important;"><code style="color: #000;">&lt;</code><code style="color: #069;font-weight: bold;">h1</code><code style="color: #000;">&gt;Sign in for the tournament!&lt;/</code><code style="color: #069;font-weight: bold;">h1</code><code style="color: #000;">&gt;</code></span></span></div>
<div style=" background-color: #fff;"><span style=" "><code style=" ">    </code><span style="margin-left: 12px !important;"><code style="color: #000;">&lt;</code><code style="color: #069;font-weight: bold;">p</code><code style="color: #000;">&gt;Legend:&lt;/</code><code style="color: #069;font-weight: bold;">p</code><code style="color: #000;">&gt;</code></span></span></div>
<div style=" background-color: #F8F8F8;"><span style=" "><code style=" ">    </code><span style="margin-left: 12px !important;"><code style="color: #000;">&lt;</code><code style="color: #069;font-weight: bold;">p</code><code style="color: #000;">&gt;Will attend: &lt;</code><code style="color: #069;font-weight: bold;">img</code> <code style="color: #808080;">src</code><code style="color: #000;">=</code><code style="color: blue;">"data:image/png;base64,iVBORw0KGgoAAAANSUhEUgAAABkAAAAZCAYAAADE6YVjAAAAAXNSR0IArs4c6QAAAARnQU1BAACxjwv8YQUAAAAJcEhZcwAADdYAAA3WAZBveZwAAAAYdEVYdFNvZnR3YXJlAHBhaW50Lm5ldCA0LjEuMWMqnEsAAAHvSURBVEhLtVTPK0RRGP1E+ZEfSdmwsRDZECU7xR9gI0uxUVYWFpaTkrK1tZSS7PwoG1YzzE9GgzRqshBNmoWkjHzXueOje98808y8ceqrd+853zn3vnffpf9ARNFMmOkxxJSMMY3KdOVwytQN82xYkdKF5zuhKgfsYPsnQELSQlUGUUVDMGVHyIrQlQEMj8wA7OoZ36dFaO84YxqzAlBBpkWhvUMpqsKqQ2YAdnUfYKoXiXcgYNIM0BVlmhXaO04U1SDk1gzALq6wu2qReEdI0ZwZkCumCaG9AyenAat+MAMwDuhvJBLvwIqXzAAJcb9GIB7U5E4J7/FSUSv6MlYI077QNmDuM0THONttQhUE+tYcAZ/4V/qFtgGxtRqMk6geoV1xztQB0zezD+NNofMBMmaJvxsyOOfjIskDFrFh6jF+v2DqEjofuO/7YJoym6Qxi/l5kf3Cr6gX8x8O7brQf8PP1I7GgNloGugfTqR657uWhulF9wtdGClFdTDcsgykMH9ww9QEw2E8W1c5DsqyWBQH/RPBxOc0yhVTAvPWbjFO40Q1S3tpiDBNwdQ+PS4F3YK0lAcYjCDoyc1cF3aROmSqFXn5wKvoRFDcLQTz0yLzjoSiRqx6zxEQL+UKKgraEMarqFfUdVDRgFBFgOgLiDAiqWaRTWAAAAAASUVORK5CYII="</code> <code style="color: #000;">/&gt;&lt;/</code><code style="color: #069;font-weight: bold;">p</code><code style="color: #000;">&gt;</code></span></span></div>
<div style=" background-color: #fff;"><span style=" "><code style=" ">    </code><span style="margin-left: 12px !important;"><code style="color: #000;">&lt;</code><code style="color: #069;font-weight: bold;">p</code><code style="color: #000;">&gt;Won't attend: &lt;</code><code style="color: #069;font-weight: bold;">img</code> <code style="color: #808080;">src</code><code style="color: #000;">=</code><code style="color: blue;">"data:image/png;base64,iVBORw0KGgoAAAANSUhEUgAAABkAAAAZCAYAAADE6YVjAAAAAXNSR0IArs4c6QAAAARnQU1BAACxjwv8YQUAAAAJcEhZcwAADdYAAA3WAZBveZwAAAAYdEVYdFNvZnR3YXJlAHBhaW50Lm5ldCA0LjEuMWMqnEsAAADqSURBVEhLvdbBDcIwDAVQj9Z70jV64cCBuXroPh2AKVLsJl9IoSaxS/mSUUmCHxBQQxuFIVFYuZ4bjRP9INJH+klf6U/5Im4ofn4va12R11f9VhnkT/AeLBMuqAZKr6d8XVM9USZN0BGQK+QtSBRvXKlekGh87Asa0YCPN+qFugHECpkBpBdyA0gLOg0gOhSXeiyPGwFEg+pyA0gLOg0gjMzHQFzKknPRNhnV+4dV0wJQbkgDeHw+2iMz9AXYN1n7MXRDLQBxQ70AYoasANINeQGkCf3lzsiT19/j+eH604qci+SC66JzVxhet9WBr/JOEy0AAAAASUVORK5CYII="</code> <code style="color: #000;">/&gt;&lt;/</code><code style="color: #069;font-weight: bold;">p</code><code style="color: #000;">&gt;</code></span></span></div>
<div style=" background-color: #F8F8F8;"><span style=" "><code style=" ">    </code><span style="margin-left: 12px !important;"><code style="color: #000;">&lt;</code><code style="color: #069;font-weight: bold;">p</code><code style="color: #000;">&gt;Count on me: &lt;</code><code style="color: #069;font-weight: bold;">img</code> <code style="color: #808080;">src</code><code style="color: #000;">=</code><code style="color: blue;">"data:image/png;base64,iVBORw0KGgoAAAANSUhEUgAAABkAAAAVCAYAAACzK0UYAAAABGdBTUEAALGPC/xhBQAAAAlwSFlzAAAN1QAADdUBPdZY8QAAABh0RVh0U29mdHdhcmUAcGFpbnQubmV0IDQuMS4xYyqcSwAAAg9JREFUSEutVU1PU0EUPbAxiBGCK1ckFdrXmQcaSIh/gPgD1IV/AYyR31OUDWzcuHAD7CQmJsCKsJACfV99NDGYuKkNLaWc+zpNaDKAbd9NTua9d889982duTPoWAWzoz5yr32orwF0JYCq8Tni8xc+vz3F/JihJnaOhcf0vxG/4dUkTuIj6hxCPTLUtp0iM+Yhv34Gt1bGTCuE2woIGWO+l+HWI6gtD1lH+CXkcky8WYaui/8mX+JFx0d+w8PkeJIgxMsRH/oz/6IpxLsQQhdDqHccj2z+buhmBL0m+pyFs8iXqp3YDT8Zdb093g/OtFqCfoUA+UJsIaSBtq5aBUt13Klp2hBd6heZRP2zEdICk1RZLvXX5kwLHvQfWZMfkcWZBrj1ORP1HR6cFS7QlY00KNgvbAv9ESfITzPjiY00KKh7zCTP0AKG2J0f2GANG7F/6EsPakX0k66/wtSDEs8cqaE9oDe0ddS3GE8fJgk6FmA6U4H7c9CekXjq7PL4mTLS3RbCcaV5+k1kmu8Xy/TCSNothjMXQ+/1uq2lRGfQ+z7jjdTdJlPl3+z0MiP2ww4P26yR+D/jpTPBRAUmurgtmXwXP3fSpzKcJya0Nyty13GdlngV/LYlke8sz7LwTEh/xn0+HCE7yxJuc60asla8Jxp83wqRmxG/oQ5uHp6PU/g9a3/Axl2SK9u47jHgGrx8LucFX4aOAAAAAElFTkSuQmCC"</code> <code style="color: #000;">/&gt;&lt;/</code><code style="color: #069;font-weight: bold;">p</code><code style="color: #000;">&gt;</code></span></span></div>
<div style=" background-color: #fff;"><span style=" "><code style=" ">    </code><span style="margin-left: 12px !important;"><code style="color: #000;">&lt;</code><code style="color: #069;font-weight: bold;">p</code><code style="color: #000;">&gt;Maybe, not sure &lt;</code><code style="color: #069;font-weight: bold;">img</code> <code style="color: #808080;">src</code><code style="color: #000;">=</code><code style="color: blue;">"data:image/png;base64,iVBORw0KGgoAAAANSUhEUgAAABkAAAAZCAYAAADE6YVjAAAABGdBTUEAALGPC/xhBQAAAAlwSFlzAAAN1QAADdUBPdZY8QAAABh0RVh0U29mdHdhcmUAcGFpbnQubmV0IDQuMS4xYyqcSwAAAuFJREFUSEu1Vs1u00AQdiPgAu0FIU4k9a6jlsCNp2iKuPECHDigpk28doJQIfAibbn15wFatc2dA4q9azdOOUJJJWguERARVTLfbtyiUKM0aTLSKFl7Z8bz981osVQuJzJP/RspU8xSS+R0i2/ozBWEuU3K+C+d8aZuco/YYpMwsZgy67PyvpSLNPShcphIsmqGML4M3oESH78NYrotGOng/6n67Z4b0fsdkhevkzk/I+UjTfF0l7k3SaGapRZfgfAXo1gL06V6aBQPQsP2Q8MSf1me8bz7vhbi/hFlYpUURDbzwr8VqeylmWfBZIpV5/BVu9SuddLFIFLIe5Vf4Og97tNi0EE49/S8mL9tB5OR6ojK4TUiDVieMmBY3j+KLsueMkSYt5tifE7qjSyEEwZygOSuGKV6e3gDEdueDGFbN901laMwnNC05x+vo1JegY+ky7GCA7IMtSoKU5RV1SWZj0oS2xTJixMYhlEACFstxIdXaN55oMk+ICY/MEqHuNAvyZdl6EHVwZu6zpwFjZpiCzXfMGyUaazAkIzyxscfI0rrGuLm49C6csIvsCeNtHQmhAaXmvDkd/zFq7HUi7470ZCknzB0Orp8nDFHAbin8ObH+D2x+DcY4ciJO76cmC5yYokthOzr2Kqr4G7AE7GIA/oEaDrqPjFFnRbEgnYPHYky21ZwHiswOMuOl/APPKyQRfehwi7CnGXkpTFS7EKoACvvMmVgF3A+YQAtKVBzJCgM+XTpsI0R/V7iYheFQY+UN1wOrD1qB6OYJ3spW2RllJSBMzJyH6aQm3llqDj4ZFT31WQU+9Mmf2LkPk1FqntJzvgkc+Yp81ZR2p/VjH85wIy3xBr64vGd/834c8K2kVry7gMJ3lDm7MOzAHwsGwvPOlgyom1FniXKegE1nQpy8FZuOX23lXOSexeqYnopmIH7C7rlrKP6OCDiu8I6i5+oPQz7GEZFTu5nqopiDWjaH+xTATZqdUK4AAAAAElFTkSuQmCC"</code> <code style="color: #000;">/&gt;&lt;/</code><code style="color: #069;font-weight: bold;">p</code><code style="color: #000;">&gt;</code></span></span></div>
<div style=" background-color: #F8F8F8;"><span style=" "><code style=" ">    </code><span style="margin-left: 12px !important;"><code style="color: #000;">&lt;</code><code style="color: #069;font-weight: bold;">hr</code><code style="color: #000;">&gt;</code></span></span></div>
<div style=" background-color: #fff;"><span style=" "><code style=" ">    </code><span style="margin-left: 12px !important;"><code style="color: #000;">&lt;</code><code style="color: #069;font-weight: bold;">h2</code><code style="color: #000;">&gt;Your options:&lt;/</code><code style="color: #069;font-weight: bold;">h2</code><code style="color: #000;">&gt;</code></span></span></div>
<div style=" background-color: #F8F8F8;"><span style=" "><code style=" ">    </code><span style="margin-left: 12px !important;"><code style="color: #000;">&lt;</code><code style="color: #069;font-weight: bold;">p</code> <code style="color: #808080;">style</code><code style="color: #000;">=</code><code style="color: blue;">"font-size:16px"</code><code style="color: #000;">&gt;Running: &lt;/</code><code style="color: #069;font-weight: bold;">p</code><code style="color: #000;">&gt;</code></span></span></div>
<div style=" background-color: #fff;"><span style=" "><code style=" ">    </code><span style="margin-left: 12px !important;"><code style="color: #000;">&lt;</code><code style="color: #069;font-weight: bold;">p</code> <code style="color: #808080;">style</code><code style="color: #000;">=</code><code style="color: blue;">"font-size:16px"</code><code style="color: #000;">&gt;Cycling: &lt;/</code><code style="color: #069;font-weight: bold;">p</code><code style="color: #000;">&gt;</code></span></span></div>
<div style=" background-color: #F8F8F8;"><span style=" "><code style=" ">    </code><span style="margin-left: 12px !important;"><code style="color: #000;">&lt;</code><code style="color: #069;font-weight: bold;">p</code> <code style="color: #808080;">style</code><code style="color: #000;">=</code><code style="color: blue;">"font-size:16px"</code><code style="color: #000;">&gt;Paint-ball: &lt;/</code><code style="color: #069;font-weight: bold;">p</code><code style="color: #000;">&gt;</code></span></span></div>
<div style=" background-color: #fff;"><span style=" "><code style=" ">    </code><span style="margin-left: 12px !important;"><code style="color: #000;">&lt;</code><code style="color: #069;font-weight: bold;">p</code> <code style="color: #808080;">style</code><code style="color: #000;">=</code><code style="color: blue;">"font-size:16px"</code><code style="color: #000;">&gt;Football: &lt;/</code><code style="color: #069;font-weight: bold;">p</code><code style="color: #000;">&gt;</code></span></span></div>
<div style=" background-color: #F8F8F8;"><span style=" "><code style=" ">    </code><span style="margin-left: 12px !important;"><code style="color: #000;">&lt;</code><code style="color: #069;font-weight: bold;">p</code> <code style="color: #808080;">style</code><code style="color: #000;">=</code><code style="color: blue;">"font-size:16px"</code><code style="color: #000;">&gt;Voleyball: &lt;/</code><code style="color: #069;font-weight: bold;">p</code><code style="color: #000;">&gt;</code></span></span></div>
<div style=" background-color: #fff;"><span style="margin-left: 0px !important;"><code style="color: #000;">&lt;/</code><code style="color: #069;font-weight: bold;">body</code><code style="color: #000;">&gt;</code></span></div>
<div style=" background-color: #F8F8F8;"><span style="margin-left: 0px !important;"><code style="color: #000;">&lt;/</code><code style="color: #069;font-weight: bold;">html</code><code style="color: #000;">&gt;</code></span></div>
</div>
<p>And here is the code I used to populate the <strong>ImagePickerToolbarItem </strong>with images:</p>
<div class="reCodeBlock" style="border:solid 1px #7f9db9;width:;height:;overflow-y:auto;">
<div style=" background-color: #fff;"><span style="margin-left: 0px !important;"><code style="color: #069;font-weight: bold;">private</code> <code style="color: #069;font-weight: bold;">void</code> <code style="color: #000;">InitializeImages()</code></span></div>
<div style=" background-color: #F8F8F8;"><span style="margin-left: 0px !important;"><code style="color: #000;">{</code></span></div>
<div style=" background-color: #fff;"><span style=" "><code style=" ">    </code><span style="margin-left: 12px !important;"><code style="color: #000;">var resourceNames = </code><code style="color: #069;font-weight: bold;">this</code><code style="color: #000;">.currentAssembly.GetManifestResourceNames();</code></span></span></div>
<div style=" background-color: #F8F8F8;"><span style=" "><code style=" ">    </code><span style="margin-left: 12px !important;"><code style="color: #000;">var imageSources = </code><code style="color: #069;font-weight: bold;">new</code> <code style="color: #000;">List&lt;RichTextImageSource&gt;();</code></span></span></div>
<div style=" background-color: #fff;"><span style="margin-left: 0px !important;"> </span></div>
<div style=" background-color: #F8F8F8;"><span style=" "><code style=" ">    </code><span style="margin-left: 12px !important;"><code style="color: #069;font-weight: bold;">foreach</code> <code style="color: #000;">(var resourceName </code><code style="color: #069;font-weight: bold;">in</code> <code style="color: #000;">resourceNames)</code></span></span></div>
<div style=" background-color: #fff;"><span style=" "><code style=" ">    </code><span style="margin-left: 12px !important;"><code style="color: #000;">{</code></span></span></div>
<div style=" background-color: #F8F8F8;"><span style=" "><code style=" ">        </code><span style="margin-left: 24px !important;"><code style="color: #069;font-weight: bold;">if</code> <code style="color: #000;">(resourceName.Contains(</code><code style="color: blue;">"sign"</code><code style="color: #000;">))</code></span></span></div>
<div style=" background-color: #fff;"><span style=" "><code style=" ">        </code><span style="margin-left: 24px !important;"><code style="color: #000;">{</code></span></span></div>
<div style=" background-color: #F8F8F8;"><span style=" "><code style=" ">            </code><span style="margin-left: 36px !important;"><code style="color: #000;">var imageSource = RichTextImageSource.FromStream(() =&gt;</code></span></span></div>
<div style=" background-color: #fff;"><span style=" "><code style=" ">                </code><span style="margin-left: 48px !important;"><code style="color: #069;font-weight: bold;">this</code><code style="color: #000;">.currentAssembly.GetManifestResourceStream(resourceName), RichTextImageType.Png);</code></span></span></div>
<div style=" background-color: #F8F8F8;"><span style="margin-left: 0px !important;"> </span></div>
<div style=" background-color: #fff;"><span style=" "><code style=" ">            </code><span style="margin-left: 36px !important;"><code style="color: #000;">imageSources.Add(imageSource);</code></span></span></div>
<div style=" background-color: #F8F8F8;"><span style=" "><code style=" ">        </code><span style="margin-left: 24px !important;"><code style="color: #000;">}</code></span></span></div>
<div style=" background-color: #fff;"><span style=" "><code style=" ">    </code><span style="margin-left: 12px !important;"><code style="color: #000;">}</code></span></span></div>
<div style=" background-color: #F8F8F8;"><span style="margin-left: 0px !important;"> </span></div>
<div style=" background-color: #fff;"><span style=" "><code style=" ">    </code><span style="margin-left: 12px !important;"><code style="color: rgb(0, 102, 153);"><strong>this</strong></code><code style="color: #000;"><strong>.imagePicker.ItemsSource = imageSources;</strong></code></span></span></div>
<div style=" background-color: #F8F8F8;"><span style="margin-left: 0px !important;"><code style="color: #000;">}</code></span></div>
</div>
<p>Then Inside the Page&rsquo;s Constructor, call the <strong>InitializeImages() </strong>method, then load the HTML document from a stream and assign the result to the Source property of the RichTextEditor. All this after the <strong>InitializeComponent()</strong>:</p>
<div class="reCodeBlock" style="border:solid 1px #7f9db9;width:;height:;overflow-y:auto;">
<div style=" background-color: #fff;"><span style="margin-left: 0px !important;"><code style="color: #000;">InitializeComponent();</code></span></div>
<div style=" background-color: #F8F8F8;"><span style="margin-left: 0px !important;"> </span></div>
<div style=" background-color: #fff;"><span style="margin-left: 0px !important;"><code style="color: #000;"><strong>InitializeImages();</strong></code></span></div>
<div style=" background-color: #F8F8F8;"><span style="margin-left: 0px !important;"> </span></div>
<div style=" background-color: #fff;"><span style="margin-left: 0px !important;"><code style="color: #000;">Func&lt;CancellationToken, Task&lt;Stream&gt;&gt; streamFunc = ct =&gt; Task.Run(() =&gt;</code></span></div>
<div style=" background-color: #F8F8F8;"><span style="margin-left: 0px !important;"><code style="color: #000;">{</code></span></div>
<div style=" background-color: #fff;"><span style=" "><code style=" ">    </code><span style="margin-left: 12px !important;"><code style="color: #069;font-weight: bold;">string</code> <code style="color: #000;">fileName = </code><code style="color: #069;font-weight: bold;">this</code><code style="color: #000;">.currentAssembly.GetManifestResourceNames().FirstOrDefault(n =&gt; n.Contains(</code><code style="color: blue;">"pick-image-demo.html"</code><code style="color: #000;">));</code></span></span></div>
<div style=" background-color: #F8F8F8;"><span style=" "><code style=" ">    </code><span style="margin-left: 12px !important;"><code style="color: #000;">Stream stream = </code><code style="color: #069;font-weight: bold;">this</code><code style="color: #000;">.currentAssembly.GetManifestResourceStream(fileName);</code></span></span></div>
<div style=" background-color: #fff;"><span style=" "><code style=" ">    </code><span style="margin-left: 12px !important;"><code style="color: #069;font-weight: bold;">return</code> <code style="color: #000;">stream;</code></span></span></div>
<div style=" background-color: #F8F8F8;"><span style="margin-left: 0px !important;"><code style="color: #000;">});</code></span></div>
<div style=" background-color: #fff;"><span style="margin-left: 0px !important;"> </span></div>
<div style=" background-color: #F8F8F8;"><span style="margin-left: 0px !important;"><code style="color: rgb(0, 102, 153);"><strong>this</strong></code><strong><code style="color: #000;">.</code></strong><code style="color: #000;"><strong>richTextEditor.Source = RichTextSource.FromStream(streamFunc);</strong></code></span></div>
</div>
<p>This is the result:</p>
<p><img src="https://d585tldpucybw.cloudfront.net/sfimages/default-source/default-album/images-in-editor-for-xamarin.gif?sfvrsn=e28e121_0" data-displaymode="Original" alt="images in editor for xamarin - user is selecting response icons for whether they will attend or not, etc. various sports on a tournament signup app" title="images-in-editor-for-xamarin"></p>
<h2>Share Your Feedback </h2>
<p>We would love to hear what you think, so should you have any questions and/or comments, please share them in our <a href="https://feedback.telerik.com/xamarin" target="_blank">Telerik UI for Xamarin Feedback Portal</a>.</p>
<p>If you are new to Telerik UI for Xamarin, you can learn more about it via the <a href="https://www.telerik.com/xamarin-ui" target="_blank">product page</a>. It comes with a <a href="https://www.telerik.com/download-trial-file/v2-b/ui-for-xamarin" target="_blank">30-day free trial</a>, giving you some time to explore the toolkit and consider using it for your current or upcoming Xamarin development.</p>
<h2>More From the World of Cross-Platform Application Development: Telerik UI for .NET MAUI </h2>
<p>Still in a preview stage, our library of UI components for .NET MAUI is growing. We have added new controls and support for macOS. Now your desktop and mobile applications can target Android, iOS, macOS and Windows.</p>
<p>Check out the Telerik UI for .NET MAUI <a href="https://www.telerik.com/maui-ui" target="_blank">product page</a> and <a href="https://docs.telerik.com/devtools/maui/introduction" target="_blank">official documentation</a>.</p>
<p>Happy coding with our controls! &zwj;&zwj;</p><img src="https://feeds.telerik.com/link/10825/15057280.gif" height="1" width="1"/>]]></content>
  </entry>
  <entry>
    <id>urn:uuid:fa051a51-9d2b-4448-bf26-12db26ff2436</id>
    <title type="text">Kendo UI and Telerik November 2021 Update</title>
    <summary type="text">In this blog post, we dive into the latest and greatest across Kendo UI and Telerik products, showing what’s new with features and components across several products within Telerik DevCraft.</summary>
    <published>2021-11-10T19:29:29Z</published>
    <updated>2022-06-30T14:06:13Z</updated>
    <author>
      <name>Carl Bergenhem </name>
    </author>
    <link rel="alternate" href="https://feeds.telerik.com/link/10825/15057281/kendo-ui-telerik-november-2021-update"/>
    <content type="text"><![CDATA[<p><span class="featured">The November update of Telerik and Kendo UI brings .NET 6 and VS 2022 support along with Angular 13 and more!</span></p>
<p>Building off of our <a href="https://www.telerik.com/blogs/kendo-ui-telerik-ui-web-dotnet-maui-components-october-update" target="_blank">update from October</a>, today I wanted to take the time to cover what your favorite Telerik and Kendo UI teams at Progress have been working on over the last few weeks. There&rsquo;s a lot to unpack here, and everything that we mention is available within the latest releases of each of these products. So, if you see something you want to use, simply visit the Your Account page and grab the latest bits!</p>
<h2 id="table-of-contents">Table of Contents</h2>
<ol>
    <li><a href="https://www.telerik.com#net-6">Support for .NET 6 and Visual Studio 2022 Official</a></li>
    <li><a href="https://www.telerik.com#angular-13">Angular 13 Support with Kendo UI for Angular</a></li>
    <li><a href="https://www.telerik.com#kendoreact">KendoReact</a></li>
    <li><a href="https://www.telerik.com#kendo-jquery">Kendo UI for jQuery</a></li>
    <li><a href="https://www.telerik.com#blazor">Telerik UI for Blazor</a></li>
    <li><a href="https://www.telerik.com#mvc-and-core">Telerik UI for ASP.NET Core and UI for ASP.NET MVC</a></li>
    <li><a href="https://www.telerik.com#ui-ajax">Telerik UI for ASP.NET AJAX</a></li>
    <li><a href="https://www.telerik.com#xamarin">Telerik UI for Xamarin</a></li>
    <li><a href="https://www.telerik.com#winui">Telerik UI for WinUI</a></li>
    <li><a href="https://www.telerik.com#wpf">Telerik UI for WPF</a></li>
    <li><a href="https://www.telerik.com#winforms">Telerik UI for WinForms</a></li>
    <li><a href="https://www.telerik.com#reporting">Telerik Reporting and Telerik Report Server</a></li>
    <li><a href="https://www.telerik.com#justmock">JustMock</a></li>
</ol>
<a name="net-6"></a>
<h2 id="support-for-.net-6-and-visual-studio-2022-official">Support for .NET 6 and Visual Studio 2022 Official</h2>
<p><img src="https://d585tldpucybw.cloudfront.net/sfimages/default-source/blogs/2021/2021-11/net-6-and-vs-2022-support.png?sfvrsn=1f55569f_0" data-displaymode="Original" alt=".NET 6 and VS 2022 Support" title=".NET 6 and VS 2022 Support"></p>
<p>The Telerik teams at Progress have worked hard to provide all .NET web, desktop and mobile UI components, Document Processing Libraries, Reporting and JustMock tools support for .NET 6 and Visual Studio 2022 immediately after it was made available by Microsoft. Take a look at the <a href="https://www.telerik.com/blogs/modern-ui-made-easy-official-support-dotnet-6-visual-studio-2022" target="_blank">dedicated blog post</a> and see how you can benefit right away with the latest and greatest release in the .NET &amp; Telerik worlds.</p>
<a name="angular-13"></a>
<h2 id="angular-13-support-with-kendo-ui-for-angular">Angular 13 Support With Kendo UI for Angular</h2>
<p>Angular 13 was released in the beginning of November and I&rsquo;m happy to say that Kendo UI for Angular has had Day-Zero support! For those of you interested about what this version of Angular brings, we have a great blog post covering <a href="https://www.telerik.com/blogs/whats-new-angular-13" target="_blank">What&rsquo;s New in Angular 13 right here</a>. As for the Kendo UI for Angular components, simply update to the latest version of the packages you have included and you will be good to go.</p>
<p>Head on over to the <a href="https://www.telerik.com/kendo-angular-ui/components/" target="_blank">Kendo UI for Angular docs and demos</a> for more information.</p>
<a name="kendoreact"></a>
<h2 id="kendoreact">KendoReact</h2>
<h3 id="enhancements">Enhancements</h3>
<p><strong>Grid: Column Virtualization with Multi-Column Headers</strong><br>
A big feature that was added to the KendoReact Data Grid with this update is the ability to have multi-column headers when virtualizing our React data table. Previously these two features did not work that well together, but with the <code>4.10.0</code> update they can be seamlessly enabled in the same component.</p>
<p>See the <a href="https://www.telerik.com/kendo-react-ui/components/grid/columns/column-virtualization/" target="_blank">KendoReact Data Table Column Virtualization demo</a> for more information.</p>
<p><strong>Editor: Expose Interfaces for onMount, onExecute, onPaste, onFocus and onBlur Events</strong><br>
Helping extend the way React developers implement the KendoReact Editor with this update, we have introduced several new events that can be used when initially rendering the component or when users interact with the content within.</p>
<p>See the <a href="https://www.telerik.com/kendo-react-ui/components/editor/" target="_blank">KendoReact Editor demos</a> to see the events in action.</p>
<p><strong>Scheduler: Auto Item Height &amp; Adaptive Slot Height</strong><br>
<img src="https://d585tldpucybw.cloudfront.net/sfimages/default-source/blogs/2021/2021-11/adaptive-slot-height.png?sfvrsn=89a22836_0" data-displaymode="Original" alt="KendoReact Scheduler Component - Adaptive Slot Height" title="KendoReact Scheduler Component - Adaptive Slot Height"><br>
By default, the KendoReact Scheduler component has a set and uniform height when it needs to display all the items, or events, that are available on that day. This, however, may not be ideal in scenarios where days may have more events than others, or there are special days that require the events to stick out a bit more.</p>
<p>This is where the new Adaptive Slot Height feature comes into play, as it allows for the event slots available in a day to adapt to all the events that should be displayed, or even lets you set aspects like minimum height to ensure that even in scenarios where no events will end up being displayed.</p>
<p>In a similar vein, the new Auto Item Height feature deals with same ability to auto-adjust or have a defined height when events are displayed in a horizontal fashion, which is done in views like the <code>TimelineView</code> and the <code>MonthView</code>, along with the <code>allDay</code> section of Day, Week and WorkWeek views.</p>
<p>Here&rsquo;s a quick link to the <a href="https://www.telerik.com/kendo-react-ui/components/scheduler/adaptive-slot-height/" target="_blank">React Scheduler Adaptive Slot Height demos</a> and here&rsquo;s a link to the <a href="https://www.telerik.com/kendo-react-ui/components/scheduler/auto-item-height/" target="_blank">React Scheduler Auto Item Height demos</a>.</p>
<a name="kendo-jquery"></a>
<h2 id="kendo-ui-for-jquery">Kendo UI for jQuery</h2>
<h3 id="new-components">New Components</h3>
<p><strong>PivotGrid Component</strong><br>
<img src="https://d585tldpucybw.cloudfront.net/sfimages/default-source/blogs/2021/2021-11/pivotgrid-overview.png?sfvrsn=dd3b0cc5_0" data-displaymode="Original" alt="Kendo UI for jQuery PivotGrid Component" title="Kendo UI for jQuery PivotGrid Component"><br>
We are excited to announce the release of the new and improved Kendo UI for jQuery PivotGrid! Throughout the years the team has received a lot of feedback around the PivotGrid component specifically, and while we have been able to add features here and there, we realized that to best serve all our Kendo UI developers we needed to rethink the PivotGrid from the ground up. We used the experience found from years of building and supporting such a component to see how we could make something better if we had a chance to do things over. That&rsquo;s right, the new jQuery PivotGrid is not just an update&mdash;it is a brand-new component!</p>
<p>If you are already using the existing jQuery PivotGrid, have no fear&mdash;nothing will change with this update. We have introduced this component separately as the &ldquo;New PivotGrid&rdquo; so the components can even live side-by-side on the same page. For now, <code>PivotGridv2</code> may have fewer features and less functionality than the original PivotGrid, but it is taking advantage of an updated design that has also been created from the ground up to ensure the user experience is as good as it can be. We will continue to keep these components together for some time until we have provided feature parity (and even extended past the original) and see evidence that most users have migrated to the new component.</p>
<p>For a full breakdown of features, please refer to the <a href="https://demos.telerik.com/kendo-ui/pivotgridv2/index" target="_blank">New PivotGrid component demos section</a>.</p>
<h3 id="enhancements-1">Enhancements</h3>
<p><strong>ColorPicker: New Design</strong><br>
<img src="https://d585tldpucybw.cloudfront.net/sfimages/default-source/blogs/2021/2021-11/redesignedcolorpicker.gif?sfvrsn=d5e1c281_0" data-displaymode="Original" alt="Kendo UI for jQuery ColorPicker Component - Redesign" title="Kendo UI for jQuery ColorPicker Component - Redesign"><br>
The Kendo UI for jQuery ColorPicker component received a new and improved design with this update! Over the years of providing a ColorPicker for jQuery, as well as our other web-based products, we have received a lot of feedback around this component and have updated the design to account for this feedback.</p>
<p>These changes include brand-new design and also some new UI elements and features: capability to switch from Gradient to Palette view within the same ColorPicker instance; new color preview where you can easily compare old vs. new color; toggleable HEX and RGB inputs with opacity support; and a Contrast Tool to show users the contrast ratio between two colors.</p>
<p>To see this new design, check out the <a href="https://demos.telerik.com/kendo-ui/colorpicker/index" target="_blank">jQuery ColorPicker Overview demo</a>.</p>
<p><strong>PanelBar: Updated Design</strong><br>
<img src="https://d585tldpucybw.cloudfront.net/sfimages/default-source/blogs/2021/2021-11/redesigned-panelbar-overview-hierarchy.png?sfvrsn=7cb013a5_0" data-displaymode="Original" alt="Kendo UI for jQuery PanelBar - Redesign" title="Kendo UI for jQuery PanelBar - Redesign"><br>
With this release, the Kendo UI for jQuery PanelBar component also received an updated design. While the component mostly looks the same, we have updated the rendering and classes applied to the rendered HTML to make the child elements within the PanelBar more distinguishable when all content is expanded. Additionally, the expand and collapse arrows have been updated to use a chevron arrow instead of a filled-in triangle.</p>
<p>See the new design over at the <a href="https://demos.telerik.com/kendo-ui/panelbar/index" target="_blank">jQuery PanelBar demos</a>.</p>
<p><strong>Grid: Multi-Column Sorting via CTRL + Click</strong><br>
<img src="https://d585tldpucybw.cloudfront.net/sfimages/default-source/blogs/2021/2021-11/multisorting.gif?sfvrsn=31bda389_0" data-displaymode="Original" alt="Kendo UI for jQuery Grid Component - Updated Multi-sort" title="Kendo UI for jQuery Grid Component - Updated Multi-sort"><br>
While the Kendo UI for jQuery Grid has had the ability to do multi-column sorting since the early days of the library, with this release we have added more ways for users to interact with columns for sorting. Specifically, this update adds an optional behavior feature that allows end users to sort on a single column when using a regular mouse click and only sort multiple columns when pressing the CTRL button. When clicking on a column header without the CTRL button pressed the Grid will revert to sorting by a single column.</p>
<p>See this new sorting behavior in action by jumping over to the <a href="https://demos.telerik.com/kendo-ui/grid/sorting" target="_blank">jQuery Grid Sorting demos</a>.</p>
<p><strong>Admin Dashboard Sample Application</strong><br>
<img src="https://d585tldpucybw.cloudfront.net/sfimages/default-source/blogs/2021/2021-11/admin-dashboard-sample-app.png?sfvrsn=d4faf576_0" data-displaymode="Original" alt="Kendo UI for jQuery - Admin Dashboard Sample Application" title="Kendo UI for jQuery - Admin Dashboard Sample Application"><br>
With this update, we are also bringing a brand-new sample application to the list of available demo apps built with Kendo UI for jQuery! This application follows the design and application architecture of popular admin dashboard templates that exist in the wild. The Admin Dashboard also uses a broad range of Kendo UI for jQuery components in a single application to help new and veteran Kendo UI users alike.</p>
<p>Head on over to the <a href="https://demos.telerik.com/kendo-ui/admin-dashboard/" target="_blank">jQuery Admin Dashboard sample app</a> right here!</p>
<p><strong>Drawer: Amazon Style Navigation Sample</strong><br>
<img src="https://d585tldpucybw.cloudfront.net/sfimages/default-source/blogs/2021/2021-11/amazon-style-drawer.gif?sfvrsn=47556d7e_0" data-displaymode="Original" alt="Kendo UI for jQuery Drawer Component - Amazon-style Drawer" title="Kendo UI for jQuery Drawer Component - Amazon-style Drawer"><br>
The Kendo UI for jQuery Drawer component has received several requests for a feature that replicates the navigation style of the Amazon menu. When a user clicks on a menu item, the Drawer component animates to the next &ldquo;level&rdquo; of the drawer to display a new set of menu items. From there users can navigate deeper or use the provided built-in navigation to move back to previous levels.</p>
<p>This has been implemented as a part of one of our <a href="https://docs.telerik.com/kendo-ui/knowledge-base/drawer-multi-level-navigation-menu" target="_blank">jQuery Knowledge Base articles</a> as it requires a little more code than would normally be found in one of our demos.</p>
<p><strong>All Components: Improved Accessibility</strong><br>
With this update, we also continue our streak of improving the accessibility of all Kendo UI for jQuery components. These additions range from tackling reported accessibility issues within our backlog as well as strengthening the automated accessibility testing that we do internally. The result is that the latest edition of our jQuery components continue to be the premier jQuery UI library for accessibility compliance.</p>
<p><strong>Visual Studio 2022 Support</strong><br>
Visual Studio 2022 was recently released, and with this update we can say that Kendo UI for jQuery and its helpful Visual Studio tooling officially supports Visual Studio 2022!</p>
<a name="blazor"></a>
<h2 id="telerik-ui-for-blazor">Telerik UI for Blazor</h2>
<h3 id="telerik-ui-for-blazor-2.29-release">Telerik UI for Blazor 2.29 Release</h3>
<p>This month we excited to share that along with the .NET 6 and Visual Studio 2022 support, Telerik UI for Blazor brings a refreshed and enhanced <a href="https://docs.telerik.com/blazor-ui/getting-started/vs-code-integration/introduction" target="_blank">Visual Studio Code extension</a>! You can enjoy the uplifted UX and configure project themes and color swatches with a couple of clicks at project creation. You can also jumpstart a Blazor project with the new Admin Dashboard project template with pre-built layout and functionality. Rearrange the layout as it fits your needs, and simply plug in your data and bind it to the components&mdash;including Grid, Tile Layout, Drawer, Calendar, Form, various Chart types, Card and more.</p>
<a href="https://d585tldpucybw.cloudfront.net/sfimages/default-source/default-album/vs-code-blazor-new.png?sfvrsn=dab745ec_0"><img src="https://d585tldpucybw.cloudfront.net/sfimages/default-source/default-album/vs-code-blazor-new.png?sfvrsn=dab745ec_0" data-displaymode="Original" alt="Visual Studio Code Extension Telerik Blazor" title="Visual Studio Code Extension Telerik Blazor" data-openoriginalimageonclick="true" style="vertical-align: middle;"></a>
<p>Starting with Telerik UI for Blazor 2.29 release, we now ship the product source code for our active license holders (available in Your Account -&gt; Downloads section).</p>
<a name="mvc-and-core"></a>
<h2 id="telerik-ui-for-asp.net-core-and-ui-for-asp.net-mvc">Telerik UI for ASP.NET Core and UI for ASP.NET MVC</h2>
<h3 id="common-features">Common Features</h3>
<p>Both Telerik UI for ASP.NET Core and ASP.NET MVC provide support for Visual Studio 2022, meaning you can develop with Telerik components, use project templates and extensions in the latest version of the IDE. Following the latest technology trends, we also provided compatibility for .NET 6 preview versions throughout the year, and we are now happy to share that Telerik UI for ASP.NET Core supports the official release of .NET 6.</p>
<p>We also added a few enhancements and new features across both ASP.NET MVC and Core offerings and will review in detail below.</p>
<p><strong>Easy Access to Client- and Server-Side APIs</strong><br>
<img src="https://d585tldpucybw.cloudfront.net/sfimages/default-source/blogs/2021/2021-11/link-to-client-and-server-api-in-core-mvc.png?sfvrsn=f4606a4d_0" data-displaymode="Original" alt="Link to Client and Server-side APIs" title="Link to Client and Server-side APIs"><br>
Both client- and server-side APIs are now easily accessible from the Telerik web UI component demos&mdash;check out the updates in the <a href="https://demos.telerik.com/aspnet-core/grid" target="_blank">Data Grid demo</a>.</p>
<p><strong>Shared Data Source With the ScrollView Component</strong><br>
<img src="https://d585tldpucybw.cloudfront.net/sfimages/default-source/blogs/2021/2021-11/scrollview.jpg?sfvrsn=41db5965_0" data-displaymode="Original" alt="UI for ASP.NET MVC and UI for ASP.NET Core ScrollView Component - Shared Data Source" title="UI for ASP.NET MVC and UI for ASP.NET Core ScrollView Component - Shared Data Source">The <a href="https://demos.telerik.com/aspnet-core/scrollview" target="_blank">ScrollView UI component</a> (also known as Carousel) can now reference <a href="https://demos.telerik.com/aspnet-core/datasource/shared-datasource" target="_blank">external data source</a> and accept DataSource Name as string in its <strong>.DataSource</strong> configuration method.</p>
<p><strong>New Features and Views in ColorPicker UI Component</strong><br>
<img src="https://d585tldpucybw.cloudfront.net/sfimages/default-source/blogs/2021/2021-11/redesignedcolorpickerd6ad32b3f4164209a6e70e2af9970bf0.gif?sfvrsn=2cbb704a_0" data-displaymode="Original" alt="UI for ASP.NET MVC and UI for ASP.NET Core ColorPicker Component - Redesigned" title="UI for ASP.NET MVC and UI for ASP.NET Core ColorPicker Component - Redesigned"><br>
The <strong>ColorPicker component</strong> now provides enriched <a href="https://demos.telerik.com/aspnet-core/colorpicker/views" target="_blank">Gradient and Palette views</a>, plus a handy option for the users to perform a switch between predefined colors (Palette) and custom colors (Gradient). It also exposes for <a href="https://demos.telerik.com/aspnet-core/colorpicker/rgb-hex" target="_blank">input both RGB and HEX formats</a> and an option to configure its default format.</p>
<p><strong>Telerik UI ColorPicker Gradient and Palette Views</strong><br>
<img src="https://d585tldpucybw.cloudfront.net/sfimages/default-source/blogs/2021/2021-11/contrastratio.gif?sfvrsn=431e841c_0" data-displaymode="Original" alt="UI for ASP.NET MVC and UI for ASP.NET Core ColorPicker Component - Contrast Tool" title="UI for ASP.NET MVC and UI for ASP.NET Core ColorPicker Component - Contrast Tool"><br>
Last but not least, the component provides options for <a href="https://demos.telerik.com/aspnet-core/colorpicker/contrast-tool" target="_blank">checking the color contrast ratio between two colors</a> following the Web Content Accessibility Guidelines (WCAG) AA and AAA levels.</p>
<p><strong>Modernization of the PanelBar Component Rendering</strong><br>
<img src="https://d585tldpucybw.cloudfront.net/sfimages/default-source/blogs/2021/2021-11/redesigned-panelbar-overview-images.png?sfvrsn=e80ee5c5_0" data-displaymode="Original" alt="UI for ASP.NET MVC and UI for ASP.NET Core PanelBar Component - Updated Design" title="UI for ASP.NET MVC and UI for ASP.NET Core PanelBar Component - Updated Design"><br>
The <a href="https://demos.telerik.com/aspnet-core/panelbar" target="_blank">Telerik PanelBar component</a> received a slightly refreshed look and feel, which is mostly noticeable when all content is expanded. The rendering and class updates make sure child items stand out better and the panel expand/collapse arrow has been changed to a chevron.</p>
<h3 id="telerik-ui-for-asp.net-core-specific-features">Telerik UI for ASP.NET Core&ndash;Specific Features</h3>
<p><strong>Telerik UI for ASP.NET Core Responsive Panel</strong><br>
To complete the support for referencing Telerik components using both HTML and TAG helpers in ASP.NET Core applications, we added the option to plug the <a href="https://demos.telerik.com/aspnet-core/responsive-panel" target="_blank">Responsive Panel UI component</a> using Html.Kendo().ResponsivePanel() configuration.&nbsp;</p>
<h3 id="telerik-ui-for-asp.net-mvc-specific-items">Telerik UI for ASP.NET MVC&ndash;Specific Items</h3>
<p><img src="https://d585tldpucybw.cloudfront.net/sfimages/default-source/blogs/2021/2021-11/admin-dashboard-sample-app.png?sfvrsn=d4faf576_0" data-displaymode="Original" alt="Kendo UI for jQuery - Admin Dashboard Sample Application" title="Kendo UI for jQuery - Admin Dashboard Sample Application"><br>
Telerik UI for ASP.NET MVC brings two flavors of a new resource&mdash;Admin Dashboard brand-new demo application and Visual Studio project template. Both provide the same use case showcasing Telerik components in an ASP.NET MVC application and include many UI components in action, including Grid, Tile Layout, Drawer, Calendar, Form, various Chart types, Card and more.</p>
<a name="ui-ajax"></a>
<h2 id="telerik-ui-for-asp.net-ajax">Telerik UI for ASP.NET AJAX</h2>
<p>The November updates span across the Telerik AJAX components as well! We made sure to include in the release of Telerik UI for ASP.NET AJAX multiple accessibility improvements, implementation of several feedback portal items, a new demo and support for Web Live Preview.</p>
<p><strong>Reporting Integration Demo</strong><br>
<img src="https://d585tldpucybw.cloudfront.net/sfimages/default-source/blogs/2021/2021-11/reporting-integration-demo.gif?sfvrsn=700e8469_0" data-displaymode="Original" alt="Telerik UI for ASP.NET AJAX and Telerik Reporting Integration" title="Telerik UI for ASP.NET AJAX and Telerik Reporting Integration"><br>
Based on your feedback, we added a dedicated demo showcasing the integration between the <a href="https://demos.telerik.com/aspnet-ajax/reporting/gridreport/defaultcs.aspx" target="_blank">RadGrid UI component and Telerik Reporting</a> and how you can pass and display <a href="https://www.telerik.com/products/aspnet-ajax/grid.aspx" target="_blank">ASP.NET AJAX Grid</a> data in a <strong>WebForms Report Viewer.</strong></p>
<p><strong>Support for Web Live Preview</strong><br>
You can now configure your Telerik ASP.NET AJAX controls directly in the browser as well as in Visual Studio Designer using the powerful capabilities of <a href="https://devblogs.microsoft.com/aspnet/introducing-web-live-preview/" target="_blank">Microsoft Web Live Preview</a> (WLP). The CSS Auto-Sync functionality allows you to customize the appearance of the Telerik controls and layout of the page without leaving Visual Studio.&nbsp;</p>
<a name="xamarin"></a>
<h2 id="telerik-ui-for-xamarin">Telerik UI for Xamarin</h2>
<p>The Calendar and Scheduling control is essential in scenarios where users need to keep track of their schedule and efficiently manage their meetings. With the <a href="https://docs.telerik.com/devtools/xamarin/controls/calendar/scheduling/calendar-scheduling-ui" target="_blank">built-in Scheduling UI</a> app, users can quickly create, modify and delete appointments. With R3 2021 Service Pack release, we&rsquo;ve enhanced that functionality by providing you with a few events to get a notification as soon as an appointment is changed through the Scheduling UI.</p>
<p>Additionally, the R3 2021 Service Pack release brings one more event you&rsquo;ve requested&mdash;<strong>MonthChangedevent</strong>. We&rsquo;ll look into those new features in detail below.</p>
<h3 id="event-for-month-change">Event for Month Change</h3>
<p>When the Calendar is in Month view, users can quickly navigate between months with a single gesture. Now with the new <strong>MonthChanged</strong> event, you can track when the current month is updated and implement custom logic accordingly&mdash;for example, load some events for that month.</p>
<h3 id="events-for-appointment-changes">Events for Appointment Changes</h3>
<p>Appointment change events would be pretty helpful in many scenarios&mdash;whether you&rsquo;d need to preserve the appointment&rsquo;s data in a database, you&rsquo;d need to notify the user a particular change has been made, and more.</p>
<p>As their names imply, <strong>AppointmentAdded</strong> is raised when a new Appointment is created, <strong>AppointmentDeleted</strong> when the user has deleted a concrete appointment, and <strong>AppointmentUpdated</strong> when the user has modified a property of an existing appointment.</p>
<p>The tricky part here is in the case of <a href="https://docs.telerik.com/devtools/xamarin/controls/calendar/recurrence/calendar-recurrence-overview" target="_blank">recurring appointments</a>. When the app user adds an exception occurrence, or updates or deletes an occurrence (all these options are available through the <a href="https://docs.telerik.com/devtools/xamarin/controls/calendar/scheduling/calendar-scheduling-ui" target="_blank">built-in Scheduling UIs</a>), <strong>AppointmentUpdated</strong> event is raised, as actually the recurrence rule of the appointment has been updated.</p>
<p>All three events provide event arguments of type <strong>AppointmentChangedEventArgs</strong>. <strong>AppointmentChangedEventArgs</strong> holds all the needed details related to the concrete appointment change, such as the appointment itself and, in the case of repeating appointments, the occurrence and the occurrence action (possible values: None, Add, Update and Delete).</p>
<p>The screencast below demonstrates notification messages shown on appointment changes with short info on the concrete updates. You can check the exact implementation in our documentation here: <a href="https://docs.telerik.com/devtools/xamarin/controls/calendar/scheduling/calendar-scheduling-events#example" target="_blank">Calendar &amp; Scheduling: Appointments Changes Events Example.</a></p>
<p><img src="https://d585tldpucybw.cloudfront.net/sfimages/default-source/blogs/2021/2021-11/xamarin-scheduling-events.gif" alt="xamarin-scheduling-events" title="xamarin-scheduling-events"></p>
<p>For more information on the R3 2021 SP for Telerik UI for Xamarin, visit our <a href="https://www.telerik.com/support/whats-new/xamarin-ui/release-history?_ga=2.58559338.1540493562.1636381953-1226047811.1616427309" target="_blank">Release Notes</a>.</p>
<a name="winui"></a>
<h2 id="telerik-ui-for-winui-v0.6.0">Telerik UI for WinUI v0.6.0</h2>
<p>We are thrilled to announce the Telerik UI for WinUI v0.6.0 release that comes with a new control as part of our expanding UI suite, support for the latest stable Windows App SDK release and a Visual Studio Extension. Let&rsquo;s unpack the latest goodies!</p>
<h3 id="windows-app-sdk-0.8.5-support-and-desktop-demos">Windows App SDK 0.8.5 Support and Desktop Demos</h3>
<p><img src="https://d585tldpucybw.cloudfront.net/sfimages/default-source/blogs/2021/2021-11/winui-Demo-app.png" alt="winui-Demo-app" title="winui-Demo-app"></p>
<p>The desktop version of Telerik UI for WinUI supports the latest stable <a href="https://docs.microsoft.com/en-us/windows/apps/windows-app-sdk/stable-channel#version-085" target="_blank">Windows App SDK (Project Reunion) 0.8.5</a>. We are also changing our example application from WinUI UWP to WinUI Desktop and will be supporting the latest stable Windows App SDK release. You can install the application from the <a href="https://demos.telerik.com/winui/" target="_blank">Telerik UI for WinUI Examples</a> web page and give it a spin! </p>
<h3 id="badge-control">Badge Control</h3>
<p><img src="https://d585tldpucybw.cloudfront.net/sfimages/default-source/blogs/2021/2021-11/Badge-control.png" alt="Badge-control" title="Badge-control"></p>
<p>The Telerik UI for WinUI suite is expanding with another new control&mdash;the Badge control! It will enable you to alert users and provide additional information about notifications, updates, changes, errors and anything else you might find useful. You can use the helper RadBadgeView control to attach Badge to any UI component of your application quickly. Choose from a predefined set of most popular badges or create your own to suit the application requirements.</p>
<p>In both cases, the control provides you with the full flexibility to adjust the appearance to your app&rsquo;s overall look and feel. You can see below how the predefined badges look:</p>
<p><img src="https://d585tldpucybw.cloudfront.net/sfimages/default-source/blogs/2021/2021-11/badge-examples.png" alt="badge-examples" title="badge-examples"></p>
<p>Here are some of the main features of the control:</p>
<ul>
    <li><strong>BadgeView</strong> &ndash; Easily attach the Badge control to any UI element.</li>
    <li><strong>Badge Position</strong> &ndash; Easily specify the position where the Badge will appear.</li>
    <li><strong>Badge Types</strong> &ndash; Choose between various predefined badge types. Also, you have the option to apply a custom geometry to the control if none of the predefined types work for you.</li>
    <li><strong>Animations</strong> &ndash; Options to disable or change the show/hide Badge animations.</li>
    <li><strong>Flexible Customization</strong> &ndash; Allows you to change the Background, Geometry, BorderBrush and more.</li>
</ul>
<p>For more details, please refer to the <a href="https://docs.telerik.com/devtools/winui/controls/radbadge/overview" target="_blank">RadBadge documentation</a>.</p>
<h3 id="visual-studio-extension">Visual Studio Extension</h3>
<p><img src="https://d585tldpucybw.cloudfront.net/sfimages/default-source/blogs/2021/2021-11/winui-VS-extension.png" alt="WinUI VS-extension" title="WinUI VS-extension"></p>
<p>We recently added Telerik UI for WinUI VS extensions for Visual Studio 2019 and Visual Studio 2022. The extension will significantly increase your productivity and jumpstart the development process by allowing you to quickly create either desktop or UWP Telerik UI for WinUI projects. With the initial version, you can choose between two predefined templates:</p>
<ul>
    <li><strong>Blank Project</strong> &ndash; empty project with all the needed references added</li>
    <li><strong>DataGrid Project</strong> &ndash; contains presetup DataGrid control in MVVM manner</li>
</ul>
<p><img src="https://d585tldpucybw.cloudfront.net/sfimages/default-source/blogs/2021/2021-11/winui-new-project-wizard.png" alt="winui-new-project-wizard" title="winui-new-project-wizard"></p>
<p>For more details, you can check the <a href="https://docs.telerik.com/devtools/winui/integration/visual-studio-extension" target="_blank">Visual Studio Extension</a> article from our documentation.</p>
<p>For more information on the Telerik UI for WinUI v0.6.0, visit our <a href="https://www.telerik.com/support/whats-new/winui/release-history?_ga=2.138848115.1540493562.1636381953-1226047811.1616427309" target="_blank">Release Notes</a>.</p>
<a name="wpf"></a>
<h2 id="telerik-ui-for-wpf">Telerik UI for WPF</h2>
<p>The R3 2021 Service Pack is here and packed with new features, enhancements and goodies.</p>
<h3 id="suggested-actions-view-all-properties">Suggested Actions: View All Properties</h3>
<p><img src="https://d585tldpucybw.cloudfront.net/sfimages/default-source/blogs/2021/2021-11/WPF-viewallproperties" alt="WPF-viewallproperties" title="WPF-viewallproperties"></p>
<p>On the very bottom of the Suggested Actions for each Telerik UI for WPF control, now you will find the &ldquo;View All Properties&rdquo; link. When clicked, it opens the Properties window for the selected control, allowing you to browse to all other properties quickly. Note that this will be supported only in the Visual Studio 2022 version and above.</p>
<h3 id="ganttview-autosize-timeruler">GanttView: AutoSize TimeRuler</h3>
<p>We are adding new option for sizing the <strong>TimeRuler</strong> that will automatically adjust the <strong>PixelLength</strong> of the control depending on the available space. This way the <strong>TimeRuler</strong> area would be stretched to fill the empty space with manually calculating the <strong>PixelLength</strong>. For more info check out the <a href="https://docs.telerik.com/devtools/wpf/controls/radganttview/features/timeruler/configuring" target="_blank">TimeRuler article</a> from the GanttView help documentation.</p>
<h3 id="combobox-dropdown-icon">ComboBox: Dropdown Icon</h3>
<p>The <strong>RadComboBox</strong> control got even more flexible with its new <strong>DropDownButtonIconContent</strong> and <strong>DropDownButtonIconTemplate</strong> properties. No more need to extract the default control template to change the dropdown icon.</p>
<p>Is it compatible with the RadGlyph? Yes, fully. Check out the following example, demonstrating how to set a RadGlyph as the combo box&rsquo;s dropdown button icon of editable and noneditable ComboBox controls:</p>
<pre class=" language-csharp"><code class="prism  language-csharp"><span class="token operator">&lt;</span>telerik<span class="token punctuation">:</span>RadComboBox IsEditable<span class="token operator">=</span><span class="token string">"True"</span> Margin<span class="token operator">=</span><span class="token string">"0 10 0 0"</span> DropDownButtonIconContent<span class="token operator">=</span><span class="token string">"&amp;#xe301;"</span> Width<span class="token operator">=</span><span class="token string">"200"</span><span class="token operator">&gt;</span>  
    <span class="token operator">&lt;</span>telerik<span class="token punctuation">:</span>RadComboBox<span class="token punctuation">.</span>DropDownButtonIconTemplate<span class="token operator">&gt;</span>  
        <span class="token operator">&lt;</span>DataTemplate<span class="token operator">&gt;</span>  
            <span class="token operator">&lt;</span>telerik<span class="token punctuation">:</span>RadGlyph Glyph<span class="token operator">=</span><span class="token string">"{Binding}"</span> Foreground<span class="token operator">=</span><span class="token string">"#F7630C"</span><span class="token operator">/</span><span class="token operator">&gt;</span>  
        <span class="token operator">&lt;</span><span class="token operator">/</span>DataTemplate<span class="token operator">&gt;</span>  
    <span class="token operator">&lt;</span><span class="token operator">/</span>telerik<span class="token punctuation">:</span>RadComboBox<span class="token punctuation">.</span>DropDownButtonIconTemplate<span class="token operator">&gt;</span>  
<span class="token operator">&lt;</span><span class="token operator">/</span>telerik<span class="token punctuation">:</span>RadComboBox<span class="token operator">&gt;</span>  
<span class="token operator">&lt;</span>telerik<span class="token punctuation">:</span>RadComboBox DropDownButtonIconContent<span class="token operator">=</span><span class="token string">"&amp;#xe301;"</span> Margin<span class="token operator">=</span><span class="token string">"0 10 0 0"</span> Width<span class="token operator">=</span><span class="token string">"200"</span><span class="token operator">&gt;</span>  
    <span class="token operator">&lt;</span>telerik<span class="token punctuation">:</span>RadComboBox<span class="token punctuation">.</span>DropDownButtonIconTemplate<span class="token operator">&gt;</span>  
        <span class="token operator">&lt;</span>DataTemplate<span class="token operator">&gt;</span>  
            <span class="token operator">&lt;</span>telerik<span class="token punctuation">:</span>RadGlyph Glyph<span class="token operator">=</span><span class="token string">"{Binding}"</span> Foreground<span class="token operator">=</span><span class="token string">"#F7630C"</span><span class="token operator">/</span><span class="token operator">&gt;</span>  
        <span class="token operator">&lt;</span><span class="token operator">/</span>DataTemplate<span class="token operator">&gt;</span>  
    <span class="token operator">&lt;</span><span class="token operator">/</span>telerik<span class="token punctuation">:</span>RadComboBox<span class="token punctuation">.</span>DropDownButtonIconTemplate<span class="token operator">&gt;</span>  
<span class="token operator">&lt;</span><span class="token operator">/</span>telerik<span class="token punctuation">:</span>RadComboBox<span class="token operator">&gt;</span>  
</code></pre>
<p>And here is the result:</p>
<p><img src="https://d585tldpucybw.cloudfront.net/sfimages/default-source/blogs/2021/2021-11/WPF-dropdown-icon.png" alt="WPF-dropdown-icon" title="WPF-dropdown-icon"></p>
<p>Lovely, huh?  For more details see the <a href="https://docs.telerik.com/devtools/wpf/controls/radcombobox/features/dropdown-icon#drop-down-button-icon" target="_blank">DropDown Button Icon</a> article from the ComboBox documentation.</p>
<h3 id="coloreditor-color-settings-panel-width">ColorEditor: Color Settings Panel Width</h3>
<p>With the new <strong>ColorSettingsPanelWidth</strong> property of <strong>RadColorEditor</strong>, you will be able to easily customize the width of the color setting panel in the dropdown (on the right side). For example, check the images below. The first editor has narrow color settings area and the second one has a wider area:</p>
<p><img src="https://d585tldpucybw.cloudfront.net/sfimages/default-source/blogs/2021/2021-11/WPF-colors" alt="WPF-colors" title="WPF-colors"></p>
<p>For more info, check out the <a href="https://docs.telerik.com/devtools/wpf/controls/radcoloreditor/overview/getting-started#set-color-settings-panel-width" target="_blank">ColorEditor help documentation</a>.</p>
<p>We have a lot more! To get an overview of all the latest features and improvements we&rsquo;ve made, check out the release notes for the products below:</p>
<ul>
    <li><a href="https://www.telerik.com/support/whats-new/wpf/release-history" target="_blank">Telerik UI for WPF (Release Notes)</a></li>
    <li><a href="https://www.telerik.com/support/whats-new/silverlight/release-history" target="_blank">Telerik UI for Silverlight (Release Notes)</a></li>
</ul>
<a name="winforms"></a>
<h2 id="telerik-ui-for-winforms">Telerik UI for WinForms</h2>
<p>The Service Pack of the Telerik UI for WinForms suite comes just in time with the official launch of Visual Studio 2022 and .NET 6! This Service Pack brings full support for VS 2022 and .NET 6; rounded forms support in Windows 11; performance improvements in the file dialogs; memory optimizations in multiple controls; mentions (suggestions) functionality in RadRichTextEditor; and a set of new most-voted features. This year, we are the first to support design-time experience for .NET Core 3.1, .NET 5 and .NET 6 in Visual Studio 2022.</p>
<p>Let&rsquo;s see in detail what is shipped with the R3 2021 Service Pack.</p>
<h3 id="rounded-corners-support-in-windows-11">Rounded Corners Support in Windows 11</h3>
<p>The newest Windows OS, v11, brings plenty of great features where the rounded corners are just a piece of the improved design. It will bring a more elegant experience to your forms in desktop applications:</p>
<p><img src="https://d585tldpucybw.cloudfront.net/sfimages/default-source/blogs/2021/2021-11/rounded-corners.png" alt="rounded-corners" title="rounded-corners"></p>
<p>The rounded corners are enabled by default which can be controlled by the Telerik.WinControls.WindowsSettings.<strong>EnableRoundedCornersDefaultValue</strong> property.</p>
<p>Make sure that Windows 10 version is defined in the app.manifest file:</p>
<p><img src="https://d585tldpucybw.cloudfront.net/sfimages/default-source/blogs/2021/2021-11/winforms-windows-10" alt="winforms-windows-10" title="winforms-windows-10"></p>
<h3 id="mentions-suggestions-in-radrichtexteditor">Mentions (Suggestions) in RadRichTextEditor</h3>
<p>This functionality enables you to show a predefined list of suggestions to be inserted into the document content when the users type a specific mention character, e.g., &ldquo;@&rdquo;. You can use a default provider for the mentions or define a custom one that suits your needs. Multiple providers are also supported while they have different mention characters.</p>
<p>The flexibility of the feature also provides you with the ability to control how the selected item is inserted, how it is visualized and how it is being matched inside the same collection.</p>
<p><img src="https://d585tldpucybw.cloudfront.net/sfimages/default-source/blogs/2021/2021-11/winforms-richtexteditor-mentions.gif" alt="winforms-richtexteditor-mentions" title="winforms-richtexteditor-mentions"></p>
<h3 id="date-selector-in-radschedulernavigator">Date Selector in RadSchedulerNavigator</h3>
<p>RadSchedulerNavigator offers a date selector. Selecting a date inside the calendar will change the start date of the active view, preserving the same days count.</p>
<p><img src="https://d585tldpucybw.cloudfront.net/sfimages/default-source/blogs/2021/2021-11/winforms-scheduler.png" alt="winforms-scheduler" title="winforms-scheduler"></p>
<h3 id="different-item’s-height-in-radpropertygrid">Different Item&rsquo;s Height in RadPropertyGrid</h3>
<p>RadPropertyGrid supports individual item&rsquo;s height. As the control does not expose the items directly, there is no Items collection. The data item can be accessed in the CreateItemElement or the ItemFormatting event. Then, specify the Item.ItemHeight property to the desired height.</p>
<p><img src="https://d585tldpucybw.cloudfront.net/sfimages/default-source/blogs/2021/2021-11/winforms-propertygrid.png" alt="winforms-propertygrid" title="winforms-propertygrid"></p>
<h3 id="radvirtualkeyboard’s-improvements">RadVirtualKeyboard&rsquo;s Improvements</h3>
<p>RadVirtualKeyboard comes with a beep sound functionality after pressing a key and an improved API for finding a key row without the necessary of knowing the exact keyboard layout.</p>
<h3 id="polishing-radtaskboard">Polishing RadTaskBoard</h3>
<p>In R3 2021, <a href="https://docs.telerik.com/devtools/winforms/controls/task-board/task-board-overview" target="_blank">RadTaskBoard</a> (also known as Kanban Board) was released. The new powerful control enables users to track their tasks in a simple, agile-style manner. It provides a clean and user-friendly interface for a functional task management application.</p>
<p>With the Service Pack, we polished the user and tag management in the task cards and now you can fully benefit from the RadTaskBoard control.</p>
<p>You can also check our <a href="https://www.telerik.com/support/whats-new/winforms/release-history" target="_blank">Release History</a> page for a complete list of the included improvements.</p>
<a name="reporting"></a>
<h2 id="telerik-reporting--report-server">Telerik Reporting &amp; Report Server</h2>
<p>Along with the latest .NET &amp; VS support, we introduced some helpful improvements and addressed a lot of bugs. Let&rsquo;s review the more impactful ones.</p>
<h3>Reporting Improvements</h3>
<p>We made a very important improvement of the text measurement under Linux. We rely on a third-party text-handling library, and it has some significant flaws. This was bringing incorrect text wrapping and not on a rare occasion text that is clipped incorrectly. Using some smart algorithms, we now managed to make the rendered text layout almost identical to the one produced in Windows. We can safely consider this Linux user scenario covered.</p>
<p>The <strong>web-based report designer</strong> again received a substantial portion of our attention. Now the main menu displays a list of the recently opened reports for easily resuming report editing.</p>
<p>The <strong>&ldquo;Open Report&rdquo; functionality</strong> is further enhanced as you can now switch between Grid and List views in the &ldquo;Open Report&rdquo; dialog so that it better supports reports with a longer name. <a href="https://www.telerik.com/support/whats-new/reporting/release-history/progress-telerik-reporting-r3-2021-sp1-15-2-21-1110" target="_blank">The list of the fixes in this designer is impressive</a>.</p>
<p>We introduced the <strong>CommandTimeout</strong> property to the MSSQL Database Storage so that it can store resources of high volume. This is usually needed when huge reports get rendered and correspondingly cached. The property may be set as well using a newly added constructor overload or declaratively in the app configuration file.</p>
<p>We added a super handy <strong>endpoint &ldquo;/api/reports/version&rdquo; to the reports&rsquo; REST service</strong> implementations. As the address suggests, it returns the version of the server-side service assembly. Having this, if the server&rsquo;s and viewer&rsquo;s versions mismatch, you would get an informative message and upgrade the needed component. The handy part is that it can be also used to test if your service implementation is up and running or the programming gods have turned their backs on you today.</p>
<p>Back in February (R1 2021 SP1) we introduced functionality to skip the rendering of all pages not producing any significant content. This is especially useful for <strong>Report Books</strong> where some of the combined reports might not have data. We were sorry to hear this change in the behavior has caused some confusion for our users. Based on your feedback, we have improved this functionality and now if a page contains any error message, it is considered significant so that you as developers do not need to switch the SkipBlankPages property back and forth.</p>
<p>Again, an improvement based on user feedback: Some devs need to traverse all the data source components in the report definition. Now this is much easier using the dedicated <strong>GetDataSources </strong>method exposed on the Report level.</p>
<p>The other tool that got a lot of care for this release is the recently added <strong>WinUI report viewer</strong>. It now started to respect and display the interactive tooltips that are defined in the report model. We also further improved the UX in the high-contrast themes by using FontIcons instead of the original PathIcons. Next, the assemblies bringing the viewer itself may now be used in x86 apps (they were previously limited to x64 usage).</p>
<p>I would also mention a bug fix concerning the WinUI viewer when rendering reports from a Report Server (I know you knew that this scenario is supported). Now the Excel 97-2003, Web archive, and XPS renderings properly show the Export report dialog when selected. <a href="https://www.telerik.com/support/whats-new/reporting/release-history/progress-telerik-reporting-r3-2021-sp1-15-2-21-1110" target="_blank">Again, the full list of fixes is available in the Release Notes article.</a></p>
<h3>Bug Fixes</h3>
<p>Lastly, let&rsquo;s honor some important bug fixes. There was an annoying issue within the <strong>JSON serializer</strong> used on the server causing an error when an integer value got assigned to a multivalue float parameter. Well, it&rsquo;s gone. Just to note that this serializer is used in the .NET Core 3.1/.NET 5/6 apps. And the second fix I will mention specifically is a security vulnerability bug fix in the legacy ASP.NET WebForms report viewer. Although this viewer is not being developed as it was effectively substituted with the HTML5 one (and all of its flavors), we are still committed to applying critical fixes, and the security ones are considered as such.</p>
<p>We hope that in this Service Pack release we managed to add valuable features and fix important bugs that will prove our product as a tool of choice for your apps, regardless of the platform or technology.</p>
<p>We will be extremely glad to hear from you about what we have missed or what can be done better, so please don&rsquo;t hesitate and share your opinion below or drop a line in our <a href="https://feedback.telerik.com/reporting" target="_blank">Feedback Portal</a>.</p>
<a name="justmock"></a>
<h2 id="justmock">JustMock</h2>
<h3>Assert All Mock Expectations with a Single Method Call</h3>
<p>A client of ours contacted us for assistance in validating the expectations set for numerous mock objects. From the communication with him, we found out that we lack a mechanism that can tackle quickly and easily such a situation. That&rsquo;s why we implemented the AssertAll method.</p>
<p>Here is an example of how this feature can be used:</p>
<pre class=" language-csharp"><code class="prism  language-csharp">[TestMethod] 
public void TestMethod() 
{ 
    var foo = Mock.Create<foo>(); 
    var bar = Mock.Create<bar>(); 

    Mock.Arrange(() =&gt; foo.Post()).Occurs(2); 
    Mock.Arrange(() =&gt; bar.Get()).Occurs(2); 

    foo.Post(); 
    bar.Get(); // just one call is made for the Get method 
    foo.Post(); 

    Mock.AssertAll(); // assert all will fail the test as the expectation for the Get method is not met 
} 
</bar></foo></code></pre>
<h3>Optimized Unit Test Discovery Process in Visual Studio</h3>
<p>Faster is always better when it comes to executing unit tests. With that in mind, we&rsquo;ve managed to significantly improve the performance during the unit test discovery process inside the test explorer in Visual Studio.</p>
<h2 id="there’s-more-to-come">There&rsquo;s More to Come</h2>
<p>Whew! No matter which product you&rsquo;re interested in, that&rsquo;s quite the update! If you&rsquo;re looking to take advantage of any of these new features, all you have to do is update to the latest version that just recently was released. We will continue to provide updates along the way as we march toward R1 2022, so keep an eye out for more updates over the next couple of weeks!</p><img src="https://feeds.telerik.com/link/10825/15057281.gif" height="1" width="1"/>]]></content>
  </entry>
  <entry>
    <id>urn:uuid:ca537900-7bf0-4c43-b4ac-fd82201f513e</id>
    <title type="text">Modern UI Made Easy with Official Support for .NET 6 and Visual Studio 2022</title>
    <summary type="text">We are excited to announce lightning fast support for .NET 6 and Visual Studio 2022 across all Telerik UI components, Document Processing Libraries, Reporting and JustMock tooling!</summary>
    <published>2021-11-10T17:53:26Z</published>
    <updated>2022-06-30T14:06:13Z</updated>
    <author>
      <name>Maria Veledinova </name>
    </author>
    <link rel="alternate" href="https://feeds.telerik.com/link/10825/15057282/modern-ui-made-easy-official-support-dotnet-6-visual-studio-2022"/>
    <content type="text"><![CDATA[<p><span class="featured">We are excited to announce lightning fast support for .NET 6 and Visual Studio 2022 across all Telerik UI components, Document Processing Libraries, Reporting and JustMock tooling!</span> </p>
<p>The Telerik teams at Progress have worked hard to ensure the massive update is available to you immediately after the official Microsoft releases, so you can take advantage of the latest and greatest in .NET 6 and VS 2022. In this blog post, we will take a closer look and see what&rsquo;s new in Telerik UI components, libraries, tooling and Visual Studio extensions. </p>
<h2>Compatibility with .NET 6 Official</h2>
<p>The <a href="https://devblogs.microsoft.com/dotnet/announcing-net-6/">official release of .NET 6</a>, the next-generation platform that unites the .NET Framework and .NET Core, is now available! .NET 6 brings performance improvements and new capabilities to web, desktop, mobile and hybrid applications, and because it is an LTS (long-term supported) version, that means it will be officially supported until November 2024 (three years after its initial release).</p>
<p>Since the release of .NET 5 last year, we have continuously followed all preview releases of .NET 6 and ensured our product updates are compatible with them, meaning you could immediately plug in the latest version and try out the new .NET features even in its early days. </p>
<p>Now that .NET 6 is officially shipped, what does it mean for your current and new applications? With the instant support provided by Telerik, you can upgrade existing projects or start a new project using .NET 6 and Telerik right away. All you need to do is download the latest .NET SDK and the respective Telerik product version. If you are an active license holder, you can grab the November update from the &ldquo;Your Account&rdquo; page or update your NuGet package reference directly in your solutions. </p>
<p>Alternatively, everyone can download a free trial by head over to the respective product homes at:</p>
<ul>
    <li><a href="https://www.telerik.com/blazor-ui" target="_blank">Telerik UI for Blazor</a></li>
    <li><a href="https://www.telerik.com/aspnet-core-ui" target="_blank">Telerik UI for ASP.NET Core</a></li>
    <li><a href="https://www.telerik.com/products/wpf/overview.aspx" target="_blank">Telerik UI for WPF</a></li>
    <li><a href="https://www.telerik.com/winui" target="_blank">Telerik UI for WinUI</a></li>
    <li><a href="https://www.telerik.com/products/winforms.aspx" target="_blank">Telerik UI for WinForms</a> </li>
    <li><a href="https://www.telerik.com/products/reporting.aspx" target="_blank">Telerik Reporting</a>  </li>
    <li><a href="https://www.telerik.com/products/mocking.aspx" target="_blank">Telerik JustMock</a></li>
    <li><a href="https://www.telerik.com/document-processing-libraries">Telerik Document Processing</a></li>
    <li><a href="https://www.telerik.com/maui-ui" target="_blank">Telerik UI for MAUI</a> (in preview)</li>
</ul>
<p>If you prefer to stay on your current version of .NET, you can rest assured that we continue to support them as well.</p>
<h2>Support for Visual Studio 2022</h2>
<p>Following the latest technology trends, we also provided early support for Telerik UI components, extensions and project templates for Visual Studio 2022 since June 2021 and now with the <a href="https://devblogs.microsoft.com/visualstudio/visual-studio-2022-now-available/">official release</a> you can:</p>
<ul>
    <li>Plug and play Telerik UI components for desktop, web and mobile and develop seamlessly in Visual Studio 2022</li>
    <li>Create new Visual Studio 2022 projects based on one of the out-of-the box Telerik project templates with pre-built layouts </li>
    <li>Jumpstart your VS 2022 project or add Telerik libraries to existing projects with a couple of configuration clicks in a wizard</li>
</ul>
<p>Below is a handy list of the available Visual Studio 2022 extensions, which you can download from Visual Studio Marketplace or as part of the product installers:</p>
<h3>Desktop Extensions</h3>
<ul>
    <li><a href="https://marketplace.visualstudio.com/items?itemName=TelerikInc.ProgressTelerikWinFormsVSExtensions" target="_blank">Telerik UI for WinForms Extension</a> </li>
    <li><a href="https://marketplace.visualstudio.com/items?itemName=TelerikInc.ProgressTelerikWinUIVSExtensions" target="_blank">Telerik UI for WinUI Extension</a> </li>
    <li><a href="https://marketplace.visualstudio.com/items?itemName=TelerikInc.ProgressTelerikWPFVSExtensions" target="_blank">Telerik UI for WPF Extension</a></li>
</ul>
<p style="text-align: center;"><a href="https://d585tldpucybw.cloudfront.net/sfimages/default-source/default-album/screenshot_126386cc012d844e690e448714c51dfe4.png?sfvrsn=7ce028c2_0" target="_blank"><img src="https://d585tldpucybw.cloudfront.net/sfimages/default-source/default-album/screenshot_126386cc012d844e690e448714c51dfe4.png?sfvrsn=7ce028c2_0" data-displaymode="Original" alt="Telerik UI for WinUI Visual Studio 2022 Extension" title="Telerik UI for WinUI Visual Studio 2022 Extension" data-openoriginalimageonclick="true"></a></p>
<p style="text-align: center;">Telerik UI for WinUI Visual Studio 2022 Extension</p>
<h3>Web Extensions</h3>
<ul>
    <li><a href="https://marketplace.visualstudio.com/items?itemName=TelerikInc.ProgressTelerikASPNETCoreVSExtensions" target="_blank">Telerik UI for ASP.NET Core Extension</a> </li>
    <li><a href="https://marketplace.visualstudio.com/items?itemName=TelerikInc.ProgressTelerikASPNETAJAXVSExtensions" target="_blank">Telerik UI for ASP.NET AJAX Extension</a> </li>
    <li><a href="https://marketplace.visualstudio.com/items?itemName=TelerikInc.ProgressTelerikBlazorVSExtensions" target="_blank">Telerik UI for Blazor Extension</a> </li>
    <li><a href="https://marketplace.visualstudio.com/items?itemName=TelerikInc.ProgressTelerikASPNETMVCVSExtensions" target="_blank">Telerik UI for ASP.NET MVC Extension</a></li>
</ul>
<p style="text-align: center;"><img src="https://d585tldpucybw.cloudfront.net/sfimages/default-source/default-album/asp-net-core-new.png?sfvrsn=d7c7805b_0" data-displaymode="Original" alt="Create New .NET 6 Project Template in Visual Studio 2022" title="Create New .NET 6 Project Template in Visual Studio 2022" style="vertical-align: middle;"></p>
<p style="text-align: center;">Create New .NET 6 Project Wizard with Project Templates</p>
<h3>Mobile Extensions</h3>
<ul>
    <li style="text-align: left;"><a href="https://marketplace.visualstudio.com/items?itemName=TelerikInc.ProgressTelerikXamarinExtensions" target="_blank">Telerik UI for Xamarin Extension</a></li>
</ul>
<p style="text-align: center;"><a href="https://d585tldpucybw.cloudfront.net/sfimages/default-source/default-album/xamarin.png?sfvrsn=8fda88ba_0" target="_blank"><img src="https://d585tldpucybw.cloudfront.net/sfimages/default-source/default-album/xamarin.png?sfvrsn=8fda88ba_0" data-displaymode="Original" alt="Telerik UI for Xamarin Visual Studio 2022 Extension" title="Telerik UI for Xamarin Visual Studio 2022 Extension" data-openoriginalimageonclick="true" style="vertical-align: middle;"></a></p>
<p style="text-align: center;">Telerik UI for Xamarin Visual Studio 2022 Extension</p>
<h3>Reporting &amp; Mocking Extensions (via Product Installers)</h3>
<ul>
    <li><a href="https://www.telerik.com/products/mocking.aspx" target="_blank">Telerik JustMock</a> </li>
    <li><a href="https://www.telerik.com/products/reporting.aspx" target="_blank">Telerik Reporting</a> </li>
</ul>
<p style="text-align: center;"><a href="https://d585tldpucybw.cloudfront.net/sfimages/default-source/default-album/reproting.png?sfvrsn=b16a0f31_0" target="_blank"><img src="https://d585tldpucybw.cloudfront.net/sfimages/default-source/default-album/reproting.png?sfvrsn=b16a0f31_0" data-displaymode="Original" alt="Telerik Reporting Visual Studio 2022 Extension" title="Telerik Reporting Visual Studio 2022 Extension" data-openoriginalimageonclick="true" style="vertical-align: middle;"></a></p>
<p align="center">Telerik Reporting Visual Studio 2022 Extension</p>
<p>While we dedicated special attention to the latest version of Visual Studio, we will continue to support previous widely used versions of the IDE: 2019, 2017 and beyond. Make sure to check the <a href="https://www.telerik.com/documentation" target="_blank">documentation</a> of your product of interest to find out the details.</p>
<h2>More .NET 6 &amp; VS 2022 Greatness </h2>
<p>In addition to the overall excitement of the Telerik products support for .NET 6 and Visual Studio 2022, we wanted to spotlight a few attractive product-specific updates.</p>
<h3>Telerik Blazor UI Components in Hybrid Scenarios </h3>
<p>We are happy to announce that <a href="https://www.telerik.com/blazor-ui" target="_blank">Telerik native Blazor UI components</a> are compatible with the hybrid scenarios inside native MAUI, WPF and Windows Forms through Microsoft Blazor WebView. If you are keen on the topic like us, try out the <a href="https://github.com/telerik/blazor-ui/tree/master/common/hybrid-blazor-apps" target="_blank">sample how-to project Blazor in Hybrid Scenarios</a> that we created or take a deep dive in the <a href="https://www.codemag.com/article/2111092" target="_blank">dedicated article &ldquo;Blazor Hybrid Web Apps with .NET MAUI&rdquo;</a>  by our awesome teammate Ed. </p>
<h3>Telerik REPLs for Blazor and ASP.NET Core</h3>
<p>Just a couple of weeks ago, we announced the launch of two new cool browser-based playgrounds for creating, saving, running and sharing C# code snippets: <a href="https://www.telerik.com/aspnet-core-ui/repl" target="_blank">Telerik REPL for ASP.NET Core</a> and <a href="https://www.telerik.com/blazor-ui/repl" target="_blank">Telerik REPL for Blazor</a> (REPL as <strong>R</strong>ead&ndash;<strong>E</strong>val&ndash;<strong>P</strong>rint-<strong>L</strong>oop). Both REPLs also provide seamless integration with Telerik UI components and let you test and customize them effortlessly in the browser without any addition setup and configuration.</p>
<p>Today we are happy to announce that both code runners provide support for .NET 6 and <strong>Share to REPL feature from Visual Studio 2022</strong>, thus allowing you to take advantage of the latest <a href="https://demos.telerik.com/blazor-ui" target="_blank">Telerik UI for Blazor</a>, <a href="https://demos.telerik.com/aspnet-core" target="_blank">Telerik UI for ASP.NET Core </a>and .NET 6 packages! </p>
<p align="center"><a href="https://d585tldpucybw.cloudfront.net/sfimages/default-source/default-album/repl-compile.gif?sfvrsn=e8553f22_0" target="_blank"><img src="https://d585tldpucybw.cloudfront.net/sfimages/default-source/default-album/repl-compile.gif?sfvrsn=e8553f22_0" data-displaymode="Original" alt="Telerik Blazor REPL Compile" title="Telerik Blazor REPL Compile" data-openoriginalimageonclick="true" style="vertical-align: middle;"></a></p>
<p align="center">Telerik REPL for Blazor</p>
<h3>Telerik WinForms Designer</h3>
<p>With the latest NuGet packages, you will also get our almighty .NET Core, .NET 5 and .NET 6 WinForms designers in Visual Studio. Last year, we were the first to release the WinForms Visual Studio designers for .NET Core and .NET 5! This year we are the first to support the .NET 6 in Visual Studio 2022.</p>
<p align="center"><a href="https://d585tldpucybw.cloudfront.net/sfimages/default-source/default-album/winforms-designer.png?sfvrsn=7c978575_0" target="_blank"><img src="https://d585tldpucybw.cloudfront.net/sfimages/default-source/default-album/winforms-designer.png?sfvrsn=7c978575_0" data-displaymode="Original" alt="Telerik WinForms Design Time Experience" title="Telerik WinForms Design Time Experience" data-openoriginalimageonclick="true" style="vertical-align: middle;"></a></p>
<p align="center">Telerik WinForms Design Time Experience</p>
<h3>Web Live Preview with Telerik UI for ASP.NET AJAX</h3>
<p><a href="https://www.telerik.com/products/aspnet-ajax.aspx" target="_blank">Telerik UI for ASP.NET AJAX</a> offers Day-Zero support for Visual Studio 2022 and <a href="https://devblogs.microsoft.com/aspnet/introducing-web-live-preview/" target="_blank">Microsoft Web Live Preview</a> (WLP). You can now configure your Telerik ASP.NET AJAX controls directly in the browser as well as in Visual Studio Designer using the powerful capabilities of WLP. The CSS Auto-Sync functionality allows you to customize the appearance of the Telerik controls and layout of the page without leaving Visual Studio. </p>
<p align="center"><a href="https://d585tldpucybw.cloudfront.net/sfimages/default-source/default-album/0day_support-wlc.png?sfvrsn=846110_0" target="_blank"><img src="https://d585tldpucybw.cloudfront.net/sfimages/default-source/default-album/0day_support-wlc.png?sfvrsn=846110_0" data-displaymode="Original" alt="Web Live Preview with Telerik UI for ASP.NET AJAX" title="Web Live Preview with Telerik UI for ASP.NET AJAX" data-openoriginalimageonclick="true" style="vertical-align: middle;"></a></p>
<p align="center">Telerik UI for ASP.NET AJAX &amp; Web Live Preview</p>
<h2>Try Out Telerik with .NET 6 and Visual Studio 2022</h2>
<p>As you can see, November is a month rich of .NET announcements, conferences and product releases, so why not just start calling it .NET-ember? </p>
<p>We encourage you to download and try out the latest bits and take a look at the <a href="https://www.telerik.com/blogs/kendo-ui-telerik-november-2021-update" target="_blank">detailed updates by Telerik and Kendo UI</a>, because we shipped new UI components, features and improvements.</p>
<p>We would love to hear your feedback, so post any questions and/or comments below or in our dedicated <a href="https://www.telerik.com/support/feedback" target="_blank">Telerik Feedback Portal</a>.</p><img src="https://feeds.telerik.com/link/10825/15057282.gif" height="1" width="1"/>]]></content>
  </entry>
</feed>